
How to Block AI Agents in Microsoft 365
Protect your Microsoft 365 environment from unauthorized AI agents operating through Copilot and Azure AI Foundry. Address risks including shadow AI, prompt injection attacks, and unmanaged agent access to organizational data. Configure policies to block or restrict AI agents and maintain governance over autonomous AI-driven workflows in your tenant.
AI agents are rapidly becoming a core part of Microsoft 365, working alongside employees to automate everyday tasks. Activities that once required manual effort, such as managing emails, analyzing data, organizing files, and running workflows, are now increasingly handled by AI-driven agents.
While these AI agents bring undeniable productivity gains, they also introduce a major security blind spot for IT teams. As agents become easier to build and deploy, users across the organization create and use agents every day through Microsoft Copilot and Azure AI Foundry. This convenience makes AI usage difficult to govern, resulting in agent sprawl, shadow AI, and overly permissive access models.
To stay in control, organization must proactively block unauthorized or unnecessary AI agents and clearly define which users are allowed to access them. In this blog, let’s explore the risks of unmanaged AI agents and how to block or restrict unwanted AI access to protect your Microsoft 365 environment.
Unlike traditional prompt-based chatbots such as standard Copilot, AI agents can operate autonomously. They are capable of planning actions, executing tasks, and triggering workflows without continuous human involvement.
As AI agents increasingly access and interact with Microsoft 365 data, unmanaged usage can introduce serious risks across security, identity, and data protection.
Here are the key risks organizations must be aware of.
- Shadow AI and unauthorized agent access: Unapproved AI agents can gain access to Microsoft 365 data through user consent without IT visibility. This reduces governance, weakens data protection, and increases the risk of sensitive information leaving the organization.
- Prompt injection attacks against AI agents: Attackers can manipulate AI agents using hidden or malicious instructions embedded in emails, chats, or documents. Unmanaged agents may follow these instructions and expose sensitive data without triggering traditional security alerts.
- API-driven data exfiltration via third-party AI: Users may use third-party AI agents that leverage APIs or connectors to extract Microsoft 365 data for external processing. Without proper DLP controls, these agents can summarize and transmit sensitive internal data to unauthorized external destinations.
- Identity and token compromise: AI agents authenticate using API keys, OAuth tokens, or service accounts that often have broad permissions and long lifespans. If compromised, these credentials can be abused to access organizational data without MFA or user interaction.
- Uncontrolled AI agent sprawl: A lack of agent governance can lead to untracked AI agents across the environment. This makes it difficult for organizations to monitor data access and meet compliance requirements. Additionally, under pay-as-you-go models, it can result in unexpected licensing, storage, and compute costs.
To prevent unauthorized or unmanaged AI agents from accessing organization data, admins must enforce controls at the identity, agent, and application levels.
Let’s explore the key methods for controlling and blocking AI agent access across Microsoft 365.
- Block all AI agents org-wide
- Limit AI access to specific users or groups
- Block specific AI agents in Microsoft 365
- Block third party AI agents in Microsoft 365
- Restrict AI Agents using a Conditional Access Policy
- Prevent AI agents from accessing a specific SharePoint site
- Turn off AI agents in Microsoft Teams channels
By blocking AI agents at the tenant level, organizations can prevent shadow AI, enforce governance, and protect sensitive data. In highly regulated or security-sensitive environments, this approach ensures AI usage is tightly controlled or completely restricted.
To block all AI agents, follow the steps below.
- Sign in to the Microsoft 365 admin center.
- In the left pane, navigate to Agents → Settings.
- Under Agent settings, select User access.
- On the User access page, select No users and click Save.
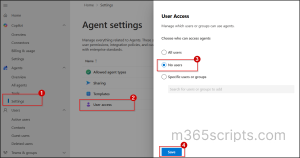
After this change, all AI agents already installed by users will be removed and will no longer be visible or usable across the organization. If a user attempts to add the agent, they will see the message: ‘You don’t have permission to add this agent. Please contact your IT admin for help’.
When AI agents are not required for every user, organizations can restrict access to specific users or groups. This allows organizations to apply role-based controls, and maintain stronger governance, while still allowing AI agents where it delivers clear business value.
To limit AI agent access to specific users or groups, follow the steps below.
- Sign in to the Microsoft 365 admin center and navigate to Agents → Settings.
- Under Agent settings, select User access.
- On the User access page, choose specific users or groups.
- Add the desired users or groups, and then click Save.
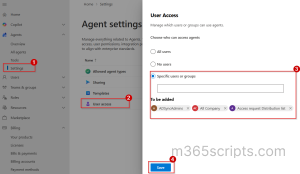
This approach allows AI access only for administrators or approved departments, ensuring controlled usage without wide access.
Not all AI agents carry the same level of risk. While some are approved and valuable for business use, others may be unnecessary, experimental, or pose potential security concerns. Rather than blocking AI entirely, Microsoft 365 provides the flexibility to block or restrict specific AI agents.
To block a specific AI agent, follow the steps below.
- Sign in to the M365 admin center and navigate to Agents → All agents.
- In the All agents section, right-click the respective AI agent and select Block.
- On the Block agent page, select the Block agent checkbox and click Save.
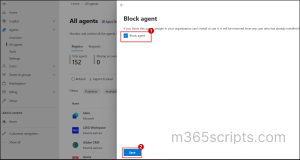
By using this method, we can block specific AI agents, such as Surveys, Workflows, and the SharePoint Page Agent, from being used by users in your organization.
While Microsoft-built AI agents operate within established tenant compliance and data boundaries, third-party AI agents can introduce additional risk if they are not properly governed. In such cases, restricting AI agents developed by external vendors helps prevent unverified or unapproved AI agents from accessing or processing tenant resources.
To block a third-party AI agents, follow the steps below.
- In the Microsoft 365 admin center, navigate to Agents → Settings.
- Under Agent settings, select Allowed agent types.
- On the Allowed agent types page, uncheck Allow apps and agents built by external publishers.
- Finally, click Save to block third-party AI agents in the Microsoft Copilot Store.
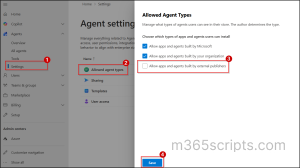
As a result, all third-party AI agents, including Asana, Jira Cloud, and Webex AI Agent, will be blocked and unavailable to users in the organization.
Instead of permanently blocking AI agents, organizations can use Conditional Access to automatically block high-risk agents. Microsoft Entra ID Protection evaluates agent risk in real time and restricts access when an agent is flagged as risky. By containing risky agents early, organizations reduce the chances of data exposure, misuse, or lateral movement across Microsoft 365.
To restrict risky AI agent access using a Conditional Access policy, follow the steps below.
- Sign to the Microsoft Entra admin center and navigate to Entra ID → Protection → Conditional Access.
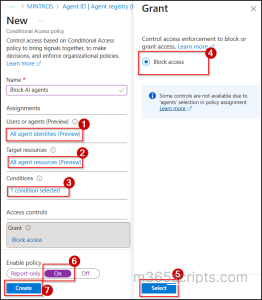
- Click + Create new policy and provide a name for the policy.
- Under Assignments, include All agent identities.
- Under Target resources, select All cloud apps or choose the specific resources you want to protect.
- Under Conditions, open Agent risk (Preview) and set Configure to Yes. Then select the risk levels that should trigger the policy based on your organization’s requirements.
- Under Access controls, select Block access and click Select.
- Set Enable policy to On and click Create to apply the policy.
AI agents in Microsoft 365 can surface insights and summaries by accessing content stored in SharePoint sites. However, some sites may contain highly sensitive, confidential, or restricted information that requires tighter control. For those sites, AI agents can be disabled using restricted content discovery. This prevents the site’s content from being included in AI processing while keeping AI enabled across the rest of the tenant.
License requirement to restrict AI access at site level:
Either SharePoint Advance Management License or Microsoft 365 copilot license.
To enable restricted content discovery:
- In the SharePoint admin center, navigate to Sites > > Active sites.
- Select the site for which you want to restrict content discovery.
- On the Settings tab, turn On the Restrict content from Microsoft 365 Copilot option, and then select Save.

To enable Restricted Content Discovery for a site using PowerShell, run the following cmdlet.
|
1 |
Set-SPOSite –identity <SiteURL> -RestrictContentOrgWideSearch $true |
Once a site is flagged with restricted content discovery, users can’t see the copilot icon in the upper-right corner of the site. As a result, they don’t have access to ready-made agents, can’t create new agents, and can’t add content from that site to any other agents.
Microsoft Teams is often where AI agents operate most actively. Agents can read messages, respond to conversations, summarize discussions, and even trigger workflows. If left unmanaged, this can expose sensitive team data to unauthorized or unnecessary AI agents.
The Microsoft Teams App Store allows users to add AI agents available to them. To block AI agents in the Teams App Store, follow the steps below:
- Sign in to the Teams admin center and navigate to Teams apps > Manage apps.
- Right-click the desired agent, go to the Users and groups tab, and select Edit availability.
- In the Edit availability pane, change ‘Available to’ from Everyone to No one.
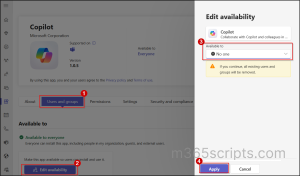
Using this method, admins can block Teams access for Copilot. Once restricted, users can no longer create or use Copilot within Teams.
And that’s a wrap! We hope this blog helped you understand how to control and block AI agents across Microsoft 365. By applying the right governance, access controls, and restrictions, you can reduce unnecessary data exposure and keep your organizational resources secure.
Have questions or scenarios you’d like us to cover? Drop them in the comments, we’d love to hear from you. Stay tuned for more upcoming blogs!


