Manage Entra Application Permissions Using PowerShell
Manage Microsoft Entra application permissions efficiently using Microsoft Graph PowerShell. View, assign, and remove delegated and application permissions for enterprise apps to maintain least-privilege access. Retrieve service principal details, audit existing permissions, and govern tenant-wide application access to protect organizational resources from over-permissioned apps.
In Microsoft Entra ID, managing enterprise app permissions is crucial because they determine how much access an application can have to your organizational data. This access to apps is granted in two ways: delegated permissions and application permissions. While managing delegated permissions allow the app to act only with the signed-in user’s rights, application permissions provide broader access without requiring user authentication. This elevated access lets apps perform tenant-wide actions, which can become a significant security risk if not properly governed. 😢
This is why managing application permissions in Entra ID is critical. Although you can use the Entra admin center or Microsoft Graph API to review and control these permissions, the process is often time-consuming. To make this process more efficient, this blog walks you through how to manage application permissions in Entra ID using Microsoft Graph PowerShell to save time and secure access to resources.
Before diving in, make sure you have the following prerequisites to manage application permissions in Entra ID:
- You must have a Microsoft Entra account with an active subscription.
- You must have one of the following roles: Cloud Application Administrator, Application Administrator, or a Global Administrator.
Once these prerequisites in place, you can connect to Microsoft Graph PowerShell with the scopes “Application.ReadWrite.All”, “AppRoleAssignment.ReadWrite.All”, and “Directory.ReadWrite.All”.
Also, to manage application permissions in Entra ID, you need to have certain key details ready. Proper preparation ensures you can view, assign, and manage permissions efficiently without causing unnecessary access issues. Here’s a breakdown: 👇
- Service principal ID – This is the Object ID of the service principal representing your application inside your tenant.
1234#Get the object ID of single Service PrincipalGet-MgServicePrincipal -Filter "displayName eq '<AppDisplayName>'" | Select-Object DisplayName, Id#Get object IDs of all service principalsGet-MgServicePrincipal -All | Select-Object Id, DisplayName - Resource ID – This is the Object ID of the resource application, like Microsoft Graph or any other API in your tenant. You can retrieve the resource ID using the same cmdlet above by replacing the <AppDisplayName> with the display name of the resource API.
- Resource App ID – This refers to the Application ID of the resource application in your tenant. You can retrieve it using the cmdlet below.
12Get-MgServicePrincipal -Filter "displayName eq '<ResourceDisplayName>'" |Select-Object DisplayName, AppId - App Role ID – This is the unique ID assigned to a specific application permission. You can retrieve the app role ID for any permission by replacing <ResourceName> with the display name of the resource API in the cmdlet below.
1234$spAppId = "<ResourceID>"$resourceSP = Get-MgServicePrincipal -All | Where-Object { $_.AppId -eq $spAppId }$AppRoles = $resourceSP.AppRoles | Where-Object { $_.IsEnabled -eq $true } | Select-Object Id, Value, Description$AppRoles | Format-Table -AutoSize - App Role Assignment ID – This is the unique ID generated when an application permission (App Role) is assigned to a service principal.
- User ID – This is the object ID of a user in your tenant. You can get it using the below cmdlet.
1Get-MgUser -UserId "<UserPrincipalName>" | Select-Object Id, DisplayName - Group ID – This is the object ID of a group in your tenant. You can get it using the below cmdlet.
|
1 |
Get-MgGroup -Filter "DisplayName eq '<GroupDisplayName>'" | Select-Object DisplayName, Id |
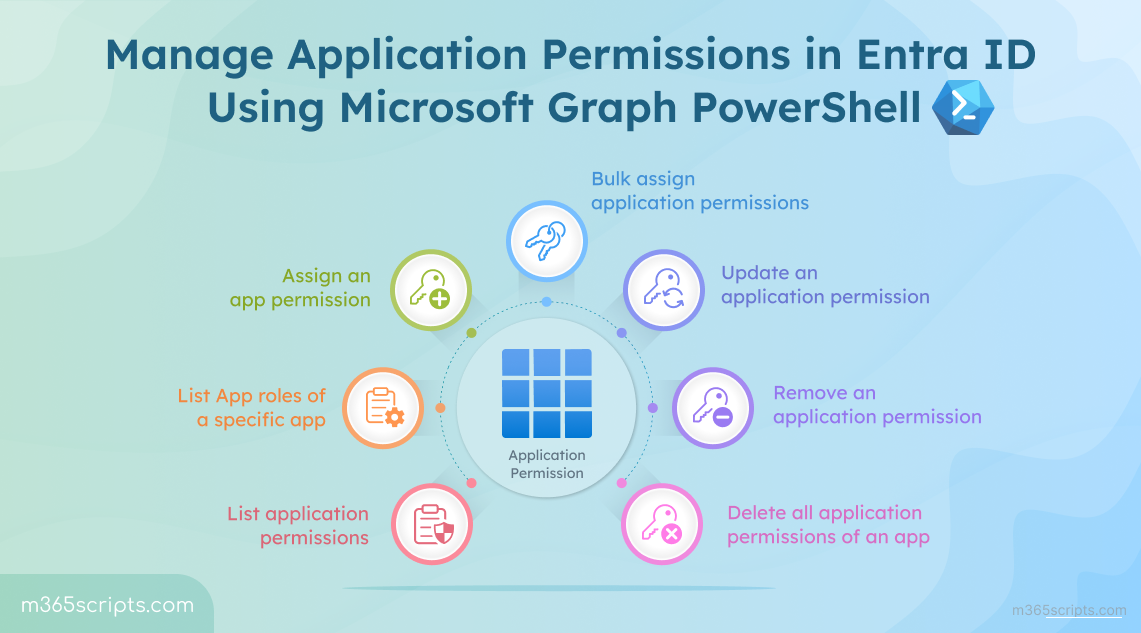
Let’s look at the essential PowerShell cmdlets that simplify application permission management in Entra ID. 🚀
- Grant an application permission
- Assign multiple application permissions to a specific service principal
- Assign multiple app roles to multiple service principals
- View all Entra application permissions
- Review application permissions assigned to an app
- Get application permissions of multiple apps
- Update an application permission
- Bulk update application permissions
- Remove a specific application permission
- Bulk remove application permissions
- Revoke all app roles from an application
- Find all application permissions assigned to a group
- Check all application permissions assigned to a user
When your organization needs to run any automation tasks, background operations or to run unattended scripts, you can assign application permissions to a service principal. This allows the app to authenticate on its own and access Microsoft 365 data with the exact permissions you grant.
To assign an app role to an application, you’ll need to register an app in Entra ID, which automatically create a service principal for the app. Once the app registration and service principal are ready, you can assign an application permission using the cmdlet below.
|
1 2 3 4 5 6 7 |
$params = @{ principalId = "<ServicePrincipalID>" resourceId = "<ResourceID>" appRoleId = "<AppRoleID>" } New-MgServicePrincipalAppRoleAssignment -ServicePrincipalId "<ServicePrincipalID>" -BodyParameter $params | Select-Object Id, AppRoleId, CreatedDateTime, PrincipalDisplayName, PrincipalId, ResourceDisplayName, ResourceId | Format-Table -Autosize |
Replace <ServicePrincipalID> with the client ID of the application, <ResourceID> with the client ID of the resource (e.g., Microsoft Graph), and <AppRoleID> with the unique ID of the desired app permission.
Output

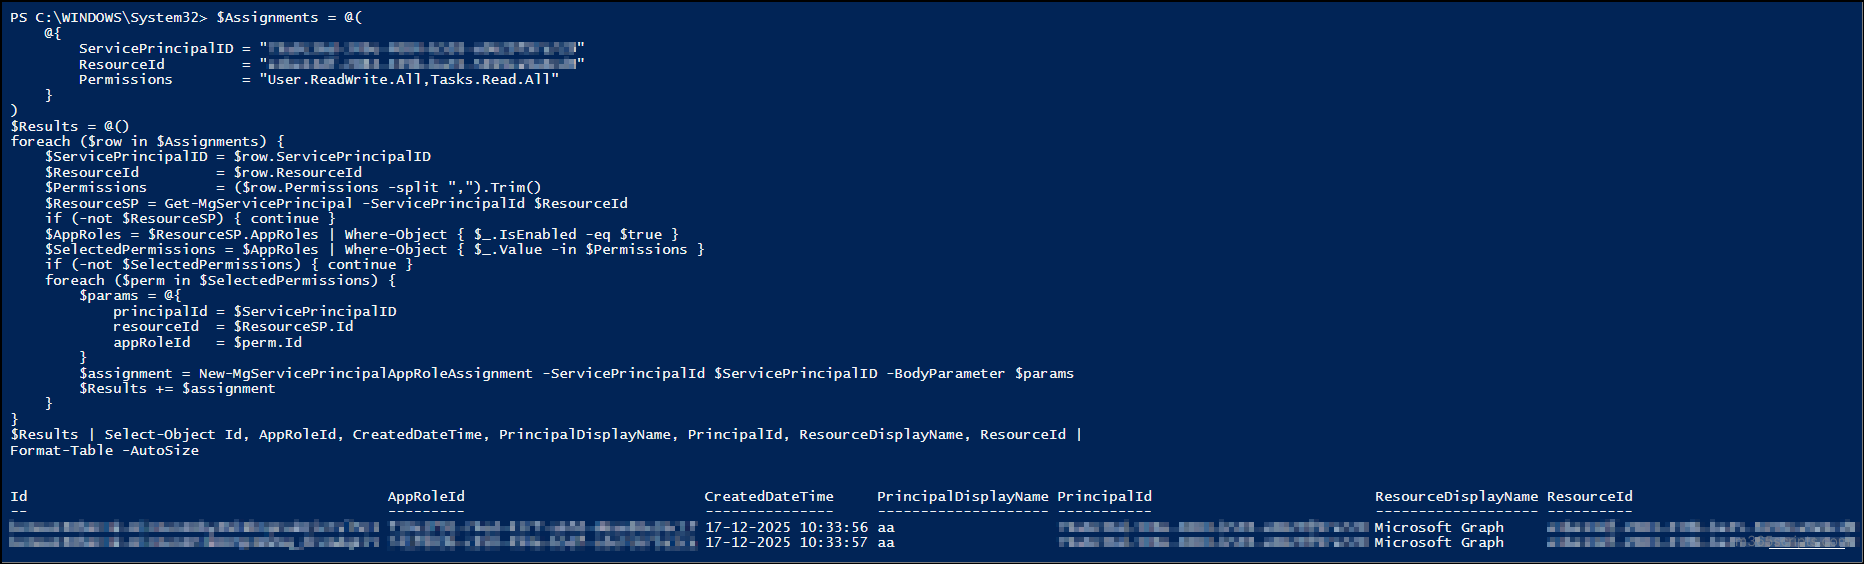
So far, you have assigned a single application permission to a service principal. You may create an application and need to grant them access to various resources such as calendars, email, and files. In such cases, you can grant the required app permissions using the script below.
|
1 2 3 4 5 6 7 8 9 10 11 12 13 14 15 16 17 18 19 20 21 22 23 24 25 26 27 28 29 |
$Assignments = @( @{ ServicePrincipalID = "<ServicePrincipalID>" ResourceId = "<ResourceID>" Permissions = "<Scope1>,<Scope2>" } ) $Results = @() foreach ($row in $Assignments) { $ServicePrincipalID = $row.ServicePrincipalID $ResourceId = $row.ResourceId $Permissions = ($row.Permissions -split ",").Trim() $ResourceSP = Get-MgServicePrincipal -ServicePrincipalId $ResourceId if (-not $ResourceSP) { continue } $AppRoles = $ResourceSP.AppRoles | Where-Object { $_.IsEnabled -eq $true } $SelectedPermissions = $AppRoles | Where-Object { $_.Value -in $Permissions } if (-not $SelectedPermissions) { continue } foreach ($perm in $SelectedPermissions) { $params = @{ principalId = $ServicePrincipalID resourceId = $ResourceSP.Id appRoleId = $perm.Id } $assignment = New-MgServicePrincipalAppRoleAssignment -ServicePrincipalId $ServicePrincipalID -BodyParameter $params $Results += $assignment } } $Results | Select-Object Id, AppRoleId, CreatedDateTime, PrincipalDisplayName, PrincipalId, ResourceDisplayName, ResourceId | Format-Table -AutoSize |
Replace <ServicePrincipalID> with the object ID of the target application’s service principal, and <ResourceID> with the object ID of the resource service principal. Also, replace <Scope1> and <Scope2> with the required app roles to be assigned to the target application. You can include multiple service principals in the script as comma-separated values.
Output
Suppose your organization has undergone an update or expansion as part of a business initiative. To extend its capabilities, you may need to implement multiple tasks across different systems. In such cases, you often require multiple applications, each with several app roles assigned to them. In such scenarios, assigning permissions individually becomes time-consuming and inefficient.
Instead, you can assign multiple role permissions to multiple service principals at once using a CSV file and running the cmdlet given below. Also, this script supports assigning multiple app roles from different Microsoft 365 resources to a single application in a single go.
CSV Input

PowerShell Script
|
1 2 3 4 5 6 7 8 9 10 11 12 13 14 15 16 17 18 19 20 21 22 23 24 25 26 27 28 29 |
$Assignments = Import-Csv "<InputCSV>" $Results = @() $ResourceSPCache = @{} foreach ($row in $Assignments) { $ServicePrincipalID = $row.ServicePrincipalID $ResourceID = $row.ResourceID $Permissions = ($row.Permissions -split ",").Trim() if (-not $ResourceSPCache.ContainsKey($ResourceID)) { $ResourceSPCache[$ResourceID] = Get-MgServicePrincipal -ServicePrincipalId $ResourceID } $ResourceSP = $ResourceSPCache[$ResourceID] if (-not $ResourceSP) { continue } $AppRoles = $ResourceSP.AppRoles | Where-Object { $_.IsEnabled } $SelectedPermissions = $AppRoles | Where-Object { $_.Value -in $Permissions } if (-not $SelectedPermissions) { continue } $ExistingAssignments = Get-MgServicePrincipalAppRoleAssignment -ServicePrincipalId $ServicePrincipalID foreach ($perm in $SelectedPermissions) { if ($ExistingAssignments.AppRoleId -contains $perm.Id) { continue } $params = @{ principalId = $ServicePrincipalID resourceId = $ResourceSP.Id appRoleId = $perm.Id } $assignment = New-MgServicePrincipalAppRoleAssignment -ServicePrincipalId $ServicePrincipalID -BodyParameter $params $Results += $assignment } } $Results | Select-Object Id, AppRoleId, CreatedDateTime, PrincipalDisplayName, PrincipalId, ResourceDisplayName, ResourceId | Format-Table -AutoSize |
Replace <InputCSV> with the exact location of the CSV file.
Output

Over time, applications in an Entra ID tenant can accumulate permissions that go unmonitored. Regularly reviewing these application permissions helps admins identify which apps have access to sensitive data, which permissions are unnecessary, and whether any consents were granted too broadly. This also helps you detect malicious app permissions or over-privileged apps operating unnoticed in your environment.
This will ensure that the principle of least privilege is applied by reviewing the application permissions assigned across all apps. To make this process easier, we’ve included a custom PowerShell script that scans all application permissions in Entra ID across your Microsoft 365 environment.
Download Script: Get-EnterpriseAppPermissions.ps1
Output

This script exports all enterprise applications and their assigned permissions.
Why the Entra Application Permissions Report Matters?
The “Get Entra Application Permissions” report helps you with several key insights, including:
- Filter apps by specific permissions
- Identify apps with no permissions
- Review permissions for a particular app
- Find apps restricted to specific users
- Generate more granular and detailed application permission reports
Overall, the report provides a complete and organized view of your application permissions, making the audit process simpler, faster, and far more accurate.
In certain situations, you only need to verify the app role assignments of a service principal, such as, when a particular app is flagged during a security review. In this case, it is not necessary to review all enterprise applications. Instead, you can directly check the application permissions assigned to that specific service principal using the PowerShell cmdlet below.
|
1 2 3 4 5 6 7 8 9 10 11 12 13 14 15 |
$spAssignments = Get-MgServicePrincipalAppRoleAssignment -ServicePrincipalId "<ServicePrincipalID>" -All | Where-Object { $_.PrincipalType -eq "ServicePrincipal" } $results = foreach ($item in $spAssignments) { $resource = Get-MgServicePrincipal -Filter "id eq '$($item.ResourceId)'" $role = $resource.AppRoles | Where-Object { $_.Id -eq $item.AppRoleId } [PSCustomObject]@{ AssignmentID = $item.Id PrincipalDisplayName = $item.PrincipalDisplayName PrincipalId = $item.PrincipalId AppRole = $role.Value AppRoleId = $item.AppRoleId CreatedDateTime = $item.CreatedDateTime ResourceDisplayName = $item.ResourceDisplayName } } $results | Format-Table -AutoSize |
Replace <ServicePrincipalID> with the object ID of the service principal.
Output

If your organization has hundreds of apps, review their application permissions one by one becomes inefficient. Instead of running the script repeatedly for each service principal, you can place all the required service principal IDs into a CSV file and run the script once.
Make sure that the column name ServicePrincipalId in the CSV matches the name used in the script to avoid errors during execution.
CSV Input

PowerShell Script
|
1 2 3 4 5 6 7 8 9 10 11 12 13 14 15 16 17 18 |
$spList = Import-Csv "<InputCSVFile>" $allResults = foreach ($spRow in $spList) { $spAssignments = Get-MgServicePrincipalAppRoleAssignment -ServicePrincipalId $spRow.ServicePrincipalId -All | Where-Object { $_.PrincipalType -eq "ServicePrincipal" } foreach ($item in $spAssignments) { $resource = Get-MgServicePrincipal -Filter "id eq '$($item.ResourceId)'" $role = $resource.AppRoles | Where-Object { $_.Id -eq $item.AppRoleId } [PSCustomObject]@{ AssignmentId = $item.Id ServicePrincipalId = $spRow.ServicePrincipalId PrincipalDisplayName = $item.PrincipalDisplayName AppRole = $role.Value AppRoleId = $item.AppRoleId CreatedDateTime = $item.CreatedDateTime ResourceDisplayName = $item.ResourceDisplayName } } } $allResults | Export-Csv "<OutputCSVFilePath>" -NoTypeInformation |
Replace <InputCSVFile> with the location of the service principal ID CSV file, and <OutputCSVFilePath> with the location where you want to save the output app permission list CSV.
Output

Suppose you need to adjust the access level by replacing an existing permission with a higher or lower privilege. In such cases, you don’t need to remove the old permission and add the new one separately. Instead, you can simply modify the existing assignment.
All you need is the assignment ID and the service principal ID. Once you have these, you can easily update the application role assignment using the Update-MgServicePrincipalAppRoleAssignment cmdlet as shown below.
|
1 |
Update-MgServicePrincipalAppRoleAssignment -ServicePrincipalID "<ServicePrincipalID>" -AppRoleAssignmentID "<CurrentAssignmentID>" -AppRoleId "<TargetAppRoleID>" |
Replace <ServicePrincipalID> with the object ID of the application, <CurrentAssignmentID> with the assignment ID of the app permission you need to update and <AppRoleID> with the unique app role ID of the target app role.
Important: ⚠️When you update an existing application permission, the current permission is replaced with the new one. If you want to add another permission without removing the existing ones, you must assign it using the New-MgServicePrincipalAppRoleAssignment cmdlet instead of the update cmdlet.
Also, assigning permissions does not automatically grant them to the application. You must still provide admin consent in the Microsoft Entra admin center for the permissions to become active.
When multiple users switch roles or responsibilities, you may need to update their existing application permissions. In such scenarios, you don’t have to modify permissions one by one. Instead, you can use a CSV input file and run the PowerShell script provided below to update permissions in bulk. Make sure that the column names in the CSV matches the name used in the script to avoid errors during execution.
CSV Input

PowerShell Script
|
1 2 3 4 |
$AppPermissionUpdate = Import-Csv "<InputCSV>" foreach ($ap in $AppPermissionUpdate) { Update-MgServicePrincipalAppRoleAssignment -ServicePrincipalId $ap.ServicePrincipalId -AppRoleAssignmentId $ap.CurrentAssignmentId -AppRoleId $ap.TargetAppRoleId } |
Replace <InputCSV> with the exact location of the CSV file.
Sometimes high-privilege roles may be assigned to an app for a project. After the project ends, you need to clean up the permission assignment. This ensures that only the unwanted permission is removed while keeping all other assigned permissions intact. To delete the app permission from an application, use the cmdlet below.
|
1 |
Remove-MgServicePrincipalAppRoleAssignment -AppRoleAssignmentId "<AppRoleAssignmentID>" -ServicePrincipalId "<ServicePrincipalID>" |
Replace <AppRoleAssignmentID> with the assignment ID of the specific app role which you need to delete and <ServicePrincipalID> with the object ID of the target application.
Important: ⚠️ Even if you remove an app permission using PowerShell, the application will still appear in the Entra admin center. However, you will not be able to connect it.
In scenarios such as tenant security reviews, or access rollback, you must need to remove multiple app roles from an application. In these cases, instead of removing permissions one by one, you can use a CSV file and a single PowerShell script, as shown below. Make sure that the column names in the CSV file matches the script to avoid execution errors.
CSV input

PowerShell Script
|
1 2 3 4 |
$Assignments = Import-Csv "E:\RemoveAppPermissions.csv" foreach ($row in $Assignments) { Remove-MgServicePrincipalAppRoleAssignment -ServicePrincipalId $row.ServicePrincipalId -AppRoleAssignmentId $row.AppRoleAssignmentId } |
Replace <InputCSV> with the exact location of the input CSV file.
While removing an unused application or an outdated one, it is a best practice to remove all application permissions assigned to its service principal. This can help you eliminate unnecessary access and improve overall security. To remove all existing app permissions from an application, use the cmdlet below.
|
1 2 3 4 5 |
$ServicePrincipalID = "<ServicePrincipalID>" $spApplicationPermissions = Get-MgServicePrincipalAppRoleAssignment -ServicePrincipalId $ServicePrincipalID -All | Where-Object { $_.PrincipalType -eq "ServicePrincipal" } $spApplicationPermissions | ForEach-Object { Remove-MgServicePrincipalAppRoleAssignedTo -ServicePrincipalId $ServicePrincipalID -AppRoleAssignmentId $_.Id } |
Replace <ServicePrincipalID> with the object ID of the target application.
Sometimes, you want multiple users to inherit the same application permissions without assigning them individually. By granting permissions to a group, all members automatically inherit them, which is especially useful for onboarding users or managing project teams. However, assigning unnecessary application permissions to a group can expose your organization to security risks and targeted attacks.
To prevent this, it’s essential to regularly verify that each group has only the required permissions. To retrieve all application permissions assigned to a specific group, you can use the following cmdlet:
|
1 2 3 |
Get-MgGroupAppRoleAssignment -GroupId '<GroupID>' | Select-Object Id, PrincipalDisplayName, PrincipalId, ResourceDisplayName, ResourceId | Format-Table -AutoSize |
Replace <GroupID> with the unique object ID of the group.
Output

When a user is granted access to multiple applications, it becomes difficult to track which app permissions they’ve inherited, especially if some apps hold high-privilege or sensitive permissions. A user may inherit permissions through groups or be assigned directly to an application, which can quietly increase their access over time. Therefore, it’s important to regularly audit the application permissions assigned to the user.
To get all the application permissions assigned to a specific user, use the PowerShell cmdlet given below.
|
1 2 3 |
Get-MgUserAppRoleAssignment -GroupId '<UserID>' | Select-Object Id, PrincipalDisplayName, PrincipalId, ResourceDisplayName, ResourceId | Format-Table -AutoSize |
Replace <UserID> with the unique object ID of the target user.
Output

That’s a wrap! We hope this blog made it easier for you to manage and analyse application permissions in Entra ID. If you have any questions or suggestions, drop them in the comments. We’d love to hear from you. Stay tuned for more upcoming blogs!


