Manage SharePoint Online Subsites in Microsoft 365 Using PowerShell
Enable and manage SharePoint Online subsites using PowerShell after activating subsite creation at the tenant level. Create subsites under parent sites, configure permissions separately, and manage content when hub sites are not suitable for your organizational structure and quick deployment needs.
There has long been debate about whether to create and manage SharePoint Online hub sites or subsites to organize related sites. While both approaches help structure your environment, Microsoft recommends using hub sites for their flexibility and flat site structure. Despite this, many organizations still use subsites—especially when there’s a need to quickly create a related site under a site collection.
There are practical scenarios where subsites make sense. For example, imagine you’ve already created an IT site for your internal users, and now you want to give them, and a few others, access to specific files. Setting up a completely new site and configuring everything from scratch can be time-consuming. Instead, creating a subsite under the parent site and modifying its permissions can save time and effort.
Even though hub sites offer more scalability and long-term benefits, subsites continue to exist in many environments, just like folders still coexist with metadata in document libraries. This blog is for those who still manage or rely on SharePoint Online subsites. Let’s dive in and explore how to manage SharePoint Online subsites using PowerShell.
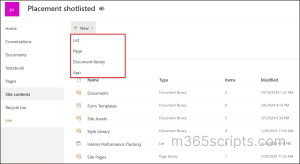
By default, subsite creation is disabled in SharePoint Online to promote a flat site structure. As a result, you won’t see the option to create subsites in the SharePoint site UI unless you manually enable it.
If you try to create a subsite using PowerShell while this feature is disabled, you’ll receive the following error:
“New subsites are not available for your organization. Create a new site instead.”
Therefore, you need to enable subsite creation at the tenant level before you can create and manage SharePoint subsites.
Requirements: You must be either a SharePoint Administrator or a Global Administrator to manage subsite creation.
Follow the steps below to enable subsite creation in SharePoint Online.
- Sign in to the SharePoint admin center.
- In the left-hand navigation, click Settings.
- Scroll down and click “Classic settings page“.
- Under Subsite creation, select Enable subsite creation for all sites.

- Click OK to save the changes.
Note:
This setting can only be managed at the tenant level. It must be enabled or disabled through the UI, as there is currently no PowerShell support for it.
Managing SharePoint Online sites and subsites through the UI can be time-consuming, especially at scale. PowerShell offers a faster, more efficient way to automate subsite creation, configuration, and cleanup tasks.
Follow the steps below to create and manage subsites in SharePoint Online.
- Create a subsite in SharePoint Online
- Rename the SharePoint Online subsite
- Modify SharePoint subsite permissions
- Add site contents in the subsite
- Delete a SharePoint Online subsite
- Restore a deleted subsite in SharePoint Online
- Get all SharePoint Online subsites
Requirements:
Make sure to connect to the SharePoint Online site using a certificate with PnP PowerShell before executing any steps. Also, ensure the required Sites.FullControl.All API permission is granted to the application used for the connection.
To set up subsites in your organization, first connect to the SharePoint Online site where you want them to reside.
|
1 |
Connect-PnPOnline -ClientID <ClientID> -Tenant <TenantName> -Thumbprint <CertificateThumbprint> -Url https://msbdyw.sharepoint.com/sites/hrdepartment |
Replace <ClientID> with the Entra ID app’s Client ID, <TenantName> with your tenant name (e.g., contoso.onmicrosoft.com), and <CertificateThumbprint> with the thumbprint of the certificate linked to the app. The above cmdlet connects to the “HR Department” site using PnP PowerShell.
Then, use the New-PnPWeb cmdlet to create the subsite using PowerShell.
|
1 |
New-PnPWeb -Url “FinanceHR” -Title “Finance HR Department” –Template “STS#3” |
The above command creates a subsite “Finance HR Department“ in the site HR Department using the modern Team Site template (STS#3). The subsite URL will be “https://<TenantName>.sharepoint.com/sites/<ParentSiteName>/FinanceHR”

Handy Tip: If you don’t want users in your organization to create subsites in a specific SharePoint site, you can lock the SharePoint Online site. This ensures that the site content remains unaltered or untouched by users during maintenance or upgrades.
You can easily update subsite information using the Set-PnPWeb cmdlet in PowerShell.
Connect to the SharePoint Online subsite where you want to update the properties.
|
1 |
Connect-PnPOnline -ClientID <ClientID> -Tenant <TenantName> -Thumbprint <CertificateThumbprint> -Url https://msbdyw.sharepoint.com/sites/hrdepartment/FinanceHR |
The above cmdlet connects to the subsite “Finance HR Department”.
Run the following cmdlet to update the subsite name in SharePoint Online.
|
1 |
Set-PnPWeb -Title "Finance Interns HR Team" |
This cmdlet changes the title of the subsite from “Finance HR Department” to “Finance Interns HR Team“.
You can also update other subsite properties like the description, logo, or header layout using additional parameters with the Set-PnPWeb cmdlet.
By default, a SharePoint Online subsite inherits permissions from its parent site. This means that users with access to the parent site will have the same level of access to the subsite.
However, there are situations where a subsite needs different permissions than its parent. In such cases, you can configure unique permissions in SharePoint Online for the subsite.
You can manage subsite permissions by doing the following:
- Break permission inheritance of the subsite
- Create unique permissions for the subsite
- Modify existing permissions on the SPO subsite
- Remove unique permissions from the subsite
- Restore permission inheritance from the parent site
Break Permission Inheritance in a SharePoint Online Subsite
You need to break the subsite permission inheritance from the parent site to assign different SharePoint Online permission levels.
Connect to the SharePoint subsite where you want to break the permission inheritance. Then, use the -BreakRoleInheritance parameter as follows.
|
1 2 3 |
$Web = Get-PnPWeb $Web.BreakRoleInheritance($true, $false) Invoke-PnPQuery |
This cmdlet breaks the subsite’s permission inheritance from its parent site, meaning future permission changes in the parent site will no longer affect the subsite.
- Setting the first parameter [BreakRoleInheritance ($true, $false)], copyRoleAssignments, to $true copies the parent site’s current permissions to the subsite at the time of breaking inheritance, allowing you to customize them further afterward.
- The second parameter, “clearSubscopes”, when set to $false, makes sure that any unique permissions already set on lists, libraries, or items in the subsite are not removed.
Create Unique Permissions for the SharePoint Online Subsite in Microsoft 365
Once inheritance is broken, no users or groups will retain access to the subsite by default. You’ll need to assign permissions manually using the Set-PnPWebPermission cmdlet.
Example 1: Assign subsite permission to a user
|
1 |
Set-PnPWebPermission -User "[email protected]" -AddRole "Full Control" |
This grants Andrew full control permissions on the subsite.
Example 2: Grant subsite permission to a group
|
1 |
Set-PnPWebPermission -Group "[email protected]" -AddRole "Contribute" |
The above cmdlet grants Contribute permissions to all “Finance Team Leads” group members.
You can assign any default permission level to users or groups. You can also create custom permission levels and assign them as needed.
Modify Unique Permissions on the SharePoint Online Subsite
To change a user or group’s permission, use “-RemoveRole” and “-AddRole” together in the Set-PnPWebPermission cmdlet.
|
1 |
Set-PnPWebPermission -User "[email protected]" -RemoveRole "Full Control" -AddRole "Edit" |
This updates Andrew’s permissions from Full Control to Edit.
Remove Unique Permissions from a User or Group in a Subsite
To remove a unique permission on the SharePoint Online subsite, use the cmdlet below.
|
1 |
Set-PnPWebPermission -User "[email protected]" -RemoveRole "Edit" |
This removes the Edit permission previously granted to Andrew.
Restore Permission Inheritance of the SharePoint Online Subsite
You can use the -ResetRoleInheritance parameter to restore inheritance from the parent site. This will give subsite access to users who have access to the parent site and simplify the SharePoint Online permission management.
Connect to the subsite and run the following cmdlet to restore inheritance.
|
1 2 3 |
$web = Get-PnPWeb $web.ResetRoleInheritance() Invoke-PnPQuery |
The above cmdlet deletes unique permissions on the SharePoint subsite. You can also use the -ResetRoleInheritance parameter with the Set-PnPList cmdlet to restore permission inheritance on a SharePoint list or library.
By default, a subsite includes a basic set of lists and document libraries based on the selected site template. However, these site contents may not always meet evolving requirements. You can create additional lists and document libraries to suit your specific needs.
A subsite functions just like any other SharePoint site—it simply resides under a parent site. So, adding content to a subsite is similar to adding content to a top-level site using PowerShell.
Note: Before running any commands, connect to the subsite using PnP PowerShell.
Create a Custom List in the Subsite
|
1 |
New-PnPList -Title "Interns Attendance Tracking" -Template GenericList |
This cmdlet creates a custom list named Interns Attendance Tracking in the subsite. You can change the title and use any predefined template value in the -Template parameter.
Tip: You can further manage the SharePoint Online list by adding list items, creating custom lists, customizing columns, etc.
Create a Document Library in the Subsite
To create a document library, use the same New-PnPList cmdlet with the template set to ‘DocumentLibrary’.
|
1 |
New-PnPList -Title "Finance Interns Team Library" -Template DocumentLibrary |
This creates a document library named Finance Interns Team Library in the subsite.
Handy Tip: You can further manage SharePoint libraries in Microsoft 365 by enabling versioning, setting custom permissions, and more.
Over time, some SharePoint subsites become outdated, unused, or redundant, cluttering your site structure and confusing users. Deleting these subsites helps keep your SharePoint environment organized and easy to navigate.
Connect to the subsite using PowerShell and use the Remove-PnPWeb cmdlet to remove a SharePoint Online subsite from your organization.
|
1 |
Remove-PnPWeb -Identity <SubsiteName> |
You can also use the -Force parameter in the above cmdlet to avoid any confirmation prompts.
Note: Before deleting a subsite, consider cleaning up its internal content too. Removing outdated pages manually or via PowerShell helps declutter the site and reduces cleanup effort later.
If a SharePoint subsite was deleted by mistake, you can restore it from the parent site recycle bin before it’s permanently removed. This helps recover important content without needing a full backup restore.
To restore a deleted subsite from the recycle bin using PowerShell, first connect to its parent site and execute the following cmdlet.
|
1 |
Restore-PnPRecycleBinItem -Identify “<DeletedSubsiteName>” -Force |
Replace the <DeletedSubsiteName> with the title of the deleted subsite. If you are unsure of the name, you can use the Get-PnPRecycleBinItem to list all deleted objects in the site collection.
Handy Tip: Just like subsites, you can also easily manage deleted SharePoint Online sites using PowerShell.
Listing all subsites within a parent site collection helps you keep track of your SharePoint structure and manage it effectively. To get all subsites using PowerShell, connect to the parent site and run the Get-PnPSubWeb cmdlet.
If you want to view subsites across multiple site collections, you’ll need to connect to each site URL individually and run the cmdlet for each one. You can automate this process by using a PowerShell script to list all subsites across all SharePoint Online sites.
That wraps up our guide on managing SharePoint subsites using PowerShell. Hopefully, this post gave you practical steps and clarity on creating subsites, handling subsite permissions, content, etc. If you have any questions or need further help, feel free to drop them in the comments below!