
How to Set Up a Catch-All Mailbox in Exchange Online
Configure a catch-all mailbox in Exchange Online to capture emails sent to non-existent or misspelled addresses within your domain. Set up internal relay accepted domain, create shared mailbox, and configure transport rules to redirect undeliverable messages and prevent missed communications.
Email communication is vital for seamless connections with clients, customers, stakeholders, and others. However, with the constant flow of emails, many Microsoft 365 organizations risk missing critical messages due to typos or misdirected addresses. This is where a Catch-All email address comes in.
Let’s see in detail what a Catch-All mailbox is and how to set it up in Microsoft 365.
A Catch-All email address is associated with a mailbox that captures all emails sent to non-existent or misspelled addresses within your domain.
However, here’s the twist with Microsoft 365: Unlike GoDaddy, Proton Mail, Zoho Mail, and others, Microsoft does not offer a built-in Catch All mailbox feature. Admins must create rules and perform configurations to simulate this function manually in Exchange Online.
By default, if a user across the world sends an email to your Microsoft 365 domain with a misspelled address, an NDR (Non-Delivery Report) is sent to the sender.
For example, if a user mistakenly emails ‘[email protected]’ instead of ‘[email protected]’, Microsoft sends a ‘How to Fix It’ message in the NDR to the sender. If you’ve disabled NDRs in Exchange Online, the sender won’t receive any notification.
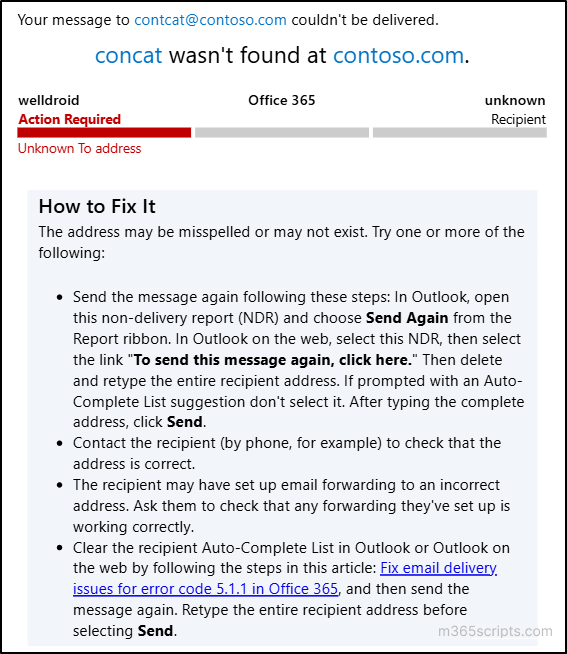
In such scenarios, the Catch-All mailbox collects all emails sent to non-existent or misspelled addresses within your domain. This ensures that important messages, such as lead requests, customer support questions, partnership opportunities, and more, are received.
To ensure you capture all emails sent to your domain with non-existent addresses, follow these steps to create a Catch-All mailbox in Exchange Online.
- Change the accepted domain type to internal relay
- Create a shared mailbox to catch all emails
- Create dynamic distribution group with all users
- Create a transport rule to redirect emails to the Catch-All mailbox
In Microsoft 365, there are two types of accepted domains: authoritative and internal relay. To enable a Catch-All mailbox, set the domain type to internal relay. This ensures that emails sent to non-existent addresses are relayed to the Catch-All mailbox rather than being rejected. If the domain type is set to authoritative, emails sent to unknown recipients are rejected.
By default, the domain type is set to authoritative in Exchange Online. To change the accepted domain type from authoritative to internal relay, do the steps described here:
- Navigate to Mail flow → Accepted domains in the Exchange admin center.
- Click on the respective domain in which you need to catch the undelivered emails.
- Change the ‘This accepted domain is’ radio button to Internal relay and hit Save.
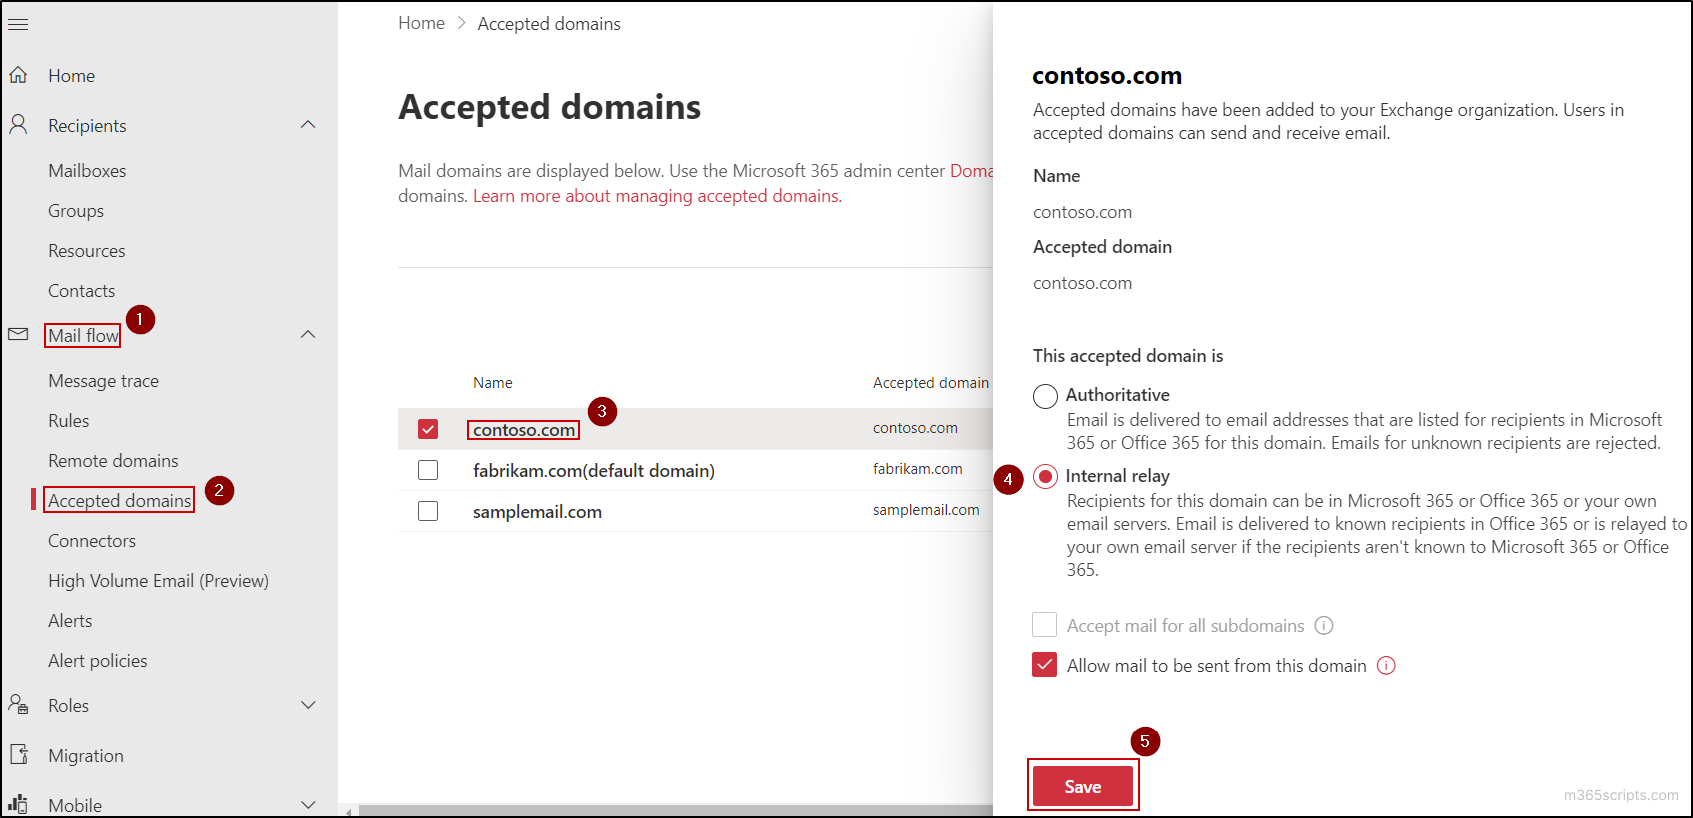
Note: If you want to catch mails undelivered in your other domain(s) or all accepted domains, change their domain type to internal relay.
Shared mailboxes allow multiple users to access the same mailbox without needing to share a single login. They also don’t require a separate license, making them suitable for Catch-All mailboxes. If you already have a shared mailbox to use as the Catch-All mailbox, you can skip this step.
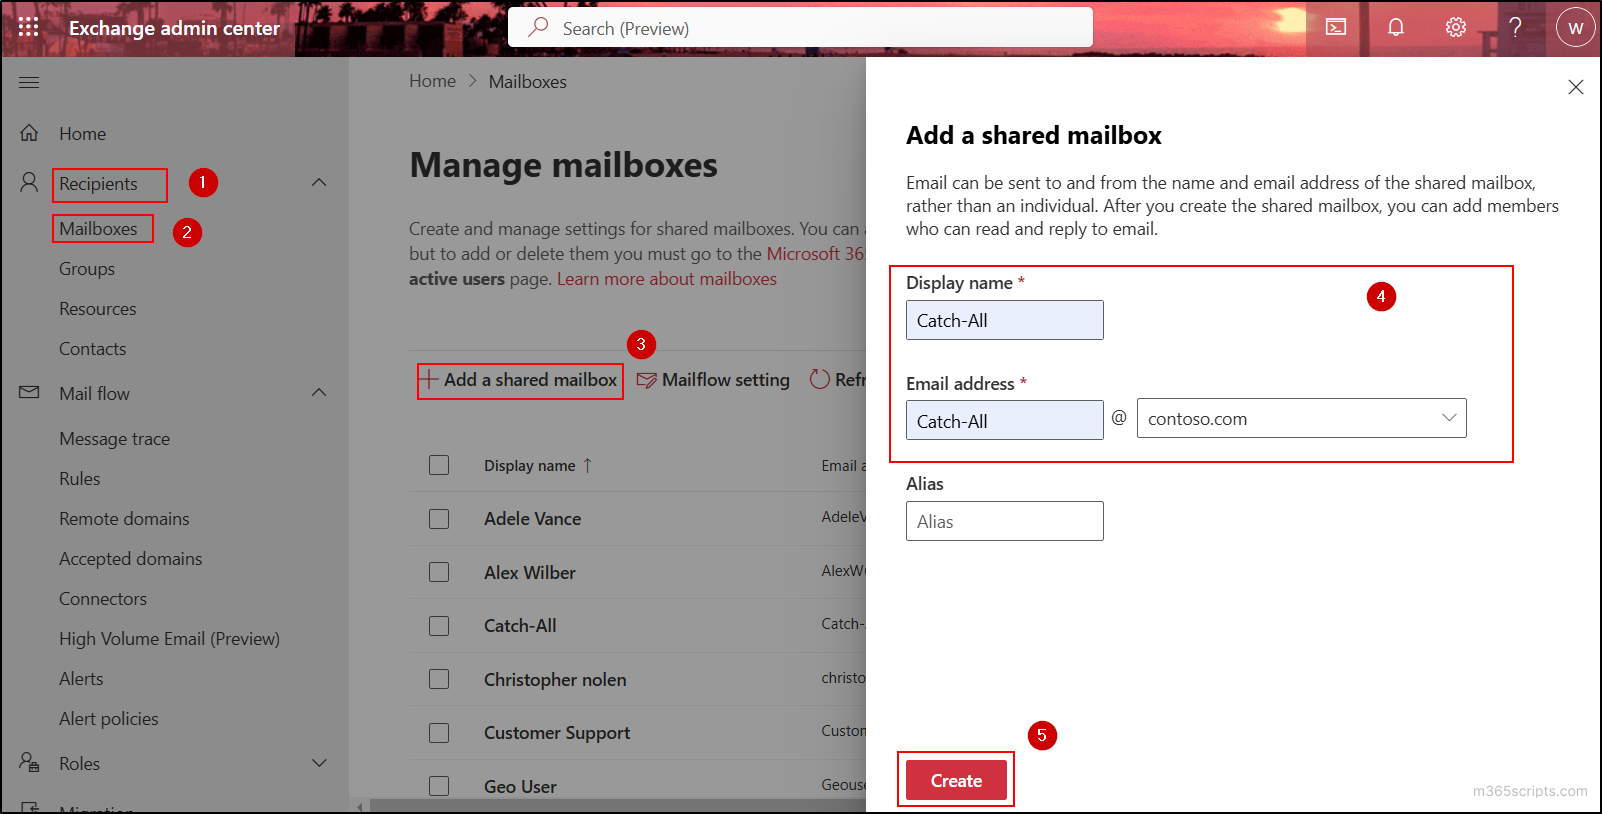
To create a shared mailbox in Microsoft 365, follow these steps:
- In the Exchange admin center, navigate to Recipients → Mailboxes → Add a shared mailbox.
- Type the Display name and the Email address with the domain you want to assign to the shared mailbox. Optionally, you can provide the alias address, but it is not mandatory in this case.
- Then click the Create button to create the shared mailbox.
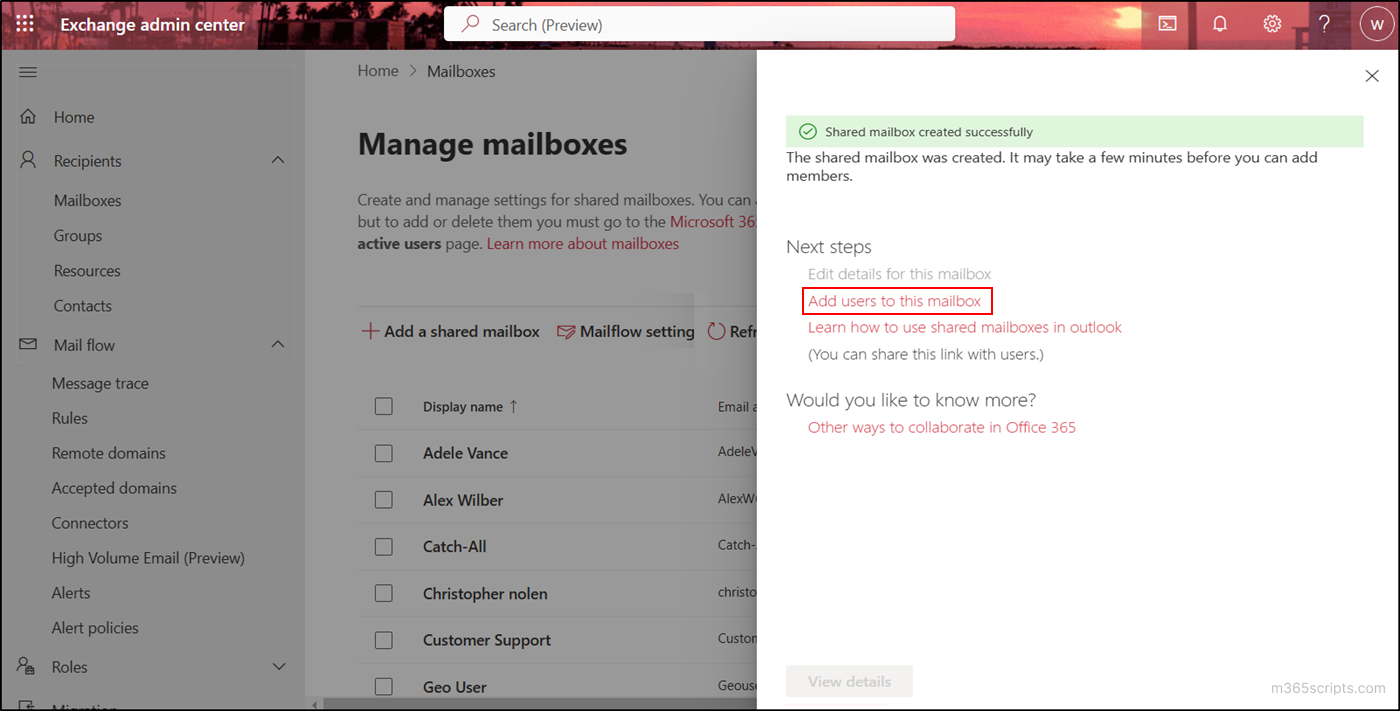
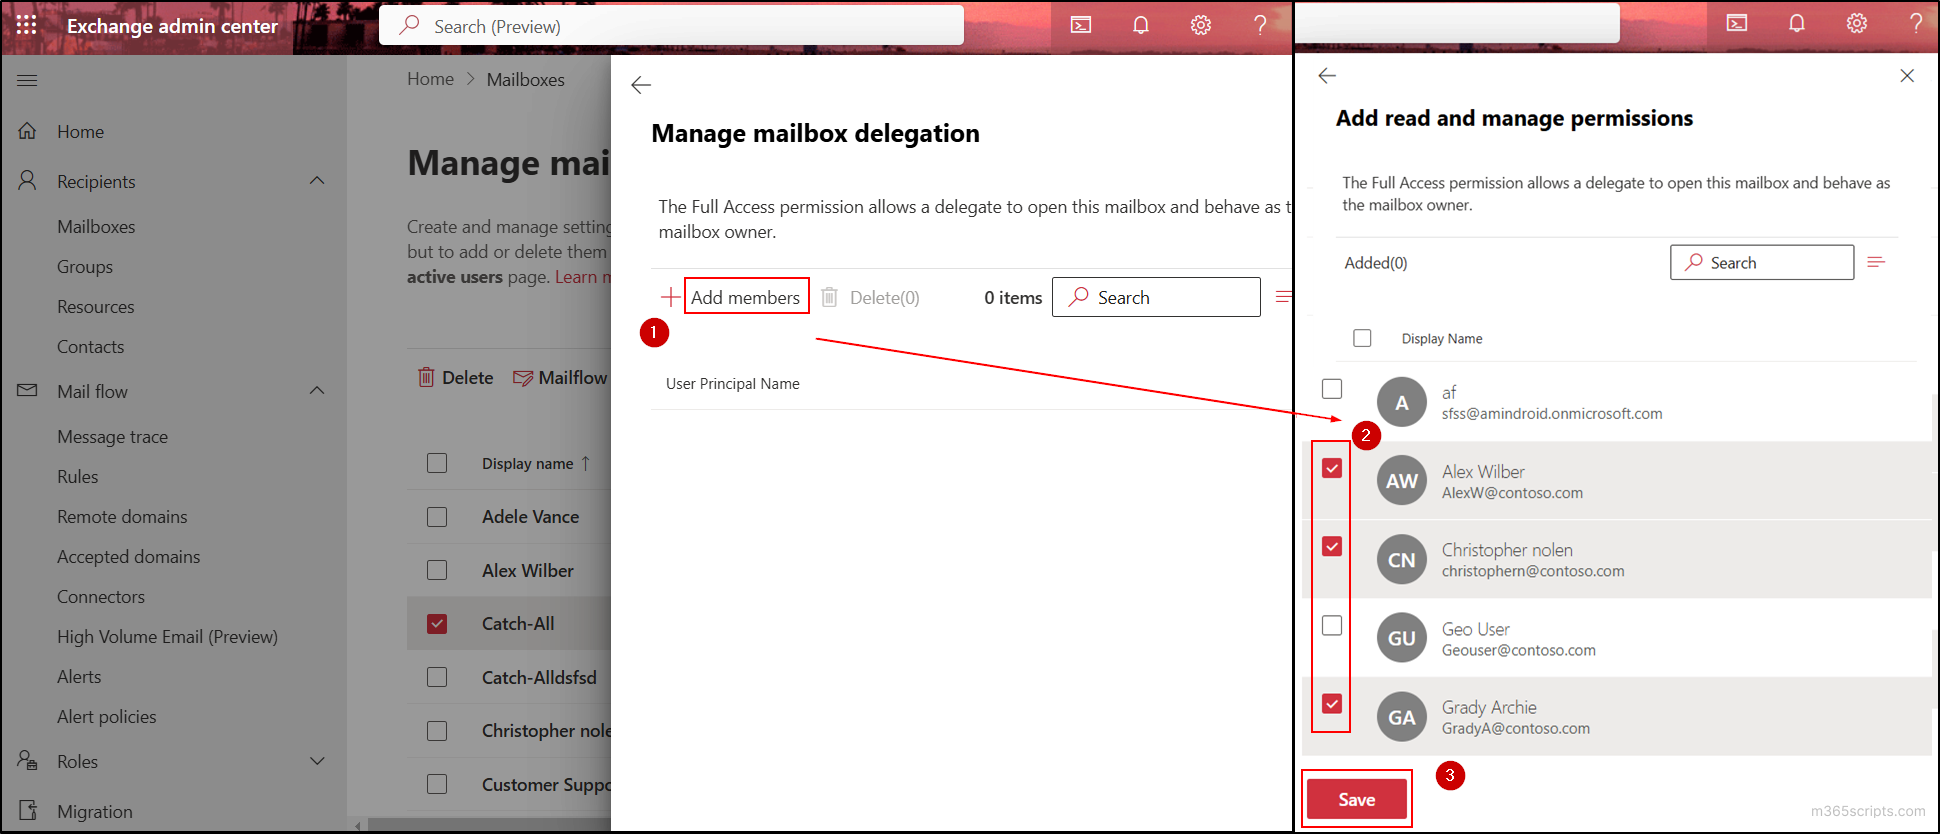
- Click on the Add users to this mailbox option appearing on the next page.
- Then, click Add members and select the members you want to grant access (Full Access) to the Catch-All mailbox.
- Click the Save button and then click the Confirm option.
Note: If you want to forward emails captured in this Catch-All mailbox based on keywords, subject, or other criteria, consider using inbox rules to manage them.
To ensure that emails sent to existing addresses in your domain are not redirected to the Catch-All mailbox, you must create a dynamic distribution group with all internal recipients. By using a dynamic distribution group, you can avoid manual intervention since new users are automatically included as they join the organization. You can also create dynamic distribution groups using PowerShell.
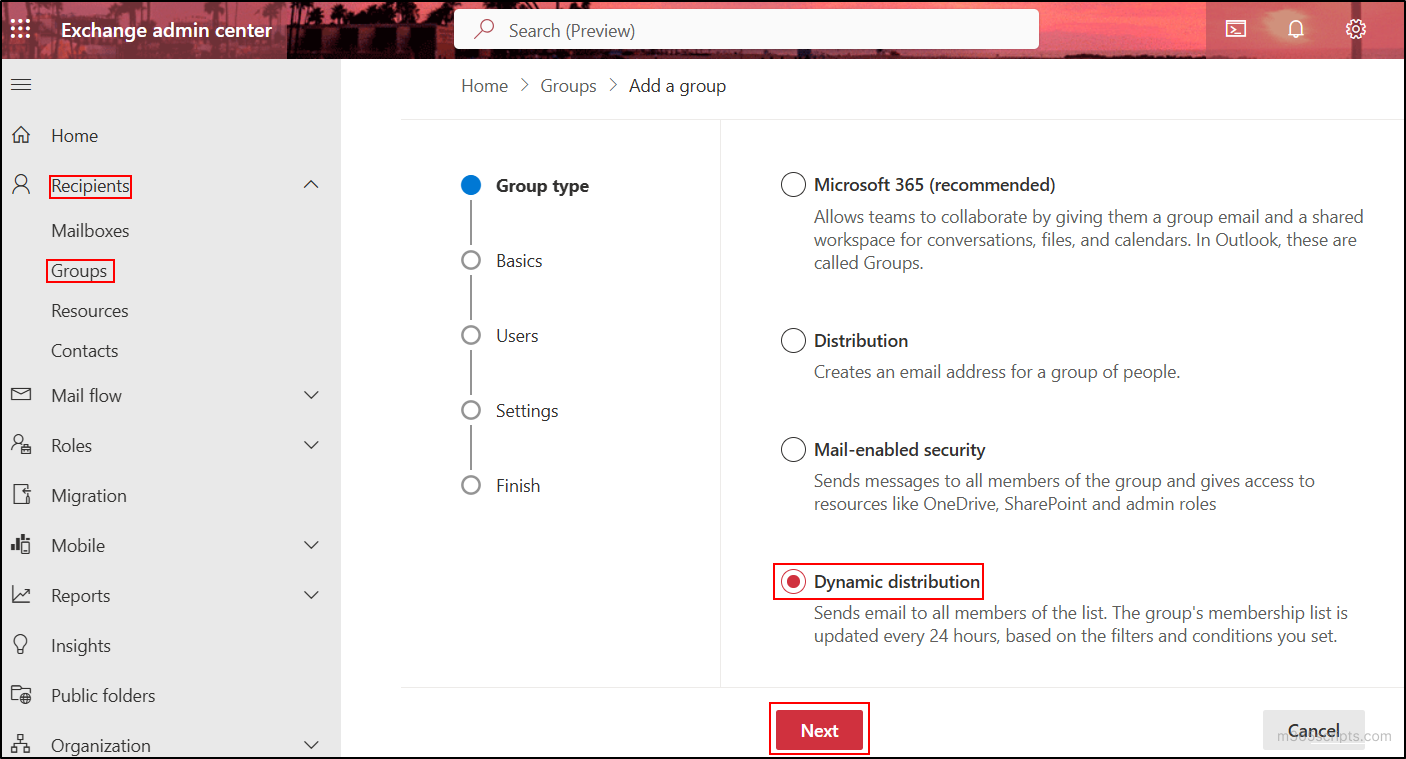
- Navigate to Recipients → Groups → Add a group in the Exchange admin center.
- Select the group type as Dynamic distribution group and click Next.
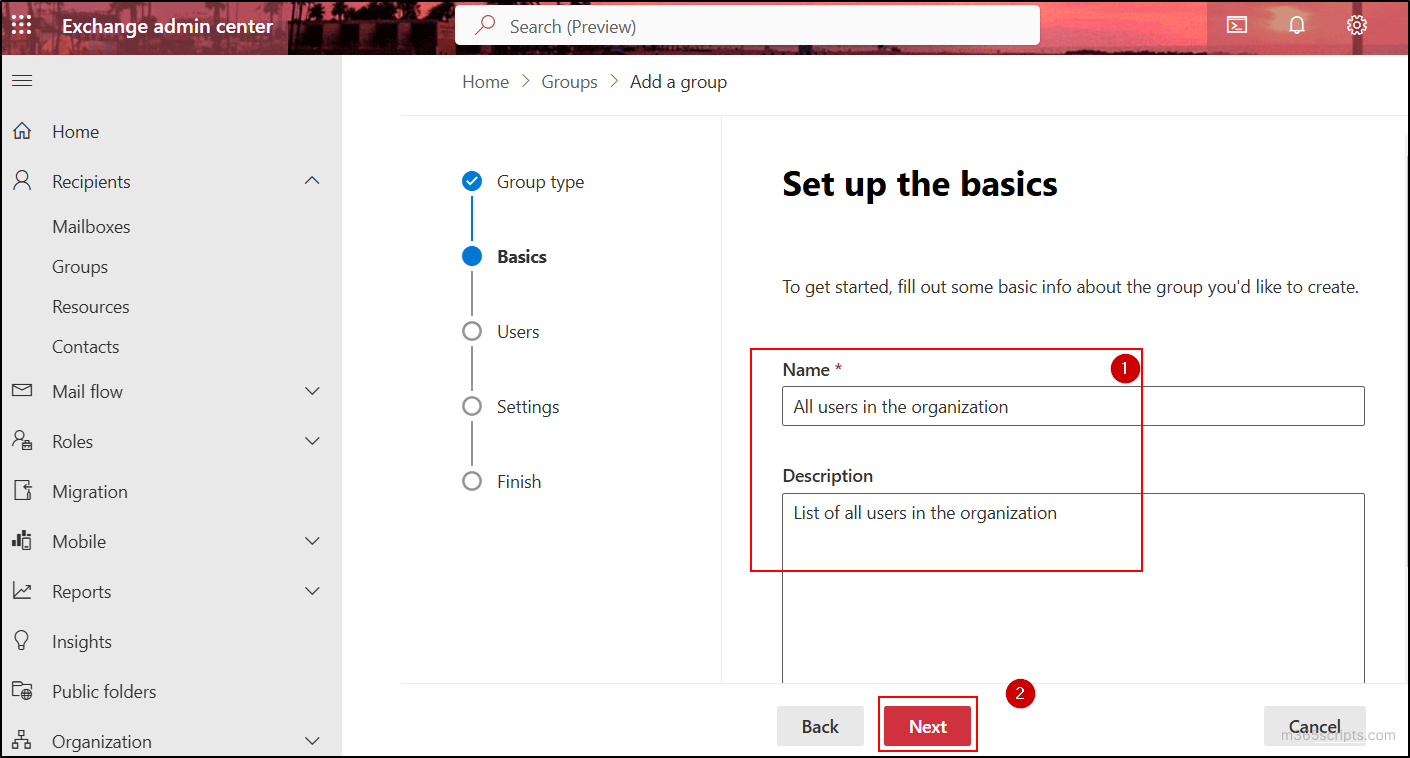
- Input the name for the group, the optional description, and click Next.
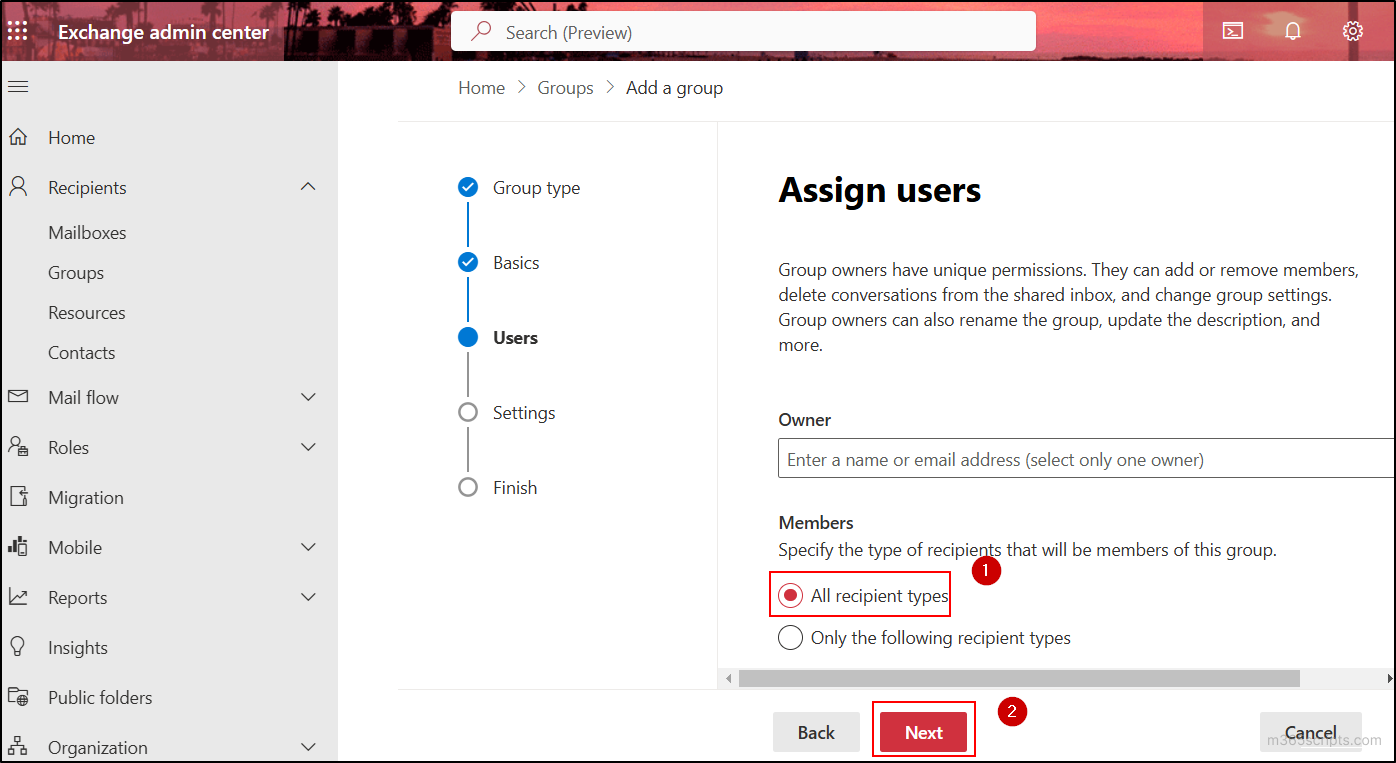
- In the Members section choose the All recipient types radio button and click Next.
- Type the group email address and choose the domain for the dynamic distribution group and click Next.
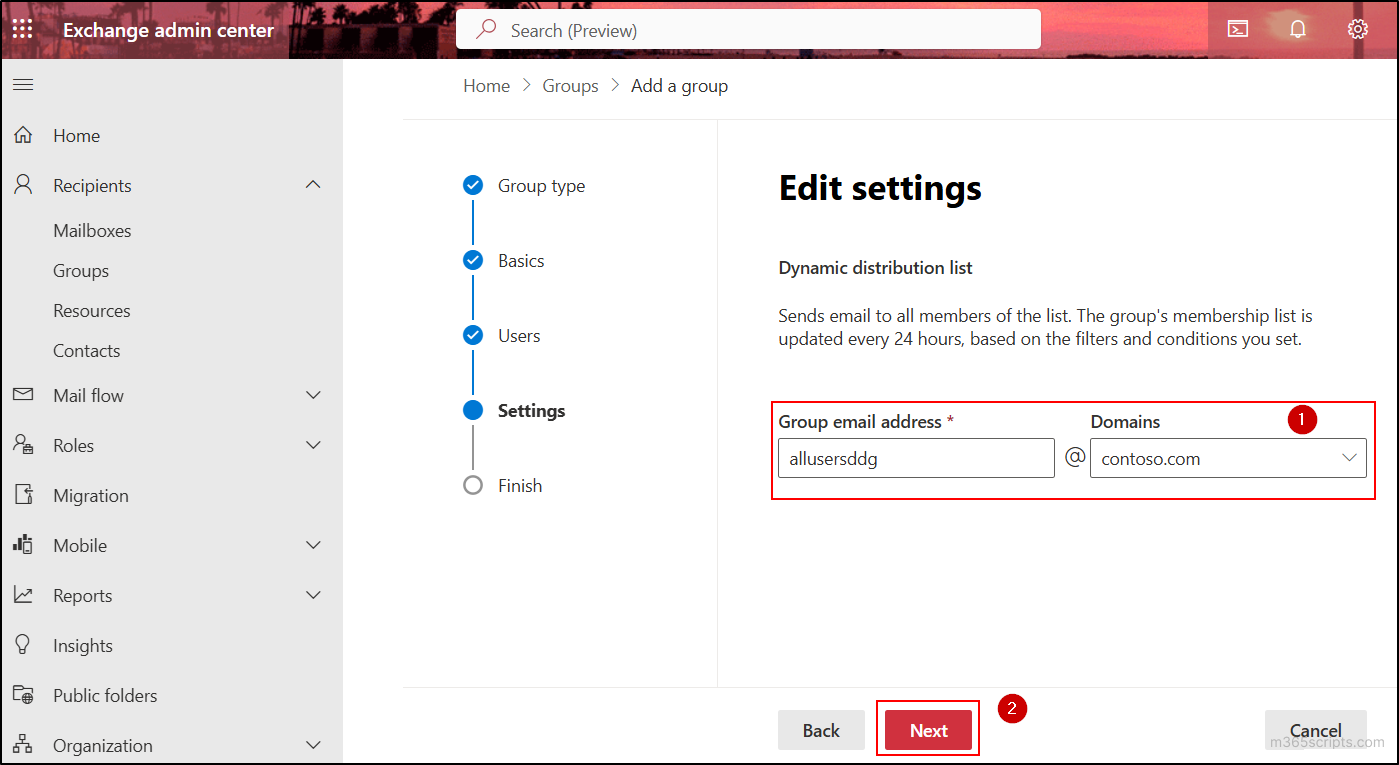
- Review the configuration of the group and click Create group.
- After that you will see a message ‘<Group Name> is created, but it isn’t ready to use yet.’ Then, click Close.
Note:
You can also use standard distribution groups instead of dynamic distribution groups for the Catch-All mailbox. Since dynamic distribution lists update new users with a delay, adding users to distribution groups during onboarding process can streamline membership in these cases.
Finally, you must create and enable a transport rule to redirect messages sent to misspelled email addresses in your domain. To create a transport rule for this purpose, follow the steps prescribed here:
- In the Exchange admin center, navigate to Mail flow → Rules.
- Click on the Add a rule option and select Create a new rule from the drop-down.
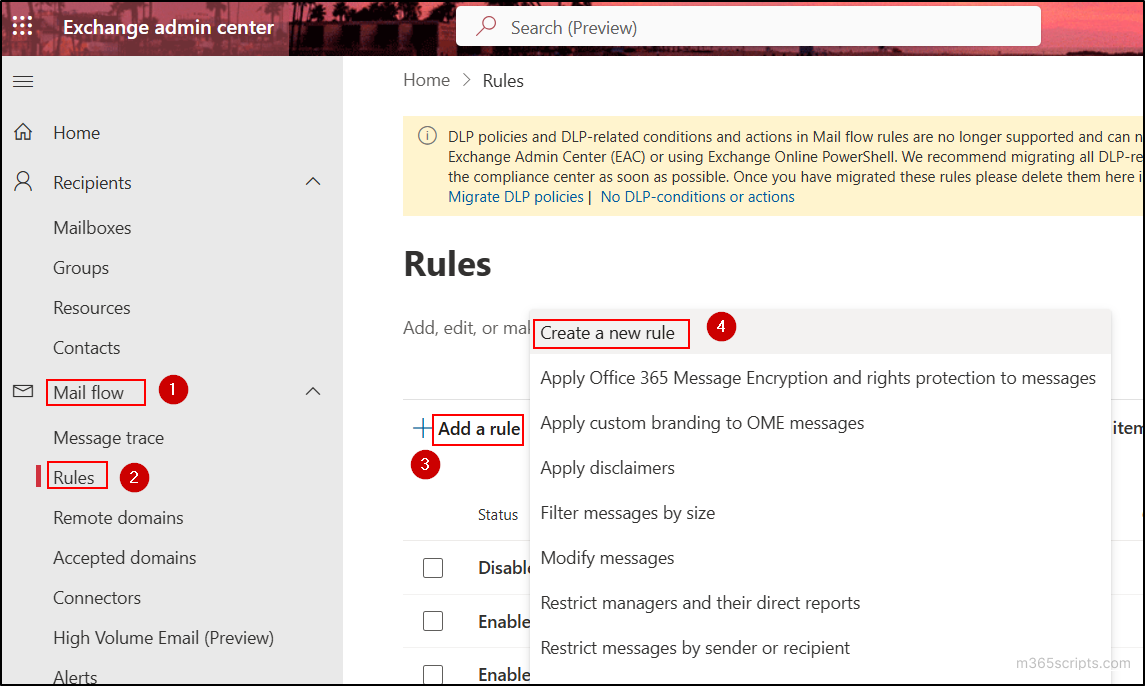
- Provide the name for the transport rule.
- In the Apply this rule if section, choose ‘The sender’ as ‘is external/internal’ and select the Outside the organization option in the flyout pane. Then, click Save.
- In the Do the following section, choose ‘Redirect the message to’ as ‘these recipients’ and select the Catch-All mailbox (shared mailbox) you created earlier. Then, click Save.
- Under the Except if section, choose ‘The recipient’ as ‘is a member of this group’ and select the dynamic distribution group you created. Then, click Save.
- Review the condition, action, and exception, then click Next.
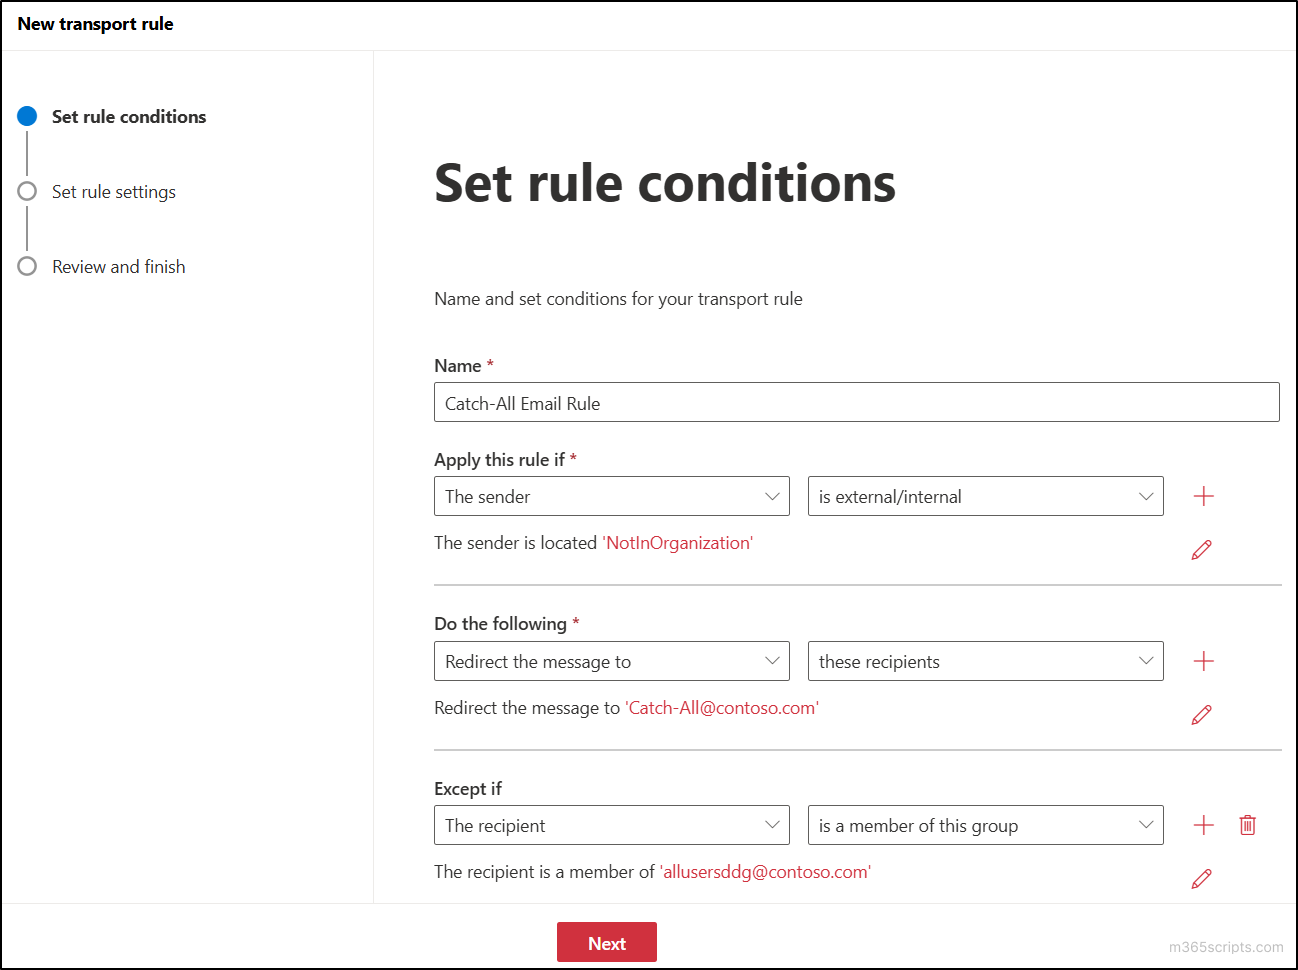
- After that, leave all the default settings in the Set rule settings page and click Next.
- Finally review all the settings in the Review and finish page and click Finish. Then click Done.
Important: The created mail flow rule will be disabled by default. To enable the rule you have created to catch emails, click the respective rule and toggle the Enable or disable rule button to the enabled state.
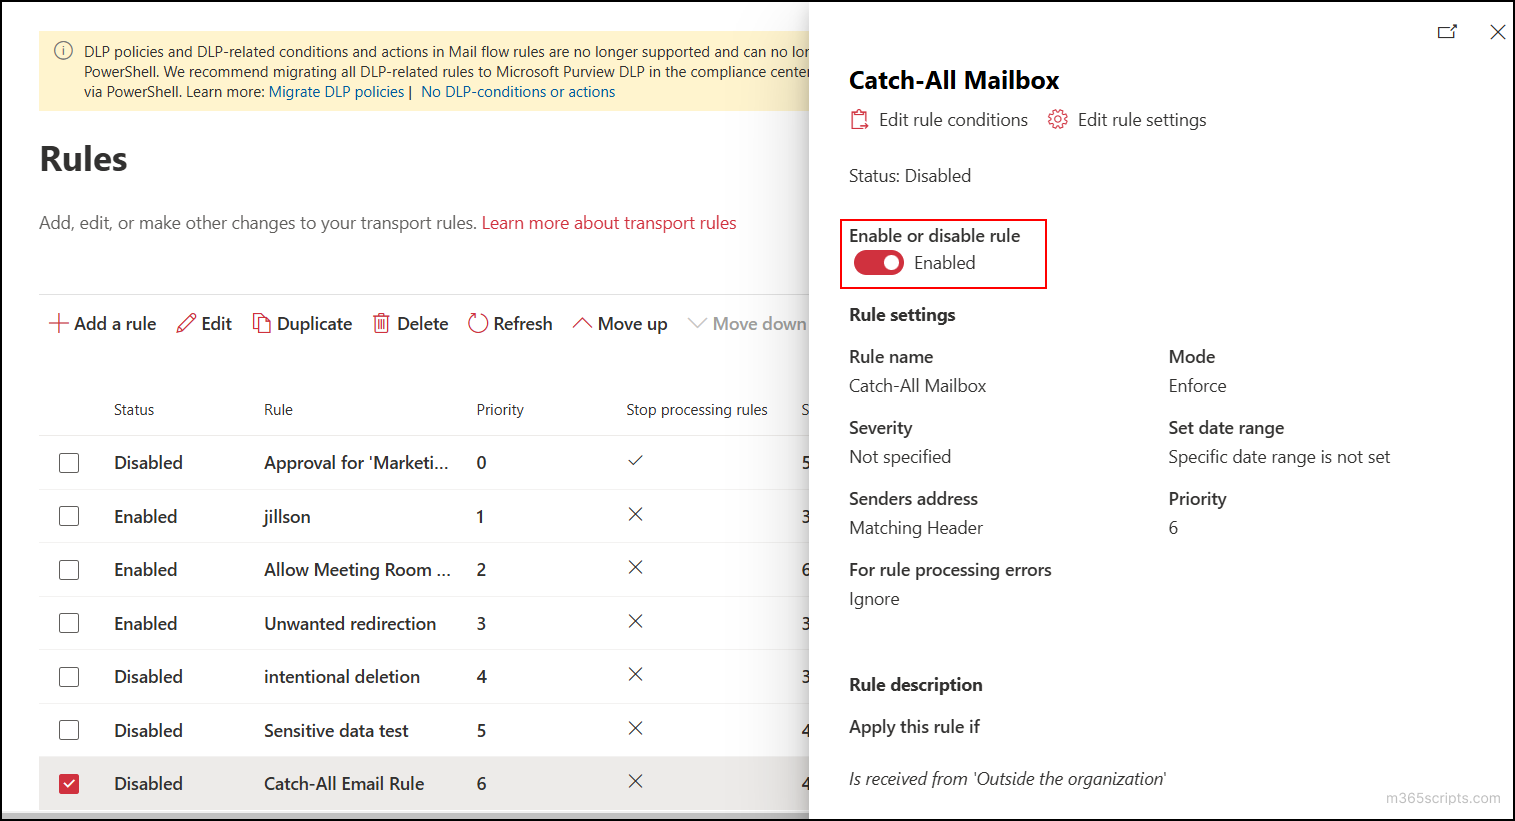
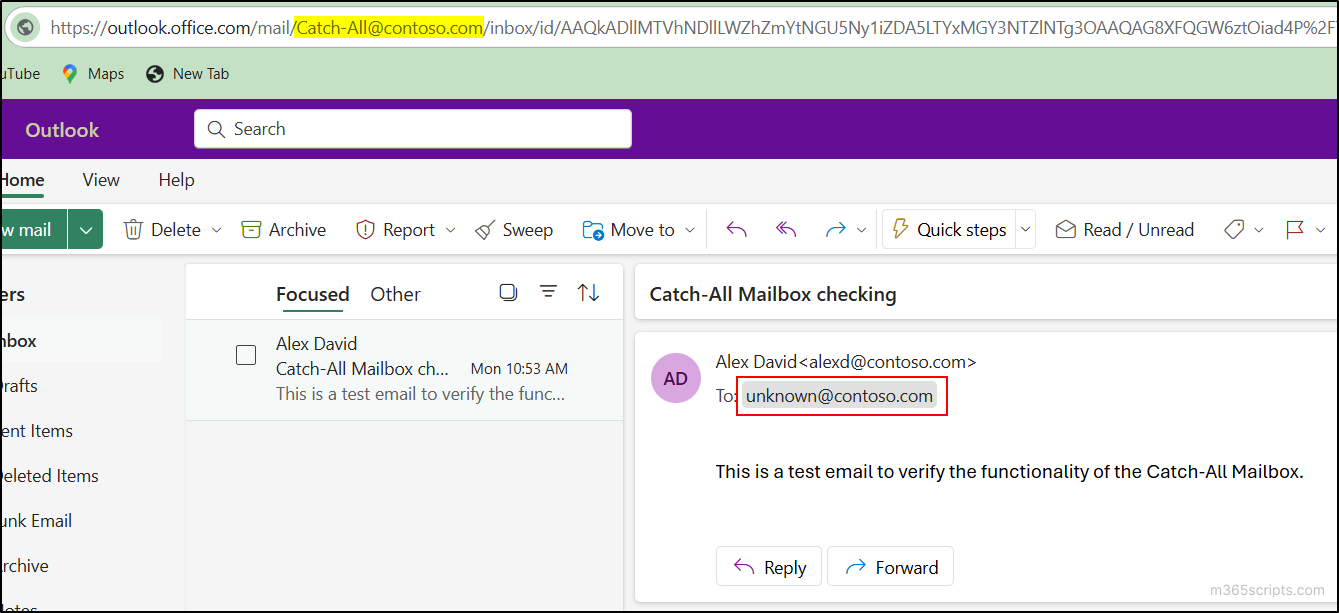
After completing all the procedures specified above, the Catch-All mailbox will begin to function. You can ensure this by sending emails to a non-existent email address in your domain. The email sent will be delivered to the created Catch-All shared mailbox if you have done everything correctly.
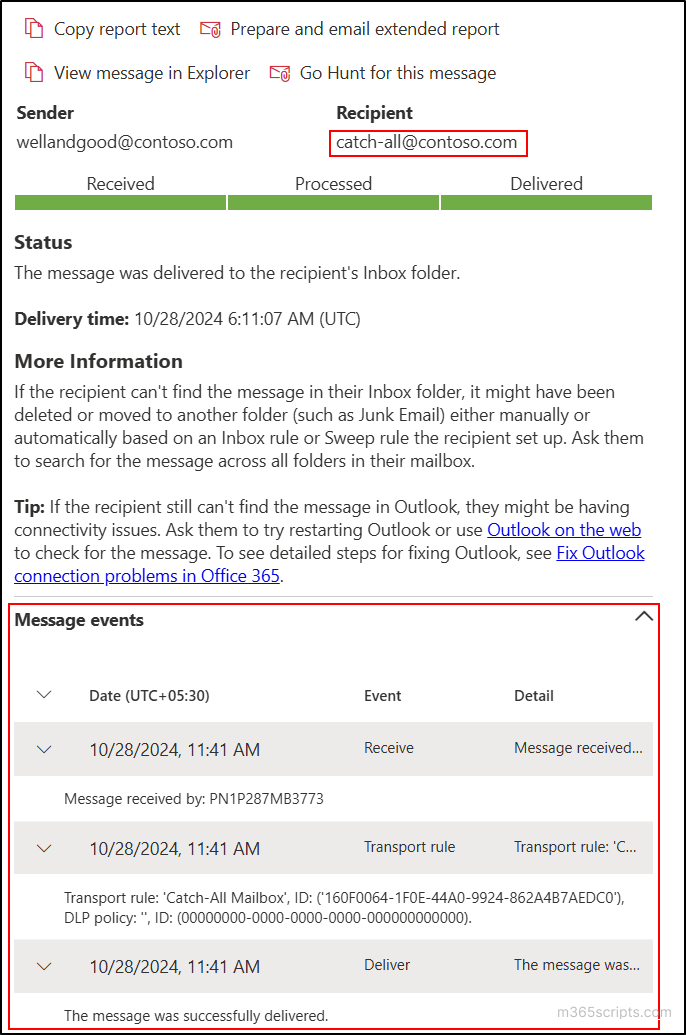
You can also refer to the message trace to track the routing of the emails sent to non-existing email addresses.
Important: If you find that emails sent to non-existent addresses are not captured, blocked, or encounter other issues, adjust the transport rule as needed. This may involve changing the priority, adding exceptions, or making other modifications based on the specific error.
When you follow the steps outlined here, the Catch-All mailbox will handle internal and external emails as follows:
Non-existing email addresses: When internal or external users send an email to a non-existing address, the email will be delivered to the Catch-All mailbox. This also prevents the sender from receiving a non-delivery report (NDR).
Existing email addresses: For emails sent to an existing address from internal or external users, messages will be delivered to the intended recipients as usual.
Here are the common limitations in setting up the Catch-All email address in Exchange Online:
Delay in new membership update: While the dynamic distribution group is used to identify non-existent mailboxes, newly created users may be considered non-existent for up to 24 hours.
Spam vulnerability: A Catch-All mailbox can receive emails sent to non-existent addresses, potentially leading to an influx of spam and malware emails.
Initial lag in rule and membership update: According to Microsoft documentation, it may take up to 30 minutes for new or updated transport rules to be applied to messages. Additionally, a dynamic distribution group may take up to 2 hours to calculate the initial membership list.
Incompatibility with third-party integration: Catch-All mailboxes can’t be used in environments where Exchange Online is integrated with another email system.
Restrictions in hybrid environments: Catch-All mailboxes can’t be established in Exchange Online hybrid environments.
I hope this blog helps you understand how to create a Catch-All email address in Microsoft 365 to capture emails sent to non-existent addresses in your domain. With careful configuration and awareness of potential limitations, you can keep your organization responsive and well-connected. If you have any questions, feel free to reach out through the comments section.

