How to Remove the External Tag in Outlook?
Remove the external email tag in Outlook to reduce inbox clutter while maintaining awareness of external senders. Disable external labeling for individual users through Outlook View settings or organization-wide using Exchange Online PowerShell. Balance security warnings with user experience preferences.
Every day, the world faces a continuous influx of suspicious email attacks. To combat this ongoing struggle, Microsoft has introduced several helpful features continually that includes enable external email tag in Exchange Online, Zero-hour auto purge, etc. These email warnings serve as a safeguard by alerting users about messages coming from external sources, particularly to prevent clicking on potentially malicious links!
However, while the external email tagging in Outlook serves as a visual reminder for emails sent by external users, it can sometimes lead to cluttering of the mailbox. Consequently, Microsoft has provided an option to remove the external tag in Outlook, allowing users to manage their mailbox more efficiently while still benefiting from the added security of the warning system.
Let’s check how!
External labelling in Outlook is a way of assigning labels to incoming emails from external users. This helps to inform recipients that the email is sent by someone outside their organization. It is turned off by default. Exchange administrators can run the Set–ExternalInOutlook–Enabled$true PowerShell cmdlet and enable external email warning. 
Some users dislike this feature due to several reasons such as,
- Cluttering of emails in their inboxes.
- Disrupting the user experience by making it more challenging to scan and prioritize emails quickly.
- Users might find it distracting or confusing, especially if they receive numerous external emails regularly.
For these users, the option to remove the external tag from the Outlook message list would be a preferable solution.
To disable external tagging from Outlook subject lines, follow the steps given below!
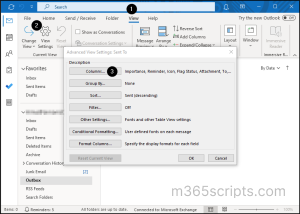
Step 1: Open your Outlook app and head to the ‘View’ tab.
Step 2: Select ‘View settings’.
Important: As the external tag is embedded with the ‘From’ field, instead of removing the entire ‘From’ column, let’s create a new ‘From’ column that contains only the ‘From’ information.
Step 3: Click on the ‘Columns’ button.

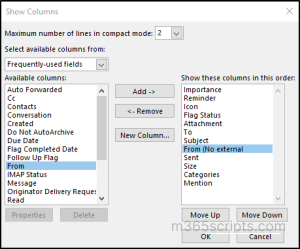
Step 4: Click on ‘New Column’ and configure the following.

Step 5: Now, in the “Show these columns in this order’ list, drag the “From (No External)’ field” and place it below the existing ‘From’ field.

Step 6: Now, select ‘From’ and press ‘Remove’, then click ‘OK’.
Thus, we have created a new column for ‘From’ field that excludes the embedded external tag!
To check if external tagging is enabled for your organization, first, make sure that you have connected to the Exchange Online PowerShell and then run the following cmdlet.
|
1 |
Get-ExternalInOutlook |
If the value is true, external tagging is enabled for your organization.
To remove the external email warning tag for all users in Exchange Online, run the following cmdlet.
|
1 |
Set-ExternalInOutlook -Enabled $false |
To remove the external email warning tag for specific users, run the following cmdlet.
|
1 |
Set-ExternalInOutlook -AllowList @{Remove="[email protected]", “[email protected]”} |
Note that the –Allowlist parameter is meaningful only when the value of the enabled parameter is $true.
In certain scenarios, you may find it unnecessary to include the ‘External’ tag for specific external partners or trusted domains. In such cases, you have the option to exclude them by adding them to the ‘AllowList‘ parameter.
|
1 |
Set-ExternalInOutlook –AllowList @{Remove="contoso.com","[email protected]"} |
Important: It can take up to 48 hours for the change to take effect depending on the number of emails.
It is generally advisable to maintain this setting for enhanced security within our organization. However, there may be exceptions, particularly for external emails that are automatically tagged as such. While such tags can raise suspicion, they may also cause discomfort for some users. In such cases, it is worth considering this implementation.
Thank you for reading. If you have any further queries, feel free to reach us through the comments section.


