Search for Email Messages Using New-ComplianceSearch Cmdlet
Managing compliance in the vast world of Microsoft 365 can seem like navigating an ocean without a map. That’s where the New-ComplianceSearch cmdlet comes in, a newer version of the Search-Mailbox cmdlet. The New-ComplianceSearch cmdlet is a powerful tool in the Microsoft Security & Compliance center that allows administrators to run compliance searches across their organization’s data. From emails to documents stored in SharePoint or OneDrive, this cmdlet enables you to ensure that all your data complies with regulatory standards.
Let’s see how to use the New-ComplianceSearch cmdlet effectively.
Before jumping further, it’s crucial to understand what the New-ComplianceSearch cmdlet is. With the retirement of the Search-Mailbox cmdlet in Exchange Online, the ComplianceSearch cmdlets become an alternative! Now, the New-ComplianceSearch cmdlet allows users to search for specific content across mailboxes based on various factors such as folder, mail item, date, sender, recipients, etc.
In simple terms, it’s a command used in PowerShell that allows you to search across your entire Microsoft 365 environment to ensure compliance with legal, regulatory, and policy requirements. Some of the ComplianceSearch cmdlets include:
- Get-ComplianceSearch
- New-ComplianceSearch
- Set-ComplianceSearch
- Stop-ComplianceSearch
- Start-ComplianceSearch
- Remove-ComplianceSearch
It’s also important to note that *-ComplianceSearch cmdlets are available both in on-premises and cloud-based services.
To use the New-ComplianceSearch cmdlet in PowerShell, you need to ensure the admin account has the necessary permissions. Here’s how to verify and set up the required permission in Microsoft Purview:
1. Create Role Group in Microsoft Purview:
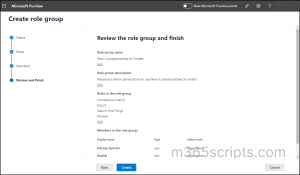
To create a role group in MS Purview, users need to be a global administrator or should have the ‘Role Management’ permission assignment. Let’s assign permission to view, export, and delete email messages.
- Sign in to the Microsoft Purview compliance portal.
- Navigate to Roles & scopes > Permissions.
- Under Microsoft Purview solutions > Roles, click Create role group.
- Name the role group and click Next.
- Click on Choose roles and add the following roles:
- Compliance Search
- Search And Purge
- Preview
- Export
- Click Next and then Choose users to add the admin account.
- Click Next and then Create.
- Finally, click Done.
Note: It can take up to an hour for the permissions to be fully assigned to the user. Once the permissions are in place, you’ll be able to use the New-ComplianceSearch cmdlet effectively to search and delete email messages in Microsoft 365.
2. Connect to the Appropriate Microsoft 365 Services PowerShell
Before proceeding further, connecting to the right Microsoft PowerShell modules is important. Since permissions were assigned related to Microsoft 365 mailbox contents, you must connect to Exchange Online PowerShell.
To connect to the Microsoft Defender and Compliance portal using the Connect-IPPSSession cmdlet, ensure that your system has at least version 3.2.0 of the Exchange Online Management module.
To find the version of the Exchange Online Management PowerShell module, run the following cmdlet.
|
1 |
Get-Module ExchangeOnlineManagement | Select-Object Version |
If you have an older version, then update your Exchange Online Management PowerShell by executing the below.
|
1 |
Update-Module -Name ExchangeOnlineManagement |
In case you proceed with the older version of Exchange Online Management PowerShell, you will encounter the following error.
Connecting to remote server eur03b.ps.compliance.protection.outlook.com failed with the following error message: For more information, see the about_Remote_Troubleshooting Help topic.
Once you updated the Exchange Online Management module, connect to the PowerShell session.
|
1 2 |
Connect-ExchangeOnline Connect-IPPSSession -UserPrincipalName <your UPN> |
Running these cmdlets will prompt you to enter the Microsoft 365 admin credentials. Following this, the console will try to establish remote connections to Exchange Online and Compliance PowerShell.
To ensure the role group permission assignments, run the following cmdlet.
|
1 |
Get-ManagementRoleAssignment -Role <role> -GetEffectiveUsers -Delegating $false |
Replace the ‘Role’ with the required permissions. For example, execute the cmdlet below to find out who has access to the Mailbox Search role:
|
1 |
Get-ManagementRoleAssignment -Role "Mailbox Search" -GetEffectiveUsers -Delegating $false |
With the right permissions, you can run the Compliance Search cmdlet in PowerShell. Now, let’s explore how to perform mailbox searches for specific information to aid in investigations or audits.
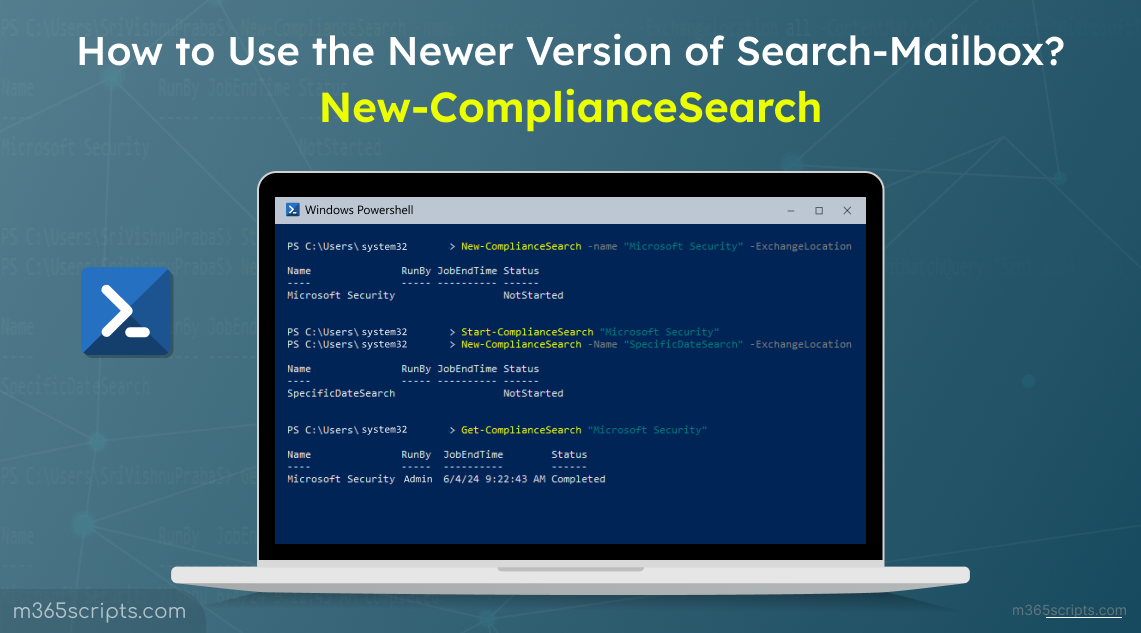
- Create a new compliance search – New-ComplianceSearch cmdlet is your starting point for creating a search.
- Start the compliance search – Use the Start-ComplianceSearch cmdlet to initiate it. To start the compliance search, use the name you assigned during configuration.
- Get the compliance search – Use the Get-ComplianceSearch cmdlet in PowerShell to view existing compliance searches, including their status.
- Export the compliance search results – Apart from viewing search details, PowerShell lets you export compliance search results into PST or CSV files for further analysis.
Let’s see a few examples of how to create compliance search for mailboxes.
- Searching for Spam Email Messages in Compliance Search
- Compliance Search for Emails Sent on Specific Dates
- Find Emails in Inactive Mailboxes Using Compliance Search
- Purge Meeting Requests Created in the Certain Period
- Permanently Delete Emails of Large Size Using Compliance Search
- Find Emails with Specific Attachment Types and Purge Them Using Compliance Search
Here’s an example of searching all mailboxes for emails containing “Spam” in the subject line:
|
1 |
New-ComplianceSearch -Name "Mailbox Security" -ExchangeLocation all -ContentMatchQuery 'subject:"Spam"' |
The -Name parameter in the New-ComplianceSearch cmdlet is used to define a friendly name for the compliance search you’re creating.
To perform a compliance search for specific mailboxes, replace the UPN instead of ‘all’ in the -ExchangeLocation parameter.

The -ContentMatchQuery parameter in the New-ComplianceSearch cmdlet allows you to search mailboxes based on specific criteria.
Here’s an example of searching for emails sent on June 1st, 2024, across all mailboxes:
|
1 |
New-ComplianceSearch -Name "SpecificDateSearch" -ExchangeLocation "All" -ContentMatchQuery "Sent:2024-06-01" |
In case if want to find emails sent within the last month (May 2024 in this case), use a date range:
|
1 |
New-ComplianceSearch -Name "LastMonthEmails" -ExchangeLocation "All" -ContentMatchQuery "Sent:2024-05-01..2024-05-31" |
Note: The -ContentMatchQuery parameter allows for more than just date searches. You can combine it with a specific sender, recipient, or other criteria to refine your search further. Apart from PowerShell, admins can also use in-built Microsoft Purview reports for content search activity.
By default, standard searches skip inactive mailboxes. To include them, use the -AllowNotFoundExchangeLocationsEnabled $true attribute in your search command.
When searching for a specific inactive mailbox, add a period (.) before its UPN.
|
1 |
New-ComplianceSearch "Search inactive mailbox" -ExchangeLocation [email protected] -AllowNotFoundExchangeLocationsEnabled $true |
This cmdlet initiates a new compliance search through inactive mailboxes and returns all items in the mailbox.
Let’s see an example to create a compliance search to purge meeting requests within a specific date.
|
1 |
New-ComplianceSearch -Name "PurgingMeetingRequests" -ExchangeLocation All -ContentMatchQuery '(ItemClass:IPM.Schedule.Meeting.Request) AND (Received>=05/05/2024 AND Received<=06/06/2024)' |
Before proceeding to the next step, you must start the compliance search and get the compliance search status.
|
1 |
Start-ComplianceSearch "PurgingMeetingRequests" |

Monitor the status of your compliance search.
|
1 |
Get-ComplianceSearch "PurgingMeetingRequests" |
Once the status is ‘Completed’, use New-ComplianceSearchAction with the -Purge and -PurgeType HardDelete parameters to execute the deletion.
Compliance searches are used to find items within mailboxes or SharePoint sites that match specified criteria. The New-ComplianceSearchAction cmdlet in Exchange Online PowerShell is used to perform actions on the results of a compliance search. Once the search is complete, New-ComplianceSearchAction allows you to perform actions such as previewing, exporting, or deleting the items found by the search.
|
1 |
New-ComplianceSearchAction -SearchName "PurgingMeetingRequests" -Purge -PurgeType HardDelete |

Once you run this cmdlet, PowerShell will ask for confirmation before proceeding. Since this action is irreversible proceed with caution and ensure proper backups before execution.
Upon your confirmation, this cmdlet will permanently remove emails matching your search criteria.
To delete emails of large sizes, we must create a compliance search to find emails with large attachments. Let’s say 50 MB here.
|
1 |
New-ComplianceSearch -Name "LargeAttachmentSearch" -ExchangeLocation all -ContentMatchQuery "hasattachments:true AND (size>=50000000)" |
You can also replace 50MB with your desired size limit.
|
1 |
Start-ComplianceSearch -Identity "LargeAttachmentSearch" |
Then, check for the compliance search to complete.
|
1 |
Get-ComplianceSearch -Identity "LargeAttachmentSearch" |
After confirming the results, you can delete the items found by the search. Be very cautious with this step as it will permanently delete the emails.
|
1 |
New-ComplianceSearchAction -SearchName "LargeAttachmentSearch" -Purge -PurgeType HardDelete |
Note:
Admins can still recover the hard-deleted email messages within the retention period.
Emails with large attachments can consume a significant amount of storage space. By identifying and purging these emails, organizations can free up valuable storage resources, ensuring that their email systems run efficiently!
Create a compliance search to find emails with specific attachment types. For example, to search for emails with .pdf attachments:
|
1 |
New-ComplianceSearch -Name "SearchEmailsWithPDFAttachments" -ExchangeLocation all -ContentMatchQuery 'hasattachment:true AND attachments:".pdf"' |
Then, Start the compliance search you just created.
|
1 |
Start-ComplianceSearch -Identity "SearchEmailsWithPDFAttachments" |
Check the status of the compliance search.
|
1 |
Get-ComplianceSearch -Identity "SearchEmailsWithPDFAttachments" |
Once the search is complete, you can purge the emails found by the search. Be cautious with this step, as it will permanently delete emails.
|
1 |
New-ComplianceSearchAction -SearchName "SearchEmailsWithPDFAttachments" -Purge -PurgeType HardDelete |
Important Considerations:
- Soft-deletion by default: Without -PurgeType, items are soft-deleted, allowing user recovery within the retention period.
- Hard deletion skips soft-delete: HardDelete bypasses the soft-delete stage, making recovery impossible.
- Holds and Retention Policies: Litigation Holds or Retention Policies may prevent deletion.
- Search limitations: New-ComplianceSearchAction processes a maximum of 10 items per mailbox at once. Consider using precise searches or looping the cmdlet for larger deletions.
Running into the error “The term ‘New-ComplianceSearch‘ is not recognized” can be frustrating when working with eDiscovery in Exchange Online PowerShell.
Error Message: The term ‘New-ComplianceSearch’ is not recognized as the name of a cmdlet, function, script file, or operable program.
This error typically indicates that PowerShell doesn’t recognize the New-ComplianceSearch cmdlet. This could happen for a few reasons:
- Missing Module: The Exchange Online Management module, containing the New-ComplianceSearch cmdlet, might not be loaded.
- Incorrect Permissions: Your user account might lack the necessary permissions to run compliance searches.
- Typos: Double-check for any spelling mistakes in the cmdlet name.
I hope this blog guided you in how to use the New-ComplianceSearch PowerShell cmdlet. In addition, message trace in the new EAC can be used to track the delivery and status of emails, offering more insights into the flow of messages while ensuring compliance across the organization. Feel free to ask if you have any queries using the comment section.
