
How to Use Approvals App in Microsoft Teams
Centralize approval workflows using the Microsoft Teams Approvals app integrated with Power Automate, SharePoint, and Dynamics 365. Create, manage, and respond to approval requests directly within Teams without switching applications. Store approval data in Microsoft Dataverse for tracking and compliance purposes.
With work moving so quickly, approval decisions often get stuck in Microsoft 365 organizations. Have you ever felt that workflow approvals disappear into crowded inboxes, get lost in chats, or simply be forgotten in other systems? This chaos causes delays and leads to missed opportunities. That’s where the Approvals app in Microsoft Teams comes in!
A space where you can create, manage, and respond to all your approvals with a few clicks, eliminating the need to jump between applications. By consolidating workflows within your collaboration hub, it supports stronger Microsoft Teams governance and keeps decisions moving smoothly.
Without further delay, let’s explore what Microsoft Teams Approvals app is and what you can do with it.
The Approvals app in Microsoft Teams provides a centralized view of all your approval requests, including those that are sent, received, and completed. It is a personal app available to all Teams users and is not shared at the team or group level. Approvals are synced across systems such as Power Automate, SharePoint, and Microsoft Dynamics 365, ensuring consistency and visibility across platforms.
Approvals created from the app are stored in the default Microsoft Dataverse environment, where essential details like title, description, template ID, and more are securely maintained. Submitted responses are captured in Microsoft Forms for tracking and analysis.
For Admins:
To configure the Approvals app in Microsoft Teams, admins must ensure the following prerequisites are met:
- A valid license for Power Automate, Microsoft 365, or Dynamics 365.
- A Power Automate account for workflow approvals.
- Permission to create a Microsoft Dataverse database.
- A Microsoft Forms license is required if users need to create new approval templates.
These licenses and permissions are required for users to send or receive approval requests triggered by Power Automate workflows within the Approvals app in Microsoft Teams.
For Users:
A Power Automate license is required to use the Approvals app. When a user sends their first approval request, they are automatically added to the Approvals User role in the assigned environment.
The Approvals app in Microsoft Teams helps streamline decision-making and workflow management. Here’s what it can do:
- Receive and send messages, data, and notifications in personal chats and team channels.
- Display personal app views and dialogs within Teams.
- Access your profile details, including name, email address, company, and preferred language.
- Access team information such as team name, channel list, and member names and email ids to enable communication.
Here’s how you can install and start using the Microsoft Teams Approvals app to manage and track approval workflows efficiently.
- Install and pin Approvals Teams app
- Check received Approval requests
- Send workflow Approval requests
- Create a new Approval request
- Create Approval with templates
- Create Approval templates
- Manage e-sign approvals
To configure the Approvals app in Microsoft Teams, follow these steps:
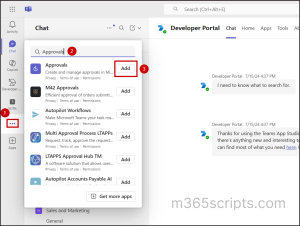
- Open Microsoft Teams and click on the View More Apps (three dots) option in the sidebar.
- Search for Approvals and select Add. The app will now appear in the sidebar for easy access.
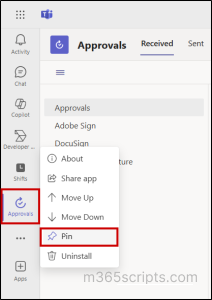
Pin the Approvals App: To keep the Approvals app easily accessible in Microsoft Teams, right-click the app icon in the sidebar and select the Pin option. This keeps the Approvals app permanently visible, allowing you to open it quickly whenever needed.
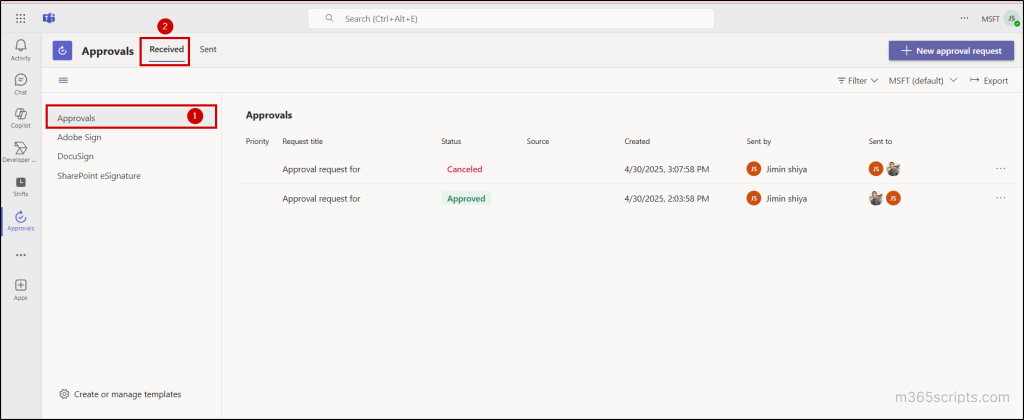
To view approval requests you’ve received, navigate to the Received tab within the Approvals app. This includes requests from Microsoft Teams, SharePoint content approvals through Power Automate, and other sources. This section displays important details such as the request’s priority, title, status, source, who created it, and who sent it.
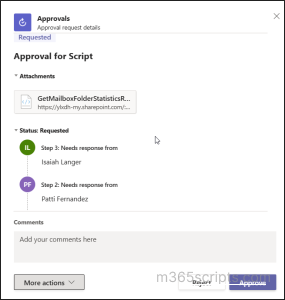
When you select a request, you’ll see additional information such as the reason for the approval, its current status, and available actions. You can choose to approve or reject the request and add comments if needed. Additionally, by selecting More Actions, you can cancel an approval request, follow up, or reassign it to another user.
To track the approval requests you have submitted, go to the Sent tab in the Approvals app. This section displays all the requests you have initiated, along with their current status and detailed information, similar to the Received tab.
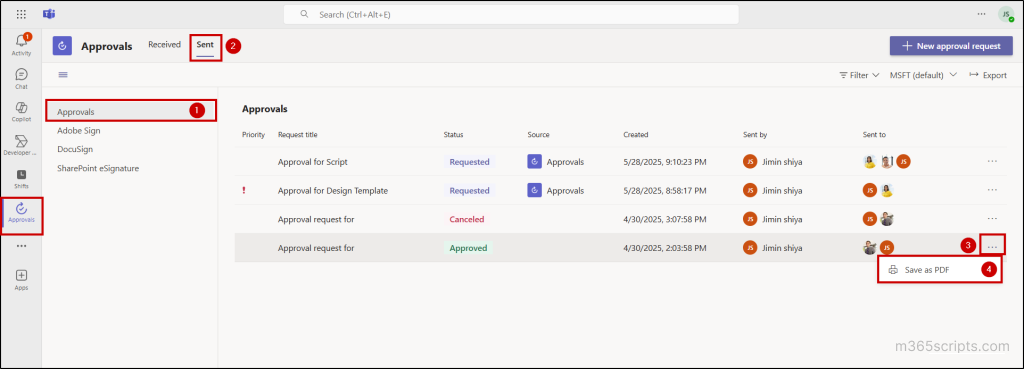
You can follow up on a request to send a notification to the approver or cancel the request if it is no longer needed. Once a request is approved or canceled, you can use the Save as PDF option to download and keep a copy of the approval. This is helpful for maintaining records, sharing approvals with others, or fulfilling compliance and audit needs.
Imagine you need to get urgent budget approval from your manager while working on a project update. Instead of switching between apps or emails, you can initiate the approval request directly from Microsoft Teams using the Approvals app.
To create a new approval request:
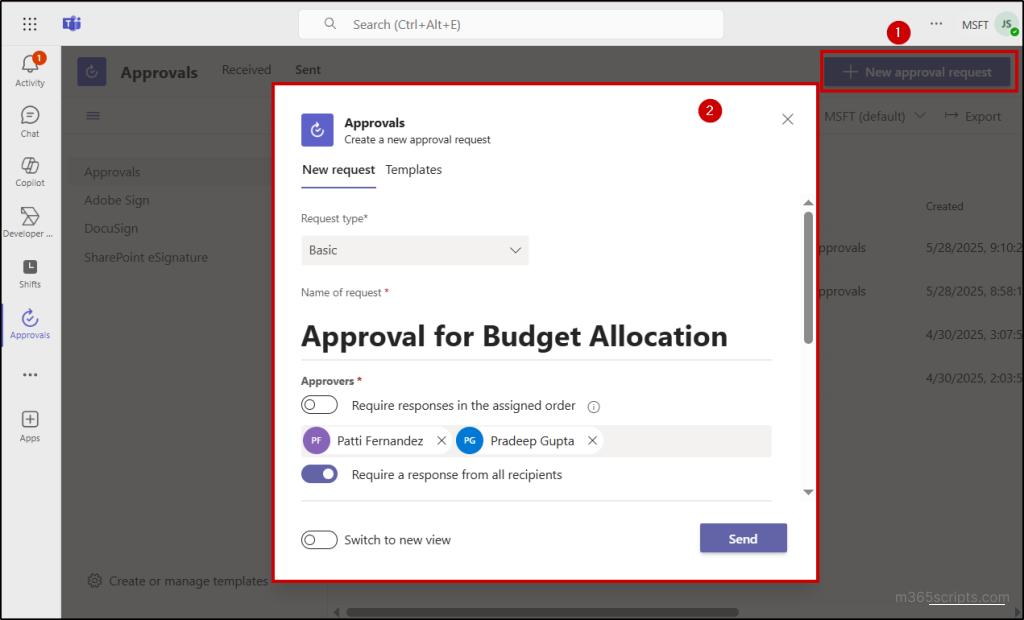
1. Open Microsoft Teams and go to Approvals > New approval request.
2. Select the Request type (Basic or eSign), enter the name of the request, and assign the approvers.
3. If you want approvals to follow a specific order, enable the Require responses in the assigned order toggle.
4. When adding multiple approvers, enable the Require a response from all recipients toggle to ensure every approver responds.
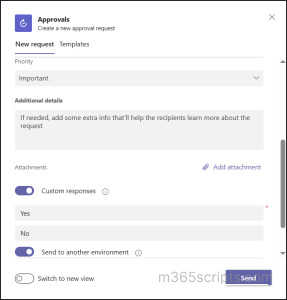
5. Set the priority of the request as Medium or Important based on urgency.
6. Use the Additional details field to add any relevant comments or context.
7. Attach any necessary files using the Add attachment option.
8. If needed, turn on the Custom response toggle to allow approvers to choose from predefined response options.
9. Use the Send to another environment toggle if you want to send the request to a different tenant than your default one.
10. Finally, select Send to initiate the approval request in Microsoft Teams.
Once the mandatory fields are filled, submit the request and track its progress right within Teams.
In addition to using the app interface, you can also initiate approval requests directly from a Teams chat. While composing a message, you can set up an approval, which will appear as a card within the conversation. Keep in mind that only participants in that specific chat can be selected as approvers.
Note: With the retirement of legacy Office 365 connectors in Power Automate, Microsoft encourages transitioning to the modern Workflows app in Microsoft Teams. The Approvals app, supported by Power Automate, is now the central hub for managing approval workflows in Teams, making it more secure and aligned with Microsoft’s current cloud strategy.
Microsoft Teams Approvals app allows you to streamline request creation using pre-defined templates. Here’s how to create an approval using a template:
- Open the Approvals app and select New approval request.
- In the dialog that appears, switch to the Templates tab and choose the desired template.
- Enter details such as the approval request name, recipients, and any additional information.
- If the template has predefined recipients set by a team owner or admin, you may not be able to modify them.
- Click Send to submit the request.
Teams users can only select predefined templates from the Templates section when submitting approval requests. However, team owners and admins can create custom templates tailored for their team. Here’s how to create approval templates as a team owner:
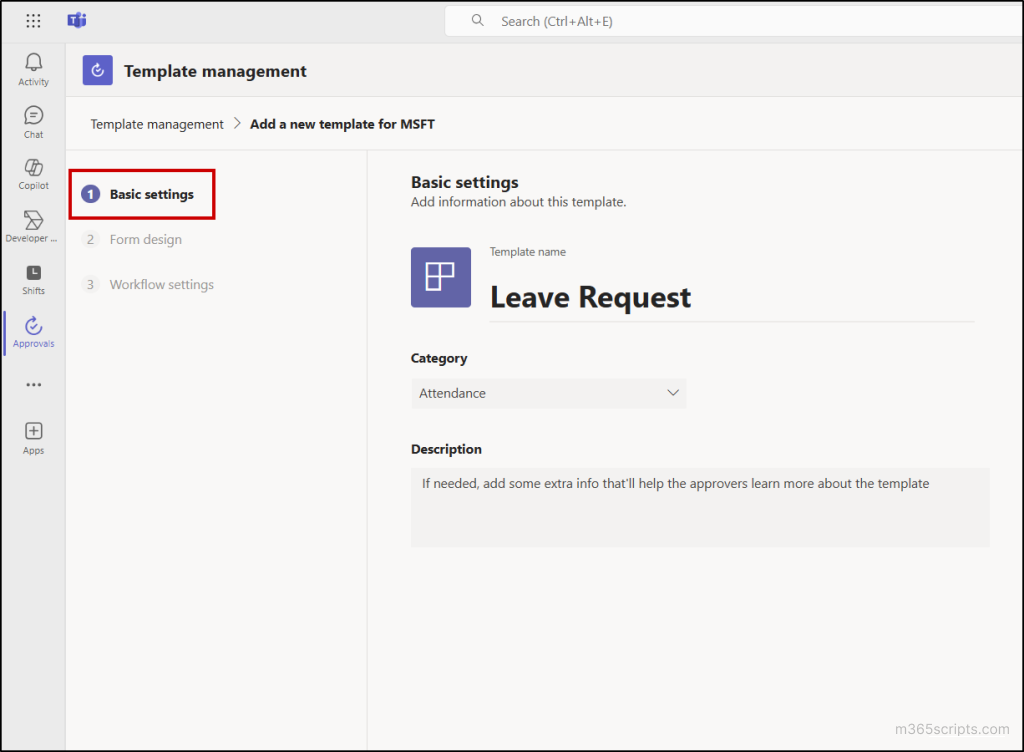
1. Go to Approvals > Create or manage templates > New template.
2. Choose a pre-built template or start from scratch. As a team owner, you can only select Team-wide when creating templates for your team.
3. Under Basic settings, enter the template name, add a brief description, and choose a relevant category (e.g., Activity, Attendance, and more). Click Next.
4. In the Form design section, add input fields such as creation date, recipient, reason, and more, using suitable field types like choice, text, or date. Then, click Next to continue.
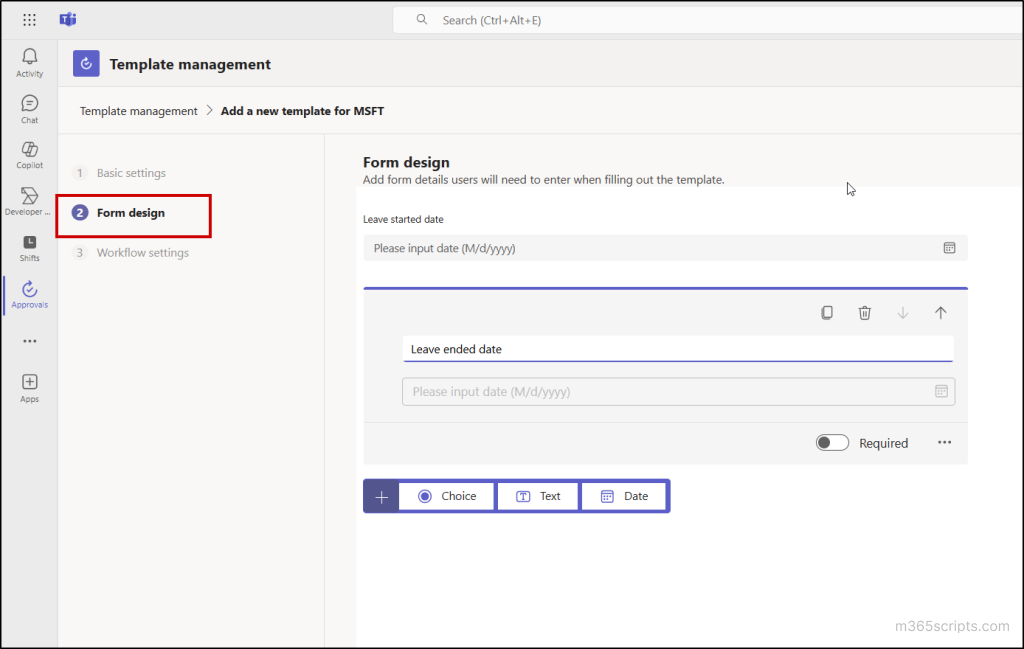
5. On the Workflow settings page, configure:
- Enable or disable file attachments.
- Choose approver options: requester-defined, specific users, or direct manager.
- Set default responses (e.g., Approve/Reject) or define custom responses.
- Switch Comments toggle on or off as required.
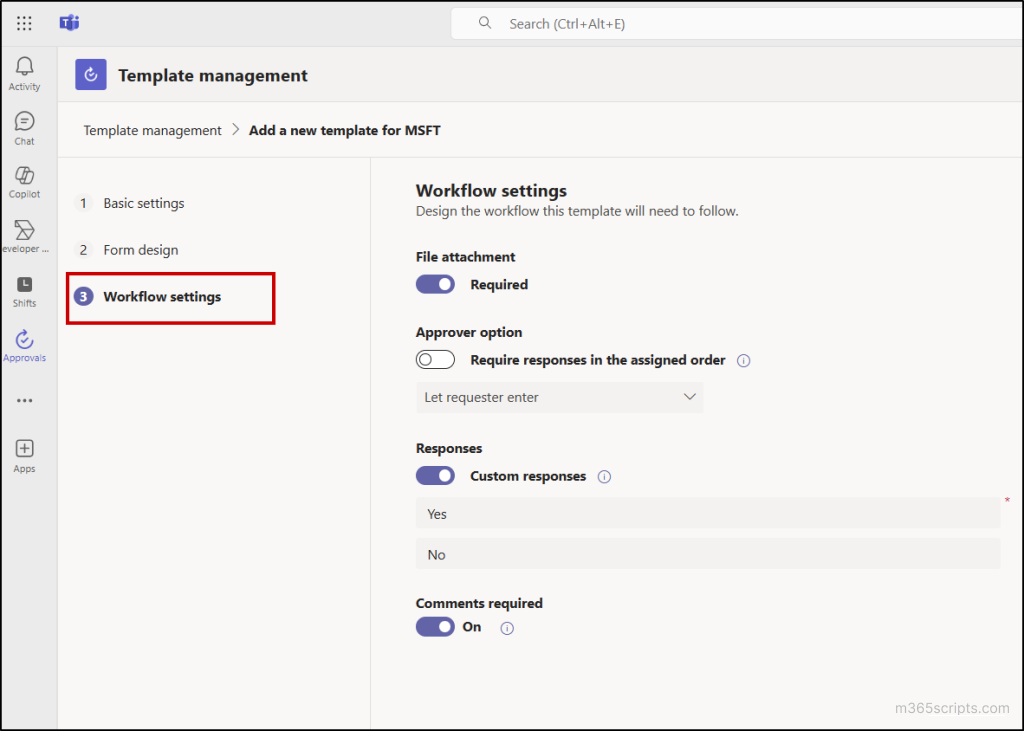
6. Select Preview to review the template, then click Publish to finish.
Note: Each team can have up to 400 templates, and each template can collect up to 50,000 approval requests, per Microsoft Forms limits.
When signatures are required on documents, there’s no need to rely on email exchanges anymore. With the Approvals app in Microsoft Teams, you can seamlessly attach files and send e-signature requests right from your desktop.
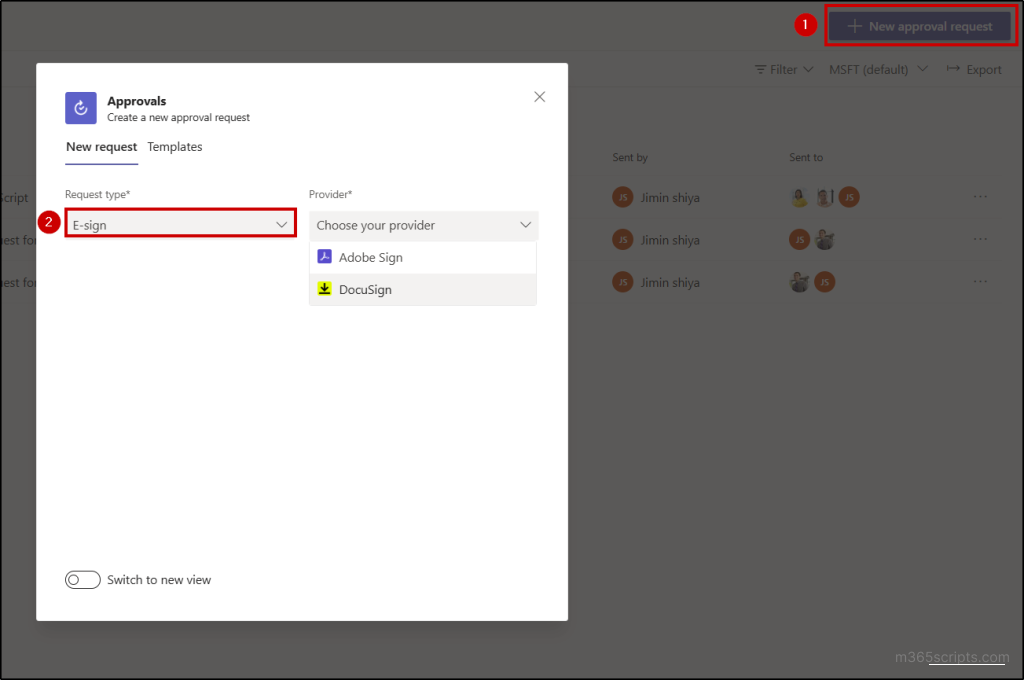
To create an e-sign request in Approvals app,
- Open Microsoft Teams and navigate to the Approvals app.
- Select New approval request, then change the Request type to E-sign.
- A dropdown menu will appear where you can choose your preferred e-signature provider, such as Adobe Sign or DocuSign.
- After selecting the provider, connect your account to create, send, and manage e-signature requests directly within the Approvals app.
Note: E-signature approvals using Adobe Sign and DocuSign are not available in Government Community Cloud (GCC) environments. However, standard approval workflows in Teams are fully supported in GCC.
As an admin, you can streamline the use of the Approvals app across your organization by configuring key settings and features in Teams.
- Use app policies to install Approvals app
- Manage e-signature providers
- Create org-wide approval templates
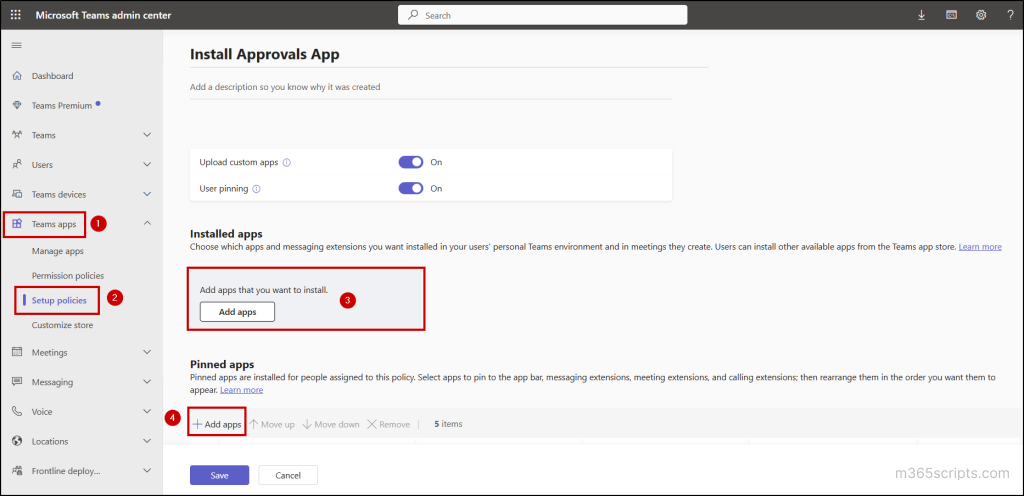
Admins can streamline access to the Approvals app by using app setup policies to auto-install in Microsoft Teams for users. This ensures the app is readily available without manual installation.
- Go to Teams admin center > Teams apps > Setup policies.
- Select Add to create a new policy.
- Provide a name and description.
- Under Installed apps, select Add apps, search for Approvals, and select Add.
- To pin the app, go to Pinned apps, select Add apps, search for Approvals, and click Add.
Optionally, enable User pinning to allow users to rearrange or pin other apps. - Finally, click Save to confirm your changes.
Note: If your organization uses app-centric management, use the Manage apps page instead. The setup policy page will show a message directing you to use app-centric management for app pre-installation.
By default, Adobe Sign and DocuSign are enabled in the Approvals app. Admins can control which providers are available to users:
- Go to Teams admin center > Teams apps > Manage apps.
- Search and select the Approvals app.
- In the Settings tab, use the toggles to enable or disable Adobe Sign and DocuSign.
- Click Submit to save your changes.
Disabling a provider prevents users from creating or viewing approvals made with it.

As an admin, you can create and manage organization-wide approval templates in Microsoft Teams. Here’s how:
- Go to Approvals > Create or manage templates > New template.
- Choose a pre-built template or start from scratch.
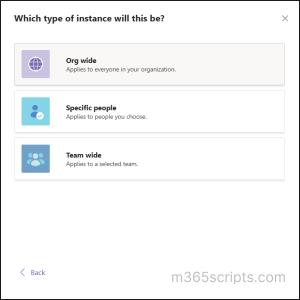
- Select the instance type:
- Org-wide – Available to everyone in the organization.
- Specific people – Available only to selected users.
- Team-wide – Applies to a specific team.
4. As mentioned in the approval template creation steps, configure the basic settings, design the form, and define the workflow options as needed.
5. Select Preview to review the template, then click Publish to complete.
- Retention Policy: Approvals data is stored in the default Microsoft Dataverse environment, which doesn’t support backups. Admins can set custom retention policies for data stored in Dataverse tables. Microsoft Forms data remains until team owners delete it manually from the Deleted forms tab.
- Conditional Access: The app supports Continuous Access Evaluation (CAE), allowing admins to apply Conditional Access policies that restrict token access to resources based on user, app, or service conditions.
- Auditing: Approvals activities like creating, viewing, approving, rejecting, reassigning, editing, and more are logged in the Microsoft Purview portal. For more detailed tracking, enable auditing in Power Automate for the Approval, Approval Request, and Approval Response entities.
- Security: If a user is part of the chat or channel where an approval was created, they are automatically assigned the viewer role. However, they cannot take any action on the approval request unless they were explicitly granted permission to manage it during creation.
The Approvals app in Microsoft Teams makes it easy to create and manage approval requests within your workflow. It streamlines decision-making and ensures consistent workflows, making large team management more efficient and organized. With auditing and security features, the app keeps your approvals secure and compliant. We hope this blog helped you understand how to use and manage Approvals in Teams.