How to Manage Named Locations Using Microsoft Entra PowerShell
Create and manage named locations in Microsoft Entra ID using PowerShell for Conditional Access policies. Define IP-based locations for trusted networks or country-based locations for geo-blocking. Configure trusted locations to allow sign-ins without MFA from corporate networks and enforce stricter controls elsewhere.
Named locations in Microsoft Entra ID plays a crucial role in defining Conditional Access policies. They allow administrators to classify network locations as trusted or untrusted based on IP ranges or geographic locations. This helps in strengthening security by restricting or granting access to specific locations.
While you can configure named locations in Microsoft Entra admin center, PowerShell provides a faster way, especially when working with large environments. In this blog, we’ll walk through how to manage named locations using the Microsoft Entra PowerShell module.
Microsoft Entra identifies where sign-ins originate by analyzing IP ranges and geographic information. This helps organizations apply precise access controls through named locations, which can be defined in two ways:
1. IP-based named location
- Define IPv4 or IPv6 address ranges (e.g., 192.168.1.0/24 or 2001:0db8::/32).
- Useful for marking your office network as trusted.
Keep in mind that Named locations using IPv4/IPv6 support up to 195 locations and 2000 IP ranges each, require CIDR masks > /8, and report the public IP for devices on private networks.
2. Country/Region-based named location
- Define locations by country, region, or even GPS coordinates.
- Useful for geo-blocking or geo-allowing sign-ins.
- By integrating with Conditional Access, named locations let you:
- Allow sign-ins without multifactor authentication from trusted networks
- Block access from specific regions
- Enforce strict location policies with CAE using IP-based locations
Let’s see how to manage named locations efficiently using PowerShell.
Before you start, connect to Microsoft Entra PowerShell module with the ‘Policy.Read.All’ and ‘Policy.ReadWrite.ConditionalAccess’ scopes. Also, ensure that you have at least the Conditional Access Administrator role assigned to manage named locations.
- Create a named location using Entra PowerShell
- Get existing named locations in Entra ID
- Update a named location in Microsoft Entra
- Remove a named location in Microsoft Entra
Using the New-EntraNamedLocationPolicy cmdlet, you can create two types of named locations in Microsoft Entra ID.
Configure Named Location Policy by IP Ranges
This approach is useful when you want to mark a network as trusted using specific IP ranges. Once you decide on the required IP ranges, you can create an IP-based named location in Microsoft Entra ID using the following command.
|
1 2 3 4 5 |
$ipRanges = New-Object -TypeName Microsoft.Open.MSGraph.Model.IpRange $ipRanges.cidrAddress = '192.168.1.0/24' New-EntraNamedLocationPolicy -OdataType '#microsoft.graph.ipNamedLocation' -DisplayName 'Office IP Range' -IsTrusted $true -IpRanges $ipRanges |
Here:
- OdataType specifies the type of location (IP range).
- DisplayName gives a friendly name for the location.
- IsTrusted $true marks the location as trusted.
- IpRanges adds the IP CIDR block.

Tip: Avoid marking company IP addresses as trusted locations unless absolutely necessary. While this allows users to bypass MFA for convenience, it can also weaken your security posture.
Configure Named location Policy by Countries
You can also create a named location based on geographic regions using country codes. To do that, execute the below cmdlet to configure a country based named location in Entra ID. Once your named locations are configured, you can create CA policies to allow or block access from specific regions.
|
1 |
New-EntraNamedLocationPolicy -OdataType '#microsoft.graph.countryNamedLocation' -DisplayName 'Granted Countries' -IsTrusted $true -CountriesAndRegions @('US', 'CA') |

In this example, ‘US’ and ‘CA’ are the country codes for the United States and Canada.
Tips:
- Test your policy enforcement using the What If API in the Maester tool. to see exactly how users and devices are impacted before enforcement.
- In addition to this, you can use tools like the Conditional Access Gap Analyzer and the Conditional Access Insights and Reporting workbook to identify any missed named locations and evaluate their impact.
Before creating or modifying named locations, it’s often useful to review what’s already configured. For example, you might want to:
- Verify which IP ranges or countries are currently marked as trusted.
- Ensure there are no overlapping or conflicting named locations before applying new policies.
- Audit existing locations for compliance or security reviews.
To retrieve all existing named locations in Microsoft Entra, run the following cmdlet:
|
1 |
Get-EntraNamedLocationPolicy |
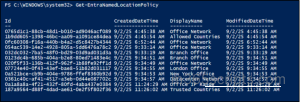
This will fetch you all the existing Entra ID named locations in the organization.
Sometimes you need to update your network settings, such as adding new office IP addresses, removing or modifying old trusted networks, or adjusting the countries from which your organization’s data can be accessed. In such cases, you can use the Set-EntraNamedLocationPolicy cmdlet to update existing named location policies, ensuring that your conditional access remain accurate and secure.
Update an IP Named Location Policy in Microsoft Entra ID
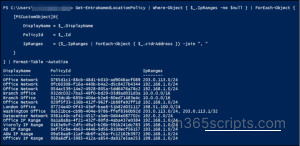
– Before updating any named location, you need to know the DisplayName and IpRanges of the named locations. To do this, run the script below, which lists all IP-based named locations along with their display name, policy ID, and IP ranges.
|
1 2 3 4 5 6 7 8 9 10 11 12 13 |
Get-EntraNamedLocationPolicy | Where-Object { $_.IpRanges -ne $null } | ForEach-Object { [PSCustomObject]@{ DisplayName = $_.DisplayName PolicyId = $_.Id IpRanges = ($_.IpRanges | ForEach-Object { $_.cidrAddress }) -join ", " } } | Format-Table -AutoSize |
– Now, run the following script, replacing the DisplayName and IpRange with the values for the named location you want to update.
|
1 2 3 4 5 6 7 8 9 10 11 |
$policy = Get-EntraNamedLocationPolicy | Where-Object { $_.DisplayName -eq 'Office Network' } $policyId = [string]$policy.Id $ipRange = New-Object -TypeName Microsoft.Open.MSGraph.Model.IpRange $ipRange.cidrAddress = '190.178.1.0/24' $type = '#microsoft.graph.ipNamedLocation' Set-EntraNamedLocationPolicy -PolicyId $policyId -OdataType $type -IsTrusted $false -IncludeUnknownCountriesAndRegions $false -IpRanges $ipRange |
The above example updates the ‘Office Network’ named location to mark it as ‘not trusted’. Any conditional access policy referencing this location will now use the updated IP range and trust status.
Update a Country Named Location Policy in Microsoft Entra ID
For policies that are based on countries rather than specific IPs, you may need to include or exclude unknown countries. This cmdlet retrieves the country-based named location and updates its inclusion rules.
|
1 2 3 4 5 6 7 |
Get-EntraNamedLocationPolicy | Where-Object { $_.IpRanges -eq $null } | Format-List DisplayName, Id Here, replace the PolicyId of the desired named location policy. $type = '#microsoft.graph.countryNamedLocation' Set-EntraNamedLocationPolicy -PolicyId $policy.Id -OdataType $type -IncludeUnknownCountriesAndRegions $true |
The country-based named location policy, “Allowed Country”, has been updated to include unknown countries if needed. This makes sure your Conditional Access policies also cover sign-ins from countries that are not explicitly defined.
Update the Display Name of a Named Location Policy in Microsoft Entra ID
Sometimes, you may want to rename a named location for clarity or better organization. This step shows how to update the display name of an existing named location policy.
|
1 2 3 |
$policy = Get-EntraNamedLocationPolicy | Where-Object { $_.DisplayName -eq 'MaryLand' } | Select-Object -First 1 Set-EntraNamedLocationPolicy -PolicyId $policy.Id -OdataType '#microsoft.graph.ipNamedLocation' -DisplayName 'Prichett' |
In this example, the named location originally named ‘MaryLand’ is now updated to ‘Prichett’.
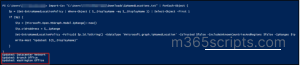
To delete a named location, use the Remove-EntraNamedLocationPolicy cmdlet and pass the id of the named location policy.
|
1 |
Remove-EntraNamedLocationPolicy -PolicyId <NamedLocationId> |
The –PolicyId parameter specifies the unique identifier (GUID) of the named location that you want to delete.
Note: Since trusted locations are used to bypass security checks like MFA for trusted networks, you must first set their trusted property to False before deleting them. This helps prevent broken access scenarios or gaps in your policies.
Large enterprises often operate across multiple countries, each with its own set of trusted networks. When onboarding new offices or branch locations, manually creating each named location in Entra is time-consuming and prone to errors. This is where bulk creation through Entra PowerShell becomes invaluable. By maintaining a structured list of all your network ranges, you can automate the creation of named locations in one run.
- Create Entra ID named locations in bulk
- Bulk update IP-based named locations
- Bulk update country named locations
- Bulk update display name of named location policy
- Bulk removal of named locations in Entra ID
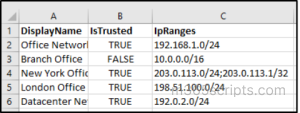
To create IP-based named locations in bulk, create a CSV file with three columns: DisplayName for the location name, IsTrusted to indicate whether the location is trusted (True or False), and IpRanges for the IP address ranges.
Please replace <FileName> with the actual input file path location.
|
1 2 3 4 5 6 7 8 9 10 11 12 13 14 15 16 17 18 19 |
Import-Csv -Path "<FileName>.csv" | ForEach-Object { # Split IP ranges if multiple $ipList = $_.IpRanges -split ';' # Create a strongly typed list of IpRange objects $ipRangesList = [System.Collections.Generic.List[Microsoft.Open.MSGraph.Model.IpRange]]::new() foreach ($ip in $ipList) { $ipRange = New-Object -TypeName Microsoft.Open.MSGraph.Model.IpRange $ipRange.cidrAddress = $ip.Trim() $ipRangesList.Add($ipRange) } # Create Named Location New-EntraNamedLocationPolicy ` -OdataType '#microsoft.graph.ipNamedLocation' ` -DisplayName $_.DisplayName ` -IsTrusted ([System.Convert]::ToBoolean($_.IsTrusted)) ` -IpRanges $ipRangesList } |
Input CSV:
When cloud services change their IP addresses, you can adjust multiple trusted locations in one go, preventing access issues and reducing admin workload.
|
1 2 3 4 5 6 7 8 9 10 11 12 13 14 15 16 17 |
Import-Csv -Path "<FileName>.csv" | ForEach-Object { $namedLocationPolicy = (Get-EntraNamedLocationPolicy | Where-Object { $_.DisplayName -eq $_.DisplayName }) | Select-Object -First 1 if ($namedLocationPolicy) { $ip = [Microsoft.Open.MSGraph.Model.IpRange]::new() $ip.cidrAddress = $_.IpRange Set-EntraNamedLocationPolicy -PolicyId $namedLocationPolicy.Id.ToString() -OdataType '#microsoft.graph.ipNamedLocation' -IsTrusted $false -IncludeUnknownCountriesAndRegions $false -IpRanges $ip Write-Host "Updated: $($_.DisplayName)" } } |
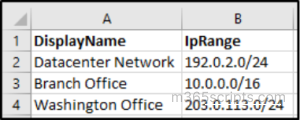
Input CSV:
Executing this script will update the named locations from the CSV file with new IP ranges and configure them as not trusted.
Note: Running this script will generate a confirmation message for every policy update.
To comply with regulatory requirements or organizational policies, you might need to include unknown countries in your country-based named locations. A bulk update makes this easier, ensuring all affected policies are updated consistently and reflect the latest requirements.
Use the following script to update country-based named locations in bulk.
|
1 2 3 4 5 6 7 8 9 10 11 12 13 14 15 16 17 |
Import-Csv -Path "<FileName>.csv" | ForEach-Object { $namedLocationPolicy = (Get-EntraNamedLocationPolicy | Where-Object { $_.DisplayName -eq $_.DisplayName }) | Select-Object -First 1 if ($namedLocationPolicy) { $ip = [Microsoft.Open.MSGraph.Model.IpRange]::new() $ip.cidrAddress = $_.IpRange Set-EntraNamedLocationPolicy -PolicyId $namedLocationPolicy.Id.ToString() -OdataType '#microsoft.graph.ipNamedLocation' -IsTrusted $false -IncludeUnknownCountriesAndRegions $false -IpRanges $ip Write-Host "Updated: $($_.DisplayName)" } } |
Input CSV:
All country-based named locations in the CSV are updated to include unknown countries. This ensures your conditional access policies reflect the latest country rules consistently.
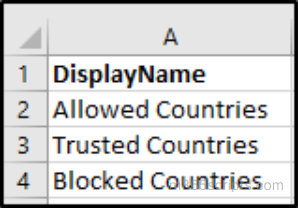
s organizations grow and evolve, you might end up with multiple named location policies that have the same display names. This can create clutter, make reporting confusing, or lead to mistakes when applying Conditional Access policies.
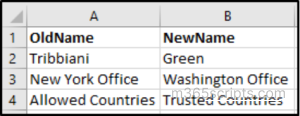
Instead of manually renaming each policy, you can use a PowerShell script that reads a CSV containing the old and new display names and updates the policies automatically. This approach saves time and helps keep your named locations organized and easy to manage.
|
1 2 3 4 5 6 7 |
Import-Csv -Path "<FileName>.csv" | ForEach-Object { $namedLocationPolicy = Get-EntraNamedLocationPolicy | Where-Object { $_.DisplayName -eq $_.OldName } | Select-Object -First 1 if ($namedLocationPolicy) { Set-EntraNamedLocationPolicy -PolicyId $namedLocationPolicy.Id -OdataType '#microsoft.graph.ipNamedLocation' -DisplayName $_.NewName } } |
Input CSV:
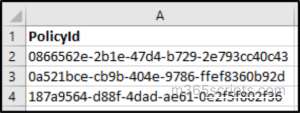
If some named locations are no longer part of your organization, you can remove them in bulk. To do this, run the following script with input CSV file containing policy IDs and delete the corresponding named locations, keeping your environment clean and up to date.
|
1 |
Import-Csv -Path "<FileName>.csv" | ForEach-Object { Remove-EntraNamedLocationPolicy -PolicyId $_.PolicyId } |
Input CSV:
Named locations may seem like a small part of Microsoft Entra ID, but they play a crucial role in securing access to your organization and keeping your Conditional Access policies effective. With Entra PowerShell, you don’t just save time, you gain more control, especially when working at scale. Feel free to reach us through the comments section if you have any queries.