
Manage Admin Roles Using Microsoft Graph PowerShell
Assign and manage Microsoft 365 admin roles using Microsoft Graph PowerShell for efficient bulk operations. List users with specific roles, grant or revoke administrator privileges, and perform bulk role assignments via CSV import. Replace deprecated Azure AD and MSOnline cmdlets with modern Graph PowerShell commands for scalable role management.
Managing admin roles efficiently is a critical responsibility for IT administrators in any Microsoft 365 environment. As organizations scale, administrators frequently need to adjust or remove elevated roles as users transition between projects or responsibilities. While you can assign admin roles in the Microsoft 365 admin center, PowerShell provides greater flexibility and automation to perform bulk operations.
With the deprecation of Azure AD and MS Online modules, it’s time to switch to the modern solution, the Microsoft Graph PowerShell module. In this guide, let’s walk through how you can assign and manage admin role assignments using Microsoft Graph PowerShell.
Before you begin with admin role assignments in Microsoft 365, you ensure to have one of the following roles:
- Global Administrator
- Privileged Role Administrator
- Cloud Application Administrator
- Microsoft Entra DC Administrator
Once you meet the above requirement, you can manage the following tasks using Graph PowerShell:
- Get admin roles assigned to a user
- Find all users with admin roles
- List all users with specific admin role
- Assign an admin role to user
- Remove admin role from a user
- Bulk assign an admin role to users
- Bulk assign different admin roles to users
- Bulk removal of an admin role from users
- Bulk remove multiple admin roles from users
Firstly, connect to the Microsoft Graph PowerShell module with scope “RoleManagement.ReadWrite.Directory” assigned.
|
1 |
Connect-MgGraph -Scopes "RoleManagement.ReadWrite.Directory" |
To identify which administrator roles are assigned to a specific user, you can use the following Microsoft Graph PowerShell command. Replace <userUPN> with the user’s actual User Principal Name.
|
1 2 3 4 5 6 7 8 9 10 11 |
$userId = (Get-MgUser -UserId "<userUPN>").Id Get-MgDirectoryRole | ForEach-Object { if ((Get-MgDirectoryRoleMember -DirectoryRoleId $_.Id).Id -contains $userId) { $_ | Select-Object DisplayName, Id } } |
This command checks all the directory roles the user belongs to and returns only the admin roles assigned to them.

As part of periodic access reviews, security and compliance teams often need a complete list of all users who hold administrative roles in Microsoft 365. The following script exports each role along with the users assigned to it.
|
1 2 3 4 5 6 7 8 9 10 11 12 13 14 15 16 17 18 19 20 21 22 23 24 25 26 27 |
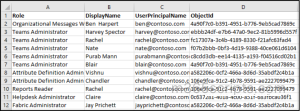
Get-MgDirectoryRole | ForEach-Object { $roleName = $_.DisplayName Get-MgDirectoryRoleMember -DirectoryRoleId $_.Id | ForEach-Object { $user = Get-MgUser -UserId $_.Id -ErrorAction SilentlyContinue if ($user) { [PSCustomObject]@{ Role = $roleName DisplayName = $user.DisplayName UserPrincipalName = $user.UserPrincipalName ObjectId = $user.Id }}} } | Export-Csv "<File Path>\AdminRoleAssignment.csv" -NoTypeInformation |
Replace the file path to where you want the CSV to be exported.
The export output file will look like the following:
Tip: You can also use the PowerShell script to get Microsoft 365 admin role reports. It supports modern authentication and is useful for identifying all admins, checking role mappings, and exporting data for audits.
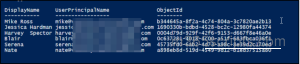
You can retrieve all users who are currently assigned to a specific admin role using Microsoft Graph PowerShell. This scenario is particularly valuable for compliance checks, audit reporting, and documenting privileged access across your Microsoft 365 tenant. Simply specify the role name and run the following command set.
|
1 2 3 4 5 6 7 8 9 10 11 12 13 14 15 16 17 18 19 20 21 22 23 24 25 26 27 |
$roleName = "<role name>" Get-MgDirectoryRole | Where-Object { $_.DisplayName -eq $roleName } | ForEach-Object { Get-MgDirectoryRoleMember -DirectoryRoleId $_.Id | ForEach-Object { $user = Get-MgUser -UserId $_.Id -ErrorAction SilentlyContinue if ($user) { [PSCustomObject]@{ DisplayName = $user.DisplayName UserPrincipalName = $user.UserPrincipalName ObjectId = $user.Id }} }} |
Replace <role name> with the actual role you want to query. For example, if you set $roleName=”Global Administrator”, the script will return all users who currently hold the Global Administrator role in your tenant.
When delegating permissions in Microsoft 365, always implement the principle of least privilege: assign users only the permissions they need to perform their job. Microsoft provides granular admin roles, such as Exchange Administrator, Teams Administrator, Security Reader, and more. Avoid assigning Global Administrator unnecessarily.
Before assigning a role, it’s a best practice to list all available directory roles in your tenant.
|
1 |
Get-MgRoleManagementDirectoryRoleDefinition | Select DisplayName, Id |
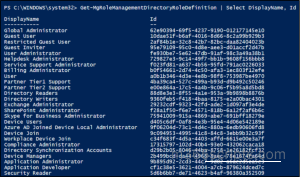
This helps you confirm the exact role name you want to assign.
Once you’ve identified the role from the list, run the script below to assign an admin role to a specific user in Microsoft 365.
|
1 2 3 4 5 6 7 8 9 10 11 12 13 14 15 16 17 18 19 20 21 22 23 24 25 |
$userUPN="<user UPN>" $roleName="<role name>" $role = Get-MgDirectoryRole | Where-Object {$_.displayName -eq $roleName} if ($role -eq $null) { $roleTemplate = (Get-MgDirectoryRoleTemplate | Where-Object {$_.displayName -eq $roleName}).id New-MgDirectoryRole -DisplayName $roleName -RoleTemplateId $roleTemplate $role = Get-MgDirectoryRole | Where-Object {$_.displayName -eq $roleName} } $userId = (Get-MgUser -Filter "userPrincipalName eq '$userUPN'").Id $newRoleMember =@{ "@odata.id"= "https://graph.microsoft.com/v1.0/users/$userId" } New-MgDirectoryRoleMemberByRef -DirectoryRoleId $role.Id -BodyParameter $newRoleMember |
Don’t forget to replace the <user UPN> and <role name> you want to assign.
This method is also suitable to assign Microsoft Entra roles in PIM. If you have implemented just-in-time access using PIM, make sure to audit PIM role activations to track temporary admin access elevation and ensure accountability.
Note: For better scalability and simpler management of multiple administrators for a single role, Microsoft recommends assigning roles to role-assignable groups in Entra ID rather than directly to individual users.
Within your access lifecycle management process, certain users will eventually outgrow their elevated roles. The following script helps you remove the appropriate admin role from that user.
|
1 2 3 4 5 6 7 8 9 |
$roleName = "<role name>" $userUPN = "<user UPN>" $roleId = (Get-MgDirectoryRole | Where-Object DisplayName -eq $roleName).Id $userId = (Get-MgUser -UserId $userUPN).Id Remove-MgDirectoryRoleMemberByRef -DirectoryRoleId $roleId -DirectoryObjectId $userId |
Replace <role name> and <user UPN> with the appropriate role and user you want to remove.
Managing administrative roles one by one can be tedious, especially in medium to large organizations. When multiple users need the same elevated access, such as during onboarding, a bulk assignment script can save significant time and reduce errors.
Create a simple CSV containing UserPrincipalName column listing the users who should receive the role.
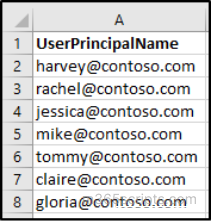
The script below automates assigning a specific Microsoft 365 administrator role to a list of users provided in a CSV file.
|
1 2 3 4 5 6 7 8 9 10 11 12 13 14 15 16 17 18 19 20 21 |
$RoleName = "Exchange Administrator" # Role to assign $CsvPath = "C:\Users.csv" # Path to CSV file # Get Role ID $roleId = (Get-MgRoleManagementDirectoryRoleDefinition | Where-Object DisplayName -eq $RoleName).Id if (-not $roleId) { Write-Host "Role '$RoleName' not found." -ForegroundColor Red; exit } # Import users $users = Import-Csv $CsvPath foreach ($u in $users) { $userId = (Get-MgUser -UserId $u.UserPrincipalName).Id $params = @{ "@odata.type" = "#microsoft.graph.unifiedRoleAssignment" roleDefinitionId = $roleId principalId = $userId directoryScopeId = "/" } New-MgRoleManagementDirectoryRoleAssignment -BodyParameter $params Write-Host "✅ Assigned '$RoleName' to $($u.UserPrincipalName)" -ForegroundColor Cyan } |
Replace $RoleName with the administrator role you want to assign, and $CsvPath with the path to your CSV file containing users.
As we know, users require different administrative roles based on their responsibilities. Manually assigning these roles one by one can be slow and error prone. With this CSV-driven bulk assignment approach, you can quickly assign multiple roles to multiple users.
Create a CSV file that lists users and the admin roles need to be assigned. The file should have two columns: UserPrincipalName and RoleName.
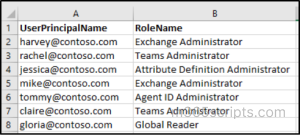
Update $CsvPath to point to the full location of your CSV file that lists users and their roles.
|
1 2 3 4 5 6 7 8 9 10 11 12 13 14 15 16 17 18 19 20 21 22 23 24 25 |
$CsvPath = "<FilePath>.csv" # Path to CSV file Import-Module Microsoft.Graph.Identity.Governance Connect-MgGraph -Scopes "RoleManagement.ReadWrite.Directory" # Import users and roles $entries = Import-Csv $CsvPath foreach ($entry in $entries) { $roleId = (Get-MgRoleManagementDirectoryRoleDefinition | Where-Object DisplayName -eq $entry.RoleName).Id if (-not $roleId) { Write-Host "❌ Role '$($entry.RoleName)' not found for $($entry.UserPrincipalName)" -ForegroundColor Red continue } $userId = (Get-MgUser -UserId $entry.UserPrincipalName).Id $params = @{ "@odata.type" = "#microsoft.graph.unifiedRoleAssignment" roleDefinitionId = $roleId principalId = $userId directoryScopeId = "/" } New-MgRoleManagementDirectoryRoleAssignment -BodyParameter $params Write-Host "✅ Assigned '$($entry.RoleName)' to $($entry.UserPrincipalName)" -ForegroundColor Cyan } |
This method ensures that users receive the correct roles quickly and consistently, reducing manual errors and saving administrative time.
In Microsoft 365 environments, it’s just as important to remove unnecessary administrative privileges as it is to assign them. Whether for user offboarding, role changes, or periodic audits, cleaning up admin roles in bulk ensures security and reduces the risk of over-privileged accounts.
First, create a CSV file containing the list of users you want to remove the role from. The CSV should have a column named UserPrincipalName with each user’s email.
Specify $RoleName with the administrator role you want to remove, and $CsvPath with the full path to your CSV file containing users.
|
1 2 3 4 5 6 7 8 9 10 11 12 13 14 15 16 17 18 19 20 21 22 |
$RoleName = "<RoleName>" # Role to remove $CsvPath = "<FilePath>.csv" # Path to CSV file # Get Role ID $roleId = (Get-MgRoleManagementDirectoryRoleDefinition | Where-Object DisplayName -eq $RoleName).Id if (-not $roleId) { Write-Host "Role '$RoleName' not found." -ForegroundColor Red; exit } # Import users $users = Import-Csv $CsvPath foreach ($u in $users) { $userId = (Get-MgUser -UserId $u.UserPrincipalName).Id $assignment = Get-MgRoleManagementDirectoryRoleAssignment ` | Where-Object { $_.PrincipalId -eq $userId -and $_.RoleDefinitionId -eq $roleId } if ($assignment) { Remove-MgRoleManagementDirectoryRoleAssignment -UnifiedRoleAssignmentId $assignment.Id Write-Host "✅ Removed '$RoleName' from $($u.UserPrincipalName)" -ForegroundColor Cyan } else { Write-Host "ℹ️ No '$RoleName' found for $($u.UserPrincipalName)" -ForegroundColor Yellow } } |
This script automates the removal of a specific admin role from multiple users at once, saving time and reducing manual errors.
When managing hundreds or thousands of accounts, privilege cleanup can’t be manual. This automated method is ideal during major reorganizations, mergers, or admin role realignments where many users need their elevated access removed simultaneously.
Create a CSV file that includes two columns: UserPrincipalName and RoleName. Each row should specify which role needs to be removed from which user.
Replace $CsvPath with the full path to your CSV file containing the users and roles.
|
1 2 3 4 5 6 7 8 9 10 11 12 13 14 15 16 17 18 19 20 21 22 23 24 25 |
$CsvPath = "C:\UsersRoles.csv" # Path to CSV file # Import users and roles $entries = Import-Csv $CsvPath foreach ($entry in $entries) { $roleId = (Get-MgRoleManagementDirectoryRoleDefinition | Where-Object DisplayName -eq $entry.RoleName).Id if (-not $roleId) { Write-Host "❌ Role '$($entry.RoleName)' not found for $($entry.UserPrincipalName)" -ForegroundColor Red continue } $userId = (Get-MgUser -UserId $entry.UserPrincipalName).Id # Find existing assignment $assignment = Get-MgRoleManagementDirectoryRoleAssignment ` | Where-Object { $_.PrincipalId -eq $userId -and $_.RoleDefinitionId -eq $roleId } if ($assignment) { Remove-MgRoleManagementDirectoryRoleAssignment -UnifiedRoleAssignmentId $assignment.Id Write-Host "✅ Removed '$($entry.RoleName)' from $($entry.UserPrincipalName)" -ForegroundColor Cyan } else { Write-Host "ℹ️ No '$($entry.RoleName)' assignment found for $($entry.UserPrincipalName)" -ForegroundColor Yellow } } |
This automated cleanup ensures that users only retain the access they truly need, helping maintain a secure, least-privilege environment.
Best Practices for Assigning Microsoft 365 Roles to Users
Follow these practices to keep your Microsoft 365 environment secure and well-managed:
- Limit Global Administrator assignments to a maximum of two users to reduce high-risk access.
- Use Entra ID access reviews to ensure whether users still need their admin roles.
- Enable MFA for admin accounts with strong verification methods in Microsoft 365.
- Keep a dedicated break glass account for emergency use.
- Regularly audit admin access to ensure only the right people have elevated permissions, securing admin accounts.
I hope this blog helps you gain an understanding on how to manage admin roles using Microsoft Graph PowerShell. Feel free to reach us through the comments section if you have any questions.


