Manage Users Using Microsoft Entra PowerShell
Manage Microsoft 365 users with the Entra PowerShell module as a simplified migration path from deprecated Azure AD cmdlets. Create users, assign licenses and roles, manage group memberships, reset passwords, and track sign-in activity with Graph PowerShell SDK compatible commands.
As Microsoft phases out the Azure AD and MSOnline PowerShell modules, migrating to MS Graph PowerShell can feel overwhelming. To ease this shift, Microsoft introduced the Microsoft Entra PowerShell module. The new module not only simplifies script migration but also enhances Microsoft 365 user management across your organization. You can perform common tasks like creating or deleting users, retrieving sign-in activities, and managing user roles, all without needing additional calls or complex queries. Let’s explore how you can effectively manage users using Microsoft Entra PowerShell.
Before you begin managing users with Microsoft Entra PowerShell, make sure you meet the following prerequisites:
- Microsoft Entra User Account: If you don’t have one, create a free account.
- Required Roles: You must have the User Administrator or Group Administrator role.
- Installed PowerShell Module: Ensure that the Microsoft Entra PowerShell module is installed.
Once you meet all of the requirements, connect to the Microsoft Entra PowerShell module with the following scopes.
-Scopes ‘User.ReadWrite.All’, ‘AuditLog.Read.All’, ‘User.Read.All’, ‘ProfilePhoto.Read.All’, ‘RoleManagement.ReadWrite.Directory’, ‘Organization.Read.All’, ‘Directory.AccessAsUser.All’
Here are some of the most common user management tasks you can accomplish with Microsoft Entra PowerShell:
- Create a new user
- Add users in bulk
- Get all Microsoft 365 users
- Assign a manager to a user
- Get a user’s manager
- Find the list of users reporting to a manager
- Add a user to a group
- Add bulk users to a group
- List a user’s group memberships
- Grant administrative role to a user
- Upload a user’s profile picture
- Track a user’s sign-in activity
- Assign a license to a user
- Reset a user’s password
- Disable a user in Microsoft 365
- Remove a user from Microsoft 365
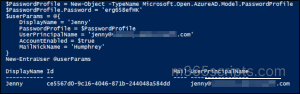
To create a new user in the Microsoft Entra PowerShell module, you can use the UserPrincipalName parameter.
|
1 2 3 4 5 6 7 8 9 10 11 12 13 14 15 16 17 18 19 |
$PasswordProfile = New-Object -TypeName Microsoft.Open.AzureAD.Model.PasswordProfile $PasswordProfile.Password = 'User@123' $userParams = @{ DisplayName = 'Jenny' PasswordProfile = $PasswordProfile UserPrincipalName = '[email protected]' AccountEnabled = $true MailNickName = 'NewUser' } New-EntraUser @userParams |
After running this cmdlet, a new user ‘Jenny’ with the specified details will be successfully created in your Microsoft Entra environment.
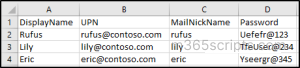
To create bulk users with the Microsoft Entra PowerShell module, start by preparing a CSV file. This file should include the following headers: DisplayName, UPN, MailNickName, and Password.
After creating a CSV file, run the following script by including the file path in <file location>.
|
1 2 3 4 5 |
Import-Csv <FileLocation> | Foreach { $PasswordProfile = New-Object -TypeName Microsoft.Open.AzureAD.Model.PasswordProfile $PasswordProfile.Password = $_.Password New-EntraUser -DisplayName $_.DisplayName -AccountEnabled $true -UserPrincipalName $_.UPN -PasswordProfile $PasswordProfile -MailNickname $_.MailNickName } |
Once this script is executed, users from the CSV file will be created in bulk, streamlining the process of adding multiple accounts efficiently.
To retrieve all Microsoft 365 users in the organization, you can use the ‘Get-EntraUser cmdlet‘.
|
1 |
Get-EntraUser -All |
Running this command will display all Entra users in your organization, simplifying user administration.
Use the following code to assign a manager to a user in Microsoft Entra ID.
|
1 |
$manager = Get-EntraUser -Filter "UserPrincipalName eq '[email protected]'" $params = @{ ObjectId = '[email protected]' RefObjectId = $manager.ObjectId } Set-EntraUserManager @params |
Here, ObjectId refers to the user, and RefObjectId refers to the manager.
This script assigns ‘[email protected]’ as the manager of ‘[email protected]’.
You can use the ‘Get-EntraUserManager‘ cmdlet to get the manager of a specific user in Microsoft 365.
|
1 |
Get-EntraUserManager -ObjectId '[email protected]' |
This will return the manager details of the user ‘Blair’.
To get the list of users reporting directly to a specific manager, use the ‘Get-EntraUserDirectReport‘ cmdlet.
|
1 |
Get-EntraUserDirectReport -ObjectId '[email protected]' |
This command will display the list of users who report directly to ‘Serena’.
To add a user to a group in Microsoft 365, first obtain the user ID and group’s object ID by running the Get-EntraUser and Get-EntraGroup cmdlets. Use the following cmdlet to add users to the Microsoft group.
|
1 |
Add-EntraGroupMember -ObjectId <GroupID> -RefObjectId <UserID> |
Make sure to replace <GroupID> and <UserID> with the actual values.
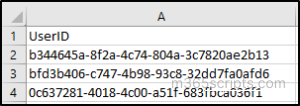
To bulk add users to a group in Microsoft 365 with PowerShell, create a CSV file containing the users’ IDs, then run the provided cmdlet to complete the process.
|
1 |
Import-csv <FileLocation> | foreach {Add-EntraGroupMember -ObjectId <GroupID> -RefObjectId $_.UserID} |
Replace <GroupID> with the real Group ID of the group to which you want to add users.
To list the groups a user is a member of, the Get-EntraUserMembership cmdlet can be used.
|
1 |
Get-EntraUserMembership -ObjectId '[email protected]' |
The result will provide the list of group IDs (GUIDs) representing the groups the user ‘Blair’ belongs to.
Admins can also assign any administrative role to a user using Microsoft Entra PowerShell. To grant the admin roles for Microsoft 365 users, execute the below.
|
1 2 3 4 5 6 7 8 9 |
$directoryRole = Get-EntraDirectoryRole -Filter "DisplayName eq 'User Administrator'" $user = Get-EntraUser -Filter "UserPrincipalName eq '[email protected]'" $roleMemberParams = @{ ObjectId = $directoryRole.ObjectId RefObjectId = $user.ObjectId } Add-EntraDirectoryRoleMember @roleMemberParams |
Here, $directoryRole.ObjectId is the ID of the role and $user.ObjectId is the ID of the user. This script adds ‘[email protected]’ to the “User Administrator” role.
To upload a thumbnail photo for a user in Microsoft 365, use the following PowerShell command.
|
1 2 3 4 5 6 7 8 9 |
$photoParams = @{ ObjectId = '[email protected]' FilePath = 'D:\UserProfilePhoto.jpg' } Set-EntraUserThumbnailPhoto @photoParams |
This command assigns the specified image file to the user’s profile, using the ObjectId to identify the user and the FilePath to locate the photo.
To access a user’s last sign-in time, use the following PowerShell command.
|
1 |
Get-EntraUser -ObjectId '[email protected]' -Property 'SignInActivity' | Select-Object -ExpandProperty 'SignInActivity' |
The above will retrieve the last sign-in details for [email protected].
To export the overall sign-in history of users in your organization, use the PowerShell script for generating Microsoft 365 user’s sign-in report.

You can also schedule a daily user sign-in summary email to automatically track login activities, failed attempts, and suspicious sign-ins.
License management with Microsoft Entra PowerShell allows administrators to assign, update, or remove licenses with precision. You can use the ‘Set-EntraUserLicense‘ cmdlet to apply the license to the specified user efficiently.
|
1 2 3 4 5 6 7 8 9 10 11 12 13 14 15 16 17 |
$UserName= '[email protected]' $LicenseToBeAssigned= 'FLOW_FREE' $User = Get-EntraUser -ObjectId $UserName $SkuId = (Get-EntraSubscribedSku | Where-Object { $_.SkuPartNumber -eq $LicenseToBeAssigned }).SkuId $License = New-Object -TypeName Microsoft.Open.AzureAD.Model.AssignedLicense $License.SkuId = $SkuId $Licenses = New-Object -TypeName Microsoft.Open.AzureAD.Model.AssignedLicenses $Licenses.AddLicenses = $License Set-EntraUserLicense -ObjectId $User.ObjectId -AssignedLicenses $Licenses |
This example demonstrates how to assign a FLOW_FREE license to the user with the ObjectId ‘harvey@contoso.com’.
Note: To assign licenses to Microsoft 365 users, you must have previously designated a usage location for them.
You can verify the license assignment of a user in Microsoft 365 using,
|
1 |
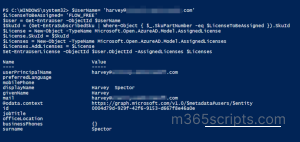
Get-EntraUserLicenseDetail -ObjectId '[email protected]' |
The output will provide information about the licenses that are currently assigned to the user, including both the unique IDs and identifiers associated with each license.
In cases of suspicious account activity, reset the user’s password using Entra PowerShell to quickly secure their access. Here’s a simple way to manage user passwords using PowerShell.
|
1 2 3 |
$securePassword = ConvertTo-SecureString 'Microsoft@365' -AsPlainText –Force Set-EntraUserPassword -ObjectId '[email protected]' -Password $securePassword |
The script securely encodes a new password and assigns it to [email protected].
To prevent a user from accessing company resources, you can disable their account with PowerShell.
|
1 |
Set-EntraUser -ObjectId [email protected]' -AccountEnabled $false |
Disabling the account with Set-EntraUser ensures that [email protected] is immediately barred from logging into company systems, accessing applications, or retrieving data. This action is crucial for maintaining security and managing user access.
To enable a user in Microsoft 365, you can execute the below.
|
1 |
Set-EntraUser -ObjectId [email protected] -AccountEnabled $true |
To delete a user from Microsoft Entra ID, you can utilize the ‘Remove-EntraUser’ cmdlet.
|
1 |
Remove-EntraUser -ObjectId '[email protected]' |
Running this command will remove the user ‘Blair’ from Microsoft 365 via Microsoft Entra PowerShell.
If you want to restore a deleted user in Microsoft 365, it is also possible with the Entra PowerShell cmdlet Restore-EntraDeletedDirectoryObject.
Tip: For safe offboarding and to prevent data loss, automate Microsoft 365 user offboarding using PowerShell rather than simply deleting the account.
I hope this blog helped you discover major user operations using Microsoft Entra PowerShell. Feel free to reach us through the comments section for any queries.