Difference Between Share and Copy Link in SharePoint Online
Understand the critical differences between Share and Copy link in SharePoint Online to prevent accidental oversharing. The Share feature sends formal invitations with immediate permissions and traceability, while Copy link generates shareable URLs with broader access options. Choose the appropriate method based on security requirements and collaboration needs.
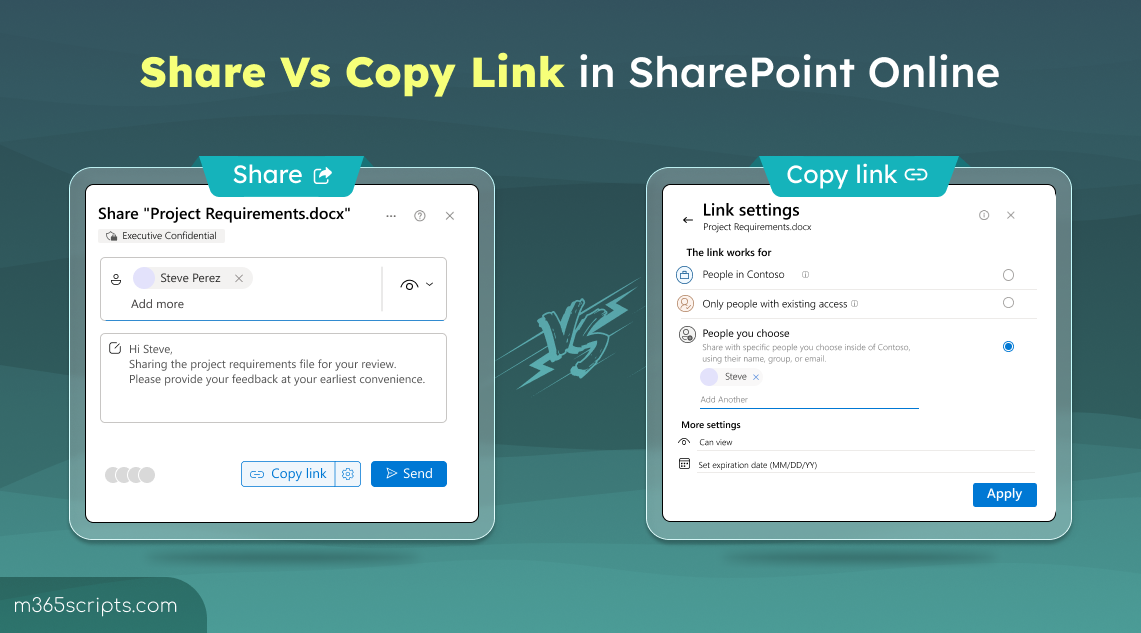
One of the most common confusions in SharePoint Online is that you have both the Share button and the Copy link option to share files or folders. Since both actions result in a shareable link, many users mistakenly believe they work the same way. The truth is, while both “Share” and “Copy” link can technically generate an identical link, they represent two fundamentally different methods of granting and managing that access. Confusing these two functions is a frequent cause of accidental over-sharing or compliance headaches.
This blog will explain the difference between share and copy link, so you can choose the right method every time for secure, controlled, and effective collaboration.
The SharePoint “Share” button is the most direct and controlled way of granting access to a file or folder. When you use this feature, it isn’t just creating a link; it explicitly sends a personalized invitation to specific individuals or groups with a direct link to the content. This process is crucial as it lets the sender instantly set exact SharePoint permission levels, whether the recipient can view or edit, at the time of sharing. Since the access is granted immediately and tied directly to their user account, the “Share” feature offers the highest level of security and traceability.
The “Share” button is the best choice when you need:
- Formal Notification: To formally alert and notify specific users via an email invitation that a document needs their attention. For example, it could be a final report awaiting sign-off or a draft document requiring review.
- Guaranteed Permissions: To immediately ensure a user has the necessary access level (view or edit) without relying on existing group permissions or a link type.
- Accountable Tracing: To establish a clear, traceable record of exactly who was explicitly invited to access a sensitive document.
When you need to securely collaborate with specific people, the “Share” option ensures precise control. Follow these steps to send a controlled, personalized access invitation:
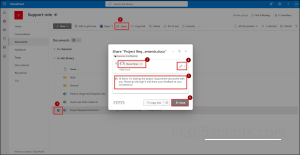
- Go to the document library on your SharePoint site and select the file or folder you wish to share by clicking the circle icon next to its name.
- You can click the Share button either at the top of the page or directly beside the specific file or folder you want to share.
- In the “Name, group or email” field, begin typing the email addresses or contact names of the people you want to share with.
- To the right of the recipient field, use the pencil icon dropdown to explicitly specify the permission level. Choose from options like Can edit, Can view, Can review or Can’t download.
- Add a personalized message in the text box below the recipients, if desired.
- Click Send. This action grants the access and immediately sends an email notification to your recipients with the link.
Note: Within the Share dialog box, selecting Copy link simply generates a sharing link based on the chosen settings. It doesn’t send an invitation email or track recipients like the Share option does.

Unlike the “Share” button, the SharePoint “Copy link” feature does not send an explicit invitation. Instead, its primary job is simply to generate a URL that you can then manually send to others. Importantly, the link’s effectiveness depends on the type you select before copying it.
The “Copy link” feature is best utilized when your goal is to generate a versatile URL rather than sending a formal invitation.
- Internal linking: When you need to embed a clickable link to a file within another document, such as a project plan, meeting agenda, or SOP.
- Existing access communication: When sharing a file link within trusted internal channels like a Teams chat or group email, where recipients already have access, you can use copy link rather than formally sharing it again.
- Quick, policy-compliant sharing: When you need to generate a fast, generic link that follows your organization’s default sharing policy, allowing standard distribution. If your organization permits sharing with anyone, then this link can be used to share with external users as well.
Using copy link is the quickest way to get a URL, but it requires you to manually check the security settings to ensure the link grants the correct level of access. Follow the steps to share using copy link option in SharePoint
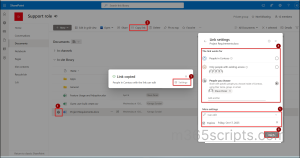
- Navigate to the file or folder in your SharePoint document library and click the circle icon next to its name to select it.
- In the sharing panel, you can select Copy link directly or click the three dots (⋯) next to the file or folder and choose Copy link.
- Click the dropdown or the gear icon next to this setting to open the Link settings menu.
- In the Link settings, choose the appropriate permission and under More settings, specify if the recipient should have Can edit or Can view permissions.
- You can optionally set an expiration date for a sharing link, after which the link will stop working and access to the file will be revoked.
- After confirming your choices, select Apply. Then, click the Copy button to place the secure, configured link onto your clipboard.
- Next, manually paste the link into your communication tools like email, Teams chat and then send it to your intended recipients.
SharePoint offers multiple link types, each designed to control how broadly your files are shared. Understanding the best practices of sharing links in SharePoint Online will help you choose the right level of access before sharing links in SharePoint.
Anyone with the link: This option grants access to absolutely anyone who possesses the URL, even if they are outside your organization and don’t have a Microsoft 365 account. This is the least secure option and is often disabled by organization administrators due to the risk of accidental over-sharing.
People in your organization with the link: This is the most common and standard choice for internal collaboration. The link works for anyone within your company who clicks it, but they must be signed in with their organizational account. This is link is best for sharing widely across internal teams or posting in a company-wide chat.
People with existing access: This link type does not grant any new permissions. It simply provides a clean URL that only works for individuals who already have permission to the file or folder. It is used for sending a reminder link to a team that already has the file in their document library.
Specific people: This is a hybrid option. It generates a link that is specifically restricted to specific people, but you deliver the link manually instead of the system sending the email.
Choosing how to share files in Microsoft 365 can impact security and collaboration.
Therefore, understanding the difference between ‘Share’ and ‘Copy Link’ helps you control access and protect your content.
| Feature | Share | Copy Link |
| Primary Action | Grants access and send an invitation to specific users. | Generates a unique access link (URL) that can be shared manually. |
| System Notification | An automated email is sent to notify the recipient.
|
You must share the link yourself, as no email is sent automatically.
|
| Expiration
|
Permissions remain active until manually revoked.
|
Link can be set to expire automatically after a set period.
|
| Access Control | Adds the user directly to the file’s Access Control List (ACL), giving them lasting permission (View/Edit).
|
Grants access based on the link type; access remains link-dependent unless “Specific people” is selected.
|
| Security & Traceability | High – access is traceable to named users.
|
Moderate – Recipients can forward the link to others.
|
| Permission Type | Direct access granted to specified users.
|
Link-based access available to anyone with the link type.
|
| External Access | Recipients must sign in with an email account.
|
Selecting “Anyone with the link” allows anonymous access.
|
SharePoint Online Sharing Best Practices
To move beyond the basic function of “Share” versus “Copy link,” adopt these practices to ensure control, efficiency, and security across your SharePoint files:
- Audit link settings before every copy: Before clicking ‘copy’, always click the dropdown to verify the link type, manage permission levels, and then click Apply. This prevents accidental over-sharing of a sensitive link.
- Avoid ‘Anonymous’ sharing links: Limit the use of anyone links and you must set expiration for anonymous links while sharing. They make it impossible to track who modified your content, creating a significant gap in accountability and data security.
- Use “Only People with Existing Access” links in Teams: When sharing a file in a Microsoft Teams channel linked to SharePoint, always choose the “Only People with existing access” link type. This generates a secure URL and as a result, does not grant new access. Thereby, ensuring only channel members who already have permission can open the file.
- The “stop sharing” distinction: Be aware that the method you use to grant access affects how you remove it.
- To revoke share access: Go to ‘Manage Access’ and remove the user’s name directly.
- To revoke copy link access: Go to ‘Manage Access’ and either delete the specific link or change the link settings (e.g., changing “Anyone” to “Specific people”).
- External sharing always requires secure links: Never share an external file using a generic “People in your organization” link. To allow external sharing for specific sites, you must use “Share” or “Specific people” links to enforce sign-in and maintain a verifiable identity record.
- If your organization frequently moves or reorganizes files across libraries or sites, enable the Document ID Service. It assigns each document a unique, permanent ID so your links remain valid even if the file is renamed or relocated.
I hope this blog helped you understand the key differences between share and copy link in SharePoint Online. If you have any questions or doubts, feel free to drop them in the comments.