How to Create SharePoint List Using PowerShell
Create SharePoint Online lists using PnP PowerShell with predefined templates or custom configurations. Add columns, items, and custom list templates. Bulk create lists from CSV files and copy lists between sites for efficient deployment across multiple SharePoint environments.
SharePoint Online lists are powerful ways to store, organize, and manage data within a Microsoft 365 organization. Whether to track the progress of any issues, monitor the status of project tasks, maintain customer records, or manage asset inventories, we usually create a SharePoint list. These lists in SharePoint Online provide a flexible and efficient solution for collaboration, where team members can seamlessly work together and organize data effectively.
However, in a large organization, manually creating lists across multiple SharePoint sites becomes tedious and time-consuming. This is where PowerShell comes to the rescue, offering a faster and more efficient way to automate SharePoint list creation. With just a few cmdlets, you can streamline the process of creating lists.
In this blog, let’s explore how to create a SharePoint Online list using PowerShell and simplify bulk operations.
PowerShell makes SharePoint Online list creation fast, efficient, and customizable. Whether you need to create a simple list, multiple lists in bulk, or a complex setup with custom columns, it gives you full control. Here are the PowerShell operations to create and manage SharePoint lists.
Before proceeding, ensure you register an Entra ID application to use with PnP PowerShell and connect to PnP PowerShell with the site where you want to create the SPO list.
- Create a SharePoint list using predefined templates
- Add items to the SPO list in Microsoft 365
- Update SharePoint list items using PowerShell
- Create custom lists in SharePoint Online
- Add columns to a SharePoint list with PnP PowerShell
- Create a custom list template in SharePoint Online
- Create a list from another list in SharePoint Online
- Create a list in a SPO site from the list on another site
- Create multiple SharePoint lists from CSV file
Note:
To create and manage a SharePoint Online list in Microsoft 365, you need at least Edit permissions on the site where you plan to create or manage the list. Other SharePoint Online permission levels, such as Full Control and Design, or custom permissions levels also allow list management on the site.
When you create a SharePoint Online site, it comes with a default set of lists and document libraries based on the selected template. While these built-in site contents provide a solid foundation, they may not always align with your specific needs. After all, every organization has unique requirements, and a one-size-fits-all approach rarely works.
That’s why Microsoft allows you to create lists in SharePoint sites. It also provides predefined SharePoint list templates such as IssueTracking, Announcements, Contacts, Events, Tasks, and more. You can choose the list template based on your requirements while creating the SharePoint Online list in subsites or sites.
To create a new SPO list using PowerShell, you can use the New-PnPList cmdlet as follows.
|
1 |
New-PnPList -Title <ListName> -Template <TemplateName> |
Replace <ListName> with the desired list name and <TemplateName> with one of the predefined template values. Additionally, the New-PnPList cmdlet includes optional parameters such as Hidden, EnableVersioning, OnQuickLaunch, EnableContentTypes, Url, etc., to define list visibility, version control, navigation, content type support, and the list’s URL.
Example
The following cmdlet creates a list in SharePoint Online named ‘Issue Tracker’ using the ‘Issue Tracking’ template.
|
1 |
New-PnPList -Title “Issue Tracker” -Template IssueTracking |

You can view the created SharePoint Online lists under the Site contents of the respective SharePoint site.

Note: A maximum of 2,000 lists and libraries combined can be created per SharePoint site collection.
A SharePoint Online list item is an individual entry or record in a SharePoint list that stores data in columns. Adding items to a SharePoint Online list is a routine task, whether for tracking issues or managing tasks for multiple users, with each row representing a separate list item.
To add items to the SharePoint list, you can use the Add-PnPListItem cmdlet. This quickly inserts items into a SharePoint Online list and simplifies the process.
|
1 |
Add-PnPListItem -List “<ListName>” -Values @{“<Column1 Name>” = ”<Value1>”; “<Column2 Name>” = "<Value2>”} |
You can replace <ListName> with the name of the list, Column Names with the respective column titles, and Values with the corresponding values for those columns.
Bonus Tip: You can configure content approvals for SPO lists to ensure that only accurate and appropriate items are added to the list.
Example
This cmdlet demonstrates how to add an item to the Issue Tracker list.
|
1 |
Add-PnPListItem -List “Issue Tracker” -Values @{“Title” = ”UI issue”; “AssignedTo” =”[email protected]”; “Status”=”Closed”; “Priority”=”(3)Low”; “DueDate”=”2/28/2025”} |

This command adds a new item to the Issue Tracker list on the SharePoint Online site.

Note: The list view threshold limitations of a SharePoint Online list are 5000 items. If you add items beyond this limit, then you can’t perform certain operations like filtering and sorting on the list.
Items in the SPO list often need updates, such as when a task status changes from Active to Closed or new details are updated. If frequent list item updates in SharePoint Online through the web interface feel time-consuming and tedious, skip the hassle! Use the Set-PnPListItem cmdlet to modify existing entries instantly and keep your list up to date with ease.
|
1 |
Set-PnPListItem -List “<ListName>” -Identity <Issue ID> -Values @{“<ColumnName>”=”<NewValue>”} |
Ensure to enter the list name in <ListName>, the item ID in <IssueID>, the column name in <ColumnName>, and the respective value in <NewValue>.
Example
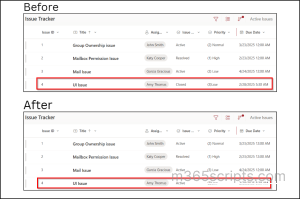
The cmdlet updates the Status column value from Closed to Active in the Issue Tracker list.
|
1 |
Set-PnPListItem -List “Issue Tracker” -Identity 4 -Values @{“Status”=”Active”} |

You can find the status has been updated from Closed to Active in the screenshot below.
Can predefined SharePoint list templates fit every scenario? Not always. While useful, they may not always meet specific needs. That’s where creating a custom list in SharePoint Online becomes essential. With a custom SharePoint list, you can define your own list structure, add the necessary columns, and tailor it to meet your specific needs.
To create a custom SPO list, use the New-PnPList cmdlet with the GenericList template, as shown below. Make sure to replace the <ListName> before execution.
|
1 |
New-PnPList -Title “<ListName>” -Template GenericList |
By default, the custom SPO list comes only with the default title column. Therefore, to make the list truly functional, you need to add more custom columns. In this section, let’s explore how to create columns in an SPO list using PowerShell with the Add-PnPField cmdlet.
|
1 |
Add-PnPField -List "<ListName>" -Type <DataType> -DisplayName "<ColumnDisplayName>" -InternalName "<InternalColumnName>" -AddtoDefaultView |
Remember to replace the below values before running the snippet above.
- <ListName> – the name of the list where you want to add the column.
- <DataType> – appropriate field types, such as Text, Number, Choice, User, or DateTime.
- <ColumnDisplayName> – the column name you want to display on the list.
- <InternalColumnName> – the internal name used for retrieving the field value. If it is not specified during creation, SharePoint automatically assigns one to the column. This name is a unique and cannot be changed after creation.
Note:
You can also use this method to add columns to lists created from the predefined SPO list templates and customize them as needed.
Example:
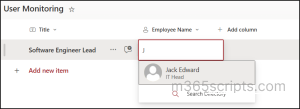
The below cmdlet will insert a column named EmployeeName in the User Monitoring SharePoint Online list.
|
1 |
Add-PnPField -List "User Monitoring" -Type User -DisplayName "Employee Name" -InternalName "EmployeeName" -AddtoDefaultView |

You can view the column added to the list using PowerShell with the below image.
Imagine setting up a custom list with specific columns, only to repeat the process for every new list across multiple sites. Instead of starting from scratch each time, SharePoint Online allows you to save your list structure as a template. This helps maintain consistency and speeds up list creation with minimal effort. A template saves columns, formulas, and formatting, making it easier to replicate the list.
Note: List templates cannot be updated after being added. Instead, you need to remove the existing template and add the updated version each time you update the list.
Let’s dive into how to save a list structure as a site script and how to create a custom SPO list template using that site script.
A site script is a collection of actions executed when setting up a new site or list. Every list has a site script that includes its columns, views, and settings configurations. To save an existing list as a template, you need to extract its site script and register it in SharePoint.
Once registered, you can use it to create a custom list template. When you add a new list using this template, SharePoint follows the script to set up the list with the same structure as the original one.
Use the below snippet to save your existing list as a site script in SharePoint Online
|
1 2 |
$extracted = Get-PnPSiteScriptFromList -URL <ListURL> Add-PnPSiteScript -Title "<SiteScriptName>" -Description "<ScriptDescription>" -Content $extracted |
Swap <ListURL> with the URL of the list you want to save. Replace <SiteScriptName> & <ScriptDescription> with a name & description for the new site script respectively.
You can list all available site scripts in your organization using the Get-PnPSiteScript cmdlet.
Now, you can use the Add-PnPListDesign cmdlet to create a custom SharePoint Online list template.
|
1 2 |
$ListScriptObj = Get-PnPSiteScript | Where-Object {$_.Title -eq "<SiteScriptName>"} Add-PnPListDesign -Title "<CustomTemplateName>" -Description "<TemplateDescription>" -SiteScriptIds $ListScriptObj.Id |
Here, change <SiteScriptName> with the created site script name, <Custom Template Name> with the new custom list template name, and <Template Description> with a description of your SharePoint Online list template.
Example
The following snippet demonstrates creating a site script (Onboarding) from the list Onboarding Users list for better understanding. Then, the site script is used to create a custom SharePoint Online list template named “User Onboarding”.
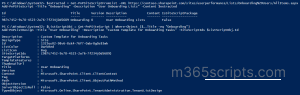
You can view the custom list template in SharePoint Online under From your organization in the Templates section while creating a new SPO List.
A SharePoint list template helps reuse list structures, but the template needs to be removed and added each time to include new columns. Instead, you can copy an existing list to create a new one with the latest columns and structure from the source site.
This method replicates the list structure from the source site, allowing you to quickly create a new list based on the columns in another list. When you copy a SharePoint list, the entire structure, including views, formatting, and columns, is copied.
To copy a list structure to another SharePoint Online list within the same site, use the Copy-PnPList cmdlet with all required attributes.
|
1 |
Copy-PnPList -Identity “<Source List>” -Title “<New List>” |
Here, replace <Source List> with the existing list name and <New List> with the desired name of the new list.
After copying lists within the same SharePoint site, you might wonder—can you copy a list to a site where the source list doesn’t exist? The answer is yes!
Use the -DestinationWebUrl parameter with the Copy-PnPList cmdlet to create a new list in any SharePoint Online site and ensure seamless list replication across your organization.
|
1 |
Copy-PnPList -Identity “<Source List>” -Title “<New List>” -DestinationWebUrl <Destination site name> |
Just ensure to change <Source List> with the existing list name, <New List> with the name of the new list, and <Destination Site URL> with the URL of the target SharePoint site before execution.
Imagine there is a need to create multiple lists in a SharePoint Online site. Creating them one by one is not only time-consuming but also increases your workload. Instead, you can create multiple SharePoint Online lists in bulk using a CSV file.
Create a CSV file with columns such as ListName, Template, and OnQuickLaunch as shown below to create SharePoint Online lists in bulk.

Use the snippet below to bulk create multiple lists in SharePoint Online using PowerShell.
|
1 2 3 4 5 6 7 8 9 10 11 12 |
$CSVFile = Import-CSV "<FilePath>" $CSVFile | ForEach-Object { Try { $Params = @{ Title = $_.ListName; Template = $_.Template; ErrorAction = "Stop" } If ($_.OnQuickLaunch -eq "True") { $Params.OnQuickLaunch = $true } New-PnPList @Params | Out-Null Write-Host -ForegroundColor Green "Created List '$($_.ListName)'" } Catch { Write-Host -ForegroundColor Red "Error: $_.Exception.Message" } } |
Replace <FilePath> with the CSV file path containing the details.
In conclusion, creating a SharePoint list using PowerShell provides a quick and efficient way to set up lists with predefined structures or custom columns. Instead of relying on the SharePoint UI, you can use PowerShell to automate the process and ensure consistency across sites.
If you have any questions, feel free to reach out through the comments section below!