A Quick Guide to Manage Room Mailbox Using PowerShell
Manage Exchange Online room mailboxes using PowerShell for efficient meeting space scheduling. Create room mailboxes, configure booking policies, assign permissions, and control resource availability. Streamline conference room reservations and avoid scheduling conflicts through automated resource booking assistant settings.
Managing meeting spaces in today’s fast-moving business environment can be a daunting task. To streamline the process, organizations often use a resource mailbox in Exchange Online. This mailbox represents conference rooms, projectors, or other resources that can be scheduled for meetings or events. Managing resource mailboxes is important to ensure the efficient use of meeting spaces and avoid scheduling conflicts. Fortunately, PowerShell can help simplify managing resource mailboxes in Exchange Online.
A resource mailbox in Exchange Online is a particular type of mailbox representing resources that can be scheduled for meetings or events. Resource mailboxes are further classified into two categories: room mailboxes and equipment mailboxes, each serving a specific purpose. While a Room mailbox is used to reserve a meeting space, an Equipment mailbox is used to reserve equipment needed for a meeting.
In this guide, we’ll walk through the basics to manage room mailbox using PowerShell, which involves creating and configuring room mailboxes, assigning permissions, and setting up booking policies.
A room mailbox in Office 365 is a type of mailbox that is associated with a physical location, such as a conference room or a shared workspace. It is used to manage the scheduling and booking of the room for meetings and other events.
Room mailboxes have a calendar that can be used to schedule and manage appointments and bookings for the associated space. This allows scheduling and management of rooms in Exchange Online, making it easier for organizations to optimize the use of meeting spaces.
You must first install and connect to Exchange Online PowerShell using an Exchange Online administrator account to manage room mailbox using PowerShell. Managing room mailboxes can help organizations streamline the process of booking and scheduling meetings in a more efficient manner. Managing room mailboxes in Exchange Online can be simplified using PowerShell commands. Below are the operations to manage room mailboxes using PowerShell.
- Create Room Mailbox Using PowerShell
- Change Room Mailbox Properties Using PowerShell
- Get Details About Room Mailboxes
- Convert User Mailbox to Room Mailbox in Exchange Online
- Room List in Exchange Online
- Delete Room Mailbox Using PowerShell
To create a room mailbox in Office 365 using PowerShell, you must run the following command with the appropriate parameters.
|
1 |
New-Mailbox -Name <RoomMailboxName> -Room |

Create Multiple Room Mailboxes from CSV Using PowerShell
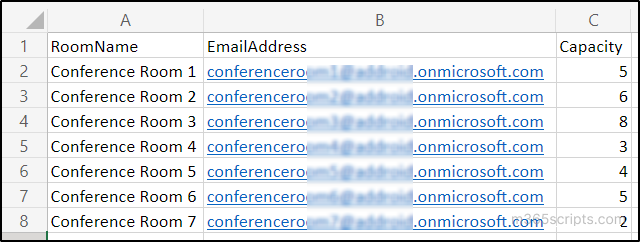
To create multiple room mailboxes using PowerShell, you can use a CSV file with the list of mailboxes to be created and their parameters. The CSV file should contain the following columns: RoomName, EmailAddress, and Capacity.
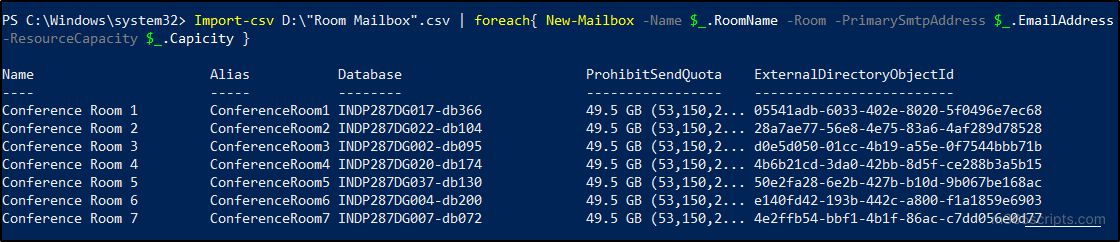
The following PowerShell cmdlet can be used to create multiple room mailboxes based on the CSV file.
|
1 |
Import-csv D:\"Room Mailbox".csv | foreach{ New-Mailbox -Name $_.RoomName -Room -PrimarySmtpAddress $_.EmailAddress -ResourceCapacity $_.Capacity } |
PowerShell commands can be used to modify various mailbox properties, such as display names, email addresses, capacity, and more. Administrators can automate the process of changing room mailbox properties and ensure consistency in the configuration of multiple mailboxes using PowerShell.
- Change Display Name and Capacity of a Room Mailbox
- Configuring Room Mailboxes to Allow Booking Requests During Working Hours
- Enable Automatic Booking for a Room Mailbox
- Assign Room Mailbox Delegate Permissions Using PowerShell
- Allow Conflict Meetings for Automatic Booking
- Enable External Users to Book Meeting Rooms
Change Display Name and Capacity of a Room Mailbox
With Exchange Online PowerShell, you can change the display name, the primary SMTP address (default reply address), and the capacity of a room mailbox. Moreover, the previous reply address is kept as a proxy address.
|
1 |
Set-Mailbox <RoomMailboxName> -DisplayName <NewRoomMailboxName> -EmailAddresses SMTP:<OldSMTPAddress>,SMTP: <NewSMTPAddress> -ResourceCapacity <CapacityCount> |
For example,
|
1 |
Set-Mailbox "New Room Mailbox" -DisplayName "Room Mailbox" -EmailAddresses SMTP:[email protected],SMTP:[email protected] -ResourceCapacity 12 |
Additionally, to ensure the calendar displays the meeting subject instead of the organizer’s name, set the -AddOrganizerToSubject and -DeleteSubject parameters to
|
1 |
$false |
|
1 |
Set-CalendarProcessing |
cmdlet.
Configuring Room Mailboxes to Allow Booking Requests During Working Hours
The following PowerShell command can configure all the room mailboxes to allow scheduling booking requests only during working hours. The “MaximumDurationInMinutes” parameter is used to set the maximum duration for meetings.
In the example below, any meeting requests exceeding 420 minutes (7 hours) in duration will be automatically declined. This can help to ensure that rooms are available for a meeting only for a maximum of 7 hours.
|
1 |
Get-Mailbox -ResultSize unlimited -Filter "RecipientTypeDetails -eq 'RoomMailbox'" | Set-CalendarProcessing -ScheduleOnlyDuringWorkHours $true -MaximumDurationInMinutes 420 |
Enable Automatic Booking for Room Mailbox
Enabling automatic booking for a room in Exchange Online enables the room to automatically accept meeting requests without requiring administrator approval. You can use the following cmdlet to enable automatic booking for a room mailbox.
|
1 |
Set-CalendarProcessing <RoomMailboxName> -AutomateProcessing AutoAccept |
To enable automatic booking for all room mailboxes, you can execute the following cmdlet.
|
1 |
Get-MailBox -ResultSize unlimited | Where {$_.ResourceType -eq "Room"} | Set-CalendarProcessing -AutomateProcessing AutoAccept |
To control who can book Exchange meeting rooms or approve requests, admins should manage BookInPolicy and ResourceDelegates settings. Use PowerShell to safely add or remove users without overwriting existing settings, ensuring smooth and conflict-free room scheduling.
Assign Room Mailbox Delegate Permissions Using PowerShell
When you assign the “Send As” delegate permission to a user for a room mailbox, the user will be able to send an email from that mailbox as if it was sent by the mailbox owner. This means that the mailbox owner’s email address will appear as the sender’s address to the recipient. To assign the “Send As” permission to a user, you can use the following PowerShell cmdlet.
|
1 |
Add-RecipientPermission <RoomMailboxName> -Trustee <UPN> -AccessRights SendAs -Confirm: $False |

You can use the below cmdlet to provide “Full Access permission” for a room mailbox to a specific user.
|
1 |
Add-MailBoxPermission <RoomMailboxName> -User <UPN> -AccessRights FullAcces |

Allow Conflicting Meetings for Automatic Booking
To enable a room mailbox to automatically accept conflicting meeting requests in Exchange Online, you can use the following PowerShell command.
|
1 |
Set-CalendarProcessing -Identity <RoomMailboxName> -AllowConflicts $true |
This will enable the automatic booking feature for a room mailbox, allowing meetings to be scheduled for the room even if conflicting meetings are already scheduled.
Enable External Users to Book Meeting Rooms
To allow external users to book meeting rooms, you can utilize the following cmdlet with the room mailbox name or UPN.
|
1 |
Set-CalendarProcessing -Identity <RoomMailboxName> -ProcessExternalMeetingMessages $true |
Note:
In addition to the above room mailbox configurations, you can allow only specific users to book meeting rooms based on certain conditions.
You can retrieve and display the information related to room mailboxes in an Exchange Online environment including mailbox properties, calendar settings, permission settings, and delegate information using Exchange Online PowerShell. By obtaining details about room mailboxes, administrators can manage and configure these resources to meet the needs of their organization.
- Display List of Room Mailboxes Using PowerShell
- Get Room Mailbox Calendar Settings
- Display Room Mailbox Calendar Permissions Using PowerShell
Display List of Room Mailboxes Using PowerShell
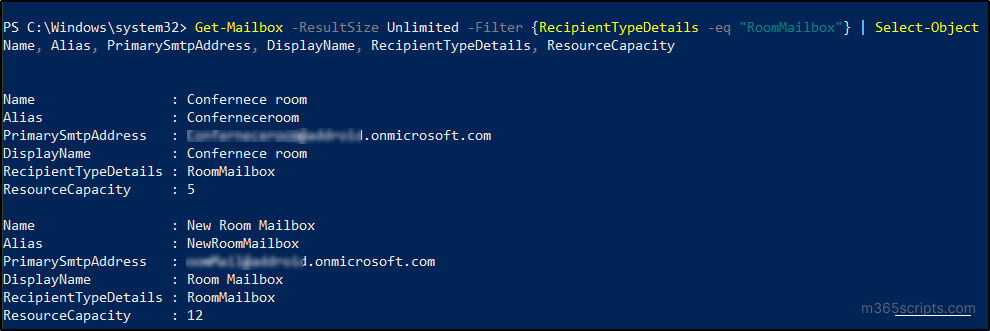
You can use the following cmdlet to display the list of room mailboxes using PowerShell.
|
1 |
Get-Mailbox -ResultSize Unlimited -Filter {RecipientTypeDetails -eq "RoomMailbox"} | Select-Object Name, Alias, PrimarySmtpAddress, DisplayName, RecipientTypeDetails, ResourceCapacity |
Get Room Mailbox Calendar Settings
To display the calendar settings for a room mailbox using PowerShell, you can use the following cmdlet.
|
1 |
Get-CalendarProcessing -Identity <Room Mailbox> | Format-List |
The generated output includes information on its settings, such as whether it automatically processes meeting requests, the maximum meeting duration, and who can receive meeting requests on behalf of the room.
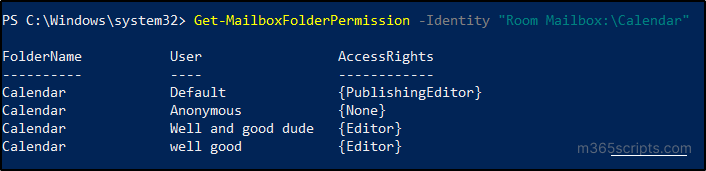
Display Room Mailbox Calendar Permissions Using PowerShell
You can use the following PowerShell cmdlet to display the calendar permissions for a specific room mailbox.
|
1 |
Get-MailboxFolderPermission "<Room Mailbox>:\Calendar" |
This cmdlet will display a list of all users who have access to the calendar for the specified room mailbox, along with their level of access.
You can also utilize the prebuilt PowerShell script to export room mailbox reports that provide comprehensive details on meeting room configuration, permissions, booking options, and more.
To convert a user mailbox to a room mailbox in Exchange Online, you can use the following PowerShell cmdlet.
|
1 |
Set-Mailbox <RegularMailboxName> -Type Room |
You can also convert the room mailbox into a user mailbox using the below PowerShell cmdlet.
|
1 |
Set-Mailbox <RoomMailboxName> -Type Regular |
After creating room mailboxes in Exchange Online, the next important step is to add them to a room list. Without being part of a room list, rooms won’t be visible in Room Finder, which can lead to confusion or booking issues.
Microsoft Exchange Online uses Room Lists to group related room mailboxes together. It helps users easily locate and select the desired meeting or event room. With Exchange Online PowerShell, you can create room lists and add room mailboxes to them.
- Create Room Lists Using Exchange Online PowerShell
- Add a Room to a Room List Using PowerShell
- Convert a Distribution Group to a Room List Using PowerShell
Create Room Lists Using Exchange Online PowerShell
To create a new room list, execute the following command in the Exchange Online PowerShell.
|
1 |
New-DistributionGroup -Name <RoomListName> -RoomList |

Add a Room to a Room List Using PowerShell
To add a room mailbox to a room list in Office 365, use the ‘Add-DistributionGroupMember’ cmdlet with the room list name and the room mailbox UPN.
|
1 |
Add-DistributionGroupMember -Identity <RoomListName> -Member <RoomMailboxUPN> |
Note:
Adding rooms to a room list in Microsoft Outlook helps users easily filter and find available meeting spaces using the Room Finder. It enables filtering based on categories like capacity, floor, building, city, and more, making room booking faster and more efficient.
Convert a Distribution Group to a Room List Using PowerShell
You can convert a distribution group to a room list with the help of the ‘Set-DistributionGroup’ cmdlet. Passing the distribution group name as the parameter to the cmdlet converts the distribution group into a room list.
|
1 |
Set-DistributionGroup -Identity <DistributionGroupName> -Room List |
Note: Before you run the cmdlet, make sure that the distribution group contains only the room mailboxes that you want to manage as a resource.
To delete a room mailbox using PowerShell in Exchange Online, you can use the ‘Remove-Mailbox’ cmdlet.
|
1 |
Remove-Mailbox -Identity <RoomMailboxName> -Confirm: $false |
Note: This command will delete the room mailbox without prompting for confirmation.
To bulk delete all the room mailboxes, you can use the following PowerShell cmdlet.
|
1 |
Get-Mailbox -Filter '(RecipientTypeDetails -eq "RoomMailBox")'| Remove-Mailbox -Confirm: $false |
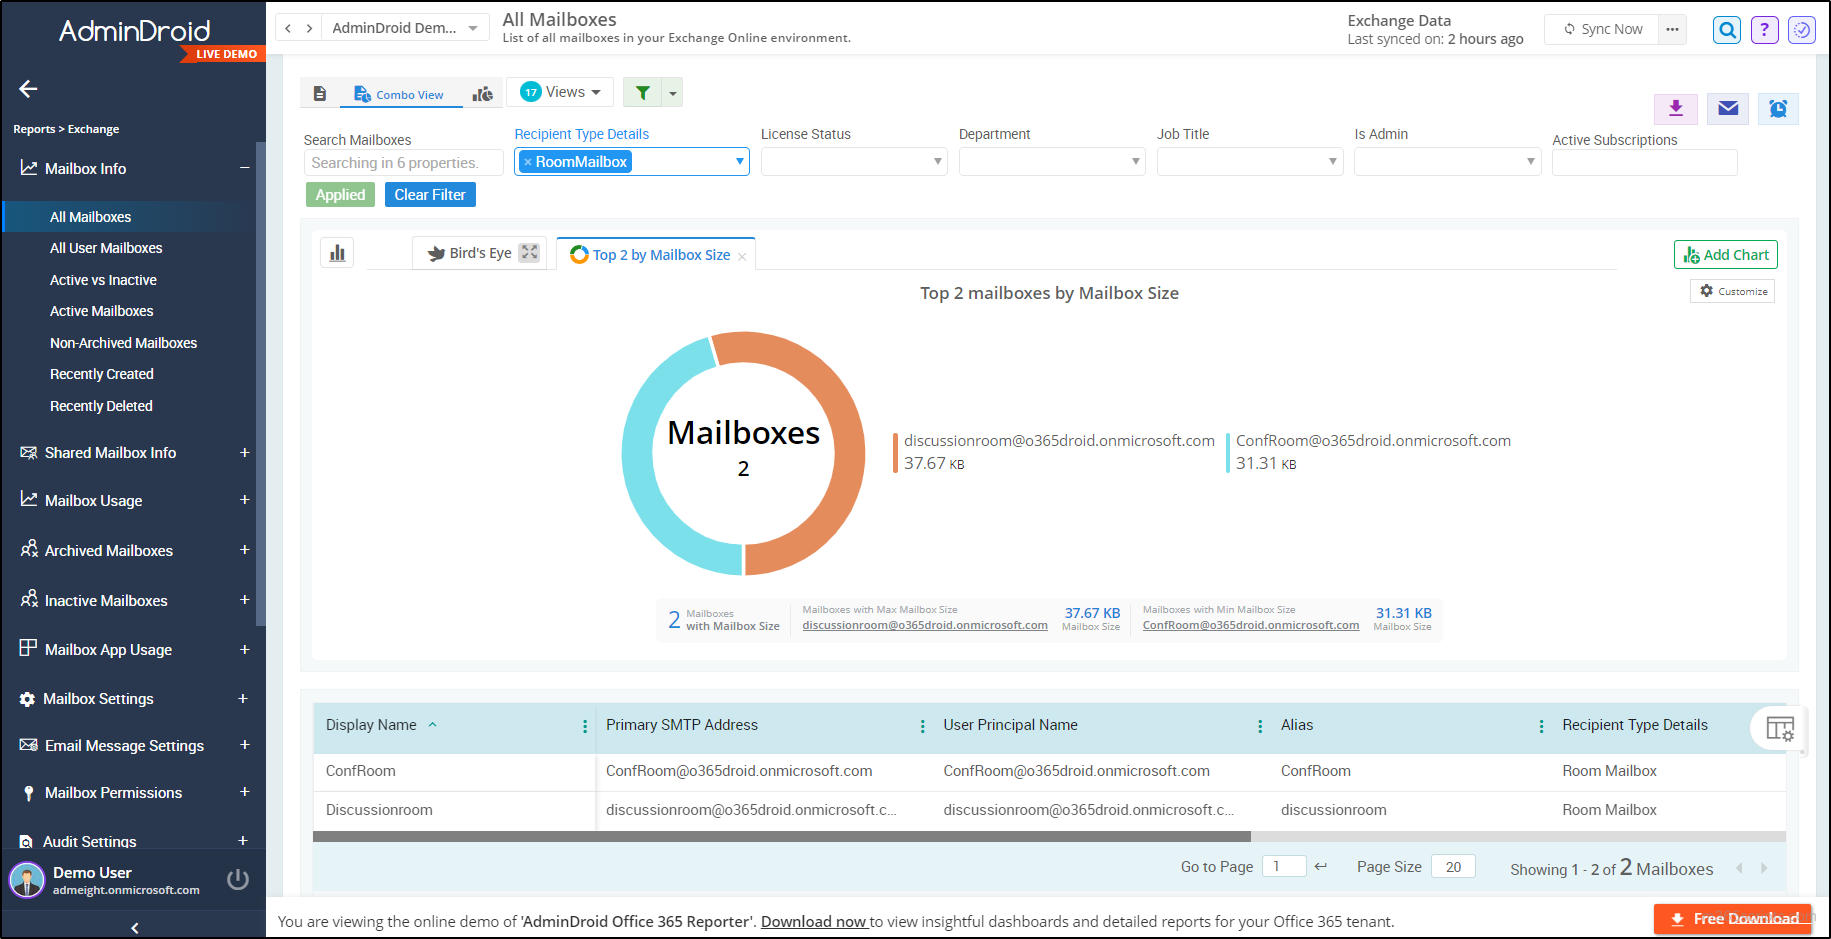
Monitoring room mailbox usage is crucial for efficient room mailbox management. Due to the inability of EAC to provide meaningful statistics regarding room mailbox usage, admins often rely on PowerShell to access comprehensive details. Nevertheless, the task of executing specific cmdlets can be cumbersome, frustrating, and time-consuming. If you’re looking for a tool to monitor entire Office 365 mailboxes, that provides more advanced reports beating the native tools, then I’ve got something to show you!
Elevate your mailbox reporting capabilities by utilizing the AdminDroid Microsoft 365 reporting tool. The Office 365 mailbox reports offered by AdminDroid provide detailed insights into top room mailboxes, inactive room mailboxes, recently created room mailbox, room mailbox storage quota, etc. with filter-based customization and stunning charts. Enjoy the ease of AdminDroid Exchange Online reporting tool with its wide range of advanced reports including,
- Exchange Online Mailbox Information
- Inactive Mailboxes Reports
- Mailboxes and their Apps Usage Reports
- Exchange Mailbox Settings Report
- Mailbox Permissions Report
- Exchange Audit Settings Report
- Email Forwarding Reports
- Exchange Online Group Reports
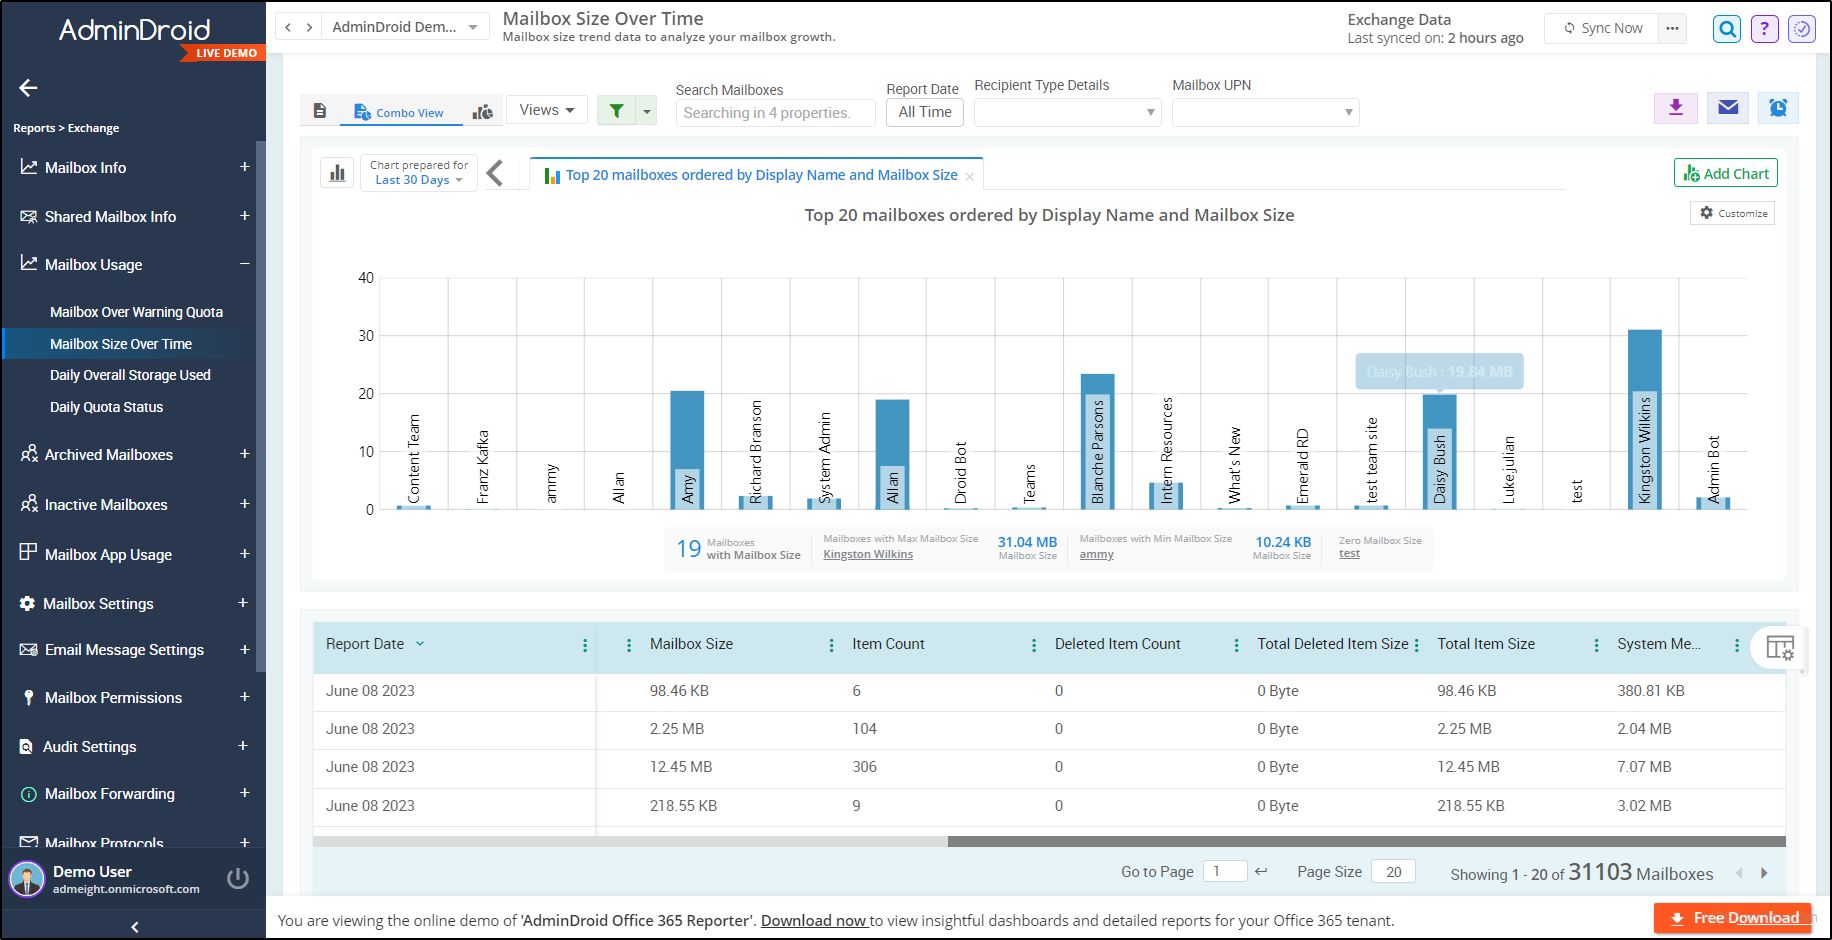
In addition, the AdminDroid Exchange Online management tool offers over 170+ Exchange Online reports, providing a comprehensive overview of Microsoft 365 mailboxes. These reports include Exchange Online insights reports, Exchange Online audit log reports, and Outlook email analytic reports.
Enhance your Office 365 administration with the AdminDroid Microsoft 365 reporting tool, offering over 1800+ powerful comprehensive reports and 30+ visually stunning dashboards. Delve deep into your Office 365 environment with extensive
reporting, auditing, analytics, usage statistics, security, and compliance features of AdminDroid.
Experience the benefits firsthand by downloading the Office 365 reporting tool from AdminDroid, which include 15 days free premium trial edition.
We hope this quick guide will help you get an overview of the essential PowerShell cmdlets to manage room mailbox using PowerShell in Exchange Online. Feel free to ask your queries in the comments section.