Manage Shared Mailboxes in Microsoft 365 Effectively Using PowerShell
Manage shared mailboxes in Microsoft 365 using PowerShell for efficient team collaboration. Create shared mailboxes, assign permissions, configure send-as and send-on-behalf rights, and monitor storage limits. Understand licensing requirements and ensure compliance by blocking sign-in for unlicensed shared mailboxes.
In today’s digitally connected world, efficient email management is essential for seamless communication, especially within larger Microsoft 365 organizations. Added icing to the cake, shared mailboxes in Exchange Online make organization’s collaboration even more effective and increase the communication speed. However, if you don’t know the right way to manage shared mailboxes, it will be challenging and consume your valuable time.
Don’t worry! Our blog aims to provide a detailed guide to manage shared mailboxes in Microsoft 365. It covers the most essential shared mailbox operations, including creating, assigning permissions, and deleting unused shared mailboxes.
Shared mailboxes don’t require a specific license like Exchange Online user mailboxes. But, with the organization’s subscription pack, shared mailboxes are limited to a size 50 GB. To increase the size limit to 100 GB like the user mailbox, assign license to the shared mailbox with an Exchange Online Plan 2 subscription. You can get all shared mailboxes size and then assign licenses accordingly. Once the license has been assigned, you can use PowerShell to find the licensed shared mailboxes.
Important:
If a shared mailbox has sign-in enabled but lacks an Exchange Online license, it violates Microsoft’s licensing terms, thereby becoming a non-complaint shared mailbox. To avoid compliance violations, ensure that sign-in is blocked for all shared mailboxes or assign them license appropriately.
Organization uses shared mailboxes for smooth communication and collaboration. Here are a few common scenarios of shared mailbox usage.
Technical Customer Support: Exchange Online Shared mailboxes are commonly used for customer support purposes to handle customer queries, issues, and provide consistent and timely replies.
Microsoft 365 Teams Collaboration: Team members can collaborate, share updates, and coordinate project tasks by accessing and contributing to the shared mailbox. Exchange Online Shared mailboxes are beneficial for teams like HR, marketing, or finance, where multiple team members need access to a shared email.
Sales and Marketing: The Sales and marketing department uses Microsoft 365 shared mailboxes to handle queries and customer interactions. This ensures that the whole team can stay informed and respond immediately to improve sales processes.
Microsoft 365 Employee Transitioning: When an employee leaves the organization, converting their mailbox to a shared mailbox enables access to incoming emails to ensure uninterrupted communication with clients. This also, ensures the license optimization in your Microsoft 365 environment.
Tip:
After converting a user mailbox into a shared mailbox, you can change the primary email address of a shared mailbox based on its purpose.
Managing shared mailboxes in Exchange Online can be simplified using PowerShell commands. Though the Exchange admin center provides the facility to manage shared mailboxes, it lacks bulk operations, specific flexible customization, etc.
Firstly, you must install and connect to Exchange Online PowerShell using an EXO administrator account to manage shared mailboxes using PowerShell. Below are the operations to manage shared mailboxes using PowerShell.
- Create Shared Mailbox Using PowerShell in Microsoft 365
- Get a List of Shared Mailboxes Using PowerShell
- Add User to a Shared Mailbox in Exchange Online
- View Shared Mailbox Permissions Using PowerShell
- Remove a User from a Shared Mailbox in Exchange Online
- Remove Shared Mailbox from Outlook Using PowerShell
- Rename Shared Mailbox Using PowerShell
- Bulk Operations in Managing Shared Mailboxes with PowerShell
If you prefer GUI, you can utilize Microsoft 365 administration tools like AdminDroid to monitor shared mailbox activities, delegations, mail traffic, email analytics reports based on peak days/hours, etc.
Creating a shared mailbox allows multiple users to access and manage emails sent to a shared email address. You can create shared mailboxes in exchange online using the following cmdlet.
|
1 |
New-Mailbox -Shared -Name <NewSharedMailboxName> -PrimarySmtpAddress <SharedMailboxUPN> |

Thus, the above cmdlet creates a shared mailbox with the given name and primary smtp address.
Note: Converting user mailboxes to shared mailboxes allows you to change the mailbox type and grant access to multiple users. You can use certain Exchange Online PowerShell cmdlets to convert the user mailbox to a shared mailbox.
To get the list of all shared mailboxes present in your Microsoft 365 tenant, you can use the following PowerShell cmdlet.
|
1 |
Get-Mailbox -Filter {RecipientTypeDetails -eq "SharedMailbox"} |

Note: Though the execution of the above cmdlet provides details related to shared mailboxes, these are not enough for effective shared mailbox management. However, you can get the shared mailbox details using the PowerShell script with more precise information. Also, mailbox folder size details needs to be tracked by admins to maintain proper storage and manage folders effectively. Export mailbox folder statistics report to get the folder size of all shared mailboxes.
The addition of users to shared mailboxes enables multiple individuals to access and manage emails, calendars, and other shared resources of mailboxes.
You can use the below cmdlet to grant “Full Access” permission to the specified user for the shared mailboxes. Shared mailbox “Full Access” permission grants a user or a group complete access to a shared mailbox in Exchange Online.
With “Full Access” permission, the user can perform various actions, such as viewing, receiving, and managing emails on behalf of the shared mailbox. Also, they can add the shared mailbox as a secondary account in Outlook to avoid account switching for email communication and get event reminders smoothly.
|
1 |
Add-MailboxPermission -Identity <SharedMailboxUPN> -User <UserUPN> -AccessRights FullAccess |
Replace “SharedMailboxUPN” with the shared mailbox email address and “UserUPN” with the User email address.

To grant “Send As” permission you can use the below cmdlet. This delegates to send email as shared mailbox with out the indication of send by delegate.
|
1 |
Add-RecipientPermission <SharedMailboxUPN> -Trustee <UserUPN> -AccessRights SendAs |

To grant “Send On Behalf” permission to a shared mailbox, you can also use the below cmdlet. This delegates to send emails on behalf of shared mailbox.
|
1 |
Set-Mailbox -Identity <SharedMailboxUPN> -GrantSendonBehalfTo <UserUPN> |
Tip: To prevent users from misusing the ‘Send As’ or ‘Send on Behalf’ permissions to send malicious emails to multiple recipients, you can restrict the number of recipients per email.
To view all the shared mailbox members with their access rights or permissions, execute the below PowerShell cmdlet.
|
1 |
Get-MailboxPermission <SharedMailboxUPN> |

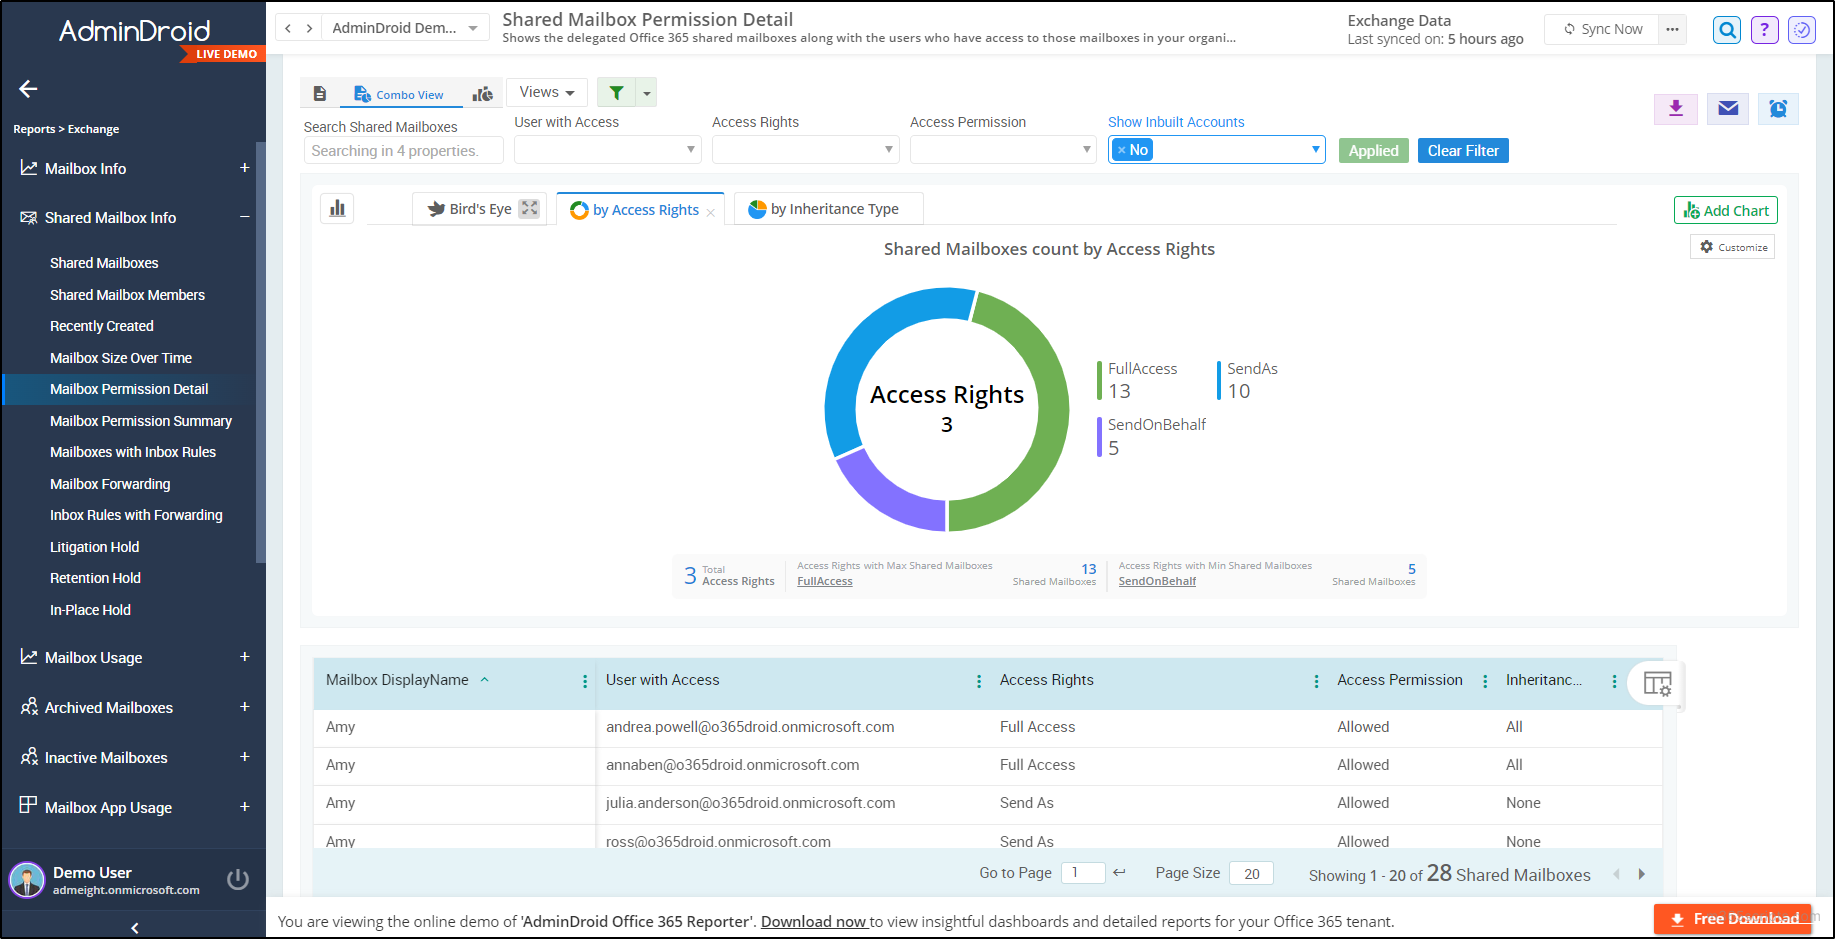
The execution above lists all users in shared mailboxes with their appropriate permissions. You can also able to export shared mailbox permissions to CSV file in different formats using PowerShell. In addition, you can verify who can access the folders in a shared mailbox using the mailbox folder permission report and avoid unwanted folder permissions.
To remove “Full Access” rights of users from the Exchange Online shared mailbox, use the below PowerShell cmdlet.
|
1 |
Remove-MailboxPermission -Identity <SharedMailboxUPN> -user <UserUPN> -AccessRights FullAccess |
Removing shared mailboxes is also very much similar to deleting user mailboxes. You can make use of the cmdlet below to remove shared mailboxes.
|
1 |
Remove-Mailbox -Identity <SharedMailboxUPN> |
Note: When you delete a shared mailbox that is converted from a user mailbox, the associated user account will also get deleted.
Renaming of a shared mailbox can be done using the PowerShell cmdlet. You can use the “Set-Mailbox” cmdlet to rename a shared mailbox.
|
1 |
Set-Mailbox -Identity <SharedMailboxUPN> -Name <NewName> -DisplayName <NewDisplayName> -Alias <NewAlias> |
By adding new display names and aliases, the name change will be reflected in the respective shared mailboxes.
Performing bulk actions allows administrators to apply changes or perform tasks simultaneously on multiple shared mailboxes. Bulk actions reduce manual effort and enable Microsoft 365 admins to efficiently manage shared mailboxes in less time. Below are the bulk operations to manage shared mailboxes using PowerShell.
- Bulk Create Shared Mailboxes in Office 365
- Add Multiple Users in Shared Mailbox Using PowerShell
- Remove Bulk Users from Shared Mailbox in Exchange Online
- Add a User to Multiple Shared Mailboxes Using PowerShell
To create multiple shared mailboxes using PowerShell, initially you have to create a CSV file with the Shared mailbox name list and primary smtp address, as shown below.
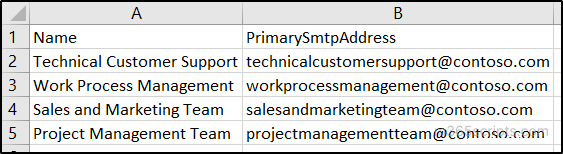
Use the cmdlet below to create shared mailboxes after the creation of the CSV file.
|
1 |
Import-Csv <FileLocation> | foreach {New-Mailbox -Shared -Name $_.Name -PrimarySmtpAddress $_.PrimarySmtpAddress} |
Replace <FileLocation> with the accurate file path of the created CSV file.
Adding multiple users to a shared mailbox provides them with access and facilitates collaboration on a shared email account. To assign multiple users “Full Access” permission to a shared mailbox using PowerShell, you can use a CSV file with the user’s email address list, as shown below.
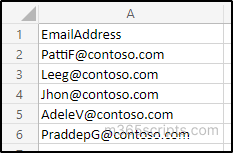
Use the cmdlet below to assign bulk users to a shared mailbox after the creation of the CSV file.
|
1 |
Import-Csv <FileLocation> | foreach {Add-MailboxPermission <SharedMailboxUPN> -User $_.EmailAddress -AccessRights FullAccess} |
Replace <FileLocation> with the accurate file path of the created CSV file.

Removing multiple users from shared mailboxes is necessary to revoke their permissions, ensuring proper data security. Therefore to remove multiple users from “Full Access” permission in the shared mailbox, you have to create a CSV file with the user’s email address list. After that, you can execute the following cmdlet.
|
1 |
Import-Csv <FileLocation> | foreach {Remove-MailboxPermission <SharedMailboxUPN> -User $_.EmailAddress -AccessRights FullAccess} |
The execution of the above cmdlet asks for the confirmation of each removal. Hence, to avoid confirmation, you can use the “-confirm: $false” as mentioned below.
|
1 |
Import-Csv <FileLocation> | foreach {Remove-MailboxPermission <SharedMailboxUPN> -User $_.EmailAddress -AccessRights FullAccess -confirm: $false} |
Adding a user to multiple shared mailboxes using PowerShell provides permissions and enables them to manage bulk shared mailboxes simultaneously. This allows the user to view and manage emails, calendars, and other shared resources. To do so, you have to create a CSV with the respective shared mailbox names with the header “Identity”.
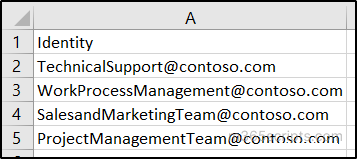
After the creation of the CSV file, execute the below cmdlet to provide “Full Access” permissions to the users.
|
1 |
Import-Csv <FileLocation> | foreach {Add-MailboxPermission -Identity $_.Identity -User <UserUPN> -AccessRights FullAccess} |

The following are the limitations to consider when using shared mailboxes in Microsoft 365.
Microsoft 365 Licensing Requirement: Once a Shared Mailbox reaches a size exceeding 50 GB, it is necessary to obtain an Exchange Online plan 2 License.
Dependency on Microsoft 365 User Licenses: Only users assigned with Exchange Online mailbox licenses can access the shared mailboxes.
Microsoft 365 Security Related Risks: Granting inappropriate or excessive permissions for users to shared mailboxes within an organization poses a significant risk of unauthorized access to sensitive information.
Even though PowerShell provides details related to shared mailboxes, these are not enough for effective shared mailbox management. Thus, monitoring and managing shared mailboxes and their usage can be a challenging task for IT admins. To overcome this situation, AdminDroid shared mailbox reporting tool provides detailed reports to manage them efficiently.
Shared mailbox reports are categorized based on:
- Office 365 shared mailboxes
- Microsoft 365 shared mailbox members
- Recently created shared mailboxes in Office 365
- Shared mailboxes size over time
- Office 365 shared mailbox permissions
- Shared mailbox permission summary
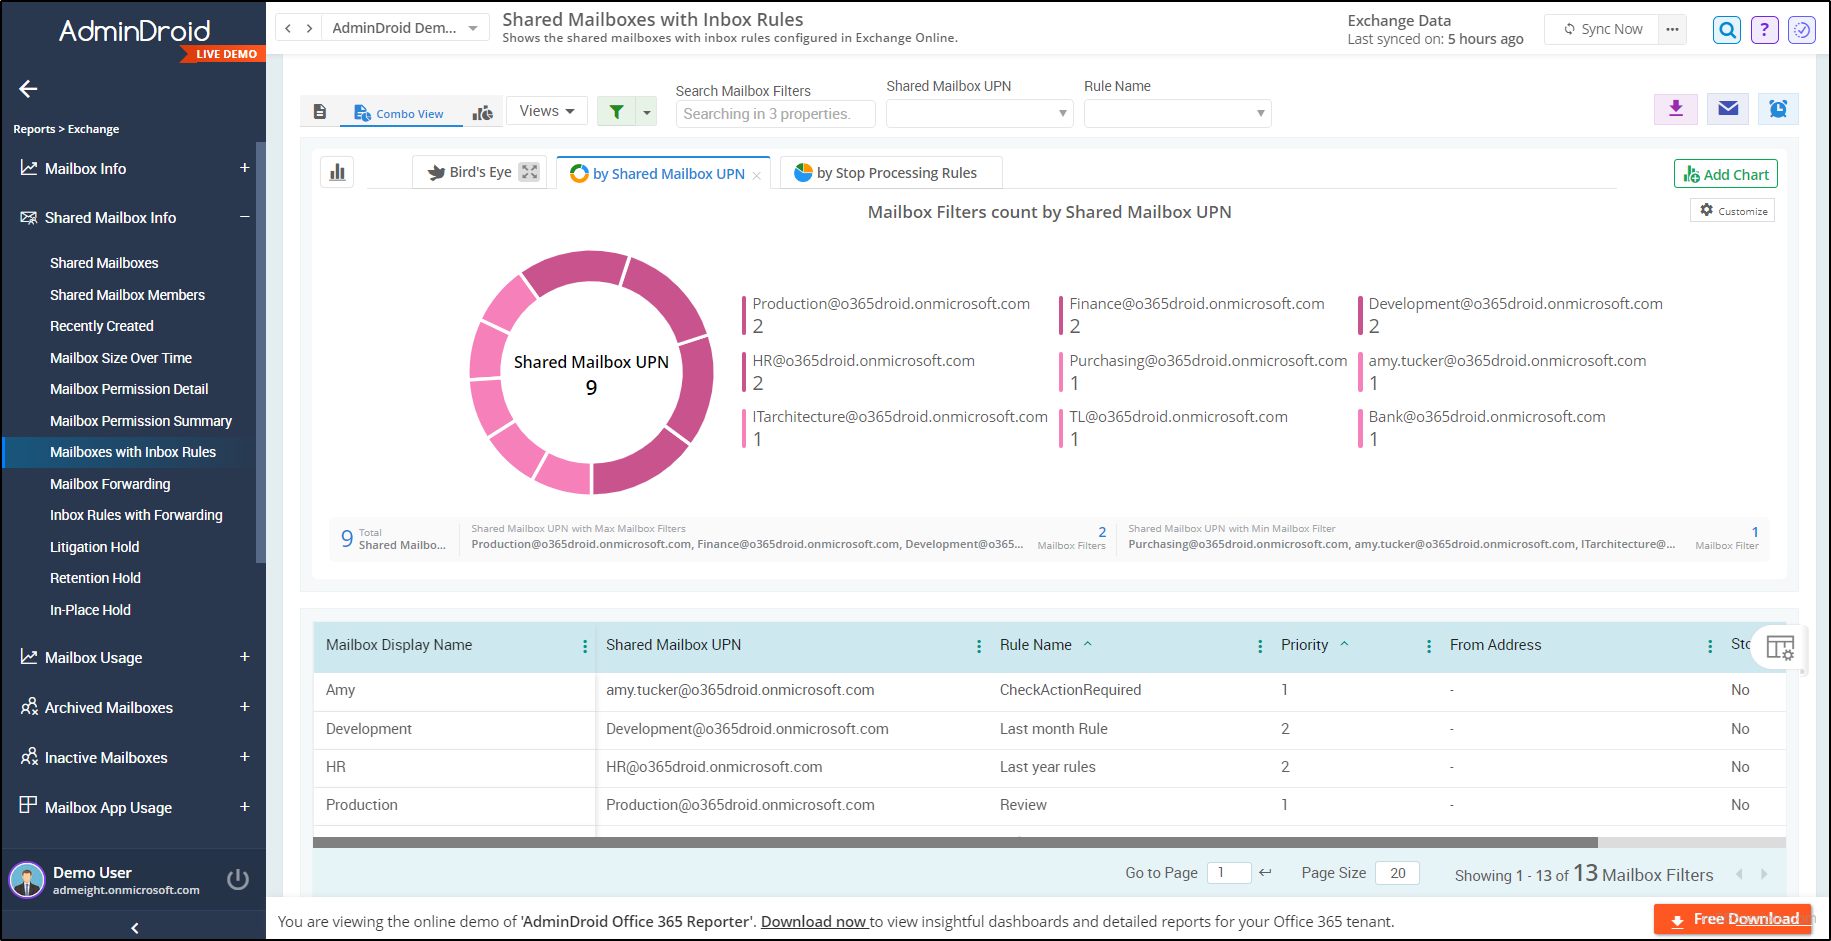
- Shared mailbox with inbox rules
- Shared mailbox email forwarding
- Shared mailbox inbox rules with email forwarding
- Litigation hold on Office 365 shared mailboxes
- Shared mailbox retention policy
- Shared mailbox in-place hold
Besides, AdminDroid Exchange Online reporting tool provides comprehensive reports on Microsoft 365 mailboxes, including info on inactive mailboxes, usage, permissions, forwarding, and Exchange settings, etc.
Apart from reporting, Exchange Online auditing provides 65+ audit reports on Microsoft 365 mailbox activities, access permissions, configuration and delegated activities. Also, the Exchange Online dashboard gives enriched data for a complete understanding of Microsoft 365 mailboxes.
Moreover, the Exchange Online management tool offers 170+ reports to track, schedule, and get alerts on suspicious Exchange Online activity with vivid graphs and crystal-clear data.
Are you still wondering why AdminDroid? Here is the answer!
AdminDroid offers more than 1800+ all-inclusive reports and over 30+ dashboards to know about your Microsoft 365 environment at a glance. This tool provides Office 365 reporting, auditing, analytics, usage statistics, security & compliance, etc. By utilizing these functionalities, admins can elevate their Microsoft 365 management to the next level.
Download the AdminDroid Microsoft 365 reporting tool and see how it helps you.
Thus, I have provided an overview of all possible ways to manage shared mailboxes in Exchange Online using PowerShell. Overall, following these PowerShell steps ensures the security and integrity of your organization‘s shared mailbox management. If you have any questions, feel free to reach us through the comment section.