Connect to Exchange Online PowerShell
Install and connect to Exchange Online PowerShell using EXO V3 module with modern authentication. Create remote PowerShell sessions supporting MFA-enabled accounts for Exchange administration. Import ExchangeOnlineManagement module and use Connect-ExchangeOnline for secure mailbox management.
Exchange Online PowerShell helps administrators to manage their Exchange Online Environment more effectively. EXO V3 module allows admins to create remote PowerShell sessions by using both
- Modern authentication
- Multi-factor authentication
Let’s see how to install and connect Exchange Online PowerShell using the EXO V3 module.
To install EXO V3 module, follow the below steps.
Step 1: Start Windows PowerShell with the “Run as administrator” option.
Step 2: Run the below cmdlet to install the Exchange Online PowerShell V3 Module (ExchangeOnlineManagement)
|
1 |
Install-Module –Name ExchangeOnlineManagement |
Note: To identify the installed EXO V3 module’s version, run the below cmdlet.
|
1 |
Get-Module -Name ExchangeOnlineManagement -ListAvailable |
Step 3: After installing the EXO V3 module, import the EXO V3 module cmdlets by running the following cmdlet.
|
1 |
Import-Module ExchangeOnlineManagement |
EXO V3 module supports REST API-based cmdlets like Get-EXOMailbox, Get-EXOMailboxStatistics, etc.
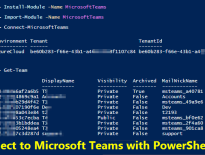
You can use the Connect-ExchangeOnline cmdlet to create a PowerShell session to Exchange Online. Both MFA and non-MFA accounts can be connected using the below cmdlet.
|
1 |
Connect-ExchangeOnline |
It will prompt for the user’s name and password. After entering the credential, it will create an Exchange Online PowerShell session.
To automatically install the EXO V3 module and connect to Exchange Online PowerShell, you can use the below PowerShell script.
|
1 2 3 4 5 6 7 8 9 10 11 12 13 14 15 16 17 18 19 20 |
#Check for EXO v3 module installation $Module = | (Get-Module ExchangeOnlineManagement -ListAvailable) | where {$_.Version.major -ge 3} if($Module.count -eq 0) { Write-Host Exchange Online PowerShell V3 module is not available -ForegroundColor yellow $Confirm= Read-Host Are you sure you want to install module? [Y] Yes [N] No if($Confirm -match "[yY]") { Write-host "Installing Exchange Online PowerShell module" Install-Module ExchangeOnlineManagement -Repository PSGallery -AllowClobber -Force Import-Module ExchangeOnlineManagement } else { Write-Host EXO V3 module is required to connect Exchange Online. Please install module using Install-Module ExchangeOnlineManagement cmdlet. Exit } } Write-Host Connecting to Exchange Online... Connect-ExchangeOnline |
1. Set the execution policy to Remote Signed
Windows PowerShell needs to be configured to run the remote script and it is not enabled by default. If you haven’t enabled it, you will get the below error.
Files cannot be loaded because running scripts is disabled on this system. Provide a valid certificate with which to sign the files.
Solution: Run the following cmdlet.
|
1 |
Set-ExecutionPolicy RemoteSigned |
2. ‘Connect-ExchangeOnline‘ is not recognized as the name of a cmdlet:
When trying to connect Exchange Online using the ‘Connect-ExchangeOnline” cmdlet, you will get the following error.
Connect-ExchangeOnline : The term ‘Connect-ExchangeOnline’ is not recognized as the name of a cmdlet, function, script file, or operable program. Check the spelling of the name, or if a path was included, verify that the path is correct and try again.
Solution: To use the Connect-ExchangeOnline cmdlet, you must install and import the ExchangeOnlineManagement module.
3. Disconnect Exchange Online PowerShell session
Make sure to disconnect the remote PowerShell session when you’re finished. Else you ended up using all remote PowerShell sessions available to you and you will get the following error.
New-ExoPSSession : Processing data from remote server outlook.office365. com failed with the following error message: [AuthZRequestId=068a9813-8420-43f0-9f20-692228962287] [FailureCategory=AuthZ-AuthorizationException] Fail to create a runspace because you have exceeded the maximum number of connections allowed: 10
Solution: Disconnect the PowerShell session using below command.
|
1 |
Disconnect-ExchangeOnline –Confirm:$false |
The above syntax, disconnects the Exchange Online sessions without the prompt.
4. Enable Basic Authentication on the WinRM service:
EXO V2 module supports modern authentication in Office 365 end. However, it requires basic auth to transport modern auth tokens at the client-side. If WinRM basic authentication is disabled, you will get the error.
New-ExoPSSession : Connecting to remote server outlook.office365.com failed with the following error message : The WinRM client cannot process the request. Basic authentication is currently disabled in the client configuration.
Solution: To enable WinRM basic auth, run the below cmdlet in the command prompt.
|
1 |
winrm set winrm/config/client/auth @{Basic="true"} |
Note: EXO V3 module doesn’t require enabling WinRM basic auth.
Finally, we have done with connecting to EXO PowerShell. Despite all the advantages of PowerShell, admins often rely on third-party solutions due to several factors, including the mess around the output, multiple scripts, and more, where PowerShell falls short. AdminDroid is an elite tool in the Exchange Online reporting and auditing world. Let’s dive into its numerous features and reports.
AdminDroid delivers crystal-clear details and AI-generated powerful charts that fulfill all the reporting & auditing requirements which admins ever crave for. In addition, the Exchange Online dashboard lets you have a glimpse of your EXO environment, such as mailbox audit, mailbox connections, and mailbox usage, with appealing insights.
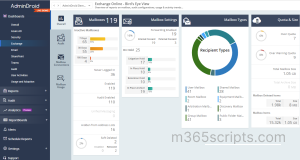
With the AdminDroid Exchange Online reporting tool, you will get details on mailbox usage, mailbox settings, mailbox devices, and more.
Additionally, it makes your Exchange Online auditing a cakewalk by providing reports on mailbox accesses, mailbox permission changes, ATP, Exchange configuration changes, etc.
Furthermore, AdminDroid has several amazing yet useful features like alerting, granular delegation, compliance reporting, advanced schedule, advanced filters, and the list never ends. Undoubtedly, AdminDroid is a gem💎 in enhancing your Exchange Online management and securing your mailboxes efficiently.
Don’t confine yourself to mailbox management in the ocean of AdminDroid. In addition, it empowers you by providing control over your mailbox traffic, email statistics, threat protection details, users’ peak & slack hours, and the list goes on. Reap the benefit of the AdminDroid email monitoring tool and maximize your email management & security. Explore AdminDroid today and enjoy the plethora of Microsoft 365 reports and features!