How to Connect to Microsoft Teams Using PowerShell
Install and connect to Microsoft Teams PowerShell module for Teams administration. Use Connect-MicrosoftTeams cmdlet to create authenticated sessions with MFA support. Access Teams cmdlets including Get-Team, Get-TeamChannel, and Skype for Business Online commands through the unified module.
Microsoft Teams has its PowerShell module called ‘MicrosoftTeams’. It helps administrators manage Teams, policies, and their settings through PowerShell.
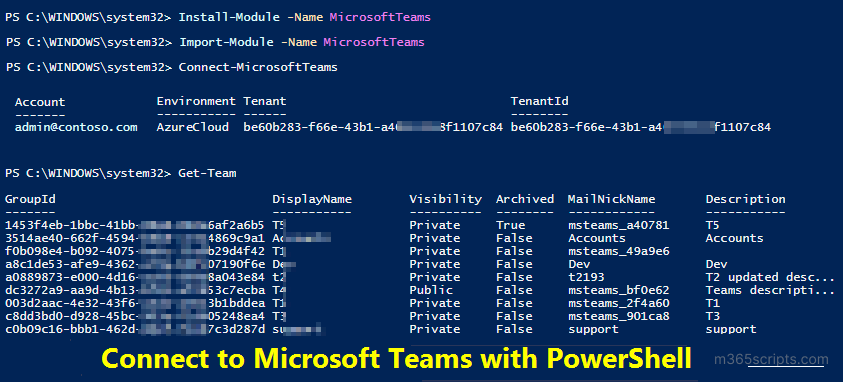
To download and install Microsoft Teams PowerShell module, run the following cmdlet in the Windows PowerShell.
|
1 |
Install-Module -Name MicrosoftTeams |
After installing, you need to import the Microsoft Teams module to avoid the following error: ‘Connect-MicrosoftTeams is not recognized as the name of a cmdlet’.
To import the module, execute the below cmdlet.
|
1 |
Import-Module –Name MicrosoftTeams |
The ‘Connect-MicrosoftTeams’ cmdlet creates PowerShell session to Microsoft Teams environment. To create a session, run the cmdlet as shown below.
|
1 |
Connect-MicrosoftTeams |
You can also use the above cmdlet to connect to Microsoft Teams with MFA enabled accounts.
To run the cmdlet by using the Credential parameter, you can use the following cmdlet.
|
1 2 3 |
$Cred=Get-Credential Connect-MicrosoftTeams –Credential $Cred |
After connecting to the Teams, you can make use of the Microsoft Teams PowerShell commands like Get-Team, Get-TeamChannel, Get-TeamUser, and more, to view and gain insights about the Teams, channels, its members in your M365 environment.
To get a list of all the cmdlets available in the Microsoft Teams module, run the following cmdlet.
|
1 |
Get-Command –Module MicrosoftTeams |
Note: You can manage Get-Cs*, Set-Cs*, New-Cs* cmdlets from the Microsoft Teams module itself. You do not require Skype for Business Online Connector for Teams administration.
To disconnect PowerShell from the Microsoft Teams environment, you can execute the below cmdlet.
|
1 |
Disconnect-MicrosoftTeams |
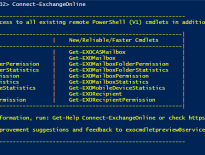
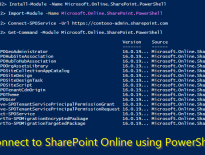
If you are working with multiple Office 365 workloads such as Azure AD, Exchange Online, SharePoint Online, etc., download the connect to all Office 365 services PowerShell script. It helps to connect all the Office 365 services by using a single cmdlet.
We have just now seen how to connect MS Teams using PowerShell. But why do we go for PowerShell despite knowing it is tiring and time-consuming? Even so, we desperately go for PowerShell since we can’t find detailed reports on Teams in admin centers. What if I say you can find them all on a single tool? No need for scripts or cmdlets to generate reports!
Yes! AdminDroid Microsoft Teams reporting tool generates and facilitates you with all kinds of reports you need regarding Microsoft Teams. It provides the following in-depth reports, and you can find detailed reports on all Microsoft Teams activities in your organization.
- All Teams
- Public and Private Teams
- Hidden Membership Teams
- Archive Teams
- Recent Team Creations and Deletions
- Teams with Private channels
- Teams with Shared channels
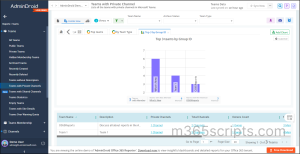
These are just the tip of the iceberg! Apart from MS Teams management, AdminDroid also provides 1800+ comprehensive reports and 30+ stunning dashboards on Azure AD, Exchange Online, SharePoint Online, OneDrive, and Yammer to have a panoramic view of Microsoft 365. It is an easy-to-set-up tool with a user-friendly interface. Its features like advanced alerting, quick scheduling, and enriched filters make AdminDroid a perfect choice for your Office management.
With these great features of AdminDroid, you can efficiently manage your entire Microsoft 365 environment!