How to Manage SharePoint Document Library in Microsoft 365
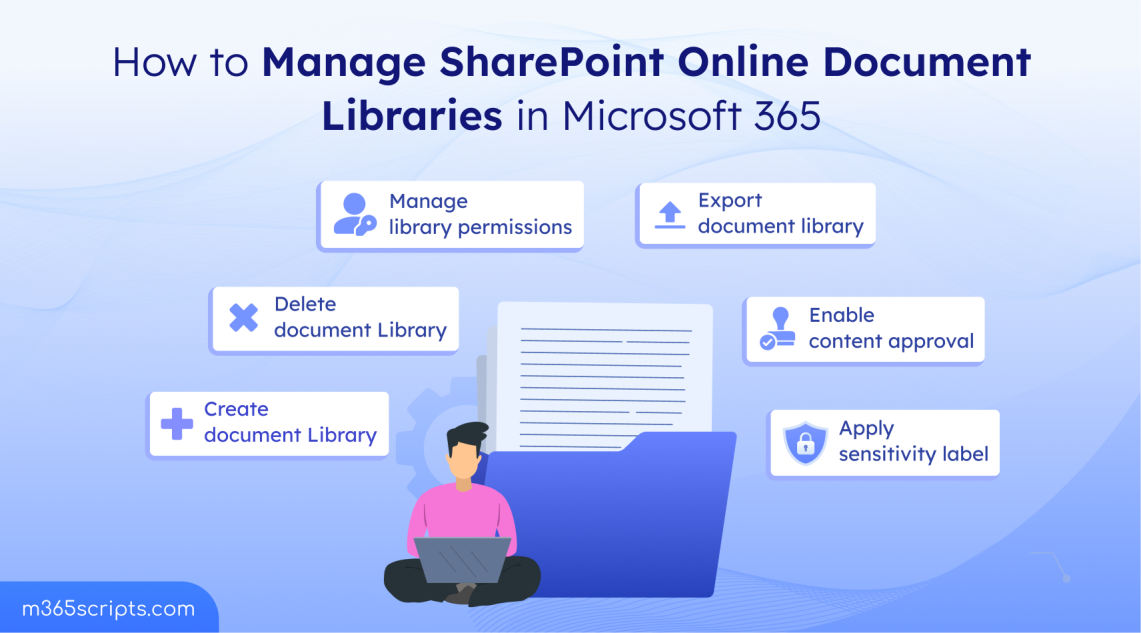
Create and manage SharePoint Online document libraries using the UI or PnP PowerShell for organized file storage. Configure versioning, content types, and metadata columns. Automate library creation across multiple sites and implement proper permission structures for team collaboration and content management.
As your organization grows, so does the volume of files, documents, and data you need to manage in SharePoint. Without a structured system, information becomes scattered, making it difficult to locate important files when needed. That’s why you need to create SharePoint Document Libraries—a solution for storing and organizing documents in SharePoint Online within your organization.
A document library is a managed storage area in SharePoint that lets teams have a place to manage content, control permissions, and collect documents in libraries in a structured way. It functions like an organized folder with collaboration and automation support.
But creating libraries is only the starting point. They also need ongoing management! Without proper management, challenges like disorganization, duplication, and access control can arise, reducing productivity.
In this guide, let’s explore how to create and manage SharePoint Online document libraries—from setting them up to implementing best practices for seamless collaboration.
You can create, manage, and delete the SharePoint Online document library using either PnP PowerShell or the SharePoint UI. The right method depends on your requirements—manual or automated.
Permissions Requirement: You must have at least Edit permissions on the site where you want to create and manage a document library.
Methods to Manage Document Libraries in SharePoint Online
Using SharePoint UI
The method differs for Team and Communication sites; refer below for their respective navigation paths.
For Teams site: Sign in to the SharePoint admin center and go to Active sites. Click the respective site, then select View site in the site’s details pane. In the navigation panel, click Site contents.
For Communication site: In the Active sites page of the SharePoint admin center, click the site where you want to create a document library. Select View site, then navigate to the Settings (⚙️) at the top of the page and choose Site contents.
Once you reached Site contents, managing document libraries becomes simple. No worries! We’ll walk you through clear steps to handle them efficiently in SharePoint Online.
Using PnP PowerShell
Before executing any cmdlets, ensure you register an Entra ID application to use with PnP PowerShell and connect PnP PowerShell with the SharePoint Online site where you want to manage the document library.
Here are the ways to manage the document library in SharePoint Online.
- Create a SharePoint Online document library
- Configure versioning in a SharePoint library
- Customize permissions for a library in SharePoint Online
- Set content approval for a document library in SharePoint Online
- Enable quick edit in the SharePoint Online document library
- Export document library in SharePoint Online
- Delete a document library in SharePoint Online
- Restore a deleted document library in SharePoint Online
- Add a sensitivity label to the SharePoint document library
By default, each SharePoint site includes a document library created during site setup. However, relying on a single library to manage all SharePoint site contents can quickly lead to clutter. To keep documents structured and easily accessible, it is essential to create a new document library on the SharePoint Online site as needed. Follow the steps below to create a document library in SharePoint Online.
Note: A SharePoint site collection can have up to 2,000 lists and libraries combined.
Using SharePoint UI
- Navigate to Site contents in the respective site.
- Click New and select Document Library.
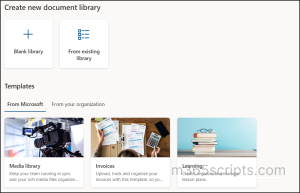
- Choose one of the following options to add a document library to the SharePoint Online site:
- Blank Library → Creates an empty document library where you need to start from scratch.
- From Existing Library → This creates a new document library from the existing document library. Therefore, this option can be used to copy an existing document library from any SharePoint site in the tenant, including all its columns, metadata, and views. It is useful when you want the new library to retain the same structure as the existing one.
- Select the existing library from the list.
- Click Next to proceed.
- Templates → Creates a document library using a predefined template, which includes columns, metadata, views, and structure. This ensures consistency and saves time by using a standardized format across sites. You can also create custom document library templates for your specific needs.
- Choose the desired template under Templates.
- Click Use Template to proceed.
- Enter a Name and an optional Description.
- To apply a sensitivity label for the library, select a label under Default Sensitivity Labels.
- Click Create to finalize the document library setup.
After creating a document library, its a best practice to enable Document ID to reliably track documents, maintain permanent links, and manage content across multiple libraries with ease.
Using PnP PowerShell
Ensure you are connected to the site using PnP PowerShell, then run the following cmdlet to create a SharePoint document library.
|
1 |
New-PnPList -Title "Finance Team Library" -Template DocumentLibrary -OnQuickLaunch |
The above cmdlet creates a library named Finance Team Library in the SharePoint Online site.
Tip: You can also use the New-PnPList cmdlet to create a document library in SharePoint Online subsites.
Intelligent versioning in SharePoint Online
is an advanced feature that helps manage document versions efficiently. It prevents outdated document libraries from accumulating excessive versions and allows users to restore previous versions in cases of human error or malware incidents. Below are the steps to configure versioning settings for a document library in SharePoint Online.
Using SharePoint UI
- Navigate to the Site contents in the respective site and click the desired document library.
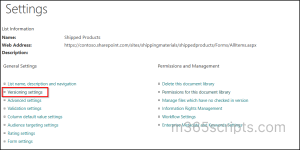
- Click on Settings(⚙️) and choose Library settings.
- Select More library settings and click Versioning settings under General Settings.
- Configure the following based on your requirements.
- Document Versioning History – Choose whether to create a new version every time a file is edited by specifying either major versions only or both major and minor versions.
- Version time limit – Set a time limit to delete older versions based on their age.
- Version count limit – Define the maximum number of versions to retain.
Note: Older versions will be automatically removed once they exceed the specified version limit or time frame.
- Click OK to save the changes in versioning settings.

Using PnP PowerShell
Execute the following cmdlet to enable and configure versioning settings for a SharePoint Online document library.
|
1 |
Set-PnPList -Identity "Alexia Project" -EnableVersioning $true -EnableMinorVersions $true -MajorVersions 1000 -MinorVersions 500 -ExpireVersionsAfterDays 30 -EnableAutoExpirationVersionTrim $false |
The above cmdlet enables versioning for the document library named “Alexia Project” and applies the following settings:
- EnableVersioning: Activates versioning for the SharePoint document library.
- EnableMinorVersions: Allows both major and minor versions to be stored. Setting this to $false enables only major versions.
- MajorVersions: Limits the maximum number of major versions to 1,000. When a new major version (1,001) is created, the oldest version is automatically deleted to maintain the set limit.
- MinorVersions: Limits the number of minor versions to 500, applying the same auto-deletion rule.
- ExpireVersionsAfterDays: Automatically deletes versions older than 30 days.
- EnableAutoExpirationVersionTrim: Disables automatic version trimming so that the SharePoint Online document library versioning history limit follows the specified retention settings. If set to $true, versions will be automatically deleted over time based on activity and age. In this case, you cannot manually define a time frame or version limit.
A SharePoint Online document library inherits permissions from its parent site. But what if a user needs access to only a specific library? Granting site-wide access isn’t ideal. This is where unique permissions in SharePoint Online come into play. By breaking permission inheritance, you can assign specific access rights to the document library, ensuring better security and control over your data.
Note: You need the Full Control permission on the library to manage SharePoint Online document library permissions.
Using SharePoint UI
- Navigate to the Site contents and click on the document library.
- Click Settings (⚙️) at the top of the page and go to Library settings → More library settings → Permissions for this document library under Permissions and Management.
- Click Stop Inheriting Permissions and confirm by clicking OK to break permission inheritance from the site.
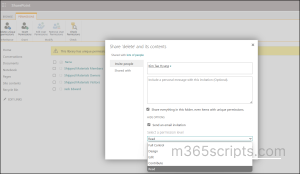
- Click Grant Permissions, enter the name of the user who should have access to the document library, and then click SHOW OPTIONS to select the appropriate permission level.
- Click Share to apply unique permissions to the library.
Select the following options to manage the library permissions based on your requirements.
-
- Remove User Permissions – This option revokes access for specific users or groups. To remove a user permission, select the checkbox next to their name, click Remove User Permission, and confirm by clicking OK in the prompt.
- Edit User Permissions – This allows you to modify users existing permissions. Select the checkbox next to the user’s name, click Edit User Permissions, and adjust the assigned permission levels as needed.
- Delete Unique Permissions – This action removes all unique permissions from the document library, resetting it to inherit permissions from the parent site. Doing so ensures consistent access control across the site hierarchy.
Using PnP PowerShell
PowerShell simplifies SharePoint Online permission management, allowing you to break inheritance, assign roles, modify access, and restore default settings with a few cmdlets.
We have specified a few cmdlets to help manage SharePoint Online document library permissions. You can use the appropriate cmdlet based on your requirements.
Break Permission Inheritance
Run the following cmdlet to break the SharePoint library permission inheritance.
|
1 |
Set-PnPList -Identity "Alexia Project" -BreakRoleInheritance -CopyRoleAssignments |
The above cmdlet breaks the permission inheritance of the Alexia Project document library from the parent site while copying existing permissions.
Add User Permissions
To grant permission to users or groups, use the cmdlet below.
|
1 |
Set-PnPListPermission -Identity "Alexia Project" -User "[email protected]" -AddRole "Full Control" |
The above cmdlet grants Full Control access to the user [email protected] for the document library. You can use this cmdlet to assign permissions to other users or groups.
Revoke the User Permissions
Execute the cmdlet below to remove the permission of users or groups from the document library.
|
1 |
Set-PnPListPermission -Identity "Alexia Project" -User "[email protected]" -RemoveRole "Full Control" |
The above cmdlet removes Full Control permissions from [email protected], restricting their access. You can replace the username with any other user or group.
Modify User Access
Use the following cmdlet to edit user permissions in your SharePoint Online document library.
|
1 |
Set-PnPListPermission -Identity "Alexia Project" -User "[email protected]" -AddRole "Read" -RemoveRole "Full Control" |
The above cmdlet modifies the user’s permission level, changing it from Full Control to Read.
Restore Inherited Permissions
Run the cmdlet below to delete a user permission in a document library.
|
1 |
Set-PnPList -Identity "Alexia Project" -ResetRoleInheritance |
This cmdlet deletes all unique permissions for the document library and restores inheritance from the parent site.
Handy Tip: You can also create custom permission levels and assign them based on specific requirements for more granular control.
Content approval in SharePoint Online allows you to keep new items or changes in a draft state until they receive approval. Draft item security adds another layer by controlling exactly who can view those drafts before approval whether it’s visitors, members, or approvers/authors. This ensures that only accurate and appropriate content is published, maintaining quality control before it becomes visible to all users.
You can configure content approval for SharePoint libraries through the versioning settings in the SharePoint Site UI.

Using PnP PowerShell
Run the below cmdlet to enable content approval for SharePoint Online libraries.
|
1 |
Set-PnPList -Identity “Alexia Project” -EnableModeration $true |
This cmdlet enables document versioning on the Alexia Project document library.
Want to take it a step further? Eliminate manual follow-ups and reduce delays from missed approvals by streamlining SharePoint content approvals using Power Automate. You can automate the entire process, from when an item is created or modified to notifying approvers and capturing their responses.
Once the approval flow is set up, you can also use the Approvals app in Teams to manage all your requests in one place. This helps keep your users informed, ensures timely responses, and improves overall visibility into approval workflows.
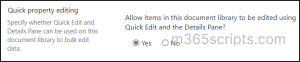
Managing data in SharePoint Online libraries can be time-consuming, especially when making bulk updates. Fortunately, SharePoint offers a powerful feature called ‘Quick Edit’ that allows users to edit list items in a grid format, similar to an Excel spreadsheet.
This feature enables faster updates without switching between pages, making it particularly useful for SharePoint Online libraries with a large number of documents and files. By using Quick Edit, users can significantly reduce the time required to update multiple items individually.
You can enable Quick Edit in a SharePoint Online library through both the UI and PowerShell to provide an intuitive grid interface where users can edit multiple items. Additionally, if your work involves frequently repeated actions like updating metadata or triggering predefined processes, you can use SharePoint quick steps to streamline those tasks.
Configuring settings alone is not enough; ongoing management ensures they function as intended. Regular monitoring helps maintain a well-organized document library and prevents unnoticed issues. Exporting a document library is crucial for backing up data, migrating content, or analyzing information when needed. Let’s walk through the steps to export a SharePoint Online document library efficiently.
Using SharePoint UI
- Navigate to Site contents and open the document library you want to export.
- Click the ellipsis (…) on the toolbar and select Export to Excel.
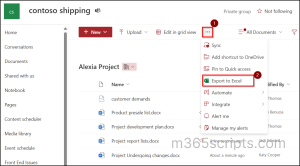
This exports the SharePoint Online document library’s metadata, including columns like Modified By, Modified On, and other default properties. However, it does not export actual files.
Using PnP PowerShell
Run the following cmdlet to export all SharePoint document libraries to a CSV file.
|
1 |
Get-PnPList -Identity "Alexia Project" | Select Title, ID, Hidden, DisableGridEditing, EnableMinorVersions, EnableModeration, ItemCount, MajorVersionLimit, MajorWithMinorVersionsLimit, HasUniqueRoleAssignments | Export-CSV -Path D:\SharePointOnline\DocumentLibrary.csv |
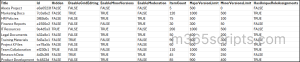
This command retrieves details of the Alexia Project document library and exports them to a CSV file at the specified location. For a more scalable approach, you can also export all SharePoint Online document libraries using a PowerShell script.
Leaving unwanted or outdated document libraries leads to high storage consumption in SharePoint Online. Therefore, once a document library is no longer needed, delete it to optimize storage space and maintain an organized SharePoint environment.
Similarly, unused or outdated site pages can clutter your site’s navigation and slow down content management. So, it’s also necessary to delete SharePoint pages to keep your site clean, relevant, and efficient.
Before deleting, ensure that the files inside the library are no longer needed to avoid any data loss.
Using SharePoint UI
- Navigate to Site contents and click the three-dot menu (⋮) next to the document library you want to delete.
- Choose Delete and hit Delete again in the confirmation prompt to delete a SharePoint Online document library.

Note:
A deleted document library is moved to the site’s Recycle Bin for 93 days, where you can restore it before permanent deletion.
Using PnP PowerShell
Run the following cmdlet to delete a document library in SharePoint Online using PowerShell.
|
1 |
Remove-PnPList -Identity "Finance Team Library" -Force |
This cmdlet deletes the library permanently. To soft delete a library in SharePoint Online, run the Remove-PnPList cmdlet with the -Recycle parameter as shown below.
|
1 |
Remove-PnPList -Identity "Finance Team Library" -Force -Recycle |
Tip: Export all files/folders storage in SharePoint Online document libraries
to identify empty ones and delete them for better storage optimization and resource management.
Human errors are inevitable in any organization. We’ve all been there—accidentally deleting a SharePoint library during an automated task or while trying to remove a different library. Fortunately, Microsoft provides an option to restore deleted libraries. You can restore libraries within 93 days of deletion. After this period, they are permanently deleted and cannot be recovered.
Below are the methods to restore a SharePoint Online document library.
Using SharePoint UI
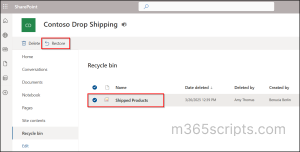
- Navigate to the Recycle bin on the SharePoint Online site.
- Select the deleted library you want to restore.
- Click Restore on the toolbar.
Note:
For a communication site, the Recycle Bin is located at the top of the Site Contents page.
Using PnP PowerShell
Run the following cmdlet to restore a deleted SharePoint Online document library.
|
1 |
Restore-PnPRecycleBinItem -Identity 985b4065-9823-976a-136o-0019345a1549 |
This cmdlet restores the library with the specified ID from the SharePoint Online site’s Recycle Bin. You can get the ID of the deleted document library using the Get-PnPRecycleBinItem cmdlet.
Many document libraries have confidential information that should be protected from unauthorized access. In such scenarios, SharePoint Online sensitivity labels help classify and secure documents with pre-configured protection settings such as encryption and content markings. Properly applying and monitoring sensitivity-labeled documents helps ensure they remain secure regardless of their location.
Note: You must first create a sensitivity label in the Microsoft Purview portal and then publish it to make it available for the users to apply. Only site admins can apply sensitivity labels in SharePoint Online.
Follow the steps below to apply a sensitivity label to a document library in SharePoint Online:
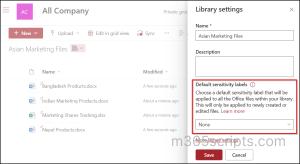
- Go to the Site contents of the respective site and click on the document library.
- Navigate to Settings(⚙️) → Library settings.
- In the Default sensitivity labels drop-down, select the desired sensitivity label.
- Click Save to apply the changes.
Note: It does not apply to existing files in the library. To label existing files, you need to manually update them or use auto-labeling policies.
We hope this blog made it easier for you to manage SharePoint Online document libraries. Feel free to ask any questions in the comments below!