How to Manage SharePoint Sites’ Privacy Settings in Microsoft 365
Manage SharePoint Online site privacy settings to control membership access and prevent unintended content exposure. Switch sites from Public to Private to restrict access to explicitly added members only. Configure hidden membership settings for confidential groups requiring enhanced privacy protection.
SharePoint sites are often created rapidly across all types of organizations for teams, projects, departments, etc. But without careful attention to privacy settings, sensitive content can be unintentionally exposed to everyone in the organization. A common mistake is leaving sites set to “Public”, which allows any user in the tenant to access the site and its contents even if they’re not part of the site. This not only risks data leaks but also violates compliance policies and creates confusion about who should have access.
The solution lies in proactively managing SharePoint sites privacy settings and switching sites from “Public” to “Private” where appropriate. By doing so, you can ensure that only approved members can access the site, safeguarding confidential information and maintaining control over collaboration spaces.
In SharePoint Online, the privacy setting of a site “public or private” controls who can access it by default
- A private site is restricted to members explicitly added to the Microsoft 365 Group, only those users (owners, members, or visitors) can view or interact with the site.
- In contrast, a public site is open to everyone in the organization for edit access, even if they haven’t been added directly. By default, the ‘Everyone except external users’ group is automatically added to the site members permission, granting edit access to all internal users unless manually removed.
- There is also a third privacy type, managed at the Microsoft 365 group level, called Hidden Membership. Enabling hidden membership hides the group’s member list from non-members, offering enhanced confidentiality. When this setting is enabled, it also applies to the connected SharePoint site. Instead of showing as ‘Public’ or ‘Private’, the site privacy will be labelled as ‘Hidden Membership’, clearly indicating that group membership is concealed. Once enabled, the group’s privacy setting (public/private) cannot be changed; consequently, this ensures consistent access boundaries.
This makes public sites suitable for broad communication, whereas private sites are ideal for managing confidential or team-specific content. Choosing the right privacy setting is essential to balance accessibility and data protection.
Managing privacy settings starts at the very beginning, when creating a SharePoint site. Regardless of whether you’re setting up a team site for confidential collaboration or designing a SharePoint intranet for broad sharing, it’s crucial to configure the right privacy level from the start. Below, we’ll walk you through how to create a SharePoint site and configure its privacy settings using two methods.
Required role permission: SharePoint Administrator or Global Administrator
1. How to configure site privacy in SharePoint using the native method
➡Set up privacy settings while site creation from the SharePoint admin center
➡Change privacy settings of a SharePoint site from private to public
➡Modify site privacy settings from SharePoint Online
2. How to update site privacy in SharePoint using PowerShell method
Managing SharePoint site privacy through native methods is ideal for admins who prefer a user-friendly interface or need to configure settings on a per-site basis. While it’s not the most scalable approach for bulk changes, it offers clarity and control for individual sites. There are three ways to update site privacy configurations using native method.
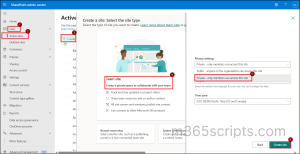
- Log in to the SharePoint admin center.
- Navigate to Sites> Active sites and then click on the “+ Create” option at the top.
- Now, choose the site type as Team site.
- Select a site template, enter all site details and click ‘Next’. You’ll see the ‘Private’ as the default option configured. Based on your requirement, you can modify the privacy settings.
- Select the language and time zone, then click ‘Create site’. Finally, add members and click ‘Finish’ to complete setup.
Alternatively, you can create a new site directly in SharePoint Online and set its privacy settings by following the same steps outlined above.
Note: Microsoft does not allow privacy setting for communication sites and classic team sites without M365 group association. So, the only way to control access for such sites in SharePoint Online is via site permissions management (owners, members, visitors) manually using SharePoint admin center or PowerShell.
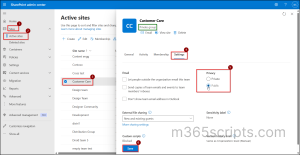
This section explains how to change privacy settings for an existing SharePoint site, unlike during site creation. Follow the below steps to update the privacy setting of a site in SharePoint admin center .
- Log in to SharePoint admin center.
- Navigate to Site> Active Sites then use the search bar to find the site where you want to change the privacy settings.
- Click on the site name, go to the ‘Settings’ pane, then change the ‘Privacy’ field from ‘Private’ to ‘Public’ and click ‘Save’ to apply the changes.
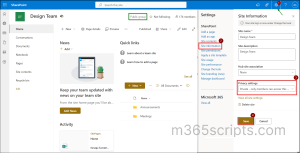
To change the privacy setting as a site admin/site owner in SharePoint Online itself, follow the below steps.
- Open SharePoint Online in your browser.
- Click the Settings (gear icon) in the top-right corner and then select ‘Site Information’.
- At the bottom of the site information pane, change the ‘Privacy settings’ to ‘Public’ and click ‘Save’ to apply changes.
The SharePoint Online admin center is user-friendly, but it has several limitations when you’re trying to manage SharePoint site privacy settings on a larger scale.
❌One major drawback is that you can only view & change the privacy setting for one site at a time, which quickly becomes inefficient in larger environments.
❌Additionally, there’s no built-in export or reporting option to view privacy details for multiple sites at once.
Due to these limitations, PowerShell becomes the go-to solution for admins. It allows you to fetch privacy settings for all sites that makes bulk auditing and reporting fast, scalable, and efficient.
- Export SharePoint sites privacy report
- Get only public team sites report in SharePoint
- Configure privacy settings while creating SharePoint site
- Change the privacy settings on SharePoint site
➡ Switch the SharePoint site privacy with PnP PowerShell
➡ Update SharePoint site privacy with Exchange Online PowerShell
➡ Modify privacy for SharePoint site with Microsoft Graph PowerShell
➡Import Microsoft 365 group IDs from text file
Before we dive into changing site privacy settings, it’s important to first understand the current privacy configuration of each site. By retrieving team sites along with their visibility status, you can identify any sites that may be unintentionally public and also take corrective action.
First, make sure to register an Entra ID application to use with PnP PowerShell and then make sure to connect to the PnP PowerShell using the below cmdlet.
|
1 |
Connect-PnPOnline -ClientId <client-Id> |
Also, ensure to grant Sites.FullControl.All, Group.ReadWrite.All, and Directory.ReadWrite.All permissions to the Microsoft Graph and SharePoint app.
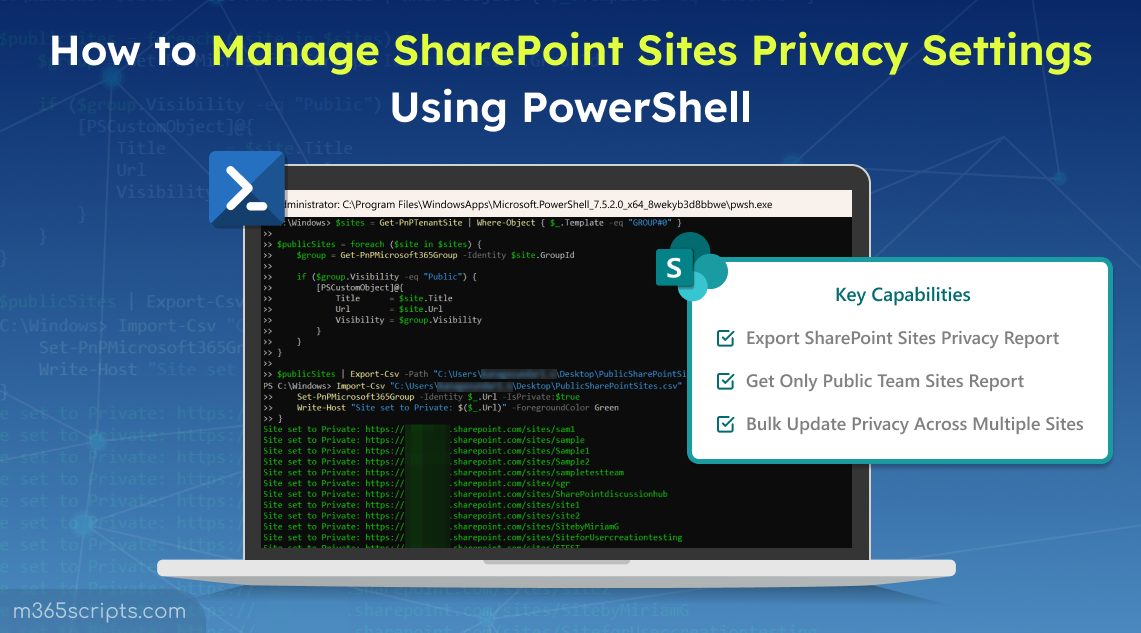
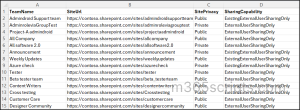
To export a SharePoint site’s privacy report in CSV format, use the following PowerShell script:
|
1 2 3 4 5 6 7 8 9 |
Get-PnPTenantSite | Where-Object {$_. Template -eq "GROUP#0"} | ForEach-Object { $grp = Get-PnPMicrosoft365Group -Identity $_.GroupId [PSCustomObject]@{ TeamName = $_.Title SiteUrl = $_.Url SitePrivacy = $grp.Visibility SharingCapability = $_.SharingCapability } } | Export-Csv -Path "C:\Users\SharePointPrivacyReport.csv" -NoTypeInformation |
To find the privacy setting of a specific site alone, run the cmdlet below.
|
1 2 3 |
$site = Get-PnPTenantSite -Url "https://<yourtenant>.sharepoint.com/sites/<yoursite>" $group = Get-PnPMicrosoft365Group -Identity $site.GroupId $group.Visibility |
You can use the script below to filter and list only the public team sites in your environment. This output can also be used as input for the next script, which updates site privacy settings. To retrieve only private sites, you can modify this visibility filter as: $group.Visibility -eq “Private“. Connect to the PnP PowerShell and run the below script to get a report on only sites with public privacy settings.
|
1 2 3 4 5 6 7 8 9 10 11 12 13 |
$sites = Get-PnPTenantSite | Where-Object {$_.Template -eq "GROUP#0"} $publicSites = foreach ($site in $sites) { $group = Get-PnPMicrosoft365Group -Identity $site.GroupId if ($group.Visibility -eq "Public") { [PSCustomObject]@{ Title = $site.Title Url = $site.Url GroupId = $site.GroupId Visibility = $group.Visibility } } } $publicSites | Export-Csv -Path "C:\Users\path\PublicSharePointSites.csv" -NoTypeInformation |
To create a new private site, connect to the PnP PowerShell and run the below cmdlet.
|
1 |
New-PnPSite -Type TeamSite -Title "Retail Team" -Alias "retailteam" -IsPublic:$false -Owner "[email protected]" |
-IsPublic:$false ensures the site is created as Private. Replace the Title, Alias, and Owner parameters with the team name, alias name, and team owner of the new site.
Note: You can also create a new Microsoft 365 group connected team sites using Microsoft Graph, but remember that communication sites or other types of sites cannot be created.
You can use PowerShell to update the privacy settings for one or multiple SharePoint sites. This can be done via PnP PowerShell, Microsoft Graph, or the Exchange Online module.
How to Switch the SharePoint Site Privacy with PnP PowerShell
Connect to the PnP PowerShell and use the below cmdlet to change the privacy of a site from private to public. Alternatively, you can change the property value (IsPrivate:$true) based on the requirement and update the site privacy.
|
1 |
Set-PnPMicrosoft365Group -Identity (Get-PnPTenantSite -Url "https://<tenant>.sharepoint.com/sites/<sitename>").GroupId -IsPrivate:$false |
How to Update SharePoint Site Privacy with Exchange Online PowerShell
You can change SharePoint site privacy using Exchange Online PowerShell because the site’s privacy is tied to its Microsoft 365 Group, which is managed through Exchange Online. Connect to the Exchange Online PowerShell and run the below cmdlet to change the privacy setting of your site from Private to Public.
|
1 |
Set-UnifiedGroup -Identity "<Group-Email>" -AccessType Public |
How to Modify Privacy for SharePoint Site with Microsoft Graph PowerShell
Connect to the Microsoft Graph PowerShell and run the below cmdlet to change the privacy setting of your site from Private to Public.
|
1 |
Update-MgGroup -GroupId "<group-ID>" -Visibility "Public" |
You can retrieve the Group ID of a specific site by using this cmdlet in PnP PowerShell:
|
1 2 |
$site = Get-PnPTenantSite -Url "https://<your-tenant>.sharepoint.com/sites/<sitename>" $site.GroupId |
You can also find all group IDs (Object ID) column via the Entra admin center.
Manually updating privacy settings for multiple SharePoint sites is not practical. SharePoint doesn’t allow bulk privacy changes directly through the interface; each site must be updated one by one. This manual process is not only time-consuming but also increases the chances of mistakes.
To simplify this, you can use PowerShell to automate SharePoint privacy settings across multiple sites. This method is faster, scalable, and ensures consistent access control throughout your organization.
Import Public Sites from CSV
Before updating privacy settings for multiple sites, you’ll need a list of SharePoint site URLs. In large environments, collecting this information manually isn’t practical.
If you’ve already used the ‘Public Sites’ script from the previous section, great! It exports a CSV file with useful details like site names, URLs, and privacy status. If not, go ahead and run that script to generate the report.
Once you have the CSV, you can reuse it here as well. Just import the file and use PowerShell to change the privacy setting from Public to Private in bulk.
|
1 2 3 4 |
Import-Csv "C:\Users\path\PublicSharePointsites.csv" | ForEach-Object { Set-PnPMicrosoft365Group -Identity $_.GroupId -IsPrivate:$true Write-Host "Updated to Private: $($_.Url)" -ForegroundColor Green } |
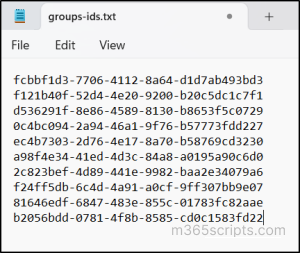
Import Microsoft 365 Group IDs from Text File
Connect to the PnP PowerShell and run the cmdlet given below to apply privacy changes in bulk for multiple sites, firstly get the group IDs and then save them as text files for input.
|
1 2 3 4 |
$groupIds = Get-Content -Path "<C:\groupids.txt>" foreach ($groupId in $groupIds) { Set-PnPMicrosoft365Group -Identity $groupId -IsPrivate:$true } |
Sample Input File:
Handle Privacy Settings for Standalone SharePoint Sites
As we already know, this can only be applied to Microsoft 365 group-connected (Teams) sites; however, it cannot be used for communication sites or classic team sites without M365 groups.
For sites that aren’t connected to Microsoft 365 Groups, you can’t manage SharePoint sites privacy using group-based settings. Instead, the only way to protect their privacy is by configuring external sharing controls appropriately. You can use Set-PnPSite – SharingCapability in PnP PowerShell to disable or limit external sharing.
If you want the site users not to share the site externally, or worldwide, run the below cmdlet to lock it down to “Only people in your organization”. It effectively disables the external sharing for that site. It also helps protect site privacy by restricting access exclusively to internal & authorized users. Combining both methods ensures comprehensive privacy control across all site types.
|
1 |
Set-PnPSite -Identity https://<your-tenant>.sharepoint.com/sites/<your-site> -SharingCapability Disabled |
Wrapping Up
Privacy isn’t just a setting, it’s a responsibility. And whether you’re managing dozens or hundreds of SharePoint sites, PowerShell, in turn, helps you enforce site visibility, maintain compliance, and protect sensitive content.
To strengthen your defences even further, the SharePoint Online security best practices explore practical ways to tighten access controls, manage sharing policies, and build a more secure collaboration environment. I hope this blog gave you a clear idea of managing SharePoint site privacy settings effectively. Feel free to drop your questions or share your thoughts in the comments!