Manage Permission Levels in SharePoint Online Using PowerShell
SharePoint Online sites in Microsoft 365 serve a variety of purposes, from file storage to internal intranet platforms, and managing permissions from the outset is crucial to secure data and structure access effectively. Each site has various permission levels that can be assigned to users based on their roles. These permission levels in SharePoint Online have a set of permissions that define what users can do on a site, such as creating SharePoint lists, adding items, modifying files, etc…
Let’s dive more into how to manage SharePoint permission levels using PowerShell in detail.
Each SharePoint Online site comes with the following default permission levels that can be assigned to site users.
- Full Control – This permission level allows complete access to create, edit, view, approve, and manage everything on a site.
- Design – It has view, add, update, delete, approve, and customize permissions on lists and document libraries. Few site permissions will not be included.
- Edit – It has add, edit, and delete list permissions, list items, and document libraries.
- Contribute – Users with this permission level can view, add, update, and delete list items and documents.
- Read – Users can view pages & list items and download documents.
- Limited Access – This level can’t be directly assigned to a user or group. Instead, it will be automatically assigned by SharePoint whenever you assign a user with view or edit permission to a specific site item. This level is hidden by default. SharePoint also offers a stricter variation called Limited-access user permission lockdown mode, which further restricts user actions on pages and libraries to enhance site security.
Creating, modifying, deleting, and copying permission levels in SharePoint Online can be done using both the UI and PowerShell.
You can view the permission levels of a site by navigating to the respective site –> site permissions –> Advanced permissions settings –> permission levels. Here, you can add, delete, and modify permission levels as you wish.
Let’s discuss different scenarios for managing SharePoint permission levels using PowerShell below.
- Get SharePoint permission levels of a site
- Create custom permission levels in SharePoint Online
- Modify permission levels in SharePoint Online
- Delete a SharePoint permission level
- Copy permission levels in SharePoint Online
- Bulk create SharePoint permission levels using CSV
Before proceeding, first, you need to register an Entra ID application to use with PnP Powershell and connect to PnP PowerShell with the site name.
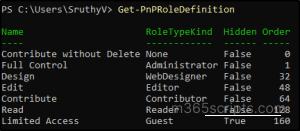
After connecting to a SharePoint site using PnP PowerShell, you can get the available permission levels on the site by running the below cmdlet.
|
1 |
Get-PnPRoleDefinition |
You will get the list of all default and custom permission levels along with role type kind, order, and its hidden status.
Sample Output:
Creating custom permission levels in SPO can be done using the ‘Add-PnPRoleDefinition’ cmdlet as shown below.
|
1 |
Add-PnPRoleDefinition –RoleName “<Role name>” -Include <list_of_actions_to_be_included> |
Example:
|
1 |
Add-PnPRoleDefinition -RoleName "New Permission Level" -Include AddListItems,EditListItems,DeleteListItems,ApproveItems |
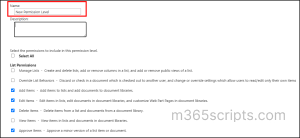
You can use –Include and –Exclude parameters to customize the set of permissions to be included and excluded in the custom permission level. Once created, you can navigate to the respective site and verify the custom permission level.
Note: As permission names differ between the UI and PowerShell, you can refer to the permission names in PowerShell here.
Sample Output:
Based on the scenarios, the need for customizing permissions might vary. If you want to modify the permission level name, add description, or update the permissions, run the below cmdlet.
|
1 |
Set-PnPRoleDefinition –Identity <PermissionLevelName> -NewRoleName <NewRoleName> -Description <Description> |
Example:
Here, I have modified the permission level name and added the description.
|
1 |
Set-PnPRoleDefinition -Identity "New Permission Level" -NewRoleName "Permission Level New" -Description "Can add, edit, delete, and approve list items." |
If you want to remove a permission level in SharePoint Online, run the below cmdlet.
|
1 |
Remove-PnPRoleDefinition –Identity <PermissionLevelName> |
Example:
|
1 |
Remove-PnPRoleDefinition -Identity "Contribute without Delete" |
After running the cmdlet, you will get prompted to confirm the removal. Give ‘y’ to remove the permission level.
Occasionally, you might want to add or remove a few permissions from the default permission levels. However, modifying the default permission level is not recommended. For such scenarios, you can clone a permission level and customize the permissions as per your requirements.
Run the below cmdlet to copy permission levels and customize the permissions.
|
1 |
Add-PnPRoleDefinition –RoleName “<NewPermissionLevelName>” -Clone “<Permission level name to be copied>” -Exclude <permission 1, permission 2> |
Example:
|
1 |
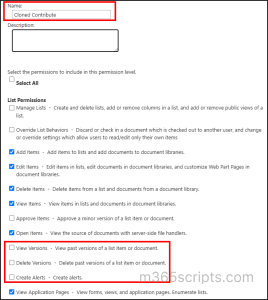
Add-PnPRoleDefinition -RoleName "Cloned Contribute" -Clone "Contribute" -Exclude DeleteVersions,ViewVersions,CreateAlerts |
In the above example, I have removed the ‘Delete versions, View versions, and Create alerts’ permissions from the ‘Contribute’ permission level.
Sample Output:
In the below image, the excluded permissions are not selected for the permission level.
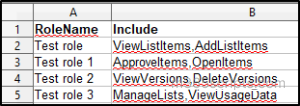
If you want to create multiple permission levels for a site with various permissions, you can create a CSV file, including the permission level name and the permissions to be included in them.
After creating a CSV file, run the below cmdlet.
|
1 2 3 4 |
Import-Csv “<file_path>” | ForEach-Object { $permissions = $_.Include -split ',\s*' Add-PnPRoleDefinition -RoleName $_.RoleName -Include $permissions } |
Note: You must give the permission level name in the ‘RoleName’ column and permissions to be included in the ‘Include’ column to run the script without getting errors.
Sample CSV File:
I hope this blog has helped you to easily manage SharePoint site permission levels and avoid unwanted access to your site content. Additionally, use unique permissions to break inheritance and grant granular access to specific users or groups. Reach out to us through the comment section for any queries!


