
Use Quick Steps in SharePoint Online to Automate Repetitive Tasks
SharePoint Quick Steps let you create single-click actions like updating metadata, sending emails, starting Teams chats, or triggering flows directly from lists and libraries. By configuring an action once and optionally adding it as a column, you can run it instantly from the view without opening items or navigating multiple menus.
In SharePoint, lists and libraries are where work actually happens. But here’s the thing: the more you depend on them, the more time you spend doing the same repetitive actions inside them. This includes updating item statuses, moving files between folders, sending approval requests, etc.
You open a list ➔ find an item ➔ click into it ➔ change the status ➔ save it ➔ go back & find the next one ➔ repeat. Or you’ve turned to Power Automate to handle something that really should have been a lot simpler. 🥲
The struggle is real. And it’s not because SharePoint is broken. It’s just that until recently, there wasn’t a great middle ground between “do it manually every time” and “build a full automation flow.”
That middle ground is now here. It’s called SharePoint Quick Steps. In this blog, we’ll explore what quick steps are, and how to use them effectively to get the most out of them.
Quick steps, as the name suggests, are built for speed. They help you get things done with a single click inside a SharePoint list or library.
You define a set of actions, assign it to a button, and anyone with the right permissions can run it on an item instantly.⚡
It’s designed to eliminate the need to build full workflows for every small, repetitive task. The feature is enabled by default and respects existing permissions within SharePoint.
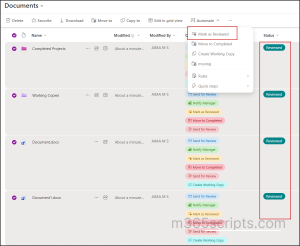
For example, in the image below, instead of selecting each document and updating its status column to “Reviewed” one by one, I selected all the documents at once and simply clicked a single button labeled “Mark as Reviewed.”
In SharePoint, there are currently 6 quick steps available. This list may expand in the future as new actions are added.
When selecting a file or list item
The following quick steps appear when you select files or list items:
- Draft an email – Opens a pre-populated email draft in Outlook so you can quickly notify team members about the selected item(s).
- Start a Teams chat – Opens a Microsoft Teams chat with the users defined and adds the item link for instant access.
- Set a value – Quickly change metadata for one or more items without opening item properties.
- Execute a flow – Triggers an existing Power Automate flow for the selected item(s) or the entire list/library.
- Move file or folder (For document libraries only) – Moves the selected file(s) or folder(s) to another location in the library or site.
- Copy file or folder (For document libraries only) – Creates a copy of the selected file(s) or folder(s) in another location in the library or site.
At the library/list level
The following quick step is available when no specific item is selected:
- Execute a flow
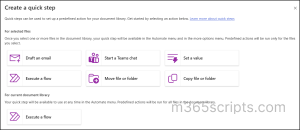
Quick steps available for a document library:
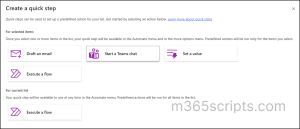
Quick steps available for a list:
Note: When you select multiple files, the ‘Draft an email’ and ‘Start a Teams chat’ options do not appear. These actions are designed for single-item context scenarios.
As mentioned before, quick steps respect the SharePoint permission model. The ability to create, manage, or use them depends on the user’s access level within the site.
| Permission Level | Create / Manage quick steps | Use quick steps | Limitations |
| Full Control (Owners) | ✅ Yes | ✅ Yes | No restrictions. |
| Contribute | ❌ No | ✅ Yes | Cannot use quick steps that trigger flows they don’t have permission for. |
| Read | ❌ No | ⚠️ Limited | Can only use Draft an email and Start a Teams chat. |
To configure quick steps in SharePoint, follow the steps below:
- Open the SharePoint site.
- Navigate to the list or document library where you want the quick step.
- You can create quick steps in two ways:
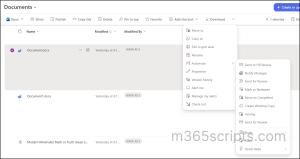
- From the command bar: Automate → Quick steps → Create a quick step
- From an item/file: Select a file → More options (…) → Automate → Quick steps → Create a quick step.
4. On the Create a quick step page, you will see the available quick step options based on whether you are creating it from a list or a document library. From there, you can create quick steps and automate the simple, repetitive tasks you handle daily.
Usually, to use the quick step, you need to go through 3-4 clicks every time (More options → Automate → Quick step).
But you don’t have to go through all those clicks anymore!
🚀 A recent SharePoint update allows quick steps to be added as a column type. This enables inline actions like sending emails, starting Teams chats, triggering approvals or flows, and updating columns with a single button — all without leaving the view.
To do this:
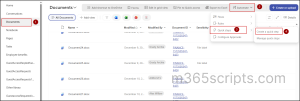
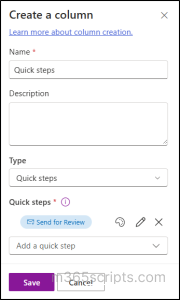
- Click Add column → Quick steps → Next
- Enter a name for the column
- In the Quick steps dropdown, select the quick step you just created
- Click Save
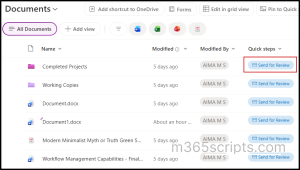
Once the quick step column is added, the button will be visible in the view for easy access.
Let’s now look at common scenarios where each quick step type can be used, and how the new column experience can simplify those use cases:
- Automate sharing reports with external users in SharePoint
- Send quick notifications in Teams from SharePoint
- Update metadata columns across multiple documents
- Archive completed project folders in SharePoint
- Reuse file or folder easily in SharePoint
- Send document for approval and notify managers
✅ Quick step to use: Draft an email
Your team uploads the finalized quarterly report to a SharePoint document library. And you need to follow up with vendors and keep stakeholders updated automatically.
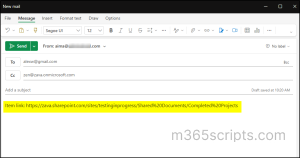
Instead of opening the document, copying the link, opening Outlook, creating a new email, and pasting the link manually, you can configure a Draft an email quick step.
Now, let’s see how to configure this in quick steps.
- Select the file from the document library.
- From More options, select Automate → Quick steps → Create a quick step → Draft an Email.
A sentence-builder interface, similar to the one previously available in the retired SharePoint Alerts feature will open.
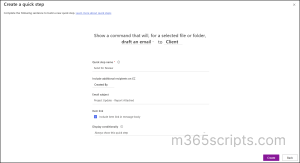
Configure the fields as follows:
- To – Select the Person column from your SharePoint library or list that contains the client(s) UPN who should receive the document (Make sure you have a custom column for client info pre-filled).
You can also enter names manually or select dynamically from fields like Created By, Modified By, or any column available in your library. Multiple entries can also be added to this field if needed.
⚠️Important: You can only add internal users or guest users who already have access to the site or library.
- Quick step name – Provide a name that will be displayed when an item is selected.
- CC – Add additional recipients. You can enter addresses manually or choose from dynamic fields.
- Email subject – Enter the subject line for the drafted email.
- Include Item Link in Message Body – When enabled, the email draft includes the direct link to the selected item. If disabled, the draft opens empty. (The link itself is plain text and not customizable.)
Note: If the email recipient does not have permission to access the item, they will receive an error such as “You need permission to access this item.”
- Display conditionally – Controls when the quick step appears:
- Always show this quick step – Visible whenever an item is selected
- Only show this quick step if – This setting allows a quick step to appear and run only when certain conditions are met. It is useful when you want to limit a quick step to specific items in a SharePoint list or library.
| Example |
| Suppose you have a Status column in your list with values like Pending, Approved, and Rejected. You can configure a Quick Step to only appear for items where Status = Pending. This ensures that the Quick Step (e.g., “Send for Approval”) is visible only when it makes sense, and won’t appear for items already approved or rejected.
|
Once you’ve configured all the options, click Create. Your quick step is now created. You can then add the quick step as a column in the list or library view. This makes it easily accessible directly from the item row.
To send a document for review, simply click the Send for Review button in the view. This opens a pre-filled email draft for you. The quick step does not send the email automatically – you can review, edit if needed, and then send it manually.
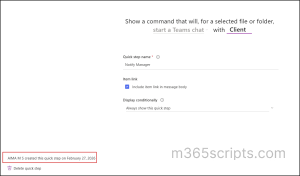
✅ Quick step to use: Start a Teams chat
A critical document has been submitted to a SharePoint library, but approval is still pending. You want to quickly notify the approvers via Microsoft Teams without manually tracking each item.
Instead of opening Teams, finding each user, and starting a chat manually, you can configure a ‘Start a Teams Chat’ quick step as below:
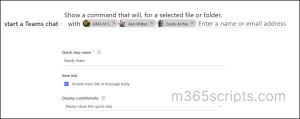
This quick step will create and open a group chat with the selected users and include a link to the document (Only users who have permission can access the document using the link). You can review or edit the message before sending – it does not send automatically.
Other common scenarios where you can use the ‘Start a Teams chat’ quick step:
- Quick approval request – Notify a manager to review and approve a document.
- File update alert – Inform the team about changes to a project file.
- Deadline reminder – Remind team members about upcoming tasks or milestones.
- Share report or insights – Send stakeholders quick access to reports or analyses.
- Coordinate small group tasks – Start a chat to discuss next steps with a team.
✅ Quick step to use: Set a value
Your team just finished a project sprint for a marketing campaign with 20 tasks in a SharePoint list. All tasks are currently marked as “In Progress”.
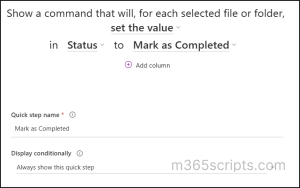
Instead of opening each task individually and changing the Status field, you can select all 20 tasks at once. Then use the ‘Set the value’ quick step to mark them as Completed in one action.
Note: Ensure that your list or library has a Status column with predefined choices. Only the choices that have been added to the column will appear when selecting a value in the quick step.
Tip: Any column with predefined choices (Status, Priority, Category, Phase) works well with this quick step for bulk updates.
Other scenarios where a ‘Set a value’ quick step can be used for:
- Mark Tasks as Completed – Update the status of multiple finished tasks at once.
- Set Priority Levels – Change the priority of several items to High, Medium, or Low.
- Assign Tasks to Team Members – Bulk assign tasks to a specific person or group.
- Update Project Phase – Change the phase of multiple items, e.g., Planning → Execution.
- Flag Items for Review – Mark selected documents or list items as Needs Review for quick tracking.
✅ Quick step to use: Move file or folder
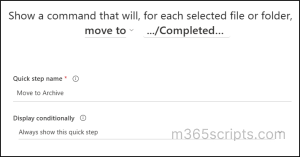
After a project is finished, you want to move the entire project folder (containing multiple files and subfolders) to an Archive folder or library. With quick steps, you can rename the action to something more intuitive, like “Archive,” making it immediately clear what the action does. This not only improves usability but also eliminates the hassle of manually moving and organizing numerous files and subfolders.
You can move a file or folder within the same library or site, to another SharePoint site or even to your OneDrive.
Other scenarios for using ‘Move File or Folder’ quick step:
- Organize client deliverables – Move each client’s folder into their designated subfolder.
- Centralize reference documents – Consolidate scattered files into a single “Resources” library.
- Archive monthly reports – Move completed report folders to a “Monthly Reports” archive.
- Reorganize project materials across teams – Transfer all project files to a new team’s library.
- Consolidate drafts for review – Gather multiple draft documents into one review folder.
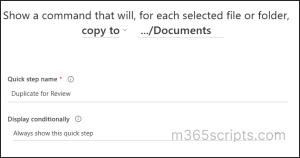
✅ Quick step to use: Copy file or folder
If you need to reuse a file or folder without altering the original, the ‘Copy file or folder’ quick step is perfect. For example, when creating a new project using an existing template, you can duplicate the necessary documents or folders instantly, without manually downloading, renaming, or re-uploading them. This reduces errors, keeps team resources consistent, and saves significant time when setting up new projects.
Other scenarios for using ‘Copy File or Folder’ quick step:
- Share reference materials – Copy key documents to another library for team access while keeping the originals intact.
- Create backups before editing – Make a copy of important files before making changes.
- Distribute training materials – Copy training documents to multiple team libraries for easier access.
- Duplicate reports for review – Copy a report folder so different teams can review or annotate without affecting the original.
Note: In both cases (Move or Copy), users must have sufficient permissions for the action to succeed. For users with Read-only permission in the site, even though the configured quick steps are visible, attempting to use them will result in an error:
“You do not have sufficient permission to perform this operation at the destination location.”
✅ Quick step to use: Execute a flow
If you need to share a document for approval and automatically notify managers of the status, the ‘Execute a Flow’ quick step is ideal.
For example, when a report or policy document is ready for review, you can trigger a flow that sends the selected document to approvers, collects their responses, and notifies managers once the status is updated.
Unlike a normal Power Automate flow, which may run automatically for all documents or requires opening Power Automate to trigger manually, quick steps let you run the flow directly from the selected document in SharePoint. This means quick steps avoid the risk of exposing other flows or data to unintended users.
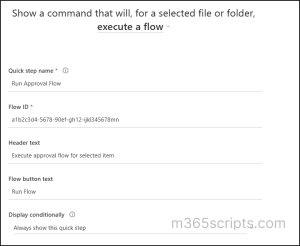
- Quick step name – Provide a meaningful name that will be displayed to users (e.g., Run Approval Flow).
- Flow ID – Get this from the URL of the flow.
Open the flow in Power Automate and copy the value that appears after /flows/ and before /details in the browser URL.

- Header text – Enter the text that will appear at the top of the flow execution panel (e.g., Run Approval Process for Selected Item(s)).
- Flow button text – Provide the label for the primary button users will click to run the flow (e.g., Run Flow or Start Process).
- Display conditionally
Important: If the owner of the flow creates the quick step button, users will only be able to use it if they have permission to run the associated Power Automate flow. If they do not have the required access, the flow will not execute and they may see a permission-related error.
Other scenarios for using ‘Execute a flow’ quick step:
- Run a status update workflow for multiple list items at once.
- Send a custom notification email for selected items.
- Execute a data export or reporting flow from the library.
- Start a multi-step business process directly from SharePoint without leaving the list view.
Ask SharePoint Quick Step:
🤖 In addition, Microsoft is also introducing an “Ask SharePoint” quick step, which is expected to bring AI-powered assistance directly within SharePoint for contextual queries and actions. However, this feature is still rolling out and there is no official detailed documentation available yet.
After creating, you can manage all quick steps by navigating to: Automate → Quick steps → Manage quick steps
On this page, you can:
- See a list of all the quick steps created for that library or list.
- Use the toggle button to disable a quick step. Turning it off will hide it from users without deleting it.
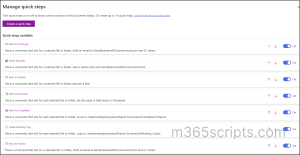
- Use the arrow icons to move quick steps up or down. The order you set here is how they appear in the menu view (Reordering does not apply to Column-type views).
- Click on a quick step and:
- Edit its configuration
- Check who created it and when
- Delete it if it is no longer needed
Limitations of Quick Steps in SharePoint Online
Quick steps in SharePoint Online come with certain limitations you should be aware of:
- Limited scope – Quick steps are library/list-specific and are limited to 15 quick steps per library.
- One action per button – Each quick step performs only a single action; you cannot combine multiple actions like sending an email and updating a list item within the same button.
- No conditions or error handling – You cannot set conditional logic; the button is visible to users even if they lack permission to perform the underlying action, which may result in errors.
- No Support for Some Actions – Not all SharePoint actions (like complex permission restructuring) can be handled through quick steps.
You might wonder – if SharePoint already has Power Automate flows and built-in Approvals, why would I use quick steps? The difference comes down to purpose and convenience:
| Automation Option | Best For | Trigger
|
Key Features |
| Quick Steps | Simple, single-click actions within a list or library | Triggered manually from the selected item in SharePoint. | Lightweight, runs directly from an item, ideal for item-level or context-specific tasks. Limited complexity. |
| Power Automate Flows | Complex, multi-step processes | Can run automatically on item creation/changes, or manually via Power Automate. | Can include conditions, loops, integrations with other systems, error handling. Ideal for automating end-to-end processes. |
| Built-in Approvals | Structured document review | Triggered when an approval is requested, typically from the document library or list. | Designed for document approvals with status tracking, Teams/email notifications, and audit trails. Best for formal, process-driven scenarios. |
If your goal is to:
- Perform a quick action on a file with a single click → Use Quick steps
- Set up a workflow that runs automatically on events → Go for Power Automate
- Get structured approvals with tracking and notifications → Use Built-in Approvals
That’s all about quick steps. Start small, test in a library, and build automation gradually based on your needs.
We hope you now have a clear understanding of how to use quick steps effectively in SharePoint Online. Thanks for reading. If you have any further questions, feel free to reach out through the comments section.


