Block Guest Access to Specific Microsoft 365 Groups
Block guest access to specific Microsoft 365 groups using sensitivity labels or PowerShell to protect confidential information. Prevent external users from being added to groups containing sensitive data while maintaining collaboration capabilities for other groups. Enforce internal-only access for HR, finance, and legal teams.
Microsoft 365 guest access is a valuable feature that enables collaboration with external users such as partners, vendors, or contractors. However, there are scenarios where restricting guest access to specific Microsoft 365 groups or Teams is necessary. Thankfully, Microsoft 365 gives you options to block guest access on a per-group basis. In this blog, let’s see why this is important and how admins can block guest access in specific Microsoft 365 groups.
By default, Microsoft 365 allows you to add guest users to groups and Teams. However, there are scenarios when you may want to restrict access to:
- Protect sensitive information: Groups like Finance or HR may hold payroll data or personal employee details that shouldn’t be shared externally.
- Follow internal policies or regulations: Teams handling legal, compliance, or confidential contracts need to restrict external access to meet company rules.
- Limit collaboration to internal users: Some projects involve internal strategies or proprietary product development where outside input isn’t necessary.
Blocking guest access prevents new guests from being added to the group. It does not remove existing guests in teams or Microsoft 365 groups.
Now that we understand why restricting guest access might be necessary, let’s explore two different ways you can prevent guests from being added to Microsoft 365 groups:
- Manage guest access with sensitivity labels in Microsoft 365 groups
- Prevent guest access to Microsoft 365 groups using PowerShell
Sensitivity labels in MS Purview Information Protection allow organizations to classify and protect data across Microsoft 365 services, including Teams, SharePoint, and Microsoft 365 groups. They let you define how groups and teams handle external collaboration. By creating and applying the right policies, you can control whether to allow or prevent guests from being added to groups. Let’s see how to do that.
- Create a sensitivity label to restrict guest access in Microsoft 365 groups
- Publish the sensitivity labels to users and groups
- Assign sensitivity labels to Microsoft 365 groups
Prerequisites:
Firstly, enable sensitivity labels for containers and ensure the following requirements are met.
- You must have access to the Microsoft 365 Compliance Center with global admin permissions to create and publish sensitivity labels.
- Your organization must have the appropriate Microsoft Purview licensing, such as Microsoft 365 E3/E5 or an equivalent license, since sensitivity labels for Teams and groups depend on it.
Let’s dive into how to prevent the addition of guests in Microsoft 365 groups and teams using sensitivity labels.
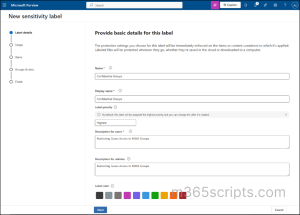
Step 1: Create a Sensitivity Label
- Go to the Microsoft Purview Compliance Portal.
- Navigate to Solutions > Information Protection > Sensitivity labels.
- Click + Create a label and provide a name, display name, label priority, and description for users and admins.
- Click on ‘Next’.
Step 2: Define the Scope for Sensitivity Label
- Under the Define the scope of this label, select Groups & sites.
- Select ‘Next’.
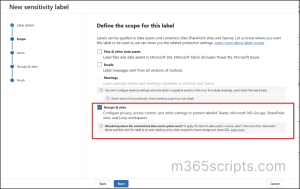
If the “Groups & Sites” option is greyed out, it means your tenant hasn’t enabled sensitivity labels for these scopes.
Note: Since our focus is on configuring sensitivity labels for containers (i.e., Microsoft 365 Groups, Teams, and SharePoint sites), we can skip the steps related to item-level protection. Proceed by clicking Next until you reach the Protection Settings for groups and sites.
Step 3: Configure Protection Settings for Groups and Sites
- To fully manage access, ensure to select both options ‘Privacy and external user access’ and ‘External sharing and Conditional Access’.
- Click on ‘Next’.

Step 4: Define Privacy and External User Access Settings
The following settings determine who can see and join the group or team, and whether guests can be added.
- Set the Privacy setting to Public/Private based on your organization’s requirement.
- Leave the External user access box un-checked to prevent group owners from inviting external users to the groups.
- Click on ‘Next’.
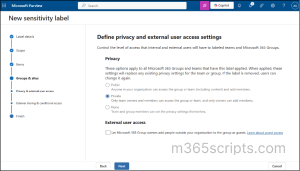
In addition to the above, you can also configure external sharing and conditional access settings. These allow you to control who can share SharePoint content with people outside your organization and define whether users are permitted to access labeled sites from unmanaged devices.
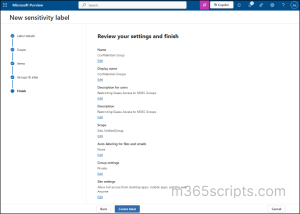
Once everything is done, review all configurations and click Create label.
After creating sensitivity labels, make sure to publish the label to users and groups.
To do this, you can select the label you just created from the list of labels and choose Publish label. You can also publish it from the final page of the label creation step by selecting the label from the “Sensitivity labels to publish” option.
When you publish a label, you can choose specific users and groups. In addition to this, it is possible to configure default settings for documents, emails, meetings, sites and groups, and Power BI separately.
Note that it may take up to 24 hours for the sensitivity labels to be available for the users after creation.
Now, assign sensitivity labels to new groups or teams, enforcing security and compliance settings.
- Sign in to the Microsoft Entra admin center with at least Groups Administrator permissions.
- Navigate to Microsoft Entra ID > Groups > All groups > New group.
- On the New Group page:
- Select Microsoft 365 as the group type.
- Enter the required details for your group.
- From the Sensitivity labels list, choose the appropriate label.
- Click Create to finish.
Once the group is created, all site and group settings associated with the selected label are automatically applied.
Note: You can also apply a sensitivity label to an existing Microsoft 365 group in your organization.
The same concept applies to assigning a sensitivity label to a new team in Microsoft Teams. During team creation, users can pick a sensitivity label from the Sensitivity dropdown.
That’s it! Guest access restrictions have now been applied to Microsoft 365 Groups using sensitivity labels.
Testing Guest Access Control with Sensitivity Labels
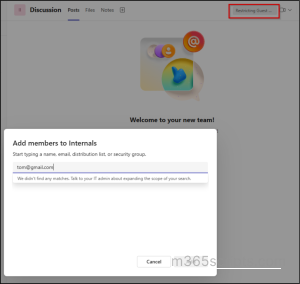
For testing, I created two teams in Microsoft Teams:
- Internals – with the new sensitivity label applied
- OpenToGuests – without any label
In the Internals team, the assigned sensitivity label is visible in the Team information pane.
When I tried inviting an external guest to the Internals team, the process could not be completed, which is the expected outcome. However, the interface does not provide any message or hint to the user explaining why the action is blocked.
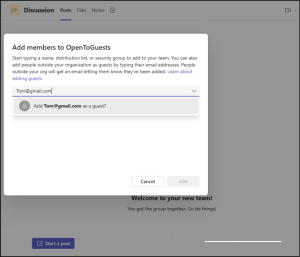
When I switched to another Team ’OpenToGuests’ and tried inviting the same user, the invitation went through successfully.
For more direct control, you can configure guest access settings at the group level using Microsoft Graph PowerShell (Beta module). You can manage guest access using the following methods:
- Prevent guest access to a specific Microsoft 365 group
- Restrict the addition of guest users to bulk Microsoft 365 groups
Prerequisites:
- Install the Microsoft Graph PowerShell Beta module.
- Ensure you have Global Administrator permission.
- Run Update-Module Microsoft.Graph.Beta to make sure you’re on the latest module version.
Here’s a script to prevent adding guests to a specific Microsoft 365 group:
|
1 2 3 4 5 6 7 8 9 10 11 12 13 14 15 16 17 18 19 |
Connect-MgGraph $GroupName = "<GroupName>" $GroupID = (Get-MgBetaGroup -Filter "DisplayName eq '$GroupName'").Id $Params = @{ TemplateId = (Get-MgBetaDirectorySettingTemplate | Where-Object {$_.DisplayName -eq "group.unified.guest"}).Id Values = @( @{ Name = "AllowToAddGuests" Value = $false } ) } New-MgBetaGroupSetting -GroupId $GroupID -BodyParameter $Params |
Replace <GroupName> with the actual name of the group where you want to block guest access.
To confirm that the configuration was applied correctly, run the following cmdlet.
|
1 |
(Invoke-GraphRequest -Uri https://graph.microsoft.com/beta/Groups/$groupId/settings -Method GET).values.values |

In larger organizations, it’s common to manage multiple Microsoft 365 groups at once. Instead of configuring guest access restrictions manually for each group, you can automate the process using a CSV file.
Prepare a CSV file listing all the group names where guest access should be blocked, using the format shown below. Then, run the script provided to block the guest access in bulk.
Input CSV format:
|
1 2 3 4 5 6 7 8 9 10 11 12 13 14 15 16 17 18 19 20 21 22 23 24 25 26 27 28 29 30 |
Connect-MgGraph $csvFilePath = "<CSVFilePath>" # Update with the path to your CSV file $GroupNames = Import-Csv -Path $csvFilePath | Select-Object -ExpandProperty GroupName $templateId = (Get-MgBetaDirectorySettingTemplate | Where-Object {$_.displayname -eq "group.unified.guest"}).Id foreach ($GroupName in $GroupNames) { $GroupName = $GroupName.Trim() Write-Host "Processing group: '$GroupName'" $groupID = (Get-MgBetaGroup -Filter "DisplayName eq '$GroupName'").Id if ($groupID) { $params = @{ templateId = "$templateId" values = @( @{ name = "AllowToAddGuests" value = "$false" } ) } New-MgBetaGroupSetting -GroupId $groupID -BodyParameter $params Write-Host "Updated settings for group: $GroupName" } else { Write-Host "Group not found: $GroupName" } } |
After disabling guest access, you can enable it again for a specific Microsoft 365 group by updating the settings through Microsoft Graph. The script below restores the ability to add guest users.
|
1 2 3 4 5 6 7 8 9 10 11 12 13 14 15 16 17 18 19 |
Connect-MgGraph $GroupName = "<GroupName>" $GroupID = (Get-MgBetaGroup -Filter "DisplayName eq '$GroupName'").Id $Params = @{ TemplateId = (Get-MgBetaDirectorySettingTemplate | Where-Object {$_.DisplayName -eq "group.unified.guest"}).Id Values = @( @{ Name = "AllowToAddGuests" Value = $false } ) } New-MgBetaGroupSetting -GroupId $GroupID -BodyParameter $Params |
Replace <GroupName> with the actual name of the group where you want to enable guest access.
Furthermore, you can set allow or blocklist policy in Entra ID to control which external domains are permitted or denied guest access to your Microsoft 365 groups.
For example, if your organization collaborates with a trusted partner like partnerdomain.com, you can add their domain to an allowlist, enabling users from that domain to be invited as guests.
Conversely, if there are domains you want to restrict, you can add them to a blocklist. This prevents users from those domains from being invited as guests to your M365 groups.
When someone attempts to invite a user from a blocked domain, they’ll receive a message like:
“Your organization does not allow collaboration with the domain of the user you’re inviting. Contact your admins to allow collaboration with this domain.”
Tip: When allowing specific external domains in your Microsoft 365 groups, make sure to block essential settings for secure external access.
I hope this guide has helped you understand how to effectively manage and block guest access in Microsoft 365 groups and Teams. If you have any questions or need further clarification, feel free to reach out through the comments section.