Add External Users to a Distribution Group in Exchange Online
Add external users to Exchange Online distribution groups by first creating mail contacts with external email addresses. Understand the differences between MailContact, MailUser, and GuestMailUser types to determine when contacts are needed versus direct group membership for external collaboration.
A distribution group (also known as distribution lists) in Microsoft 365 is a convenient way to send emails to multiple recipients at once. Instead of entering each address individually, you can simply send an email to the group, and it will reach everyone in it. However, there are times when you may need to include people outside your organization – for instance, distributing meeting invites to guest speakers or sending important updates to stakeholders.
By default, distribution groups only accept members from within your organization. That means you cannot directly add an external Gmail or Yahoo address. To solve this, you first need to create a contact for the external user and then add that contact to the distribution group.
Before we get into the steps, let’s quickly look at the different types of contacts available in Exchange Online and how each can be added to distribution groups.
There are mainly three types of contacts in Exchange that you can add to distribution groups:
| Type | Has Azure AD Account & Access to Org Resources? | Mail-Enabled | How They’re Added |
| MailContact | No – external contact only, no sign-in or resource access
|
Yes | Manually added as contacts using admin center or PowerShell |
| MailUser | Yes – has Azure AD account with logon credentials, can access resources | Yes | Added as an external user with an external email address |
| GuestMailUser | Yes – guest account with limited access to shared resources | Yes (auto-created) | Created automatically when a guest is invited through SharePoint, Teams, or Entra ID |
So, in short,
If your guests appear as MailUser or GuestMailUser, you can add them directly to distribution groups. MailContacts are only needed when a guest does not exist, or when you want a simple external contact without guest lifecycle management.
Let’s start by creating a new distribution group in Microsoft 365.
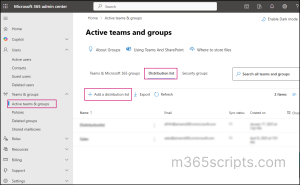
- Sign in to the Microsoft 365 admin center.
- Go to Active teams & groups -> Distribution list
- Click ‘Add a distribution list’.
4. Enter the group name and description -> Next.
5. Assign group owners and add members as needed.
When you try to add an external Gmail account as a member, you’ll notice it doesn’t appear in the list. That’s why you need to add them as contacts — we’ll see how in the coming sections.

6. Head to the Edit settings page and specify the group’s email address. Here, you will also find the option to allow external senders to email the group.
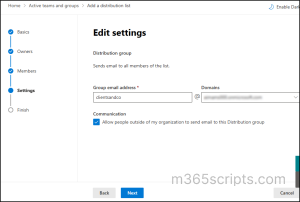
7. Click Next -> Create group to finish creating the group.
After creating the group, you can see it listed under distribution lists in the admin center. You can also use PowerShell to list all distribution groups and confirm the new group exists.
Since you cannot directly add external email addresses to the distribution group, you must first create a Mail Contact for them. To do this,
- In the Microsoft 365 admin center, go to Users > Contacts.
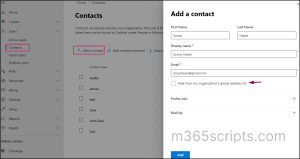
- Click Add a contact. To add multiple contacts at once, select the ‘Add multiple contacts’ option.
- Provide details such as first name, last name, display name, and the external user’s email address.
- Choose whether to hide the contact from the organization’s global address list.
- Update profile information and add a mail tip if needed.
- Click Add and create the contact.
At this stage, the external person is available as a contact of your tenant. Keep in mind that they are not added as a guest user in your directory. They simply exist as mail-enabled contact.
Now that the external email is created as a contact, you can add it to the distribution group.
- Go back to the Groups section in the Microsoft 365 admin center.
- Select the distribution group you created earlier.
- Open Members > View all and manage members.
- Click Add members and search for the external contact you just created. You’ll now see the external user listed and available to be added to the group.
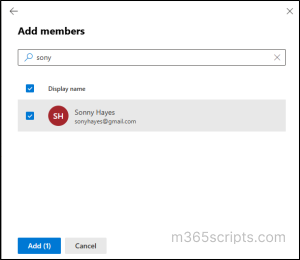
5. Save the changes by clicking Add.
From now on, whenever someone sends an email to the distribution group, the message will be delivered to both internal members and the external contact.
You can also use PowerShell to achieve this. First, connect to Exchange Online PowerShell, and then follow the steps below.
To create a new mail contact for the external user using PowerShell, run the below cmdlet:
|
1 |
New-MailContact -Name "John Doe" -ExternalEmailAddress “[email protected]” |
This creates a mail contact for John without adding him as a guest in your tenant.
Now, to add the contact to a distribution group using PowerShell, run,
|
1 |
Add-DistributionGroupMember -Identity "[email protected]" -Member "[email protected]" |
This command adds John’s contact to the Sales team distribution group.
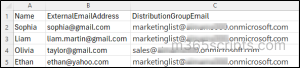
To add multiple external users to distribution groups using PowerShell, first create a CSV file containing the column names Name, EmailAddress, and DistributionGroupEmail. These exact column names must be used for the script to run without errors.
Then, run the following script by replacing the Import-Csv path with the location of your CSV file.
|
1 2 3 4 5 6 7 8 9 10 11 12 13 14 15 16 |
$users = Import-Csv "C:\Scripts\ExternalUsers.csv" foreach ($user in $users) { $contact = Get-MailContact -Filter "ExternalEmailAddress -eq '$($user.ExternalEmailAddress)'" -ErrorAction SilentlyContinue if (-not $contact) { New-MailContact -Name $user.Name -ExternalEmailAddress $user.ExternalEmailAddress Write-Host "Created Mail Contact for $($user.Name)" -ForegroundColor Green } else { Write-Host "Mail Contact for $($user.Name) already exists." -ForegroundColor Yellow } try { Add-DistributionGroupMember -Identity $user.DistributionGroupEmail -Member $user.ExternalEmailAddress -ErrorAction Stop Write-Host "Added $($user.Name) to $($user.DistributionGroupEmail)" -ForegroundColor Cyan } catch { Write-Host "Failed to add $($user.Name) to $($user.DistributionGroupEmail): $($_.Exception.Message)" -ForegroundColor Red } } |
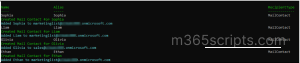
This way, you can quickly add external addresses to your distribution groups without navigating through the admin center. After adding external contacts, you can use PowerShell to retrieve distribution lists with external contacts.
We hope this blog helped you understand how to add external users to Microsoft 365 distribution groups. If you have more questions, feel free to share them in the comments section.