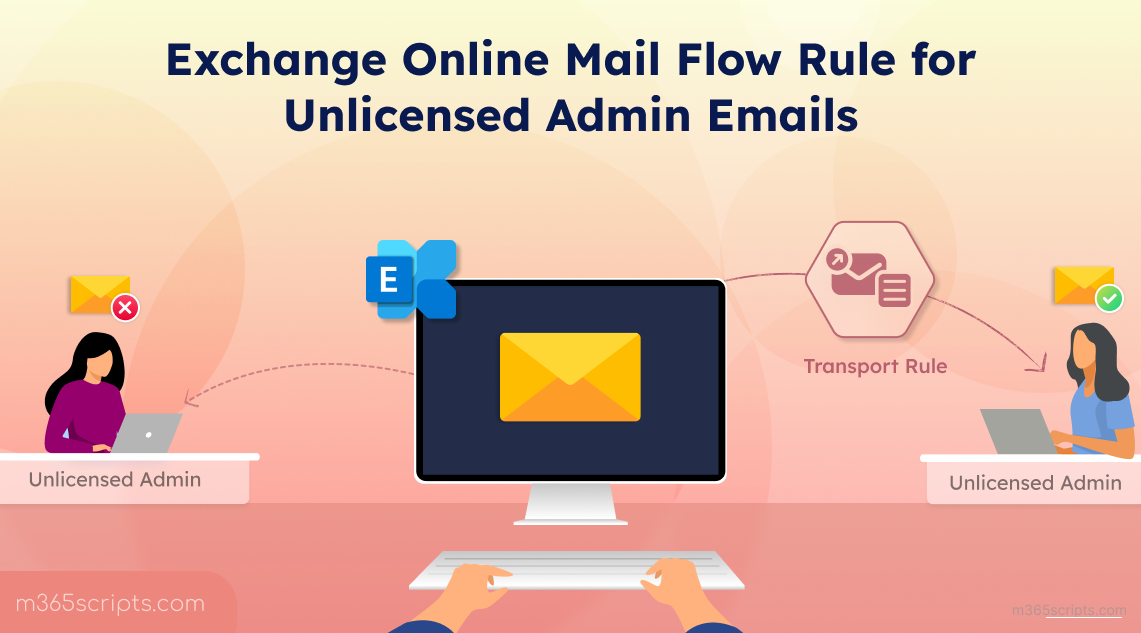
Receive Emails on Unlicensed Admin Accounts Using Mail Flow Rules
Configure Exchange Online mail flow rules to redirect emails sent to unlicensed admin accounts to shared mailboxes. Create mail contacts using the admin UPN as the external address, then set up transport rules to ensure important alerts and service notifications reach administrators without requiring additional licenses.
When organizations create unlicensed admin accounts in Microsoft 365 to minimize license usage and reduce exposure to attacks, they often overlook that these accounts do not have active mailboxes. As a result, these accounts cannot receive important emails such as alerts, policy updates, service health reports, and more. That’s why it’s essential to configure alternate methods for admin accounts to receive emails.
One of the effective methods is to use an Exchange Online mail flow rule for unlicensed admin accounts. This allows you to automatically redirect emails sent to these accounts, ensuring that no important messages are missed.
In this blog, we’ll guide you through setting up a mail flow rule for unlicensed admin accounts to improve incident response and alert management.
You can create mail flow rules in two ways to receive email messages sent to unlicensed admins in Microsoft 365.
- Create a transport rule for unlicensed admin using EAC
- Create a mail flow rule for unlicensed admin using PowerShell
The process of creating a transport rule for an unlicensed admin to receive emails involves creating a mail contact for that account. Here, the admin’s UPN (User Principal Name) is used as an external email address to make Exchange Online recognize it as a valid recipient.
Once the mail contact is created, a shared mailbox will be set up to save email messages, and then a mail flow rule is configured to redirect all emails sent to the admin to that shared mailbox.
Create a Mail Contact for Unlicensed Admin
Follow the steps below to configure mail contact for unlicensed admin account.
- Sign in to the Exchange admin center (EAC), navigate to Recipients –> Contacts and click Add a mail contact.
- Enter the details, such as the display name, a unique alias, and set the external email address to the unlicensed admin’s UPN, then click Next.
- Provide optional mail contact information and click Create.
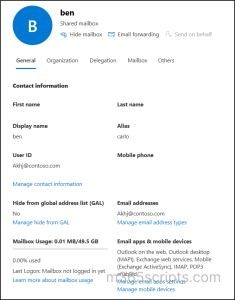
Set Up Shared Mailbox to Receive Unlicensed Admin Emails
After assigning a mail contact to the admin, create the shared mailbox that will be used to receive emails sent to the admin’s mail contact using the steps below.
- Navigate to Recipients –> Mailboxes in the EAC.
- Click + Add a shared mailbox, enter the display name and email address for the mailbox, and click Create.
- Next, close the flyout pane and select the created mailbox from the list.
- On the Delegation tab, click Edit under Read and manage (Full Access) and add the admins’ non-privileged accounts, then hit Confirm to save the changes.
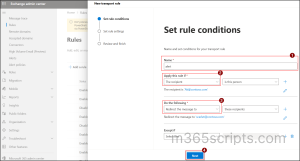
Create a Mail Flow Rule in Exchange Admin Center
You can follow the steps below to use mail flow rules to receive email/alerts notifications for an unlicensed admin account using Exchange admin center.
- Navigate to Mail flow –> Rules in EAC.
- Click + Add a rule, select Create a new rule, and give the rule a descriptive name.
- In Apply this rule if drop-down, select “The recipient” and “is this person”, then select the created mail contact.
- Under Do the following, select “Redirect the message to” and “these recipients”, then select the created shared mailbox.
- Click Next, and in the Rule Mode option, choose Test with Policy Tips first to validate the rule.
- Check Stop processing more rules if you want to prevent other rules applied on the same message. Finally, Save the rule.
The newly created rule is disabled by default. You can enable them by navigating to the configured rule and toggling it on.
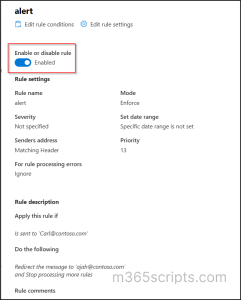
After verifying that the rule works as expected, switch the Rule mode to Enforce to activate it.
You can use Exchange Online PowerShell to create a mail flow rule that redirects email messages for an unlicensed admin account to a shared mailbox, as shown below.
Connect to Exchange Online Management PowerShell and run the cmdlet below to create a mail contact for the unlicensed admin account.
|
1 |
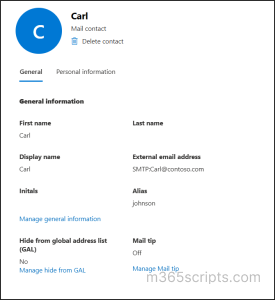
New-MailContact -Name "CarlAdminContact" -ExternalEmailAddress "[email protected]" |
This creates a mail contact named “CarlAdminContact” using the unlicensed admin’s UPN ([email protected]) as the external email address so that Exchange can recognize it as a valid directory object.

Next, use the following cmdlet to create a shared mailbox that is going to be used to receive all the emails sent to an unlicensed admin account.
|
1 |
New-Mailbox -Shared -Name "Unlicensed Admin Inbox" -DisplayName "IT Alert Inbox" -Alias "AlertInbox" |
This will create a shared mailbox with the email address “[email protected]”.
Now, run the following cmdlet to add unlicensed admin’s normal user account with Read and manage (Full Access) permission to that shared mailbox.
|
1 |
Add-MailboxPermission -Identity "[email protected]" -User "CarlNormalAccount" -AccessRights FullAccess |
This grants admin Carl’s normal account full access to open and manage emails sent to the shared mailbox “[email protected]”.
Then, use the following cmdlet to create a mail flow rule that redirects all emails sent to the unlicensed admin account to the shared mailbox.
|
1 |
New-TransportRule -Name "Mail flow rule for unlicensed admin" -SentTo "[email protected]" -RedirectMessageTo "[email protected]" |

Here, a transport rule is created to redirect all emails sent to unlicensed admin “[email protected]” to the shared mailbox “[email protected]”.
Pro Tip: Alongside mailbox rules, configuring plus addressing in Exchange Online provides a simple way to route unlicensed admin emails to licensed mailboxes, ensuring better visibility of alerts.
Points to Remember
- When an admin email is already taken, remove leftover mailbox attributes or conflicting addresses prior to creating a mail contact.
- Also, group-based licensing which can prevent license removal from admin account.
- You can also use the admin’s external or third-party email address while creating mail contact.
- Newly created shared mailboxes may take some time before they can receive external emails.
- In Outlook, shared mailboxes appear as separate mailboxes unless automapping is turned off or emails forward is disabled.
After enabling the mail flow rule, admins can receive emails set to their email address in the shared mailbox configured in the rule.
Example:
Here, the mail contact we created for unlicensed admin “[email protected]” successfully receives email sent from user “[email protected]”.
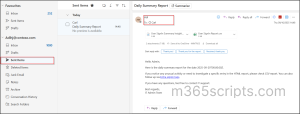
Then, the mail received by “[email protected]” delivered to the shared mailbox “[email protected]”, as shown in the image below.

I hope this blog helps you efficiently receive emails sent to unlicensed accounts using a mail flow rule in Microsoft 365. Feel free to reach out in the comments section with any questions.