How to Allow Only Specific Users to Book Meeting Rooms in Microsoft 365
Restrict Exchange Online room mailbox bookings to specific users using Set-CalendarProcessing cmdlet or Outlook Web settings. Configure BookInPolicy to allow only authorized users to reserve meeting rooms, preventing scheduling conflicts and unauthorized reservations in your organization.
Meeting rooms in Microsoft 365 are virtually managed using room mailboxes, which streamline and control access to calendar meeting facilities. By default, all users can book room mailboxes in the organization. While this is convenient, it can lead to scheduling conflicts, unauthorized reservations, and other issues. Therefore, managing room mailbox scheduling permissions is essential to allow only specific users to book meeting rooms.
Let’s explore the possible configurations to ensure that only specific users can book designated conference rooms in Exchange Online.
Managing room mailbox scheduling permissions in Microsoft 365 can be achieved using Outlook on the Web (OWA) and Exchange Online PowerShell. You can choose the approach that best fits your workflow.
Set Scheduling Permissions for a Room Mailbox Using Outlook Web
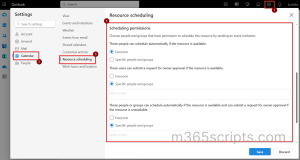
You can manage the resource mailbox booking settings in Microsoft 365 using Outlook on the web. To do so, open the respective room mailbox and navigate to Settings (⚙️) → Calendar → Resource scheduling → Scheduling permissions.
Note: To open and manage the room mailbox in Microsoft 365 via Outlook OWA, you must have ‘Full Access’ permissions to the mailbox.

Manage Room Mailbox Scheduling Permissions using PowerShell
The Set-CalendarProcessing cmdlet is specifically designed to modify calendar processing options for resource mailbox in Microsoft 365. It includes various parameters that allow you to configure reservation policies for Exchange Online resource mailboxes.
You can export all room mailbox booking options in Microsoft 365 to understand how the settings are configured for each meeting rooms. If necessary, you can then modify the scheduling permissions to align with your requirements.
Note: Install and connect to Exchange Online PowerShell before managing room mailbox resource scheduling using PowerShell.
As mentioned earlier, allowing unrestricted access for everyone to book room resources can lead to last-minute conflicts between priority users needing the same room at the same time. This often results in the overbooking of popular rooms while others remain underutilized.
To address these challenges, we’ll explore several methods to manage room mailbox booking policy. It ensures controlled and efficient booking by specific users or groups. Before proceeding, consider reviewing the Microsoft 365 room mailbox usage statistics report to understand current booking patterns and identify where restrictions may be needed.
- Allow only specific users to book a meeting room in Exchange Online
- Enable specific users to book a meeting room with delegate approval
- Allow some users to book the room without delegate approval, while others require it
- Allow specific users to request delegate approval if a meeting room is unavailable
Allowing only specific users to schedule meetings in a Microsoft 365 room mailbox gives dedicated access to key users or groups. It also ensures that important meetings are prioritized. This control helps prevent unauthorized bookings and reduces the risk of scheduling conflicts.
Using Outlook
Open the respective room mailbox in OWA and navigate to the Resource Scheduling window. Configure the Scheduling permissions as outlined below to allow only specific users to book meeting rooms.
- Select Specific people and groups under the ‘These people can schedule automatically if the resource is available’ and enter the names of the users or groups who should have exclusive access to book the room.
- Select Specific people and groups under ‘These users can submit a request for owner approval if the resource is available’ and leave the input field empty.
- Select Specific people and groups under ‘These people and groups can schedule automatically if the resource is available and can submit a request for owner approval if the resource is unavailable’, leave the input field empty, and click Save.
Tip:
Create a custom meeting policy with verification checks to join Teams meetings and assign it to users who are allowed to schedule meetings. This helps prevent anonymous bots from joining and disrupting meetings
Using PowerShell
To limit who can book conference rooms in Microsoft 365 using PowerShell, run the following cmdlet.
|
1 |
Set-CalendarProcessing -Identity “<RoomMailboxUPN>” -AutomateProcessing AutoAccept -AllBookInPolicy $false -BookInPolicy “<UserUPN(s)>” -AllRequestInPolicy $false -RequestInPolicy $null -AllRequestOutOfPolicy $false -RequestOutOfPolicy $null -ResourceDelegates $null |
Here, replace <RoomMailboxUPN> with the room mailbox name or UPN.
Replace <UserUPN(s)> with the User Principal Names of the users or groups you want to book the meeting room.
For example, replacing <RoomMailboxUPN> with “[email protected]” and <UserUPN(s)> with “[email protected]” ensures only Katy can book the Conference Room, while all other users are blocked.
Note: You can also use Room Finder in Outlook to avoid scheduling conflicts. It filters and displays only available rooms based on your specific criteria, reducing the chance of conflicts.
Allowing specific users to schedule meeting rooms is essential, but delegate approval adds a crucial layer of oversight. It prevents conflicts, misuse, and overbooking of high-demand rooms. It ensures that priority meetings always have access to rooms, while limiting access for other users.
Using Outlook
From the Resource scheduling window, configure the Scheduling permissions as follows. This configuration allows specific users to book room mailbox with delegate approval. This approach blocks everyone else from booking meeting rooms in Exchange Online.
- Select Specific people and groups under the ‘These people can schedule automatically if the resource is available’ and leave the input field empty.
- Select Specific people and groups under ‘These users can submit a request for owner approval if the resource is available’ and choose the desired users.
- Select Specific people and groups under ‘These people and groups can schedule automatically if the resource is available and can submit a request for owner approval if the resource is unavailable’, leave the input field empty, and click Save.
Note:
Delegate approvals must be set up for the room mailbox in Exchange Online to manage room booking requests.
|
To add delegates for a room mailbox via the Exchange admin center, navigate to Recipients → Resources → respective room mailbox → Booking tab. Next, click Manage delegate settings, choose Select delegates who can accept or decline booking requests, enter their names, and click Save. |
Using PowerShell
Run the below cmdlet in PowerShell to allow only specific users to book meeting rooms in Microsoft 365 with delegate approvals.
|
1 |
Set-CalendarProcessing -Identity "<RoomMailboxUPN>" -AutomateProcessing AutoAccept -AllBookInPolicy $false -BookInPolicy $null -AllRequestInPolicy $false -RequestInPolicy “<UserUPN(s)>” -AllRequestOutOfPolicy $false -RequestOutOfPolicy $null -ResourceDelegates “<DelegateUserUPN(s)>” |
Here, replace <RoomMailboxUPN> with the name of the room mailbox.
Replace <UserUPN(s)> with the User Principal Names of the users allowed to submit booking requests.
Replace <DelegateUserUPN(s)> with the UPNs of the delegates managing meeting requests.
For example, replace <RoomMailboxUPN> with “[email protected]”, <UserUPN(s)> with “[email protected]”, and <DelegateUserUPN(s)> with “[email protected]”. This setup allows Katy to send booking requests for the Conference Room to Berlin. Now, she can accept or decline the requests.
Keep in mind that you cannot directly add/remove a new user in existing ResourceDelegates list using Set-CalendarProcessing cmdlet, because it overwrites the current list. Any names you specify will replace all existing delegates.
Trusted personnel, like department heads or senior managers, often require quick and seamless access to meeting rooms to stay productive. Bypassing Exchange room mailbox delegation for these specific users removes delays caused by approvals, ensuring their critical work proceeds without interruption. This setup strikes a balance between efficiency for key users and requiring approval for others.
Using Outlook
- Select Specific people and groups under ‘These people can schedule automatically if the resource is available’ and enter the names of the users who can bypass the requirement for delegate approval.
- Select Everyone under ‘These users can submit a request for owner approval if the resource is available’.
- Select Specific people and groups under ‘These people and groups can schedule automatically if the resource is available and can submit a request for owner approval if the resource is unavailable’, leave the input field empty, and click Save.
Using PowerShell
To allow specific users to book a room mailbox without needing approval while requiring others to have their bookings approved in Microsoft 365, run the following cmdlet.
|
1 |
Set-CalendarProcessing -Identity "<RoomMailboxUPN>" -AutomateProcessing AutoAccept -AllBookInPolicy $false -BookInPolicy "<UserUPN(s)>" -AllRequestInPolicy $true -RequestInPolicy $null -AllRequestOutOfPolicy $false -RequestOutOfPolicy $null -ResourceDelegates "<DelegateUserUPN(s)>" |
Here, replace <RoomMailboxUPN> with the name of the room mailbox.
Replace <UserUPN(s)> with the User Principal Names of the users allowed to book the room without approval.
Replace <DelegateUserUPN(s)> with the UPNs of the delegates managing meeting requests.
For example, replace <RoomMailboxUPN> with “[email protected]”, <UserUPN(s)> with “[email protected]”, “[email protected]”, and <DelegateUserUPN(s)> with “[email protected]”. This allows Katy and Amy to book the Conference Room directly without approval, while all other users will require approval from the manager.
Imagine a critical meeting arises suddenly, and the team leader tries to book the conference room, but another team has already reserved it. In this situation, the Exchange Online resource booking assistant declines the booking request due to the conflict. To address this, you can allow the team leader to submit a booking request to manual delegates. They can assess the meeting’s importance and approve the reservation accordingly.
Using Outlook
- Select Everyone under the ‘These people can schedule automatically if the resource is available’ and leave the input field empty.
- Select Specific people and groups under ‘These users can submit a request for owner approval if the resource is available’ and leave the input field empty.
- Select Specific people and groups under ‘These people or groups can schedule automatically if the resource is available and can submit a request for owner approval if the resource is unavailable’, enter the name of the user or group that should have this exclusive access, and click Save.
Using PowerShell
Run the cmdlet below to permit specific users to submit a booking request for the delegate’s approval when the room is unavailable. While all other users can only book the room when it is available.
|
1 |
Set-CalendarProcessing -Identity "<RoomMailboxUPN>" -AutomateProcessing AutoAccept -AllBookInPolicy $true -BookInPolicy $null -AllRequestInPolicy $false -RequestInPolicy $null -AllRequestOutOfPolicy $false -RequestOutOfPolicy "<UserUPN(s)>” -ResourceDelegates “<DelegateUserUPN(s)>” |
Here, replace <RoomMailboxUPN> with the name of the Exchange room.
Replace <UserUPN(s)> with the User Principal Names of the users who are allowed to schedule room bookings.
Replace <DelegateUserUPN(s)> with the UPNs of the users who must approve or decline these requests.
For example, replacing <RoomMailboxUPN> with “[email protected]”, <UserUPN(s)> with “[email protected]”, and <DelegateUserUPN(s)> with “[email protected]” allows Katy to automatically book the Conference Room if it is available. If the room is unavailable, the request will be sent to Berlin, who can approve or decline the request.
Tip: Besides allowing only specific users or groups to book meeting rooms, you can also restrict Exchange room bookings. This includes limiting advanced reservations, recurring meetings, and excessive time durations.
You can revert the meeting room reservation policy to default if you wish to allow all users to book room mailbox without delegate approval.
Note: Reverting to default will allow all users to book the meeting room without requiring delegate approval.
Using Outlook
To set the room mailbox calendar policy to default, navigate to the Resource scheduling page in the room mailbox Outlook web.
- Select Everyone under ‘These people can schedule automatically if the resource is available’.
- Select Specific people and groups under ‘These users can submit a request for owner approval if the resource is available’ and leave the input field empty.
- Select Specific people and groups under ‘These people and groups can schedule automatically if the resource is available and can submit a request for owner approval if the resource is unavailable’, leave the input field empty, and click Save.
Using PowerShell
Run the following command to revert the room mailbox scheduling permission to default.
|
1 |
Set-CalendarProcessing -Identity “<RoomMailboxUPN>” -AutomateProcessing AutoAccept -AllBookInPolicy $True -BookInPolicy $null -AllRequestInPolicy $false -RequestInPolicy $null -AllRequestOutOfPolicy $false -RequestOutOfPolicy $null -ResourceDelegates $null |
Replace <RoomMailboxUPN> with the User Principal Name of the resource mailbox you want to allow all users to book without any restrictions.
Tip: Resetting the room mailbox to default lets everyone book the meeting room, but old and unwanted recurring meetings from former employees may cause conflicts. In such cases, deleting recurring meetings scheduled by former employees can help ensure seamless booking.
And that’s a wrap! We hope this blog has helped you understand how to allow only specific users to book meeting rooms in Microsoft 365. Thanks for reading! If you have any doubts or need further clarification, feel free to leave a comment below—we’re here to help!


