Filter Spam Using Mail Flow Rules in Exchange Online
Create Exchange Online mail flow rules to filter spam emails based on keywords, sender patterns, and Spam Confidence Level scores. Configure transport rules to move suspicious messages to junk folders or quarantine, adding customized spam protection beyond built-in anti-spam policies.
Spam emails are one of the most common tactics used by cybercriminals to steal sensitive information, distribute malware, or compromise Microsoft 365 email accounts. These messages often look like real emails but may contain fake links, harmful attachments, or misleading information. If users aren’t careful, clicking on them can lead to data loss, malware infections, or even security breaches.
While built-in anti-spam policy provides a solid first layer of defense, organizations can enhance spam filtering by using mail flow rules for more precise and customized control. One simple and effective method is by using mail flow rules to block incoming spam emails.
This approach adds an extra layer of protection without adding manual work for your IT team. In this blog, we’ll show you how to create mail flow rules in Exchange Online to help filter spam emails and improve your Microsoft 365 email security.
Mail flow rules (also called transport rules) let admins create conditions to detect spam or filter bulk email in Exchange Online based on attributes like specific words, senders, or patterns and then take action, such as moving to the junk folder or quarantine them.
For example, if an email uses common scam words or suspicious phrases like “Reset your password” or “Click this link” or “Claim your gift card”, then mail flow rule can detect these keywords and automatically move the message to the junk folder protecting users from phishing or scam attempts.
When creating mail flow rules and managing spam filtering in Exchange Online, it is necessary to know about SCL as well as anti-spam policies.
- SCL (Spam Confidence Level):
SCL (Spam Confidence Level) is a score assigned to emails using mail flow rule in Exchange Online to show how likely a message is spam. The SCL is typically a number between 0 and 9, where a higher number indicates a higher probability of the message being spam. - Anti-spam policies:
Anti-spam policies are security settings designed to protect your organization from unwanted, malicious, or spoofed emails. They work by analyzing incoming email traffic to detect and filter suspicious messages. Here you define how messages with different SCL ratings are treated (e.g., move to junk, quarantine).
First, all you need to do is to create a mail flow rule with specific target keywords or text patterns and set an SCL (Spam Confidence Level) between 6-9 to indicate how likely the message is spam. Spam filters analyze various factors of an incoming emails, including sender reputation, message content, and other indicators to calculate an SCL score. Once an email matches the specific words in the subject or body defined by the mail rule created, it automatically assigns the configured SCL score.
Based on that score, your anti-spam policies step in to decide what happens next, whether to move it to junk or quarantine it.
Handy Tip: Implement email filtering rules and essential spam protection settings in order to increase Microsoft Secure Score.
Permission required:
Exchange Administrator, Security Administrator or Global Administrator roles.
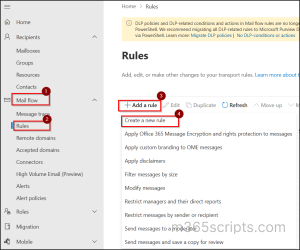
You can follow the steps below to implement email filtering through mail flow rules in EAC.
- Sign in to the Exchange admin center.
- Navigate to Mail flow → Rules.
- Click on Add a rule and select Create a new rule.
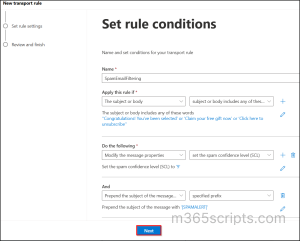
4. Set Mail Flow Rule Conditions
- Provide a suitable name for your mail flow rule.
- Configure the ‘Apply this rule if’ settings with ‘The subject or body’ and select ‘subject or body includes any of these words’ from the dropdown menu beside the settings.
- Now, you can click on Edit to enter the specific words/phrases which usual spam mail uses like ‘Congratulations! You’ve been selected’ or ‘Claim your free gift now’ or ‘Click here to unsubscribe’.
- Under ‘Do the following’ drop-down, select Modify the message properties →Set the Spam confidence Level (SCL).
- Click on the edit option to specify the Spam Confidence Level between 6 to 9.
- Now, click ‘+’ option to add another action, choose ‘Prepend the subject of the message with’ from the dropdown menu and specify subject prefix as [SPAM ALERT] or any preferred text.
- Then, click Save and select Next.
Tip: You can use the ‘Except if’ field so that certain emails are excluded from being filtered out as spam based on specific conditions.
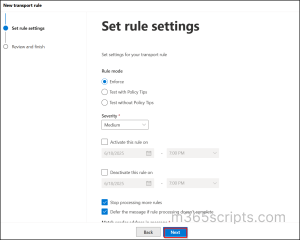
5. Set Mail Flow Rule Settings
- By default, the rule mode is set as Enforce. If required, you can change it to test with or without policy tips so that you can evaluate rules without impacting mail flow.
- Click on the ‘Severity’ dropdown and choose the desired option.
- If you want to set the time range to apply rule, use the Activate this rule on and deactivate this rule on checkboxes to define the start and end date.
- Leave the ‘Match sender address’ in the message as Header and click Next.
6. Review the policy conditions & settings and click Finish to create an Exchange Online mail flow rule.
7. Once the mail flow rule has been created, click Done.
8. After you create the rule, it remains disabled by default. To activate it, simply click on the rule and turn on the toggle switch so that it starts applying to emails.
To create a mail flow rule to filter spam email messages using PowerShell, follow the steps below.
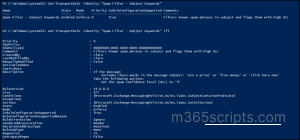
Firstly, connect to Exchange Online PowerShell and run the below cmdlet to create a transport rule that filters out spam emails in your organization.
|
1 |
New-TransportRule -Name "<RuleName>" -SubjectOrBodyContainsWords “<WordOrPhrase1>”, "<WordOrPhrase2>” -SetSCL <6 | 9> -Priority 0 –Comment “<Description>" |
Here, configure the parameters based on your requirements.
- Name: Set a unique name for the rule.
- SubjectOrBodyContainsWords: Specify keywords or phrases typical of spam messages.
- SetSCL: Assign a Spam Confidence Level between 6 to 9 (e.g., 6 for likely spam, 9 for high-confidence spam). So that, it influences how anti-spam policies will handle the message.
- Priority: Set priority to the rule.
- Comments: Add description to the mail flow rule created.
You can use the below cmdlet to confirm that you’ve created the rule.
|
1 |
Get-TransportRule -Identity "<RuleName>" | Format-List |
- Identity: Enter the name of new rule created.
You can also create mail flow rules with different or even more conditions so that they suit your organization’s requirement using New-TransportRule cmdlet. This could include filtering out emails sent from specific users/domains, redirecting the message to a quarantine mailbox, etc.
Similar to filtering or blocking spam emails, you can also configure a mail flow rule to receive emails on your unlicensed admin account. This ensures that important alerts are received, keeping you informed without the need for a licensed mailbox.
To update an existing mail flow rule, use the Set-TransportRule as follows:
|
1 |
Set-TransportRule –Identity "<RuleName>" -SubjectOrBodyContainsWords “<WordOrPhrase1>”, "<WordOrPhrase2>” -SetSCL <6 | 9> -PrependSubject “<SpamAlertMessage>” -Priority 0 –Comment “<Description>" |
- PrependSubject: Enter a spam alert message to be displayed before the subject of spam mail. (E.g., [SPAM ALERT]).
You can use the below cmdlet to confirm that you’ve updated the rule.
|
1 |
Get-TransportRule -Identity "<RuleName>" | Format-List Name, SubjectOrBodyContainsWords, PrependSubject, SetSCl |
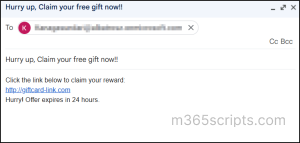
- For testing, I initiated a test mail with the phrase “Claim your free gift now,” which was specified in the configured mail flow rules
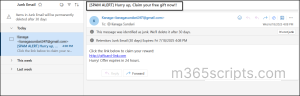
- In this case, the rule sets a high Spam Confidence Level (SCL = 9) and prepends a [SPAM ALERT] to the subject line. Once you set the SCL, anti-spam policies configured in Microsoft Defender evaluate the score and take the appropriate action.
- For high SCL values like 9, the default action is to move the email to the Junk Email folder. As a result, the end user sees the message in their junk folder and the subject modified by the rule. It helps them to identify and avoid potential threats.
Sender of the mail (Spammer):
Recipient of the mail (End user):
Message Trace in Exchange Online acts like a report card for your mail flow rules—it shows when a rule was triggered and what happened to the message, giving you full visibility and control over your organization’s email traffic. Follow the below steps to audit messages via message trace.
- Navigate to Message Trace under the Mail flow tab in the Exchange admin center.
- Under the Default queries section, select ‘Start a trace’.
- Select senders and recipients as ‘All’ and set the Time range.
- Now, choose the subject/body that contains specific words or phrases as well as choose the delivery status as ‘Filtered as Spam’ and then click Search.
Emails flagged by the transport rule with SetSCL values of 6 to 9 are automatically delivered to the junk,
as a result, they are categorized as ‘Filtered as Spam’ emails. 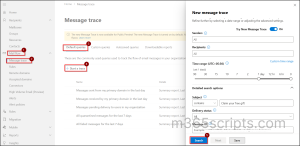
Below screenshot shows the result of our query search which can be viewed by the admins through message trace in EAC.
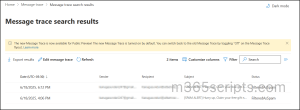
By auditing the message trace, admins can test and confirm that the messages were marked as spam due to a mail flow rule and SCL (Spam Confidence Level) assignment.
We hope this blog helps you understand how mail flow rules create a layered defense strategy which strengthens your organization’s email security.
With a well-planned set of mail flow rules, you can cut down on noise, reduce risk, keep your users focused & safe. Have a favourite rule or use case? Share it in the comments below, also feel free to reach out to us if you have any concerns!