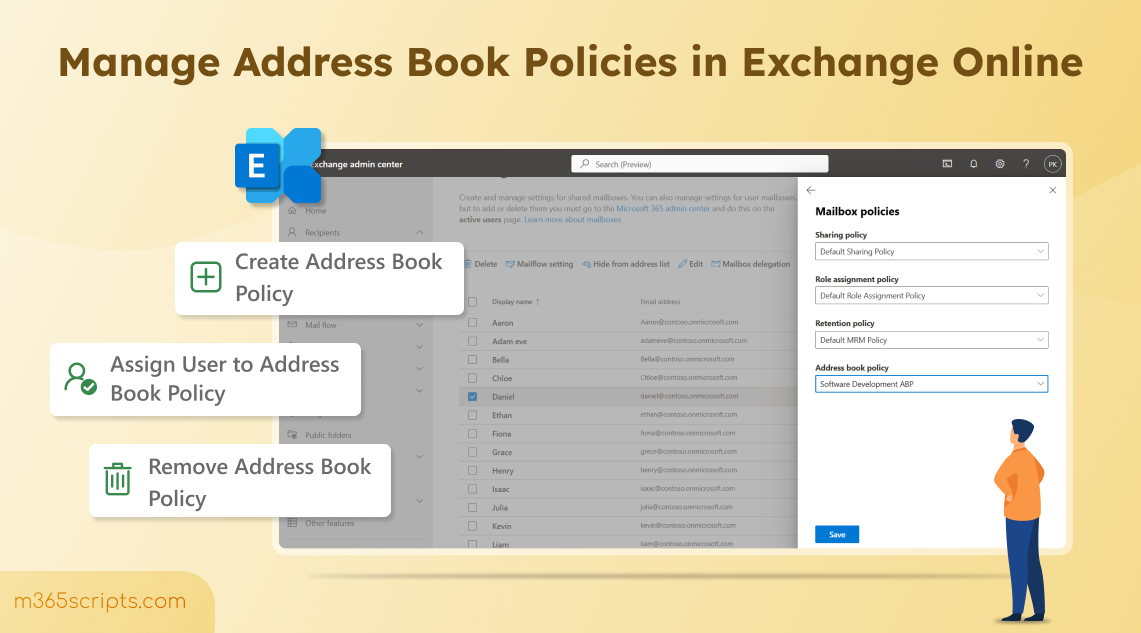
How to Create and Manage Address Book Policies in Exchange Online
Create Address Book Policies in Exchange Online to segment the Global Address List for different departments or companies sharing a tenant. Configure custom address lists, room lists, and offline address books to provide users with relevant contacts only. Enhance privacy and prevent accidental data exposure through proper directory segmentation.
If you’ve ever worked in a large organization, you’ve likely noticed how cluttered and confusing the Global Address List (GAL) is. With hundreds or even thousands of users across departments, locating the right contact or ensuring communication stays within the right group can be challenging.
To address this, Exchange Online offers Address Book Policies (ABPs) — a powerful feature that allows administrators to logically segment address lists. This helps streamline communication, enhance privacy, and maintain clear boundaries between teams or departments.
In this blog, we’ll explore how to create and manage Address Book Policies in Exchange Online.
Let’s start with the basics! Address Book Policies (ABPs) help administrators segment users into specific groups to provide customized views of the organization’s Global Address List (GAL). This ensures users only see the contacts relevant to their group or department, enhancing privacy and compliance.
For example, imagine two companies, Company A and Company B, sharing the same Microsoft 365 tenant. Without proper separation, users from one company could view and contact employees from the other, leading to privacy and compliance issues. ABPs solve this by isolating each company’s address lists, ensuring users from Company A see only their colleagues, and the same for Company B.
Now that we’ve covered what an Address Book Policy (ABP) is, let’s look at a different example to understand the need to create and manage Address Book Policies.
Consider this situation: a confidential team member intends to email “John” from their own team but accidentally sends the message to another “John” from a different department. If the message contains crucial or sensitive information, this mistake could lead to a potential data leak. This highlights the importance of maintaining a well-organized directory structure and implementing strong access controls to prevent such incidents.
To address this, creating an appropriate Address Book Policy becomes essential. Moreover, managing these policies effectively is equally important to ensure they function as intended. Let’s dive in deeply into the process now to handle this department segregation case!
- How to create Address Book Policy using PowerShell
- Assign Address Book Policy in Exchange Online
- Remove Address Book policy in Exchange Online
Before you begin to create and manage Address Book Policies, make sure you have the required permissions and PowerShell requirements. To do this, assign the “Address Lists” role to a new or existing role group and add the relevant administrators.
Then, connect to Exchange Online PowerShell. After completing the prerequisites, follow the procedures below, which are the four crucial components needed to create the Address Book Policy.
1. Enable Address Book Policy Routing in Exchange Online
Enable Address Book Policy (ABP) Routing in Exchange Online. This ensures users only see and communicate with recipients defined in their assigned Address Book Policy, maintaining separation and privacy between groups or organizations.
2. Create a Custom Address List Using PowerShell
An address list is a filtered collection of recipients such as users, groups, contacts, or rooms that share common attributes like department, location, or role. Custom address lists help users quickly find relevant recipients without browsing the entire organization’s directory.
3. Create a New Custom Global Address List (GAL) in Exchange Online
The Global Address List (GAL) is the master directory that includes all users, groups, and contacts. Creating a custom GAL ensures that each business unit or group only sees the contacts and resources relevant to them.
4. Create an Offline Address Book (OAB)
The Offline Address Book (OAB) lets users access contact details even when offline. A custom OAB ensures that users within a specific Address Book Policy can only view and sync the contacts assigned to their scope.
5. Create a Room List:
A room list is a special type of address list containing meeting room mailboxes. It helps users easily find and book available rooms in Outlook or Teams.
ABP routing enforces virtual organisational boundaries, when users are assigned different GALs by different ABPs, enabling routing causes those users to appear as external recipients to each other, helping maintain logical separation.
So, enabling ABP Routing in Exchange Online is essential when you use Address Book Policies (ABPs) to segment users within the same organization.
|
1 |
Set-TransportConfig -AddressBookPolicyRoutingEnabled $true |
To make sure it is enabled run the cmdlet given below.
|
1 |
Get-TransportConfig | Format-List AddressBookPolicyRoutingEnabled |
Now, use the the following cmdlet to create a new custom address list that includes users from a specific department for which you want to assign the Address Book Policy (ABP).
|
1 |
New-AddressList -Name "<ALName>" -RecipientFilter "(RecipientType -eq 'UserMailbox' -and Department -eq '<Department>')" |

Replace <ALName> with the desired name of the address list, and <Department> with the department name of the users you plan to assign the ABP to.
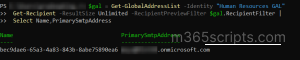
To check the users who are added in the address list use the following code and replace <ALName> with name of the address list.
|
1 2 3 |
$Value = Get-AddressList -Identity "<ALName>" Get-Recipient -ResultSize unlimited -RecipientPreviewFilter $Value.RecipientFilter | Select Name, PrimarySmtpAddress |
Run the cmdlet given below to create a new custom global address list for ABP and replace <GALName> with the name of the Global Address List and <Department> with name of the department.
|
1 |
New-GlobalAddressList -Name "<GALName>" -IncludedRecipients AllRecipients -ConditionalDepartment "<Department>" |

To check whether the user is assigned to the global address list, use the cmdlet below and replace <GALName> with the name of the Global Address List.
|
1 2 3 |
$gal = Get-GlobalAddressList -Identity "<GALName>" Get-Recipient -ResultSize Unlimited -RecipientPreviewFilter $gal.RecipientFilter | Select Name,PrimarySmtpAddress |
You can now use the cmdlet given below to create custom offline address book. Replace <OABName> and <ALName> with the name of the custom offline address book and address list name you have created in the above section.
|
1 |
New-OfflineAddressBook -Name "<OABName>" -AddressLists "\<ALName>" |
Note: Make sure that the custom address list and custom global address list names differ from each other to avoid the following error creating an offline address book.
New-OfflineAddressBook: ||There are multiple address lists or global address lists matching the identity “\All M365Solutions”. Please specify a unique value.
Run the cmdlet below to create a custom room list and replace <RoomListName> and <Department> with the name of the roomlist and department respectively.
|
1 |
New-AddressList -Name "<RoomListName>" -RecipientFilter {(Department -eq "<Department>") -and (RecipientDisplayType -eq 'ConferenceRoomMailbox')} |
We have all set! Now let’s create a new address book policies to segregate the users from the default address list. Replace <GALName>, <OABName>, <RoomListName> <ALName> with the actual name of the it was created with in PowerShell. Also, provide a unique name for the policy.
|
1 |
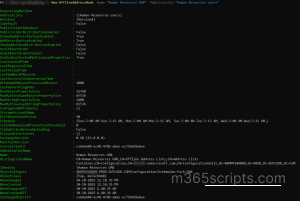
New-AddressBookPolicy -Name "\<ABPName>" -AddressLists "\<ALName>" -OfflineAddressBook "\<OABName>" -GlobalAddressList "\<GALName>" -RoomList "\<RoomList>" |

Assigning custom Address Book Policies (ABPs) in Exchange Online ensures that users are linked to the appropriate custom address lists, custom Global Address List (GAL), and custom Offline Address Book (OAB) based on their department or project.
This helps maintain organized and secure communication by controlling which contacts and resources each user can view and browse. There are two methods to assign users to an Address Book Policy.
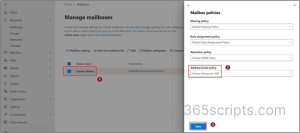
A) Assign Address Book Policy to user using EAC
B) Assign Address Book Policy to user using PowerShell
- Log in to Exchange Admin Center, go to Recipients → Mailboxes.
- Search and select the user you want to add to address book policy and select Mailbox policies.
- Navigate to Address Book policy and in the drop down select the address book policy you created and add the add user to the ABP by clicking Save.
Run the following cmdlet to assign an Address Book Policy (ABP) to users in the department you are targeting for your use case. Replace <ABPName> with the name of the Address Book Policy and <MailID> with the user’s email.
|
1 |
Set-Mailbox <MailId> -AddressBookPolicy "<ABPName>" |
Bulk Assign and Manage User to Address Book Policy
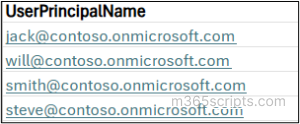
In large organizations, manually assigning Address Book Policies (ABPs) to each user in your target department can be inefficient and error-prone. To simplify the process, you can use a CSV file containing the users from that department.
So, now create a CSV with details user list of the department you created the policy for and save it in your computer locally, for example: D:/Users.csv
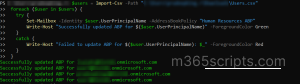
Once added all the users run the following cmdlet given below.
|
1 2 3 4 5 6 7 8 9 10 11 |
$users = Import-Csv -Path "<FilePath>" # Loop through each user and assign the Address Book Policy foreach ($user in $users) { try { Set-Mailbox -Identity $user.UserPrincipalName -AddressBookPolicy "<ABPName>" Write-Host "Successfully updated ABP for $($user.UserPrincipalName)" -ForegroundColor Green } catch { Write-Host "Failed to update ABP for $($user.UserPrincipalName): $_" -ForegroundColor Red } } |
Bulk Assign User to Address Book Policy Using Distribution group
As an alternative, you can add all the user to a distribution group and use the cmdlet given in the end to assign the created ABP to users of the distribution group. To do it,
- Create a new distribution group in Microsoft 365 Admin Center.
- Add the required users as members to the group.
Then run the cmdlet by replacing the <YourDistributionGroupName> with your created distribution group.
|
1 2 3 |
Get-DistributionGroupMember -Identity "<YourDistributionGroupName>" | ForEach-Object { Set-Mailbox $_.PrimarySmtpAddress -AddressBookPolicy "<ADP Name>" } |
If a department no longer requires a specific Address Book Policy (ABP), you can easily remove it to restore their default Global Address List visibility. Run the PowerShell cmdlet given below to remove the particular address book policy.
Before the removal of Address Book Policy, you need to check whether any user mailbox is assigned to it. Let’s do it!
At first, you will have to get the DistinguishedName of your ABP using cmdlet given below and replace <ABPName> with the name of the address book policy.
|
1 |
Get-AddressBookPolicy -Identity "<ABPName>" | Format-List DistinguishedName |
Now copy the DistinguishedName of your ABP from the output and add it in the <ABPDistinguishedName> to see all the user mailboxes present in it.
|
1 |
Get-Mailbox -ResultSize unlimited -Filter "AddressBookPolicy -eq '<ABPDistinguishedName>'" |

To remove any assigned mailbox for the address book policy, replace the <ABPDistinguishedName> with the distinguished name of the ABP.
|
1 2 |
$abp = Get-Mailbox -ResultSize unlimited -Filter "AddressBookPolicy -eq '<ABPDistinguishedName>'" $abp| foreach {Set-Mailbox -Identity $_.MicrosoftOnlineServicesID -AddressBookPolicy $null} |
Now, we have removed the policy from the mailboxes. Our next steps is to remove the Address Book Policy from Exchange Online.
To remove the Address Book Policies from your organization, use the below cmdlet. Replace <ABPName> with the name of the Address book Policy.
|
1 |
Remove-AddressBookPolicy -Identity <ABPName> |
Hope this blog helped you to create and manage address book policies in Exchange Online easily. Feel free to share your thoughts and feedback in the comment section!