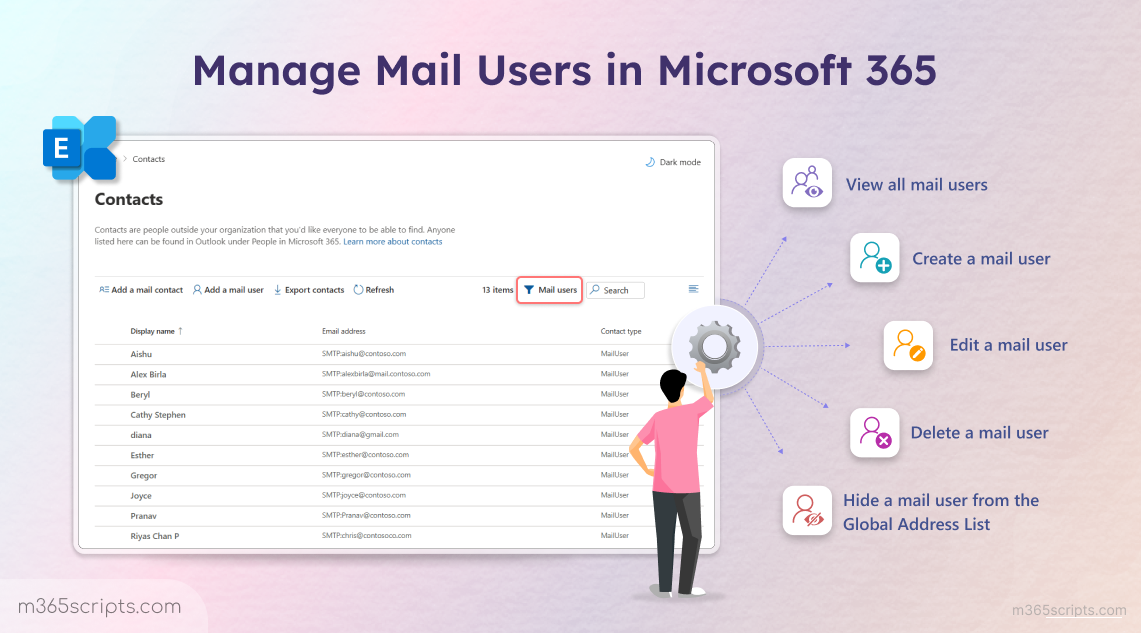
How to Manage Mail Users in Exchange Online
Create and manage mail users in Exchange Online to enable secure external collaboration with vendors and partners. Configure mail-enabled user accounts through Exchange admin center or PowerShell, set external email addresses, and control access permissions. Monitor inactive accounts to prevent security risks from unauthorized access attempts.
External collaboration helps organizations expand their business reach by working closely with vendors, partners, and collaborators. Microsoft supports this through two types of external entities: Mail contacts and Mail users (also known as mail-enabled users).
Although both appear in the Global Address List (GAL) and have external email addresses, mail users stand out because they have sign-in credentials to access resources.
However, this added access can become a security risk if not managed properly. For instance, an inactive mail user account from a former collaborator could be exploited through password spray or unauthorized access attempts.
So, let’s explore how to create and manage mail users in Exchange Online to enable secure and efficient collaboration.
To put this into action, if you are not a Global Administrator, make sure you have the Recipient Management or Organization Management role before proceeding. Now, you can efficiently handle mail users in Microsoft 365 in two ways:
A. Manage mail-enabled users using the Exchange admin center
B. Manage Microsoft 365 mail users using PowerShell
Before we dive in, let’s clarify an important point. Microsoft provides two types of objects, one is mail users and the other is guest mail users.
Mail users are typically created by administrators manually to support external collaboration needs. In contrast, guest mail users are added automatically when someone is invited to collaborate through services like Azure AD B2B invitations (for directory-level guest access), SharePoint Online, Microsoft Teams, and others.
Both types fall under the mail-enabled category. However, in this blog, our focus will be solely on Mail Users. Let’s get started!
Here are the steps you can follow to administer mail users through the Exchange admin center.
- Get a list of all mail users in Microsoft 365
- Add a new mail user account to your tenant
- Change a mail user settings in Exchange Online
- Hide a mail user from the Global Address List
- Remove a mail user from your organization
In order to assess your external collaborators, you first need to know all the mail users in your organization. By reviewing all mail users, you can quickly identify inactive or unnecessary accounts that still exist in your tenant and prevent unauthorized access to sensitive data. To view all the mail users, follow the steps below:
- Sign in to the Exchange admin center.
- Go to Recipients → Contacts.
- Apply a filter for Mail users to view all mail users along with their email addresses.
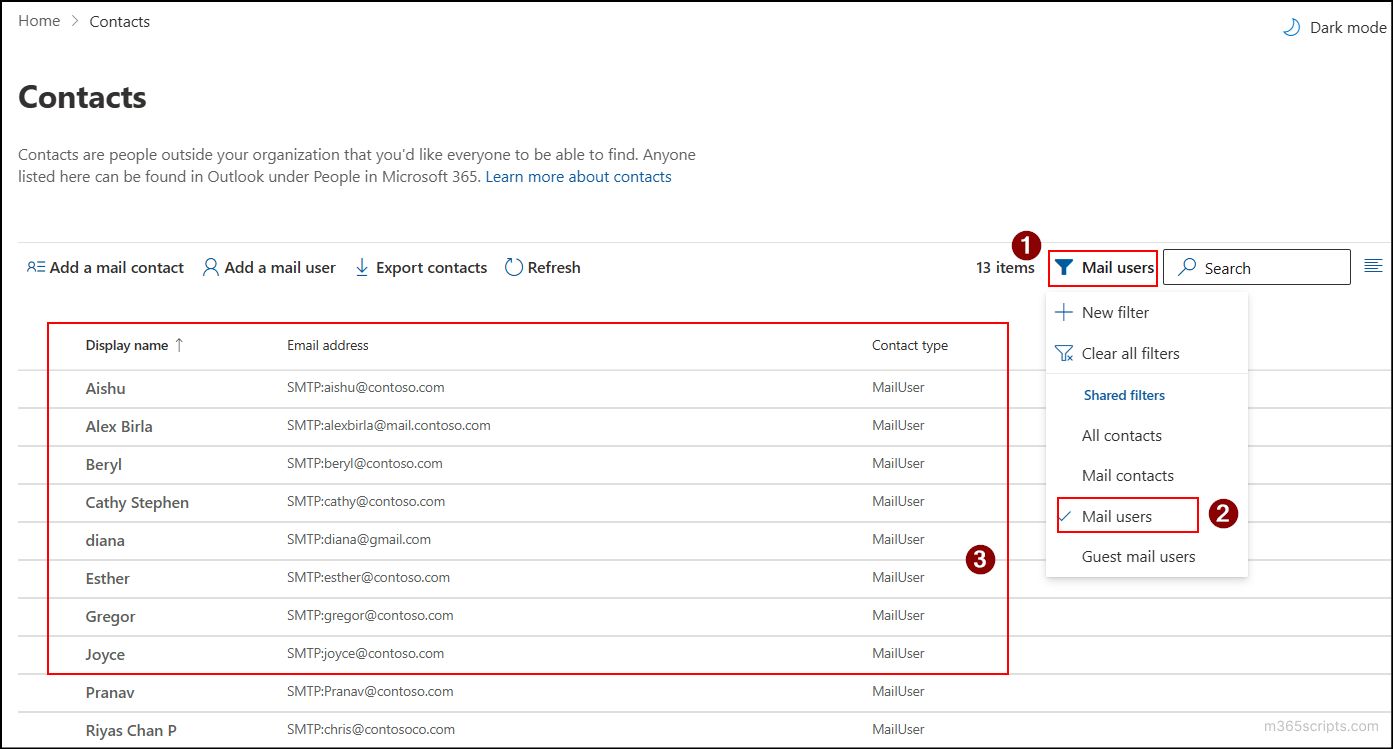
Note: You can use the Guest mail users filter to view all the guest mail users in your tenant. - You can also view the details of a specific mail user by clicking on their account. This allows you to see all relevant information, including the user’s name, external email address, contact details, company information, group memberships, and more.
After reviewing all your existing mail users, you might need to add a new one for a fresh project or collaboration. For instance, if a new contractor joins your team for a short-term project, creating a dedicated mail user lets them communicate and collaborate securely without giving access to unrelated internal data. Here’s how to create a new mail enabled user.
- Go to the Contacts page in the Exchange admin center.
- Click Add a mail user at the top of the page.
- Provide the required details such as Display Name, Alias (mail nickname that will appear to recipients), User ID, and select the Domain to which the mail user needs to be added.
- Enter a valid password and confirm it. You can also fill in other optional details if required, then click Next.
- On the Review mail user page, click Create to proceed if everything looks good.
- Once done, your mail user is successfully created and ready to use.

For a newly added external contractor, you can update their job title, department, or group memberships as they join a new project team to keep their profile updated. You can modify a mail user’s information by following the steps below.
- Select the mail user in the Contacts page whose information you want to update.
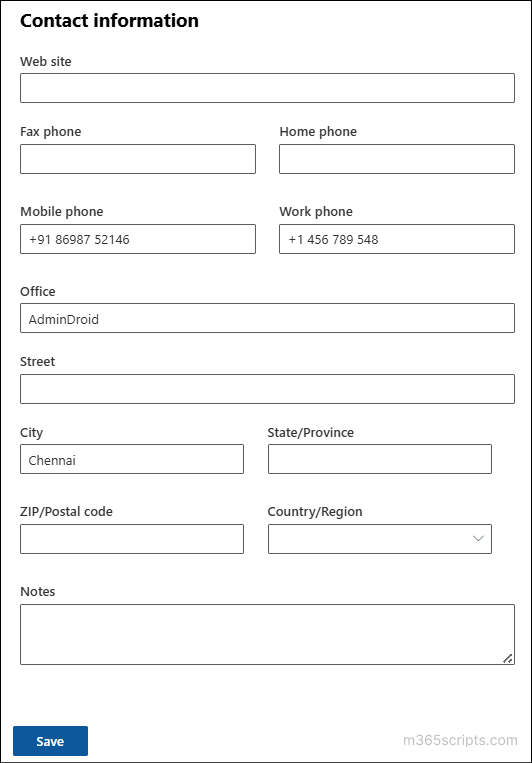
- Choose the appropriate edit option from the three tabs. For example, you can select Contact information to make changes. You can pick any tab depending on the details you need to update.
- Make the necessary changes and click Save to apply them.
Along with the above changes, you can also make a mail user account hidden from the Global Address List (GAL). This helps prevent users from accidentally sending emails to these mail users, as they are typically outside your organization. To hide a mail user from the address book, follow these steps:
- On the Contacts page, select the mail user, go to General > Hide from Global Address List (GAL), and click Manage hide from GAL.
- Toggle the Hide from Global Address List option to On.
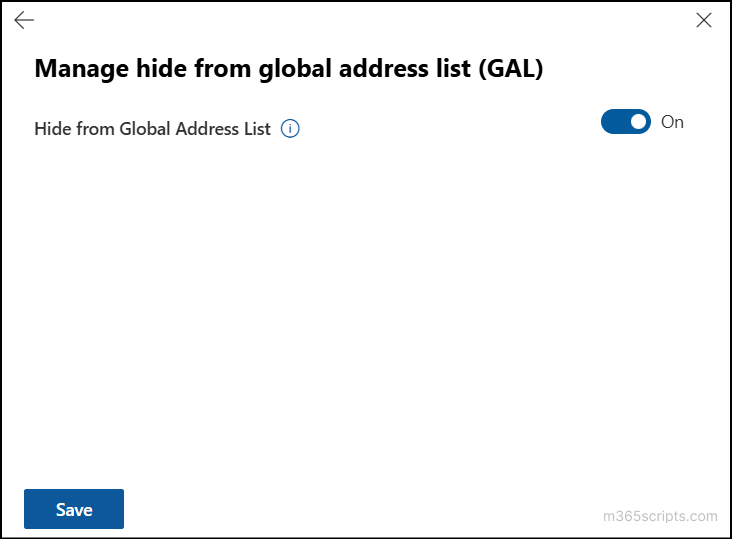
- Click Save. Now, the selected mail user will no longer appear in the address book (GAL).
If a contractor added for a short-term project remains in your tenant long after the project ends, it poses a security risk, as the account could be mistakenly granted access to sensitive resources. To prevent this, delete the mail user account using the steps below:
- On the Contacts page, select the mail user you want to remove.
- In the flyout pane, click Delete contact at the top of the page.
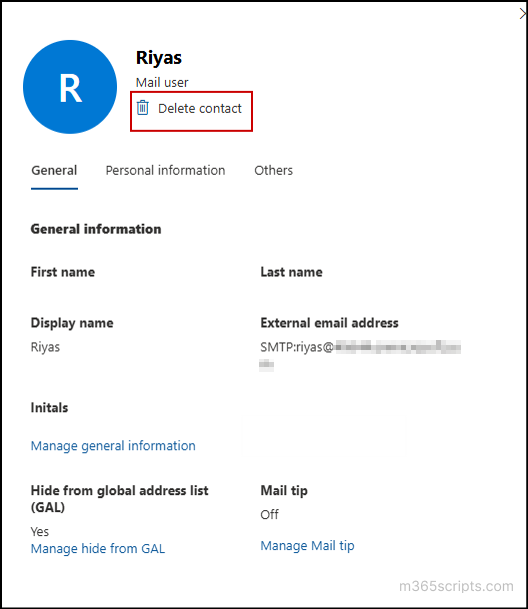
- Once done, confirm the deletion. The mail user will now be successfully removed.
To get started, connect to Exchange Online PowerShell using your admin credentials. Once connected, you can perform the following management actions efficiently through PowerShell.
1. Get all mail users in Exchange Online
2. Add a mail user using PowerShell
3. Update a mail user account using PowerShell
4. Set custom attribute for a mail user
5. Hide a mail user from the address book
6. Remove a mail user from your organization
Instead of manually applying filters in the Exchange admin center, you can quickly view all mail users in your organization using the following PowerShell cmdlet:
|
1 2 3 |
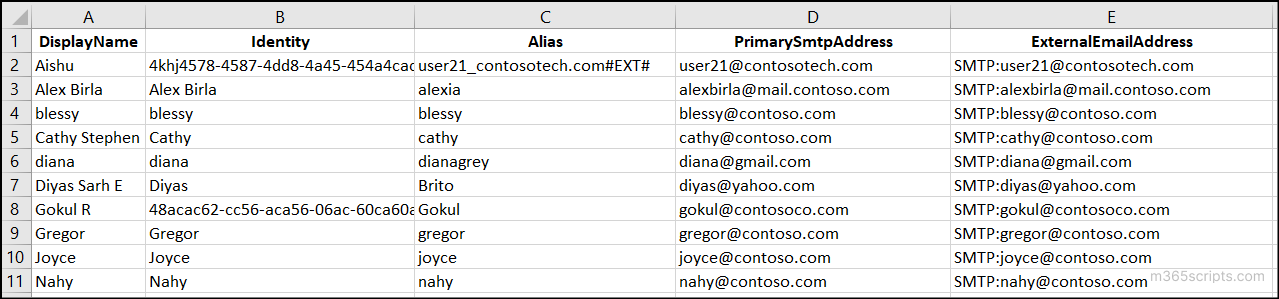
Get-MailUser -ResultSize Unlimited -Filter "RecipientTypeDetails -eq 'MailUser'" | Select-Object DisplayName, Identity, Alias, PrimarySmtpAddress, ExternalEmailAddress | Export-Csv -Path "<FilePath>" -NoTypeInformation |
Replace <FilePath> with the location where you want to export the output file. This cmdlet retrieves all mail users and exports their details to a CSV file at the specified location. The exported information includes display name, identity, alias, primary SMTP address, and external email address.
You can also customize the Select-Object portion to include additional properties based on your requirements.
Note: Since we are focusing only on mail users, you can also use the RecipientTypeDetails parameter to target guest mail users. This applies to all the cmdlets in the upcoming sections as well.
Once you’ve reviewed the list of existing mail users, you can create a new mail user using the following PowerShell cmdlet:
|
1 |
New-MailUser -Name "Riyas" -MicrosoftOnlineServicesID [email protected] -Password (Read-Host "Enter password" -AsSecureString) -Alias Charlie -DisplayName "Riyas Chan P" -ExternalEmailAddress [email protected] -FirstName Riyas -Initials P -LastName Chan |
When prompted for the password, enter a strong and unique value to ensure account security.

In this example, a new mail user named Riyas Chan is created. Below is a breakdown of the key parameters used in the command:
- Name – The name of the mail user object in your directory.
- MicrosoftOnlineServicesID – The sign-in ID (UPN) for the mail user within your Microsoft 365 tenant.
- Password – The password for the new account.
- Alias – A mail nickname that is displayed to recipients instead of the full proxy email address.
- DisplayName – The name that appears in the Global Address List (GAL).
- ExternalEmailAddress – The external email address associated with the user, such as their personal or partner domain address (optional).
- FirstName – The user’s first name (optional).
- Initials – The initials or other identifying characters of the user (optional).
- LastName – The user’s last name (optional).
This command allows administrators to quickly create new external collaborators with controlled access to Microsoft 365 resources, without needing to navigate through the Exchange admin center.
Instead of creating each mail user individually, you can use a CSV file with PowerShell to add multiple users at once. This method saves time and ensures consistency.
First, create a CSV file with the required user details and save it locally on your machine, for example: E:/NewMailUsers.csv.
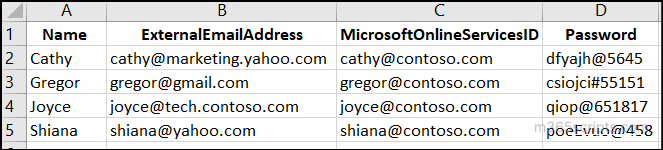
Then, use the following PowerShell snippet to import the CSV file and create the mail users:
|
1 2 |
$BulkMailUser = Import-Csv "<FilePath>" $BulkMailUser | ForEach-Object { New-MailUser -Name $_.Name -ExternalEmailAddress $_.ExternalEmailAddress -MicrosoftOnlineServicesID $_.MicrosoftOnlineServicesID -Password (ConvertTo-SecureString -String '$_.Password' -AsPlainText -Force)} |
Replace <FilePath> with the actual location of your CSV file and run the script.

In this way, you can efficiently create multiple mail users at once. This reduces manual effort and ensures consistent configuration across your tenant.
After checking the mail user’s details, if you need to modify a mail user’s information, run the following cmdlet:
|
1 |
Set-MailUser -Identity "Cathy" -DisplayName "Cathy Stephen" |
Here, the display name of the mail user “Cathy” has been changed to “Cathy Stephen.” If you want to verify the update, use the following cmdlet:
|
1 |
Get-MailUser -Identity "Cathy" | Format-Table Name, DisplayName |

Similarly, you can modify any mail user properties, such as the primary SMTP address in Microsoft 365 as per your requirements.
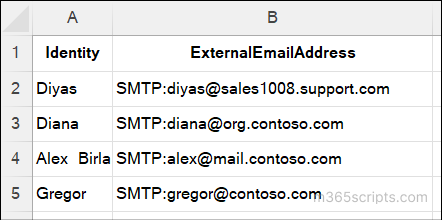
To be more efficient, you can also perform multiple modifications simultaneously, such as changing external email addresses to mail users using a single CSV input. First, prepare a CSV file with the required display names and corresponding external email addresses, as shown in the sample CSV.
Once the file is ready, run the following cmdlet by replacing the required file path:
|
1 2 3 4 |
$UpdateEmail = Import-Csv -Path "<FilePath>" foreach ($user in $UpdateEmail) { Set-MailUser -Identity $user.Identity -ExternalEmailAddress $user.ExternalEmailAddress } |
This script imports the mail user details from the CSV file and assigns the corresponding external email addresses to all mail users in a single operation. After running the command, you can confirm that it was applied successfully by using the Get-MailUser cmdlet to view the updated mail user details.
Along with updating known attributes like external email addresses, you can also assign a custom attribute to categorize mail users for identification or filtering. To set a custom attribute for a single mail user, you can use the following cmdlet.
|
1 |
Set-MailUser –Identity “Diyas” -CustomAttribute1 “HR Department” | Format-List DisplayName, CustomAttribute1 |
In this example, CustomAttribute1 is set to indicate that Diyas belongs to the HR department. You can verify the assignment using the Get-MailUser cmdlet.
|
1 |
Get-MailUser -Identity "Diyas" | Select-Object DisplayName, CustomAttribute1 |

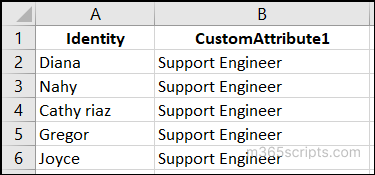
You can use a CSV file to assign custom attributes to multiple mail users at once. For example, create a CSV file (E:\SupportEngineers.csv) with the following structure:
Once done, you can run the following snippet.
|
1 2 3 4 5 |
$Support = Import-CSV -Path "<FilePath>" $Support | ForEach-Object { Set-MailUser -Identity $_.Identity -CustomAttribute1 $_.CustomAttribute1 Get-MailUser -Identity $_.Identity | Select-Object DisplayName, CustomAttribute1 } |
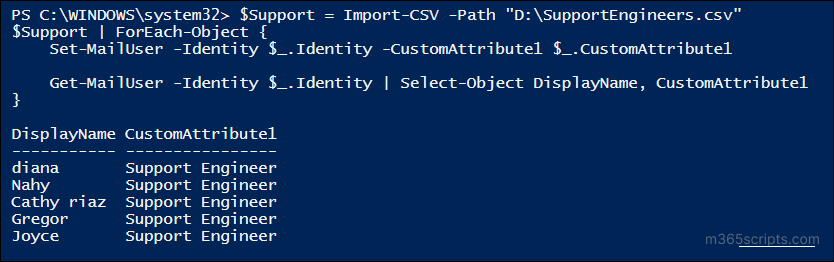
In this example, support engineers from different organizations are labelled as “Support Engineer”. You can use this attribute to filter, organize, or apply mail flow rules to this group within Exchange Online.
In the same way, you can also update a custom attribute for all mail users in your organization. To set a custom attribute for all users, use the following cmdlet:
|
1 2 3 4 5 |
Get-MailUser -ResultSize Unlimited -Filter {RecipientTypeDetails -eq 'MailUser'} | ForEach-Object { Set-MailUser -Identity $_.Identity -CustomAttribute2 "Mintros Collab Partner" Get-MailUser -Identity $_.Identity | Select-Object DisplayName, CustomAttribute2 } |
This cmdlet will assign the CustomAttribute2 value as “Mintros Collab Partner” for all mail users. You can later use this attribute to organize, search, or apply mail flow rules to specific user groups within Exchange admin center.
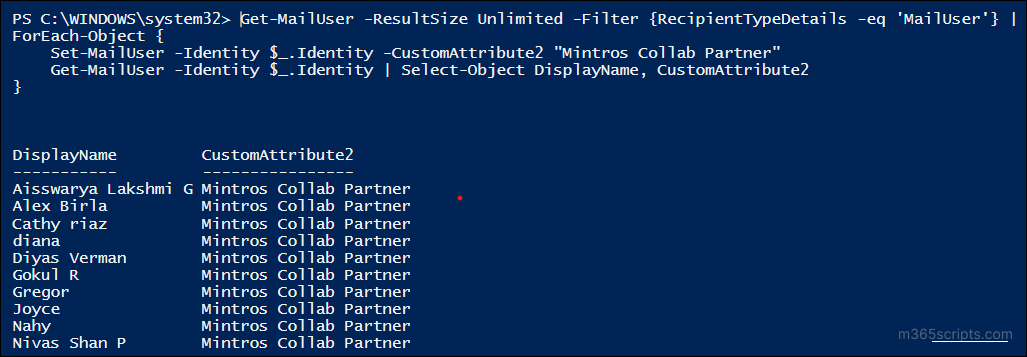
Note: While executing this cmdlet, you may encounter an error message such as “Write-ErrorMessage : ||The -HVEAccount parameter is required for updating HVE users.” This happens because there are High Volume Email (HVE) accounts in the Mail Users list. To resolve this, include the -HVEAccount switch when updating HVE users.
If you don’t want a mail user to appear in the Global Address List (GAL), you can hide them using the following cmdlet:
|
1 |
Set-MailUser -Identity "Diana" -HiddenFromAddressListsEnabled $true |
This will hide the user Diana from all address lists, including the GAL.
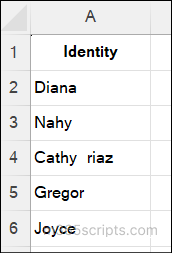
You can hide multiple users by maintaining a CSV file with a list of mail users. For example, create a CSV file (E:\HideMailUsers.csv) like this:
Then use the following PowerShell script to make the mail users hidden from the address book.
|
1 2 3 4 |
$UsersToHide = Import-CSV -Path "D:\HideMailUsers.csv" $UsersToHide | ForEach-Object { Set-MailUser -Identity $_.Identity -HiddenFromAddressListsEnabled $true } |
To hide all mail users from the address book, run the cmdlet below:
|
1 2 3 |
Get-MailUser -ResultSize Unlimited -Filter {RecipientTypeDetails -eq 'MailUser'} | ForEach-Object { Set-MailUser -Identity $_ -HiddenFromAddressListsEnabled $true } |
When a mail user is inactive for a longer time, you can remove them using the following cmdlet:
|
1 |
Remove-MailUser -Identity "Joyce" |
When prompted, type Yes (Y) to confirm deletion.
Warning: ⚠️ This permanently deletes the mail user from your tenant. Make sure you have a backup or export any needed information before proceeding.
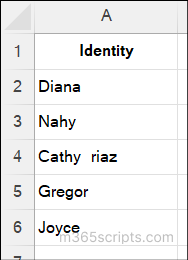
To remove multiple mail users at once, you can maintain a CSV file, for instance, E:\RemoveMailUsers.csv, like the below image.
Then use the following PowerShell script to delete the specific mail users.
|
1 2 3 4 |
$UsersToRemove = Import-CSV -Path "D:\RemoveMailUsers.csv" $UsersToRemove | ForEach-Object { Remove-MailUser -Identity $_.Identity -Confirm:$false } |
To remove all mail users in your organization, you can use the cmdlet given below.
|
1 2 3 |
Get-MailUser -ResultSize Unlimited -Filter {RecipientTypeDetails -eq 'MailUser'} | ForEach-Object { Remove-MailUser -Identity $_.Identity -Confirm:$false } |
Important:⚠️ This action is irreversible. Ensure you really want to remove all mail users before running this command.
We hope this blog helped you understand how to manage mail users in Microsoft 365 effectively and efficiently. Feel free to share your questions or feedback in the comments below and stay tuned for more Microsoft 365 management blogs.