How to Send Email Using Alias Address in Microsoft Outlook
Send emails from alias addresses in Outlook by enabling SendFromAliasEnabled in Exchange Online. Configure the organization setting through PowerShell or Exchange admin center, then select alternate email addresses when composing messages. Manage multiple identities without switching accounts.
Email aliases, also known as proxy addresses, empower Microsoft 365 users to send emails from different addresses without needing to switch accounts. This feature is especially valuable for those juggling multiple identities, whether for business or personal communication. Effectively managing these additional email addresses is crucial, particularly during domain changes. However, to be able to send emails from these aliases, you first need to enable them.
In this blog post, let’s check out how to send emails from different email addresses in Outlook and troubleshoot when you are unable to send email from alias address.
By default, the ability to send email from aliases is disabled. An administrator must enable this feature in either PowerShell or the Exchange admin center.
To enable sending emails from a proxy address using PowerShell, follow these steps:
Firstly, connect to Exchange Online PowerShell. Then, enable the SendFromAlias feature.
|
1 |
Set-OrganizationConfig -SendFromAliasEnabled $True |
Once enabled, users can start sending emails from alternate addresses.
To confirm that the SendFromAlias feature is active, run the following.
|
1 |
Get-OrganizationConfig | Format-Table SendFromAliasEnabled |
If successful, the status will display as “True.”
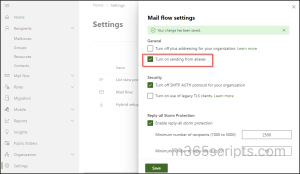
Likewise, to enable sending from aliases in Outlook using Exchange admin center, follow these steps:
- Sign in to the Exchange admin center.
- Navigate to Settings –> Mail flow.
- Check the box labeled Turn on sending from aliases.
- Click Save. A confirmation message will appear, indicating that your changes have been successfully saved.
Follow the steps to send a message from proxy address in Outlook. Before that, you can export all Microsoft 365 email alias addresses to easily identify the current alias address for the email accounts.
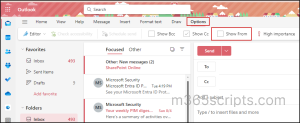
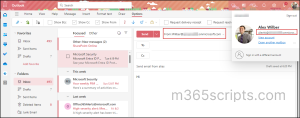
- Start composing a new message by clicking the New mail button.
- In the new message window, click on Options in the menu bar.
- Check the box next to Show From to display the “From” field in your email.
- Click on the From drop-down menu in the email window.
- If the alias is not listed, click on Other E-mail Address.
- You can either choose from the suggested contacts or enter your alias email address in the From field.
- Compose your email as you normally would.
- Ensure the From field displays your alias email address.
- Click Send to send a message from an alias email address.
Ensuring that your email has been sent from the correct alias address is very important. If the email is sent from the wrong alias, it could lead to confusion, miscommunication, or even a breach of confidentiality. For instance, sending an email from a personal alias instead of a professional one might give an impression of informality.
To verify your email is sent from the correct alias, follow these steps:
- Go to the “Sent Items” folder in Outlook.
- Open the email you just sent and verify the “From” field shows your alias email address.
Explore some of the common queries related to the issue where you cannot send emails from an alias address in Outlook.
If you’re having trouble with the “Send As” alias feature in Office 365, make sure the SendFromAliasEnabled setting is enabled. You can verify and enable this setting using PowerShell after connecting to Exchange Online PowerShell. When successful, the status will show as ‘True.'”
|
1 |
Get-OrganizationConfig | Format-Table SendFromAliasEnabled |
If the ‘SendFromAliasEnabled’ setting is not enabled, you must turn on sending from alias in Microsoft 365.
‘Receiving email on alias but not able to send any emails on Outlook web?’ or ‘Not able to send emails from alias in Outlook desktop?’ Here’s what you can do:
- Verify that the settings for each mailbox are configured correctly.
- Navigate to Outlook app > Settings > Mail > Compose and Reply > Addresses to send from, and ensure the desired alias is selected.
- You can also choose the alias you want to use as your default from the drop-down list and select Save.
- When composing a message, manually enter the alias and avoid using auto-complete or cached entries.
- If the issue persists, try clearing your browser’s cache.
- If this does not resolve the problem, switch to a different browser and log in to OWA using incognito mode to see if it makes a difference.
Using an alias email address in Microsoft Outlook, offers flexibility and professional management of multiple email identities. Whether you are looking to send from a different email address or domain in Outlook or manage your email proxies efficiently, these steps should help you navigate the process with ease.
By understanding how to utilize proxy addresses and troubleshooting common issues, you can ensure smooth communication and maintain a professional image across all your email interactions.