A Complete Guide to Manage Tags in Microsoft Teams
Manage tags in Microsoft Teams to mention groups of people simultaneously based on roles, projects, or locations. Create tags through Teams client interface and manage at scale using Microsoft Graph PowerShell SDK. Enable efficient team communication by notifying relevant members with single @mentions.
Microsoft Teams holds an ideal place in organization collaborations. Its @mention feature makes communication within Team channels and chats trouble-free. One similar feature that does, even more, is ‘tagging’. Organizations use tagging to facilitate the attention of one or more people at the same time. Managing those tags is simple but limited to a few options in the Microsoft Teams admin center. However, if you are a large organization and are struggling to manage a lot of tags, Microsoft Graph PowerShell SDK is to the rescue. Let’s dig deep into the concepts below!
In Microsoft Teams, @mentions are used to get someone’s attention in a channel or a chat conversation. Tags are also ‘mentions’ but, for a group of people at the same time. Using these tags, you can reach out to people at the double, based on their attributes such as role, project, skill, training, or location. A Team can have up to 100 tags.
To create a tag in Microsoft Teams, follow the steps given below.
Step 1: Open your Microsoft Teams.
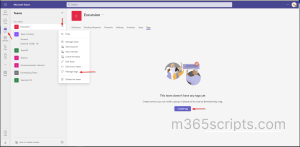
Step 2: Reach out to ‘Teams’ from the navigation.
Step 3: From the available list of Teams in your organization, select the Team, you want to create a tag for.
Step 4: Select ‘More options ◾◾◾’ -> ‘Manage tags’.
Step 5: From ‘Create Tag’, create a new tag by giving the tag name and description.
Step 6: Add people by entering their names -> Then, Create.
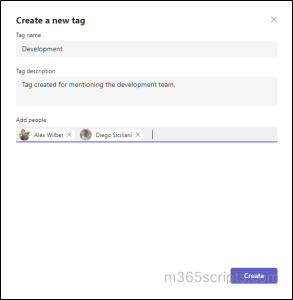
Important: When you create a tag for a team, you can add only people who are owners, members, or guests of that team.
A tag can be used as mentions in channels and everyone added to that tag will receive notifications. In chat, it is used to add a group of people to the conversation at once. A user can be in multiple tags(up to 25) and a maximum of 200 members can be added to a tag.
After a tag is added, it can be used by anyone in the Team to @mention and notify the people added to that specific tag. For example, a “Development” tag can be used to mention a set of people without having to mention their names one by one.
Important: Tags are not supported for private or shared channels.
For managing tags, you need to be the team owner. Admins can manage this setting in the Microsoft Teams admin center. You can change the ‘Who can manage tags’ option and allow team members to manage tags, or turn off tags for your organization.
To do so, navigate to Microsoft Teams admin center > Teams > Teams settings > Tagging.
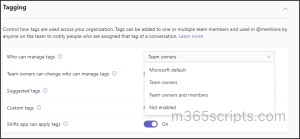
The ‘Microsoft default’ option currently maps to ‘Teams owners and members’ value by default. Thereby allowing all team members to create and edit tags. When you choose the ‘Microsoft Default’ option, control over the setting is given to Microsoft, and Team owners no longer have the ability to manage it themselves.
Managing MS Teams tags using PowerShell is simple but, you will have to go through some steps before you can manage them. Let’s check them one by one.
For executing further steps successfully, make sure you have the Microsoft Graph PowerShell SDK installed. Since tag management is only available in Graph API beta, beta profile needs to be selected on Graph SDK. Use the following cmdlet to select the beta profile.
|
1 |
Select-MgProfile -Name "beta" |
The PowerShell SDK supports two types of authentications – Delegated access and app-only access. For app-only access, we will have to register a new application in Azure AD and create a self-signed certificate for that application and the step goes on. In this case, we can use the delegated access to call the Microsoft graph and determine the required permission scopes as the next step. To do so, run the following cmdlet.
|
1 |
Connect-MgGraph -Scopes "User.Read.All","Group.ReadWrite.All","TeamworkTag.ReadWrite" |
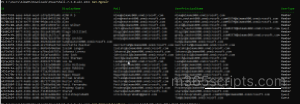
For managing tags, we would require UserIDs, TeamIds and TagIds. To fetch all the userIds in your organization, use the following cmdlet.
|
1 |
Get-MgUser |
Use the ids from the above result to fetch TeamIds using the following cmdlet.
|
1 |
Get-MgUserJoinedTeam -UserId <user id> |
Now, by using the Teamid, get all the tagids for a particular team using the following cmdlet
|
1 |
Get-MgTeamTag -TeamId <team id> |
Let’s see how to manage Microsoft Teams tags and tag members using PowerShell.
- To create a new tag, run the following cmdlet.
|
1 |
New-MgTeamTag -TeamId <team-id> -DisplayName "Project Manager" -Description "All project managers" -Members @{"userID"=<User's Azure AD Object Id>} |
- If you wish to add multiple users to a tag, use the following cmdlet.
|
1 |
New-MgTeamTag -TeamId <team-id> -DisplayName "Project Manager" -Description "All project managers" -Members @(@{"userID"="userID1"},@{"userID" = "userID2"}) |
Tip: To retrieve a specific team by tag id, run the following cmdlet.
|
1 |
Get-MgTeamTag -TeamId <team id> -TeamworkTagId <teamwork tag id> |
- To update tag’s display name and description, run,
|
1 |
Update-MgTeamTag -TeamId <team id> -TeamworkTagId <tag id> -DisplayName "New name" -Description "New description" |
- To remove a tag, use Remove-MgTeamTag cmdlet.
- To list members of a specific tag, run the following cmdlet.
|
1 |
Get-MgTeamTagMember -TeamId <team id> -TeamworkTagId <tag id> |
- To add new members to the tag,
|
1 |
New-MgTeamTagMember -TeamId <team id> -TeamworkTagId <tag id> -UserId <AAD Object Id> |
- To remove a user, use Remove-MgTeamTagMember cmdlet.
Although the PowerShell’s approach might seem complex, it provides more control over tags. PowerShell cmdlets come in handy if your organization handle tags a lot and needs a way to manage large teams effectively.
I hope this blog will help you understand the concepts of Managing MS Teams Tags using PowerShell. Feel free to reach us in the comments for any assistance.