Detect Sensitive Content During Screen Sharing in Microsoft Teams Meetings
Enable sensitive content detection in Microsoft Teams meetings to alert presenters when screen sharing exposes credit card numbers, bank accounts, or personal identification data. Configure Teams Premium meeting policies to protect against accidental disclosure of financial and personal information during presentations.
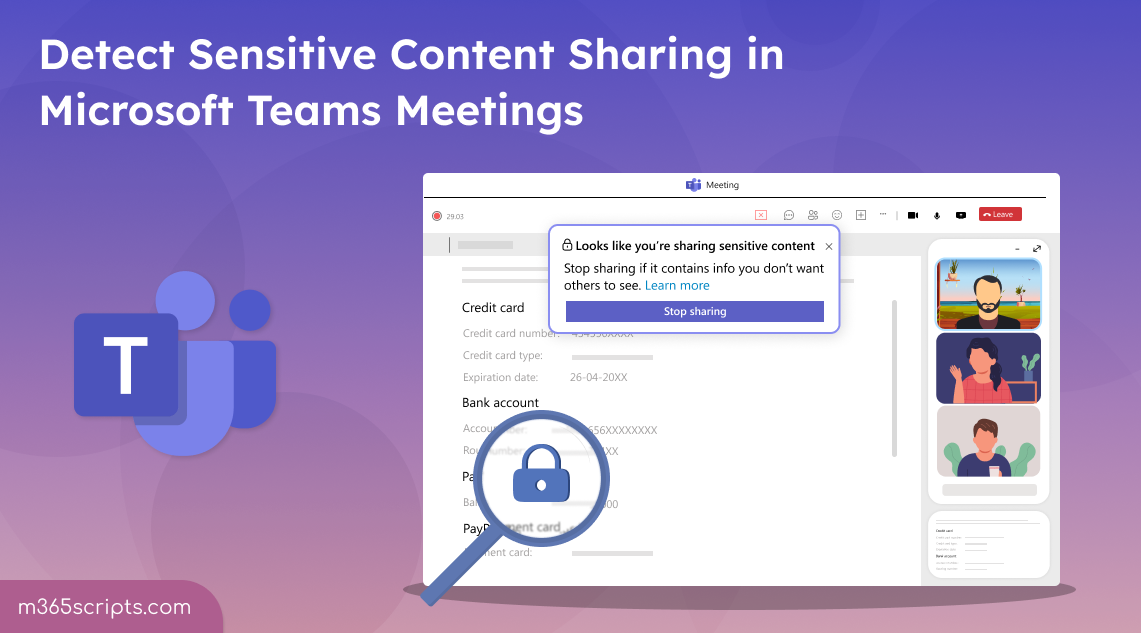
Microsoft Teams Meetings make it easy to collaborate with internal and external users for exchanging financial data, project updates, and more. This convenience also introduces serious risks, such as accidental exposure of sensitive content during screen sharing! ⚠️
As part of enhancing Microsoft Teams security, a new Teams Premium feature has been introduced to detect sensitive content during screen sharing. 🔍
This blog explains how admins can set up sensitive content detection in Teams meetings to protect sensitive data, and how end users can enable the feature in their own meetings.
Sensitive content detection is a Microsoft Teams public preview feature available to Teams Premium users. This feature proactively scans screen-shared information during a meeting and alerts the organizer and presenter to stop sharing when sensitive content is detected.
Sensitive content detection in Microsoft Teams meetings is crucial to:
- Prevent accidental exposure – Screen sharing can unintentionally reveal confidential files, spreadsheets, or personal data.
- Strengthen compliance – Helps meet data protection regulations like GDPR, HIPAA, and PCI-DSS by reducing real-time risks.
- Protect organizational data – Safeguards internal strategies, financial records, and personal information from being leaked.
- Maintain trust – Reassure clients, partners, and employees that their information is handled with care and confidentiality.
Note: Sensitive content detection works across Microsoft Teams meetings, webinars, and town halls to help protect shared data in any session.
Microsoft Teams enables automatic detection of personal and financial data shared during meetings such as:
- Credit and Debit Card Numbers
- Bank Account Numbers (US)
- ABA Routing Numbers
- Password Numbers (EU)
- Driver’s License Numbers (EU)
- Social Security Numbers (EU)
- National Identification Numbers (EU)
- Social Security Numbers (US)
- Passport Numbers (US / UK)
- Individual Taxpayer Identification Numbers (US)
- Tax Social Security Numbers (EU)
Important: Sensitive data detection is currently limited to ‘English’ language content and static screen shares. It doesn’t work with fast-moving visuals or features like Microsoft Whiteboard, PowerPoint Live, or Excel Live.
Microsoft Teams uses Microsoft Purview’s predefined Sensitive Information Types (SITs) to detect sensitive data during screen sharing using the following techniques:
- Data format recognition – Identifies pre-defined data format in SSN, credit card, and other information.
- Pattern matching with checksums – Detects known sequences (e.g., credit card numbers) and verifies them for authenticity using validation logic like checksums.
- Proximity analysis – Ensures sensitive data is near related fields like account number, name, or date of birth.
- Confidence levels – Classifies detection as low, medium, or high based on match accuracy.
To improve precision and protect confidential data unique to your organization, you can also create custom Sensitive Information Types (SITs) that help Microsoft Teams detect sensitive content more accurately during meetings. Apart from that, use the best practice configurations dashboard to maintain Teams meeting settings and the Teams client health dashboard to monitor client performance.
This setting is policy-driven and designed to enable sensitive content detection, prevent data loss, and safeguard critical information in your Microsoft 365 environment.
- Enable content detection in meetings via Teams admin center
- Configure sensitive content detection for Teams meeting using PowerShell
To prevent sensitive data disclosure during Teams meetings screen sharing, admins can enable content protection settings through meeting policies.
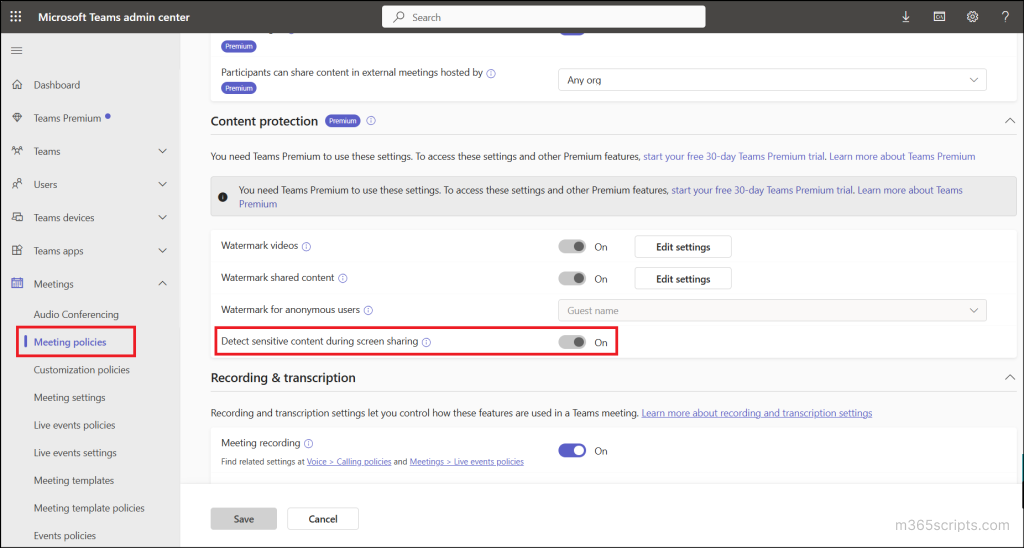
- Sign in to the Microsoft Teams admin center.
- Navigate to Meeting → Meeting Policies, then select a policy. Use the ‘Global (Org-wide default)’ policy to apply meeting settings for all users or choose a custom policy to apply settings to specific users.
- Then, head to Content Protection, and enable the Detect sensitive content during screen sharing toggle to the On (default) state.
- Select Save.
Follow the steps below to enable sensitive content detection for Teams meetings through PowerShell.
- Connect to the Microsoft Teams PowerShell.
- Run the following cmdlet to check whether sensitive content detection during screen sharing is currently enabled in the Global (Org-wide default) policy.
1Get-CsTeamsMeetingPolicy -Identity “Global” | Select-Object Identity, DetectSensitiveContentDuringScreenSharing - If the current value of the sensitive content detection is set to $false, then enable it by executing the following cmdlet.
1Set-CsTeamsMeetingPolicy -Identity "Global" -DetectSensitiveContentDuringScreenSharing $true - If you want to use a custom meeting policy for specific users to enable sensitive content detection, simply replace “Global” with the name of your custom policy.
Even if an admin enables sensitive content detection at the policy level, meeting organizers must enable it for individual meetings for the feature to take effect. Teams calendar simplifies this by letting meeting organizers to enable the feature directly. Organizer’s must turn sensitive content detection on before a meeting starts. If enabled after a meeting begins, it only takes effect once everyone leaves and rejoins.
⚠️Warning️: End-to-end encryption isn’t available in meetings with sensitive content detection.
To enable sensitive content detection for a Teams meeting, follow the steps below in the calendar.
- Navigate to Teams → Calendar and select an upcoming meeting.
- Click Edit, then choose whether to edit choose which part of the series This event, This and all following events, or All events in the series.
- Then, select Meeting options → Advanced protection.
- Turn on the Detect sensitive content during screen sharing toggle.
- Select Save.
Note: If sensitive content is detected during screen sharing, both the presenter and organizer are notified. The presenter sees a Stop Sharing prompt. The meeting continues, but the warning helps prevent accidental data exposure.
Apart from sensitive content detection, Microsoft Teams offers several security settings to protect confidential information during meetings. To enhance the security strength of your Teams meetings, you can configure the following options:
- Enable watermark for sensitive team meetings
- Control who and what can be shared in meetings
- Restrict copying and forwarding in meeting chat messages
Watermarks in Microsoft Teams meeting help protect confidential content by showing each participant’s email address on shared content. If someone takes a screenshot or records the session, the watermark can be used to trace the source of a leak.
To enable this, go to the Microsoft Teams admin center and navigate to Meetings → Meeting policies, and select a policy. Under Content Protection, turn on the Watermark shared content option.
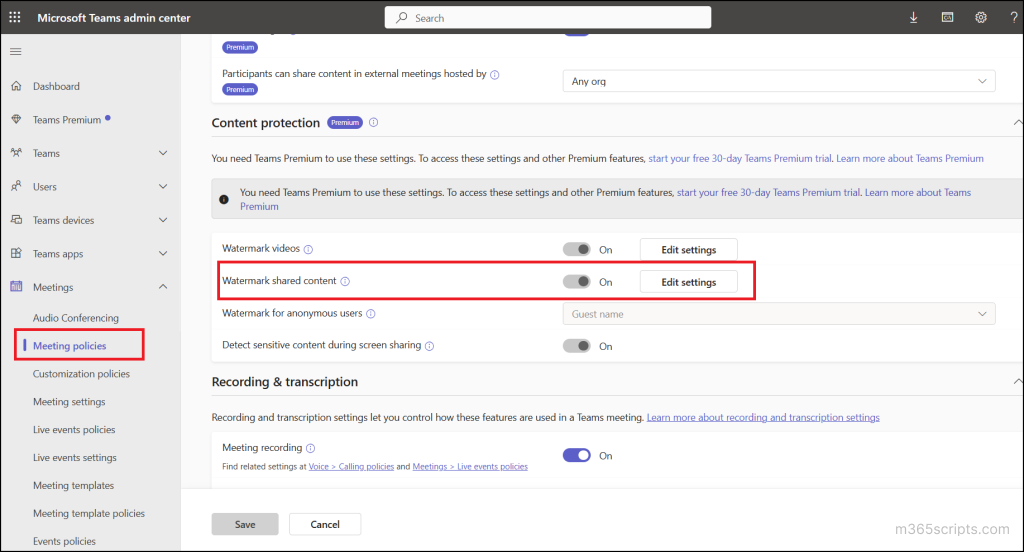
Click the Edit settings button associated with the option to choose between a single or repetitive pattern and the transparency of the watermark over the shared content. Additionally, admins can enable Watermark videos and Watermark for anonymous users to apply watermarking to participants’ video feeds and to users who join the meeting without authentication.
Users can turn on this feature from the Teams calendar by going to Meeting options → Advanced protection and switching on Apply a watermark to shared content.
You can also watermark for Teams meetings via sensitivity labels or meeting templates for consistent protection across sensitive meetings.
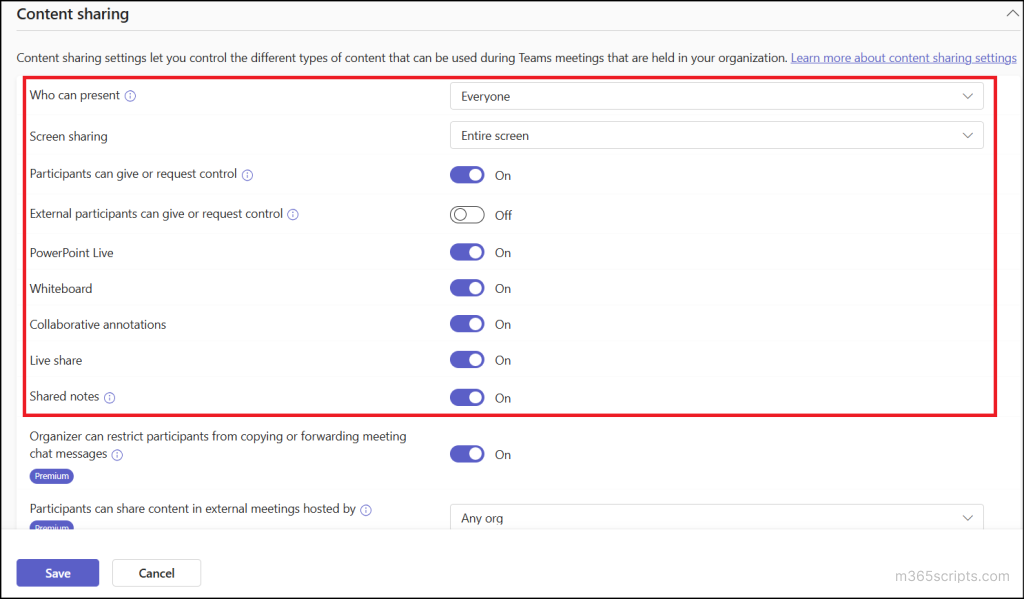
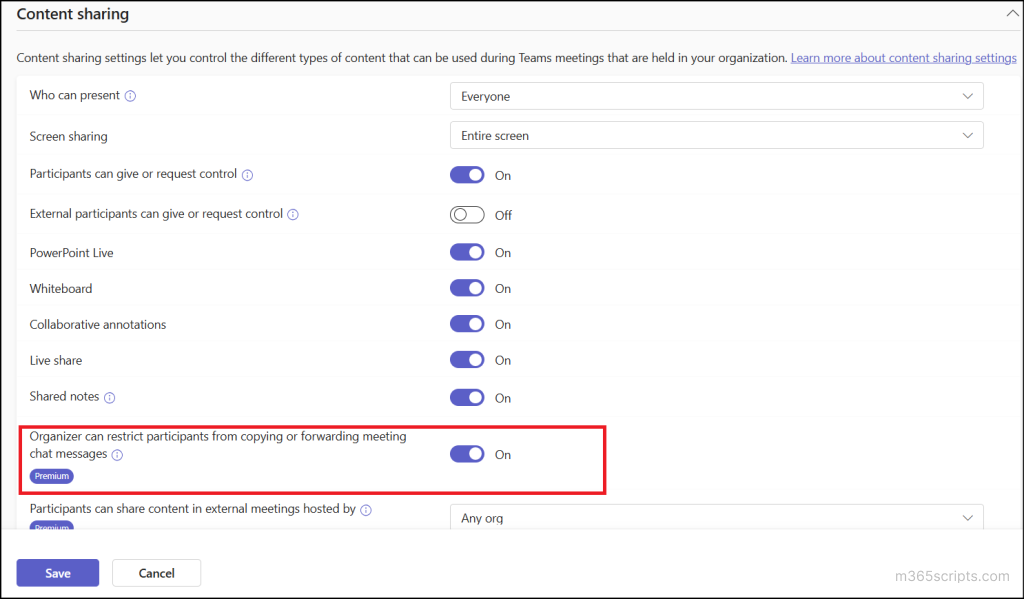
Managing content sharing in Teams meeting policies ensures that only authorized individuals can present or share. Admins can restrict sharing permissions to co-organizers or designated presenters, ensuring that all other participants join as attendees without the ability to share content.
To configure and control who can share and what can be shared in Teams meetings:
- Sign in to the Microsoft Teams admin center and navigate to Meetings → Meeting policies → select the desired policy.
- Under the Content sharing section, you can control who can present, limit screen sharing to the entire screen or a single application, and disable tools like whiteboard, collaborative annotations and more.
- Save the changes to apply the updated policy.
With Teams Premium add-on, meeting organizers can prevent participants from copying or forwarding meeting chat messages, live captions, and transcripts. This restriction also blocks actions like using keyboard shortcuts, right-click, or the More actions menu to copy or forward content.
This can be enforced by enabling the ‘Organizer can restrict participants from copying or forwarding meeting chat messages’ toggle under the Content sharing section of a Meeting policy in the Teams admin center.
Wrapping Up
We hope this blog has helped you understand how advanced meeting protection in Microsoft Teams premium enhances data security and compliance. As this feature is currently in public preview, it might undergo further changes before being released publicly. In case of any queries, feel free to reach out to us through the comments section.