
How to Block Specific Team Members from Communicating with Others
Restrict internal communication in Microsoft Teams using Information Barriers, supervised chat controls, or priority account chat controls. Block specific users from messaging executives or sensitive roles while maintaining collaboration across departments. Configure messaging policies through Teams admin center or PowerShell to enforce communication boundaries and protect organizational data.
When organizations secure Microsoft Teams, the focus is usually on external users. There are several well-documented ways to manage external access in Microsoft Teams including guest access policies, external collaboration settings, federation controls, and more.
Internal communication, however, presents a different challenge. Not all employees should be able to communicate freely with one another. Compliance requirements, data sensitivity, and organizational boundaries often demand restrictions within the same tenant.
While Microsoft Teams offers several ways to block external communication, the options for restricting internal communication are limited. This blog explains the available approaches and how to allow users to block chat messages in Microsoft Teams inside the organization.
Organizations often need the ability to block specific users to communicate with other employees in Microsoft Teams without shutting down collaboration across the organization. Beyond simple chat restrictions, these controls help enforce boundaries and protect sensitive roles. Common real-world use cases include:
- During onboarding, companies may make newly hired users in Teams not able to chat with the rest of the organization. This will allow new hires to communicate only with mentors or managers until they are fully onboarded.
- C-suite executive teams may want to block a specific person on Teams from messaging executives directly. They may also want to give control so individuals can decide who can contact them.
To address these communication control needs, Microsoft Teams offers three ways to restrict internal communication, each designed for a specific organizational need. Understanding when to use each approach is key to choosing the right solution.
Best for: Preventing unwanted communication between departments with strict regulatory requirements.
Information Barriers in Microsoft 365 are built for organizations operating under strict regulatory and compliance requirements. They enforce permanent communication boundaries between predefined user segments within the same tenant across Microsoft 365 services. Only administrators with the Global Administrator, Compliance Administrator, or IB Compliance Management role can configure Information Barrier policies. End users cannot enforce restrictions from their side, as all such controls are centrally managed by administrators.
Once Information Barriers in Microsoft Teams are applied:
- Users cannot discover, chat, call, meet, or share screens with people in restricted segments, fully isolating them in Microsoft Teams.
- They cannot be added to the same teams or channels, nor access each other’s team or channel content.
- These restrictions are enforced bidirectionally, ensuring consistent separation across all collaboration experiences.
This makes Information Barriers ideal for industries such as finance, legal, or healthcare, where mandatory and auditable separation between teams is required. However, their rigidity also means they are less flexible for dynamic or user-driven communication controls.
Best for: Protecting specific users from unwanted direct messages without supervisor oversight.
Supervised chat in Microsoft Teams is a role-based communication control that ensures certain users can only communicate when an authorized supervisor is present. While it was originally designed for education environments, it is fully supported in commercial and enterprise tenants. Supervised chat controls, including Full, Limited, and Restricted permissions, are assigned by Teams administrators through messaging policies and are not user configurable.
Supervised chat works by assigning every user one of three chat permission roles:
- Full – Users assigned ‘Full’ permissions are considered Supervisors in Teams and can initiate chats with anyone in the organization.
- Limited – Can chat freely with ‘Full’ and other ‘Limited’ users but can only chat with ‘Restricted’ users when a Full user is present.
- Restricted – Users who can only participate in chats when a ‘Full’ user is involved.
For example, new hires are assigned the ‘Restricted’ role during their onboarding period, while mentors are assigned the ‘Full’ role and existing employees the ‘Limited’ role. This ensures new hires can only participate in chats when a mentor is present, while existing employees continue to communicate normally.
Once you enable supervised chat controls, new private chats are enforced by these rules. Restricted users cannot start or continue unsupervised conversations, and supervisors cannot be removed or leave chats they oversee. While effective for strict oversight, supervised chat controls can become restrictive because supervisors cannot leave chats and restricted users are unable to start or continue conversations on their own.
This leaves end users with no decision-making ability, as all access is governed entirely by administrator-defined permissions. To address this, the next option offers two flexible alternatives.
Best for: Allowing users to block specific person in Microsoft Teams on their own terms.
Priority account chat controls are designed for scenarios where you need to block specific users from sending Teams chat messages without restricting collaboration across the entire organization. This feature takes a user-centric approach, enabling protected users to decide who can start conversations with them.
This feature allows priority chat control enforced accounts to:
- Restrict newly initiated 1:1 chats in Microsoft Teams.
- Make certain users in Teams not able to chat without approval.
Unlike Information Barriers, this restriction applies only to inbound communication, not outbound messaging. This makes it especially effective for executive account protection, limiting spam, and mitigating the risk of targeted social engineering attacks.
When flexibility is critical, the asymmetric nature of priority account chat controls stands out! It provides a way to control sensitive internal communication without waiting for IT or admin intervention. Let’s see how to implement priority chat controls in Microsoft Teams.
Priority account chat control feature, part of Advanced Collaboration Tools (ACT), lets users block someone on Microsoft Teams internally. Advanced Collaboration Tools is available as part of Microsoft Teams Premium features.
Priority account chat control works in two stages; it must first be enabled at the organization level. Once enabled tenant-wide, it is applied and controlled through policies that determine which users can block other users in MS Teams.
You set up this feature in two different ways:
- Enable priority account chat controls in Teams Admin Center
- Configure priority account chat controls using PowerShell
Before enabling this control, administrators should be aware of the following prerequisites and limitations:
- Only users with Teams Premium license can allow or block Teams members.
- Available only on Microsoft Teams desktop and web clients; mobile clients are not supported.
- Applies exclusively to internal one-on-one chats between users.
- Does not impact channel conversations or meeting chats in any way.
- Priority account chat controls do not affect existing chats; the policy applies only to new chat conversations initiated after the policy is enabled.
- Even when chat is restricted, the blocked user can still view the presence status of the priority account, which is a limitation for scenarios requiring stricter communication privacy.
- To enable this policy, you need to be either a Teams administrator or a global administrator.
To effectively control who can block someone in Microsoft Teams, administrators must configure set up priority account controls. This will give controlled chat permissions without disrupting the rest of the organization.
Once prerequisites are clear, turn on priority account chat controls across the entire tenant. This allows administrators to configure custom messaging policies to control chat blocking between specific users.
- Sign into the Teams admin center with administrative credentials.
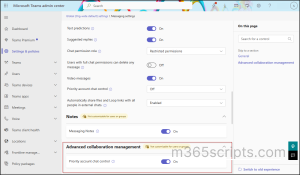
- Navigate to Settings & Policies → Global (Org-wide default) settings → Messaging.
- Locate Advanced collaboration management section.
- Toggle Priority account chat control to On.
- Click Save.
Next, create or modify a messaging policy to define which users can allow/block specific Teams members from chatting other members.
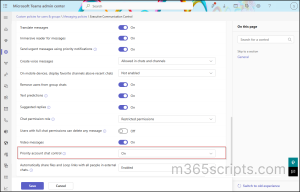
- In the Teams admin center, go to Settings & Policies → Custom policies for users and groups → Messaging.
- Click +Add to create a new policy (or select an existing one).
- Provide a descriptive policy name (e.g., “Executive Communication Control”).
- Enable the Priority account chat control option.
- Click Save.
This policy ensures only assigned accounts have the ability to allow or permanently block users on Teams.
So far, you’ve created a policy that includes chat blocking control in Teams. The next step is to determine which users will see the Accept or Block option in Microsoft Teams by assigning this policy to the appropriate users or groups. Follow the steps below to complete this configuration.
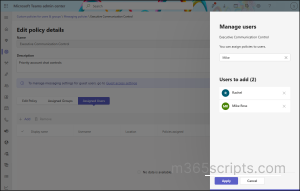
Give Selected Users Control to Block Other Users in Microsoft Teams
- In the Teams admin center, within Messaging policies, select the respective Group policy created, and click Edit.
- Slide to Assigned Users tab.
- Click Add and assign it to required users. Once added, click on Apply to give control to allow specific users to block other user in Teams
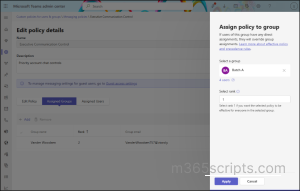
Block Chat Messages in Teams Via Group Assignments
- Within the same Messaging policies, select the Group policy assignment tab.
- Click +Add to create a new group assignment.
- Choose the target group from Select a group.
- Set the assignment rank (Higher-ranked policies override lower-ranked ones, ensuring the most appropriate controls apply).
- Click Apply, then Confirm.
Note: The assignment may take some time to apply, depending on the number of users in the group.
Unfortunately, the organization-wide messaging settings (the toggle under Advanced Collaboration Management) must be configured through the Teams Admin Center GUI. There’s currently no PowerShell cmdlet to enable the tenant-level “Priority account chat control” setting.
However, we can manage priority chat controls for specific users by creating and assigning Teams messaging policies via PowerShell.
To do that, firstly, connect to the Microsoft Teams PowerShell module.
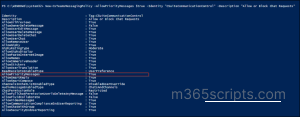
To enable priority chat for selected users, a new messaging policy can be created using PowerShell. The parameter name for Priority account chat controls is AllowPriorityMessages. Setting this to $true enables the feature for users assigned to this policy.
|
1 |
New-CsTeamsMessagingPolicy -AllowPriorityMessages $true -Identity "<MessagingPolicyName>" -Description "<Description>" |
Once the policy exists, it can be applied to specific users with the following command.
|
1 |
Grant-CsTeamsMessagingPolicy -Identity "<[email protected]>" -PolicyName “<MessagingPolicyName> " |
In this command, the -PolicyName parameter should match the policy name defined earlier. This step ensures that priority chat controls are applied only to targeted users.
For applying the priority chat controls to a team or department, the group policy assignment using Microsoft Teams PowerShell is recommended. To assign the Messaging policy to a group, group ID is a must. To get Group ID, connect to MS Graph PowerShell module and run the below:
|
1 |
Get-MgGroup |
Once the appropriate group ID is located, use the following command to assign the messaging policy.
|
1 |
New-CsGroupPolicyAssignment -GroupId "<GroupId>" -PolicyType "TeamsMessagingPolicy" -PolicyName " <MessagingPolicyName> " -Rank "1" |
Replace the Group ID with respective ID. The -Rank parameter determines priority if multiple policies are applied; generally, setting it to 1 is sufficient.
After assigning the priority account chat control policy, the designated user’s Teams account will have the ability to review incoming chat messages that require approval before communication can proceed.
When an internal user initiates a conversation in Teams, the priority account user can either allow or block the chat based on their preferences, as shown below.

I hope this blog helped you gain knowledge on how to block unwanted incoming chat messages in Microsoft Teams. Feel free to reach out if you have any queries.


