
Restrict Private Messaging in Microsoft Teams Using Supervised Chats
Supervised chats is a security feature in Microsoft Teams that allows supervisors to monitor users’ private messages based on assigned permissions. It provides 3 chat permission levels: Full, Limited, and Restricted, determining the type of access a user has to create 1:1 chats and group chats with others. Once the required settings are configured, you can start using supervised chats to keep Teams conversations secure and monitored.
In organizations, 1:1 and group chats in Microsoft Teams are essential for exchanging ideas, discussing projects, and fostering effective collaboration. However, when all users are allowed to communicate with each other, there is a risk of information that violates company policy being shared with the wrong audience. For example, imagine an intern asking an employee, “What is the salary range?” and the colleague respond in exact figures. Even though this conversation may not be intentional or malicious, it still violates the company policy and exposes confidential data. This happens because private chats in Microsoft Teams are not visible to administrators by default, and there is no built-in monitoring for these conversations.
This is where supervised chat feature in Microsoft Teams becomes essential. It allows certain 1:1 and group chats in Microsoft Teams to be monitored by admins or supervisors based on assigned permissions. In this blog, we will walk through what supervised chats are, how to use them, and how they strengthen Teams messaging security.
Supervised chats feature in Microsoft Teams allow organizations to control who can initiate private 1:1 and group conversations. Certain users can start chats only with users who have the required permission, while others are restricted from initiating new conversations.
Supervised chat offers 3 role-based permission levels in Microsoft Teams:
- Full
- Limited
- Restricted
These permission levels define how users can communicate with each other.
With this understanding of supervised chats, let’s explore chat permissions in detail.
Understanding these levels is key for assigning the right role to the right users and keeping the private chats controlled.
The table below shows the differences between the chat permissions in supervised chats and the level of access each one provides.
| Full Permission | Limited Permission | Restricted Permission |
| Can start private chats with anyone in the organization. | Can start private chats with ‘Full’ and other ‘Limited’ permission users. | Can start private chats with ‘Full’ permission users only. |
| Can supervise and control conversations. | Cannot supervise and control conversations. | Cannot supervise and control conversations. |
| Can create group chats and add any users. | Can create group chats with any ‘Full’ and ‘Limited’ permission users. To chat with ‘Restricted’ users, a ‘Full’ permission user can create the group and invites them. | Can create group chats with ‘Full’ permission users only. To chat with ‘Limited’ or ‘Restricted’ users, a ‘Full’ permission must create the group and invite them. |
| Cannot be removed from any private chats. | Can be removed by ‘Full’ permission users from the from the chats they were invited to. | Can be removed by ‘Full’ or ‘Limited’ permission users from chats they were invited to. |
| Can delete private chats they created, but cannot delete chats they were invited to. | Can delete private chats they created, but not chats they were invited to. | Can delete any 1:1 chats, but not group chats. |
| Best suited for managers, administrators, and senior leads. | Best suited for existing employees, and team members who need chat access under control. | Best suited for interns, or users who require close supervision. |
These chat permission roles play a key role in configuring supervised chats in your tenant, which is why we discussed them first. Let’s break them down using a simple real-world scenario to make things easier to understand.
Imagine an organization with three types of users:
- managers (assigned ‘Full’ permission)
- existing employees (assigned ‘Limited’ permission)
- interns (assigned ‘Restricted’ permissions
With these roles in place, the managers can start chats and create group conversations with both the employee and the intern.
The existing employees can chat and create groups only with the manager and other existing employees. If the existing employee needs to communicate with an intern for a project, the manager must first create a group chat and then add the intern to it.
Similarly, the interns can initiate chats only with the manager. They cannot directly message existing employees or other interns. If communication is required, it must happen in a chat created by the manager, who invites all required participants.
This is how supervised chat permissions work in practice. Now that you understand how the permissions work, let’s move on to configuring supervised chats in Microsoft 365.
To configure supervised chats in Microsoft Teams, you must be a Teams Administrator or hold a higher role. No additional license is required to use this feature. Once the required permissions are in place, you can start managing private messaging in Teams using supervised chats. The setup process involves enabling role-based chat permissions at the tenant level and assigning the appropriate chat permission roles to specific users. You can configure supervised chats through either the Teams admin center or PowerShell.
- Set up supervised chats using Teams admin center
- Configure supervised chats in Teams using PowerShell
Follow the steps below to deploy supervised chats using the Teams admin center.
1.1 Enable role-based chat permissions in Microsoft Teams
1.2 Apply chat permission roles to users in Microsoft Teams
The first and the crucial step in supervised chats is to enforce role-based chat permissions at the tenant-level. By default, this setting is disabled. It must be enabled for the chat permission roles to work correctly.
Below are the steps to allow role-based chat permissions using Teams admin center.
- Sign in to the Microsoft Teams admin center.
- Go to Settings & policies → Global (Org-wide default) settings → Teams & channels → Teams.
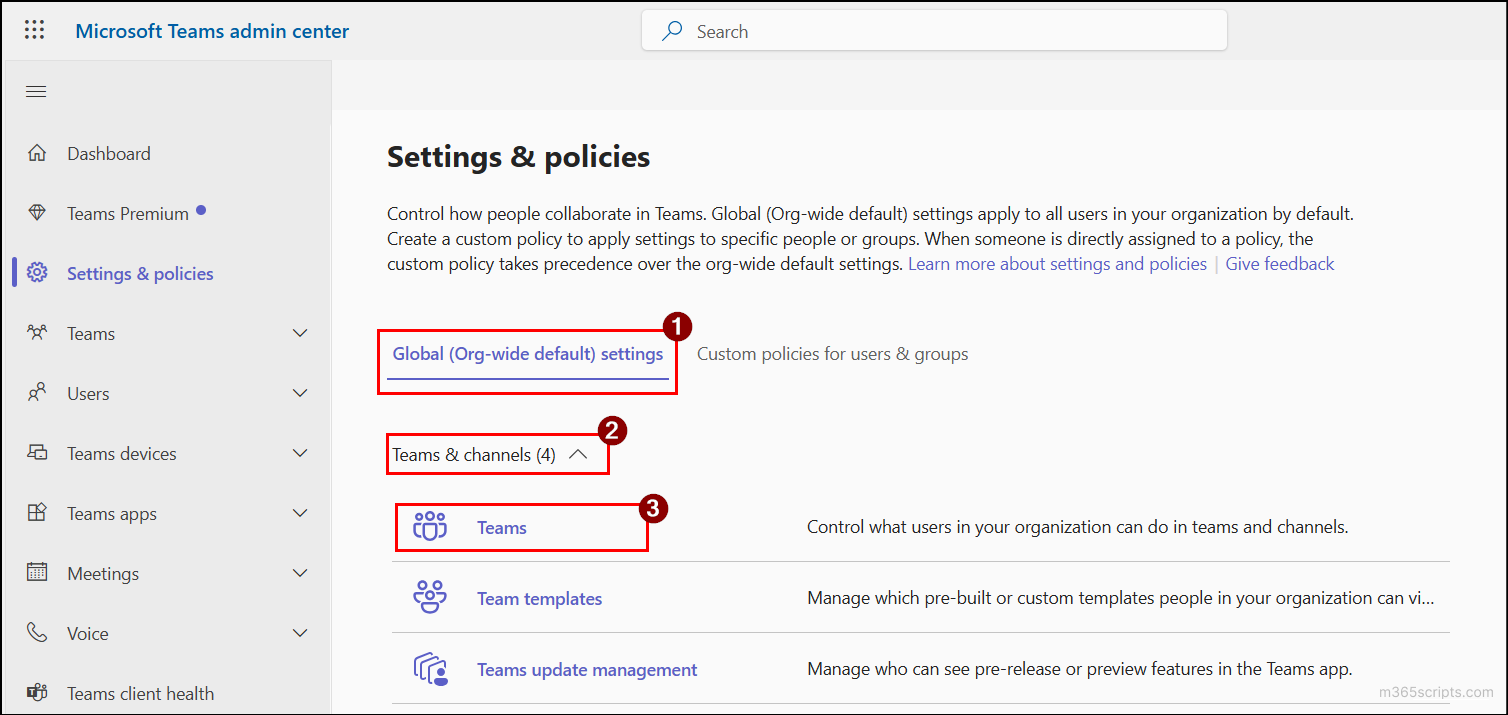
- Under Safety and communications → Role-based chat permissions, toggle the setting to On.
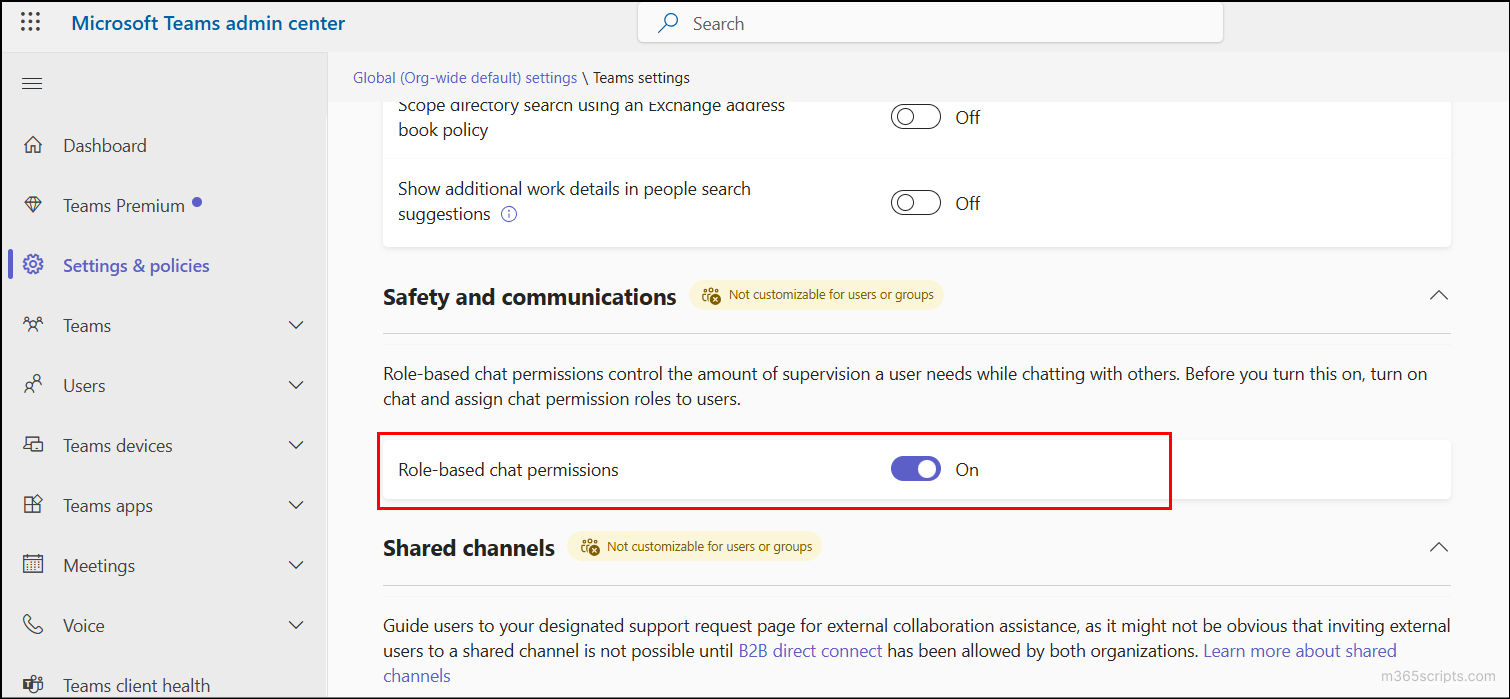
- Click Save to apply the setting. Once saved, you can proceed to assign chat permission roles to users.
The next step in setting up supervised chats is assigning chat permission-based roles to users. By default, the chat permission role is set to ‘Full permission’ in the Global (org-wide) policy. To ensure that each user has the right level of chat access, three separate policies must be created. This allows you to assign ‘Full’, ‘Limited’, or ‘Restricted’ access to the appropriate users through dedicated messaging policies.
To set up the chat permission-based roles on custom messaging policy, first create a policy and then assign users to it. Follow the steps below to assign chat permission role for users in supervised chats.
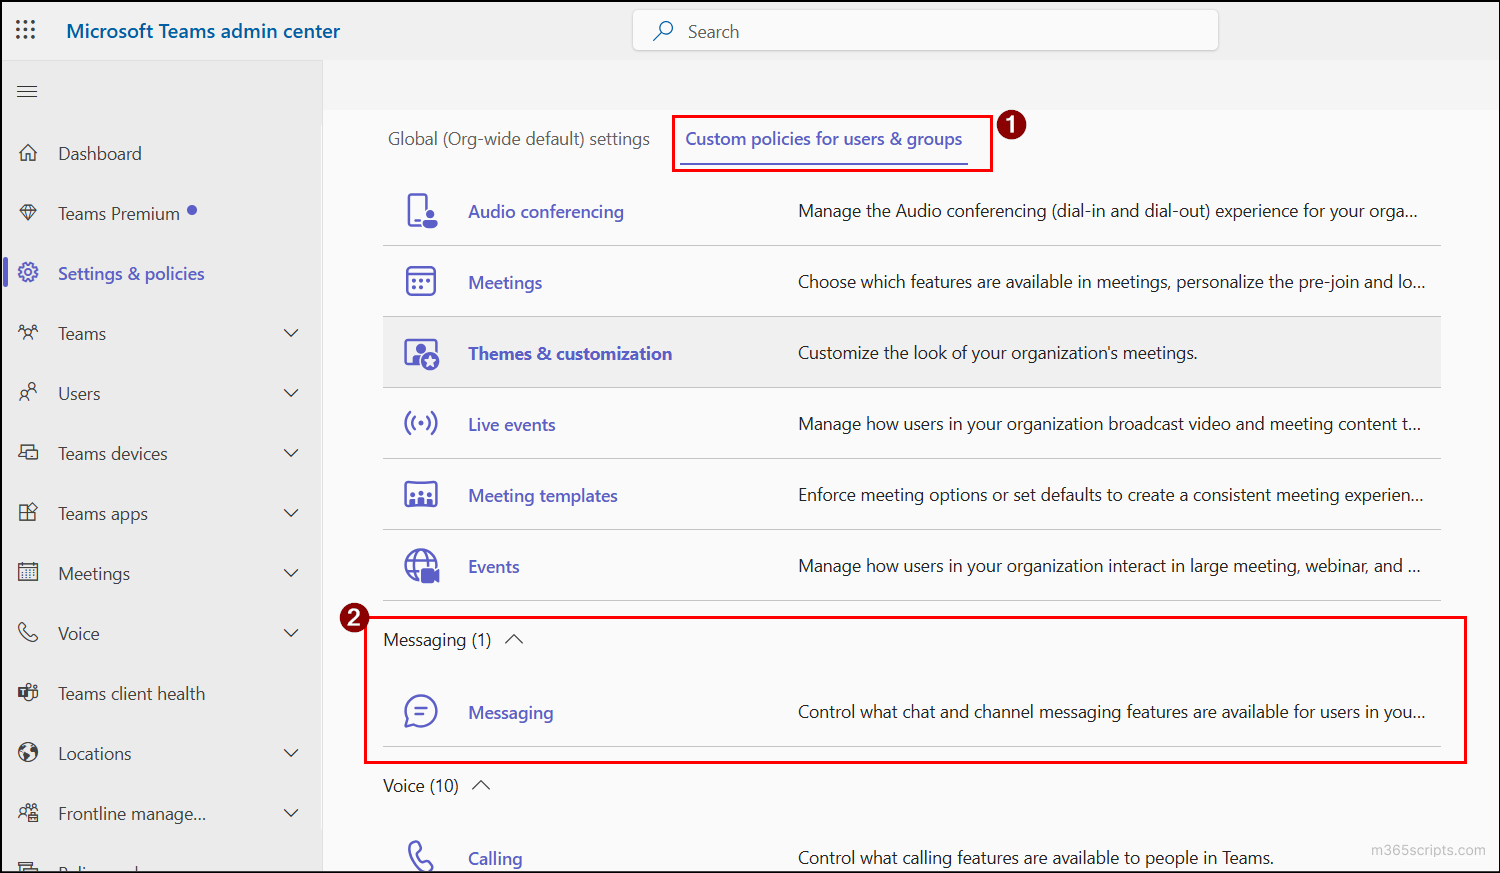
- Sign in to the Microsoft Teams admin center.
- Navigate to Settings & policies → Custom policies for users & groups → Messaging → click Messaging.
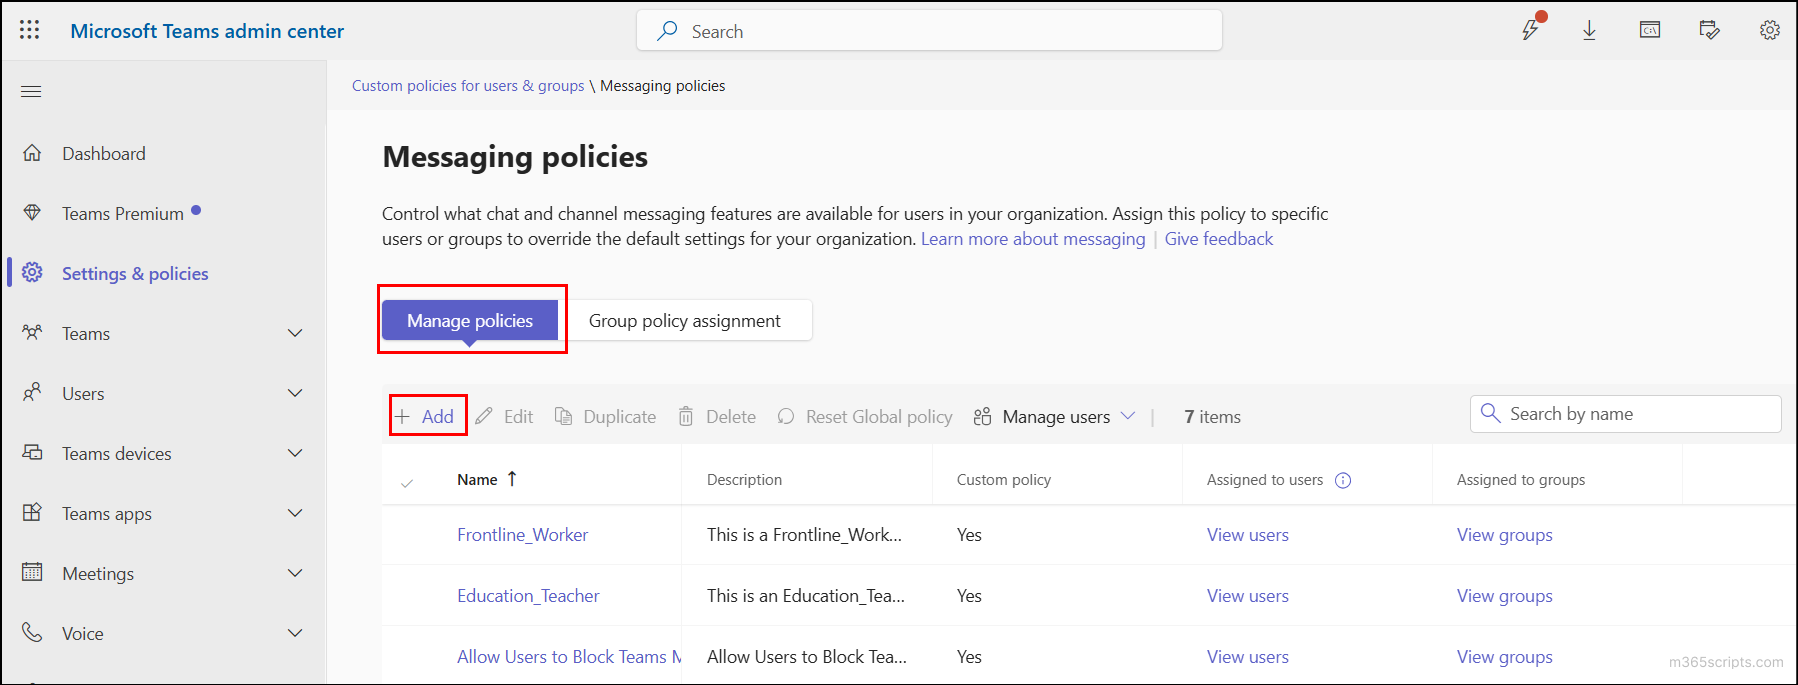
- Under Manage policies, click +Add, provide a name for the policy and description (optional).
- Under Add policy, scroll down to Chat permission role, and select one of the roles: Full, Limited or Restricted.
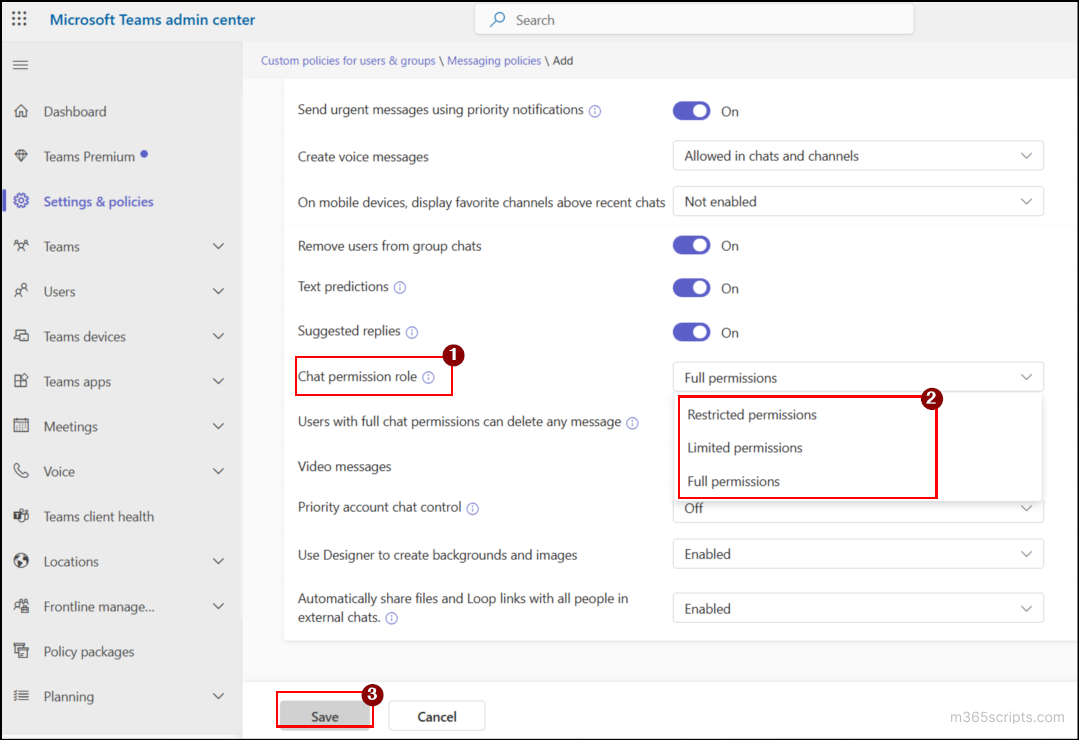
- Then, select the toggle for On. Click Save and a new policy is created with the required chat permission role.
- If you need to assign chat permission to a group, group policy assignments can be used. In the Edit policy page of a policy, select Assigned Groups, click +Add, select a group by clicking Add near it, assign a Rank, and then click Apply.
- If you want to assign chat permissions to specific users, go to Edit policy page of a policy. Select Assigned Users, click +Add. Select the required user by clicking Add next to their name, and then click Apply.
Important:
- Assigning ranks (precedence) is critical and must be done carefully. If a user belongs to multiple groups with different permission roles, the role from the group with the higher priority rank is applied. For example, if a user is in a group with ‘Full’ permission ranked as 2 and also in another group with Restricted permission role ranked as 1, the Restricted permission role will take effect.
- If a user is assigned a permission role both individually and through a group, the individual (user-level) assignment always overrides the group assignment.
Manually assigning messaging policies to each user individually can be time-consuming and inefficient. PowerShell provides a faster, more efficient way to allocate chat permissions to users and groups. To begin, connect to Microsoft Teams PowerShell and run the following cmdlets.
Activate Role-Based Chat Permissions Using Microsoft Teams PowerShell
To quickly enable role-based chat permissions using PowerShell, run the following cmdlet:
|
1 |
Set-CSTeamsClientConfiguration –AllowRoleBasedChatPermissions $True |
This cmdlet activates role-based chat control across your tenant and ensures that the assigned permission roles are enforced.
Create a New Messaging Policy for Each Permissions in Supervised Chats
To create a new messaging policy in Microsoft Teams, run the cmdlet below:
|
1 |
New-CsTeamsMessagingPolicy –Identity <PolicyName> -ChatPermissionRole <ChatPermissionRole> |
Replace <PolicyName> with the name of the policy, and <ChatPermissionRole> with one of the following values: Full, Limited, or Restricted. As mentioned earlier, it is essential to create separate policies for each chat permission level.
Assign Appropriate Chat Permission Policy to the Users
Once the messaging policy for the chat permissons is created, you can assign it to a single user using the below cmdlet:
|
1 |
Grant-CsTeamsMessagingPolicy -Identity "<UserDisplayName>" -PolicyName <PolicyName> |
Replace <UserDisplayName> with the user’s display name, and <PolicyName> with the target policy name.
Bulk Assign Users to a Chat Permission Policy in Teams
To assign multiple users to a messaging policy at once, you can filter users based on an attribute such as ‘JobTitle’ to target the required users. This approach is ideal to target ‘Full’ permission users like managers, admins, etc.
To do this, connect to Microsoft Graph PowerShell with the ‘User.ReadWrite.All’ scope. Once connected, you can use the below cmdlet:
|
1 2 3 4 5 6 |
$JobTitle = "<JobTitle>" $users = Get-MgUser -Filter "JobTitle eq '$JobTitle'" -ConsistencyLevel eventual -All foreach ($user in $users) { Grant-CsTeamsMessagingPolicy -Identity $user.UserPrincipalName -PolicyName “<PolicyName>" } $users | Select-Object DisplayName, UserPrincipalName, JobTitle |
Here, I’ve considered the attribute ‘JobTitle’. Replace <JobTitle> with the required job role (e.g. Manager).
If your ‘Limited’ and ‘Restricted’ users are spread across different job titles or departments, the CSV method is more suitable for bulk assignment. To assign messaging policy to such users, create a CSV file containing the user principal names of the target users as shown below.
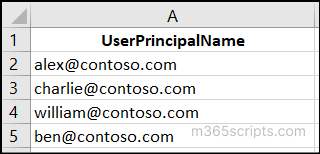
After creating the CSV file, run the following cmdlet by replacing <FilePath> with the actual location of your file.
|
1 2 3 4 |
$users = Import-Csv "<FilePath>" foreach ($user in $users) { Grant-CsTeamsMessagingPolicy -Identity $user.UserPrincipalName -PolicyName "<PolicyName>" } |
Assign a Specific Group to a Chat Permission Policy
To assign a specific group to the policy, you can use the below cmdlet:
|
1 |
Grant-CsTeamsMessagingPolicy –GroupName <GroupName> -PolicyName <PolicyName> -Rank <Rank> |
Replace <GroupName> with the group name, and <Rank> with any integer according to your desired precedence.
Bulk Assign Groups to Chat Permission Policy Using CSV Input
To assign multiple groups at once, first create a CSV file with the group names and rank as below:
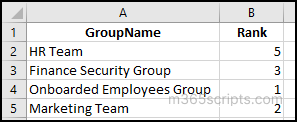
Once done, you can run the below cmdlet by replacing <FilePath> with the location of the target CSV input file.
|
1 2 3 |
Import-Csv "<FilePath>" | ForEach-Object { Grant-CsTeamsMessagingPolicy -GroupName $_.GroupName -PolicyName "<PolicyName>" -Rank $_.Rank } |
Now, let’s take a look at how each user can communicate with others under these permissions.
In the configuration above, I’ve created three separate policies for users with Full, Limited, and Restricted permissions. I’ve added the following members to each policy:
- Full Permissions Policy – User A, User B
- Limited Permissions Policy – User C, User D
- Restricted Permissions Policy – User E, User F
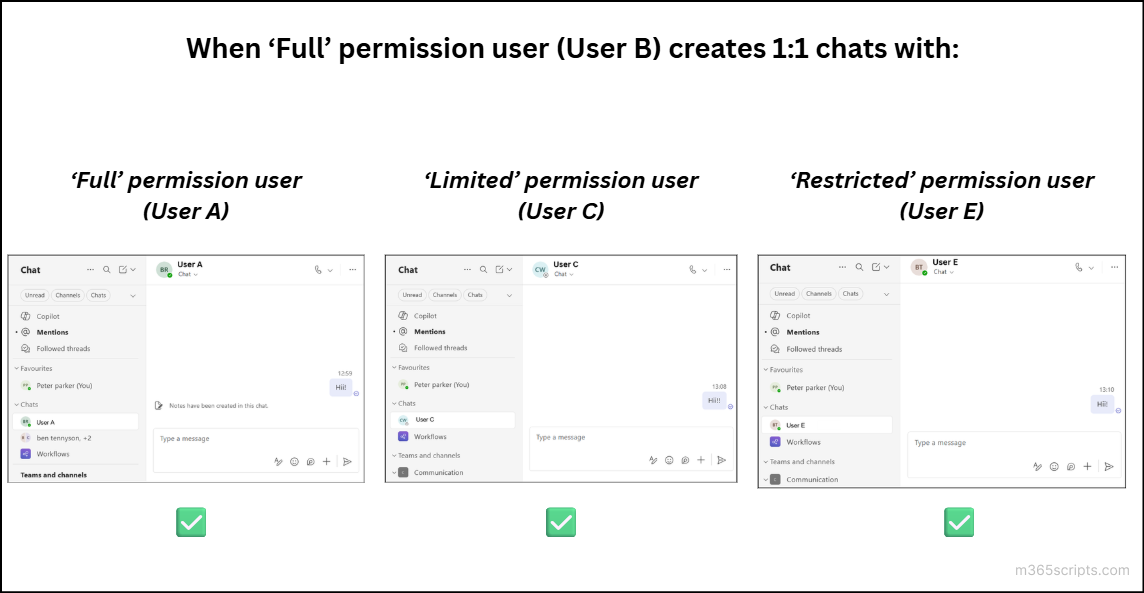
What Happens When a ‘Full’ Permission User Chat with Other Users?
Take ‘User B’, for example. With ‘Full’ permissions, ‘User B’ can chat freely with anyone; no restrictions. If ‘User B’ messages users with ‘Limited’ and ‘Restricted’ roles, all the conversations go through seamlessly. The image below illustrates User B’s 1:1 chat with each of the three users.
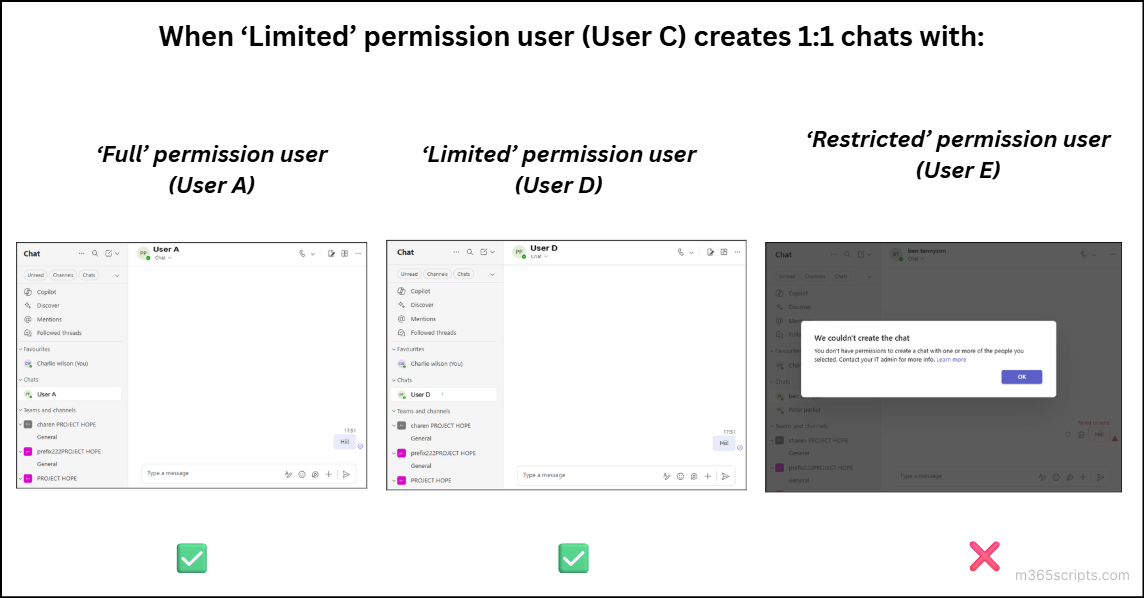
What Happens When a ‘Limited’ Permission User Chats?
Let’s take ‘User C’ as an example. With ‘Limited’ permissions, User C’s chat options are more controlled. User C can chat freely with a ‘Full’ or ‘Limited’ permission users. However, if User C tries to start a chat directly with a ‘Restricted’ permission user, an error will be displayed as below:
“You don’t have permission to create a chat with one or more of the people you selected.”
The image below shows User C’s attempts to start 1:1 chat with each user.
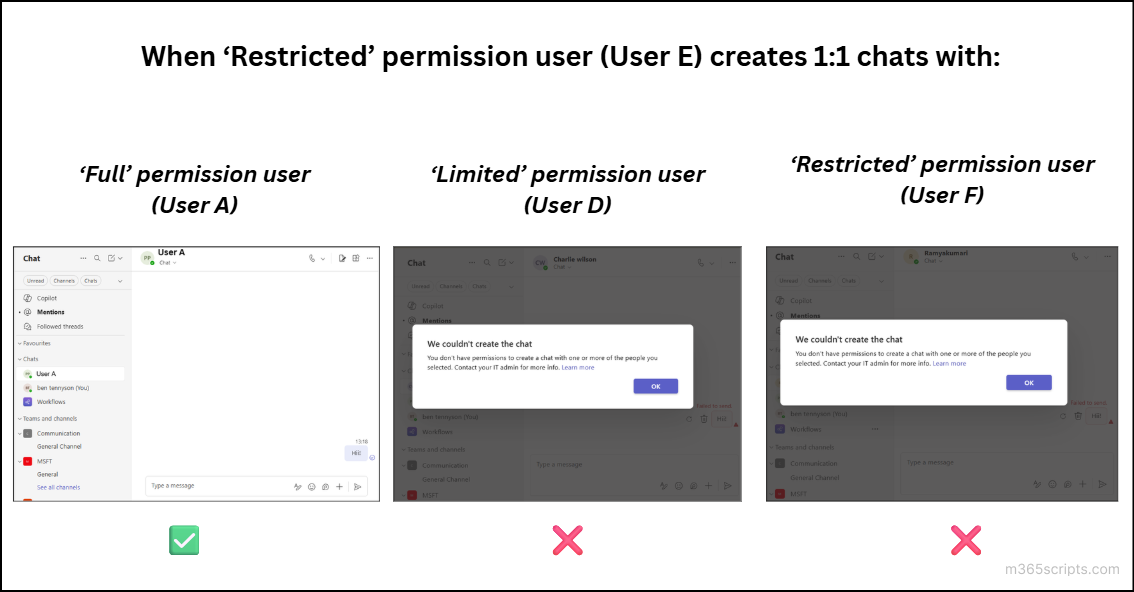
What Happens When a ‘Restricted’ Permission User with Others?
Let’s take ‘User E’ as an example. When ‘User E’ starts a 1:1 chat with a ‘Full’ permission user, no restriction is applied. However, if ‘User E’ tries to start a chat with a ‘Limited permission’ user or another ‘Restricted’ user, an error message is displayed:
“You don’t have permission to add certain people to the chat.”
Now that you’ve seen how supervised chats behave for different users, let’s look at some common questions people ask about using supervised chats.
1.Do we need any license requirements to use supervised chats?
Not at all. You don’t require any licenses to use supervised chats in Microsoft Teams. You just need to configure the settings correctly to enable and manage this feature.
2. Does the supervised chat policy apply to existing chats?
No. Existing chats, meetings, and channels will continue to work as they did before and are not affected by the new policy. After supervised chats is enabled, the updated settings apply only to new private chats. Migrating existing accounts to new accounts is the reasonable solution to apply supervised chats to existing accounts.
3. Is there a way to apply the supervised chat settings to existing private chats?
For the new settings to take effect, existing private chats must be deleted from both the sender’s and the receiver’s chat history. Only then will the new permissions be enforced.
4. What happens when a ‘Full’ permission user leaves a chat or removed from the tenant?
If a ‘Full’ permission user leaves a chat or is removed from the tenant, the chats are left unmonitored. To ensure continued supervision, another ‘Full’ permission user must be added to the chats. If there are no ‘Full’ permission users, existing participants can continue chatting, but no one can add new members or maintain supervision.
5. What if a guest user needs to communicate with a ‘Restricted’ permission user in my tenant?
If a guest user needs to chat with a ‘Restricted’ permission user in your tenant, they must be assigned the ‘Limited’ permission role in their own tenant. Then, a ‘Full’ permission user from the ‘Restricted’ user’s tenant must create the chat and invite the required users.
6. Is there a way to delete supervised chats?
Supervised chats can only be deleted by the original creators of the chat. If the chat was created by a ‘Full’ permission user, only that Full permission user can delete it. Similarly, if a Limited permission user creates a chat and invites a Full permission user for supervision, only that Limited permission user can delete that chat.
7. Is it possible to assign multiple chat permission-based roles to a user?
No, a user can have only one permission policy at a time. If a new policy with different permission is assigned, the most recently applied policy takes effect, and the earlier permission is removed automatically.
8. What’s the difference between the Information barrier, supervised chats and priority account chat control?
Even though information barriers, supervised chats, and priority account chat control help to limit communication in Teams, they work in very different ways.
- Information barriers in Microsoft Teams are designed for organizations with strict regulatory requirements and create permanent communication boundaries between specific groups of users. These restrictions are enforced by the system, and end users cannot override them.
- Priority account chat control, on the other hand, gives individual users the ability to block specific people in Teams on their own terms, making it user-controlled rather than admin-enforced.
- Supervised Chats focus on protecting certain users from unwanted direct messages by requiring supervisor oversight and users cannot bypass these controls.
Closing Lines
That’s it! We hope this blog helped you understand the use of supervised chats and how to manage them in Microsoft Teams. This feature keeps private conversations restricted and monitored, helping maintain Microsoft Teams security as well.
If you have any questions, suggestions, or experiences to share, feel free to post them in the comments section below. Stay tuned for more upcoming blogs!


