Configure Preservation Lock to Restrict Changes to Retention & Label Policies
Configure preservation lock in Microsoft Purview to prevent modifications to retention and label policies meeting regulatory compliance requirements. Lock policies to restrict changes during legal holds or compliance periods, ensuring data retention settings remain unchanged for investigations and audits.
Every organization follows certain regulatory compliances to secure customers’ data efficiently. To meet these requirements and assist with investigations, data is often retained for a certain period. In Microsoft 365, admins can use retention policies or retention label policies to manage how long data is kept and when it should be deleted. To avoid unnecessary changes made to these retention policies, admins can configure preservation lock.
Let’s dive into what a preservation lock is and how to configure it in Microsoft 365 in detail!
Retention settings can be applied to retain content on SPO & OneDrive sites, Exchange mailboxes, Teams, Viva messages, and interactions with M365 Copilot. To apply the retention settings, admins must use retention policies or retention label policies.
Retention policies apply the same retention settings at the container level, covering all content within a site or mailbox. You can apply a retention policy to multiple locations, or to specific locations or users:
- Exchange mailboxes
- SharePoint classic and communication sites
- OneDrive accounts
- Microsoft 365 Group mailboxes & sites
- Skype for Business
- Exchange public folders
- Teams channel messages (standard channels and shared channels)
- Teams chats and Copilot interactions
- Teams private channel messages
- Viva Engage community messages
- Viva Engage user messages
Note: Once a retention policy is applied to SharePoint sites, any subsequent modification to content triggers the retention mechanism. When a file or item is edited, SharePoint preserves the previous version by automatically storing a copy in the preservation hold library. This ensures that the original state of the content is retained for compliance, eDiscovery, and audit purposes, even though users continue working on the updated version in the site.
Retention label policies help to assign retention settings at an item level like folder, document, email, etc.
With retention labels, admins can do the following:
- Enable people in the organization to apply a retention label manually.
- Apply retention labels to content automatically if it matches specific conditions.
- Start the retention period from when the content was labeled for documents in SPO and OneDrive sites, and for email items.
- Start the retention period when an event occurs.
- Apply a default retention label to a document library, folder, or document set in SharePoint.
- Mark items as a record as part of the records management strategy.
Note: For Exchange Online mailboxes, admins might also prefer an archive and deletion policy to back up older data.
Preservation Lock restricts everyone, including a global admin, from making changes to a retention policy or retention label policy. Changes like turning off the policy, deleting the policy, or making it less restrictive can’t be made once the policy is locked. This feature might also be needed for regulatory requirements to secure the retention policies.
License Requirement for Preservation Lock: Admins need a Microsoft 365 E5 license to apply for a Preservation Lock.
When the retention policy is locked using Preservation Lock,
- No one can disable the policy or delete it.
- Locations can be added but not removed.
- The retention period can be extended but can’t be decreased.
When the Preservation Lock is applied to a retention label policy,
- No one can disable the policy or delete it.
- Locations can be added but not removed.
- Labels can be added but not removed.
Note: Admins must understand the impact of enabling Preservation Lock for retention policies and label policies and ensure whether it’s necessary for the organization before implementation.
After creating a retention policy or retention label policy , admins can configure Preservation Lock to restrict changes to those policies. Admins must use PowerShell to configure Preservation Lock.
Before implementing, remember that to apply Preservation Lock on a retention label policy, the labels must contain only items that are marked as regulatory records. You need to remove other types of labels from the label policy to configure this option.
- First, connect to Security & Compliance PowerShell.
- To get the name of the policy, run Get-RetentionCompliancePolicy.
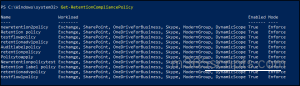
- To configure a Preservation Lock on a policy, run the Set-RetentionCompliancePolicy cmdlet along with the policy name and the ‘RestrictiveRetention’ parameter set to true.
|
1 |
Set-RetentionCompliancePolicy –Identity “<Policy Name>” -RestrictiveRetention $true |

- Now, the policy will be locked. To confirm whether the Preservation Lock has been set successfully, run the below cmdlet.
|
1 |
Get-RetentionCompliancePolicy –Identity “<Policy Name>” | Fl |
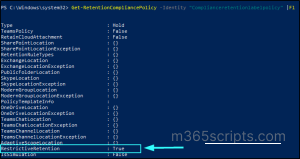
Important: Admins won’t be able to disable or delete the policy once the Preservation Lock is applied.
I hope this blog helps to understand Preservation Lock, its impacts, and how to configure it on a retention policy or retention label policy effectively. Drop any queries in the comment section.