How to Remove User Access to Applications Using Entra ID and PowerShell
Remove user access to Microsoft Entra applications using the admin center or Graph PowerShell. Revoke direct assignments, group-based access, and user consent grants. Disable sign-ins for specific apps or delete applications permanently to manage application permissions and enhance security.
Applications in Entra ID play a critical role in managing how users access various resources across Microsoft 365 and other connected services. Admins can assign access permissions to these applications for specific users or groups, ensuring that they can only access the resources necessary for their roles. To maintain visibility, organizations can monitor permissions granted to enterprise applications and ensure they align with users’ requirements. However, there are situations where an admin might need to remove user access from applications. Whether it’s due to role changes, security concerns, revoking illicit consent grants, or offboarding, knowing how to effectively revoke application access is essential.
In this blog, we’ll manage application permissions by exploring how to remove user access using both the MS Entra admin center and Graph PowerShell.
Before diving into the steps to remove user access, let’s first understand the different ways users can be assigned access to applications within Entra ID.
Users can gain access to applications in the following ways:
- Direct Assignment: Admins manually assign users to applications.
- Group Assignment: Users are assigned to an application through group membership.
- Self-Service: Users request access to applications through the MyApps portal, if enabled.
- Admin Consent: Admins can consent on behalf of users for third-party applications.
- User Consent: Users themselves can grant consent to applications (if allowed by policy).
There are four primary methods to revoke permissions granted to enterprise applications in Entra ID.
- Remove Specific User or Group Assignment from Application
- Remove Application Access to Bulk Users
- Disable User Sign-Ins for Applications in Entra ID
- Delete an Application Permanently in Entra ID
- Disable Future User Consent for Applications
Below, we’ll explore how to manage user and group assignments to applications in Entra ID.
To manage user access to an Entra ID application, ensure you have the following:
- One of the following roles: Global Administrator, Privileged Administrator, Cloud Application Administrator, Application Administrator, or owner of the service principal.
- A Microsoft Entra account.
- A Microsoft Entra P1 or P2 license.
To remove a specific user/group assignment from an Entra ID enterprise application, follow the steps below.
Using Microsoft Entra Admin Center:
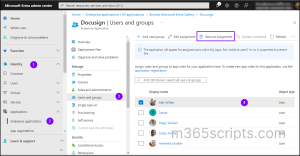
Enterprise app owners can revoke user access to applications through the Microsoft Entra admin center by following the steps outlined below.
- Sign in to the Microsoft Entra admin center.
- Go to Identity > Applications > Enterprise applications > All applications.
- Choose the application for which you want to revoke access.
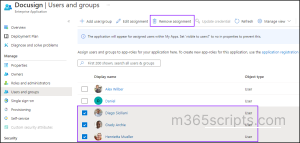
- Under Manage, click on the ‘Users and groups’ tab.
- Select the user or group you wish to remove access for.
- Click ‘Remove assignment’ and confirm by selecting Yes in the confirmation message.
Handy Tip:
You can navigate to a specific user profile in the Entra admin center to view and revoke all application assignments associated with that user.
To block users from enterprise applications using Microsoft Graph PowerShell, first connect to MS Graph PowerShell with administrative privileges, then run the following script:
|
1 2 3 4 5 6 7 8 9 10 11 12 13 14 |
Connect-MgGraph -Scopes "Application.ReadWrite.All", "Directory.ReadWrite.All", "AppRoleAssignment.ReadWrite.All" $userId = '<userid>' $appObjectId = '<ObjectId>' $user = Get-MgUser -UserId $userId $servicePrincipal = Get-MgServicePrincipal -ServicePrincipalId $appObjectId $assignments = Get-MgServicePrincipalAppRoleAssignedTo -ServicePrincipalId $servicePrincipal.Id | Where-Object { $_.PrincipalDisplayName -eq $user.DisplayName } if ($assignments) { foreach ($assignment in $assignments) { Remove-MgServicePrincipalAppRoleAssignedTo -AppRoleAssignmentId $assignment.Id -ServicePrincipalId $servicePrincipal.Id Write-Output "Removed assignment with ID: $($assignment.Id)" } } else { Write-Output "No assignments found for user $($user.DisplayName)" } |
Replace ‘<userid>’ with the email address of the user whose access you want to remove, and ‘<ObjectID>’ with the Object ID/Service principal ID of the application. This removes the user from the given application only.
Tip: To retrieve the Object IDs of all applications, run the following cmdlet:
|
1 2 3 |
Connect-MgGraph -Scopes "Application.Read.All" $enterpriseApps = Get-MgServicePrincipal -All | Select-Object DisplayName, Id $enterpriseApps |
To remove access for multiple users or groups from an enterprise application in Entra ID, follow these steps:
Using Microsoft Entra Admin Center:
To remove bulk users from access an application using Microsoft Entra admin center,
- Sign in to the Microsoft Entra admin center.
- Go to Identity > Applications > Enterprise applications > All applications.
- Choose the application from which you want to remove access.
- Under Manage, click on the ‘Users and groups’ tab.
- Use the checkboxes to select the users or groups you wish to remove.
- Click on ‘Remove assignment’ and confirm by selecting Yes in the confirmation message.
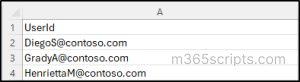
To remove multiple users’ access to a specific application in Entra ID using Microsoft Graph PowerShell, first create a CSV file with the format shown below: User Ids separated by a new line with “UserId” as header. Not including this header will result in errors when running the script.
Then, run the following script by replacing ‘<ObjectID>’ with the Object ID/Service principal ID of the application and ‘<filepath>’ with the path to your CSV file containing the user IDs.
|
1 2 3 4 5 6 7 8 9 10 11 12 13 14 15 16 17 18 |
Connect-MgGraph -Scopes "Application.ReadWrite.All", "Directory.ReadWrite.All", "AppRoleAssignment.ReadWrite.All" $csvFilePath = '<filepath>' $appObjectId = '<ObjectID>' $userIds = Import-Csv -Path $csvFilePath | Select-Object -ExpandProperty UserId $servicePrincipal = Get-MgServicePrincipal -ServicePrincipalId $appObjectId foreach ($userId in $userIds) { $user = Get-MgUser -UserId $userId $assignments = Get-MgServicePrincipalAppRoleAssignedTo -ServicePrincipalId $servicePrincipal.Id | Where-Object { $_.PrincipalDisplayName -eq $user.DisplayName } if ($assignments) { foreach ($assignment in $assignments) { Remove-MgServicePrincipalAppRoleAssignedTo -AppRoleAssignmentId $assignment.Id -ServicePrincipalId $servicePrincipal.Id Write-Output "Removed assignment with ID: $($assignment.Id) for user: $($user.DisplayName)" } } else { Write-Output "No assignments found for user $($user.DisplayName)" } } |
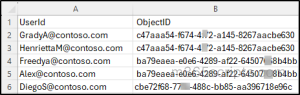
To remove multiple users’ access to various applications in Entra ID using Microsoft Graph PowerShell, prepare a CSV file with headers UserId and ObjectID as two columns. Under these headers, list the user IDs and corresponding application Object IDs (as shown in the image). Ensure the headers are given as it is, as they are required for the script to execute correctly.
Replace ‘<filepath>’ in the script with the path to your CSV file, then run the script.
|
1 2 3 4 5 6 7 8 9 10 11 12 13 14 15 16 17 18 |
Connect-MgGraph -Scopes "Application.ReadWrite.All", "Directory.ReadWrite.All", "AppRoleAssignment.ReadWrite.All" $csvFilePath = '<filepath>' $assignmentsData = Import-Csv -Path $csvFilePath foreach ($data in $assignmentsData) { $userId = $data.UserId $appObjectId = $data.ObjectID $servicePrincipal = Get-MgServicePrincipal -ServicePrincipalId $appObjectId $user = Get-MgUser -UserId $userId $assignments = Get-MgServicePrincipalAppRoleAssignedTo -ServicePrincipalId $servicePrincipal.Id | Where-Object { $_.PrincipalDisplayName -eq $user.DisplayName } if ($assignments) { foreach ($assignment in $assignments) { Remove-MgServicePrincipalAppRoleAssignedTo -AppRoleAssignmentId $assignment.Id -ServicePrincipalId $servicePrincipal.Id Write-Output "Removed assignment with ID: $($assignment.Id) for user: $($user.DisplayName) in application: $($servicePrincipal.DisplayName)" } } else { Write-Output "No assignments found for user $($user.DisplayName) in application: $($servicePrincipal.DisplayName)" } } |
If you want to prevent your employees from accessing an Entra ID application, such as temporarily restricting access to an application due to a security breach, you can block access by disabling user sign-in. This stops any tokens from being issued for the application. To remove application access for all users, follow these steps:
Using Microsoft Entra Admin Center:
To disable user sign-ins to Entra ID applications using the Microsoft Entra admin center, follow these steps:
- Sign in to the Microsoft Entra admin center.
- Navigate to Identity > Applications > Enterprise applications > All applications.
- Select the application you want to disable sign-ins for.
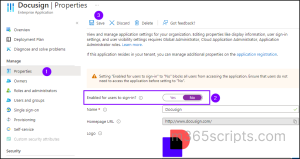
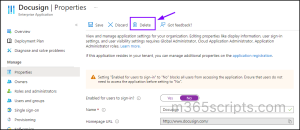
- Click on Properties under the Manage tab.
- Toggle the Enabled for users to sign-in? option to No, then click Save.
To prevent all users from accessing a specific Entra ID application using PowerShell, run the following script.
|
1 2 3 4 5 6 7 8 9 10 11 12 13 14 15 |
Connect-MgGraph -Scopes "Application.ReadWrite.All" $appId = '<ApplicationID>' $servicePrincipal = Get-MgServicePrincipal -Filter "appId eq '$appId'" if ($servicePrincipal) { Update-MgServicePrincipal -ServicePrincipalId $servicePrincipal.Id -AccountEnabled:$false Write-Host "Service Principal exists. It has been disabled." } else { Write-Host "Service Principal with the specified ID does not exist. Please input the correct Application ID." } $servicePrincipal = Get-MgServicePrincipal -Filter "appId eq '$appId'" if ($servicePrincipal) { Write-Host "Final Status of Service Principal: Enabled = $($servicePrincipal.AccountEnabled)" } else { Write-Host "Service Principal not found." } |
Replace ‘<ApplicationID>’ in the code with the actual Application ID.
Tip: To find the Application IDs, use the following command:
|
1 2 3 4 5 6 7 |
$apps = Get-MgApplication $apps | ForEach-Object { [PSCustomObject]@{ DisplayName = $_.DisplayName ApplicationID = $_.AppId } } | Format-Table -AutoSize |
Another way to remove user access to enterprise application in Entra ID is to remove the registered app from the Entra tenant entirely. To delete an enterprise application from your Microsoft Entra tenant, follow these steps:
Using Microsoft Entra Admin Center:
To delete an enterprise application using the Microsoft Entra admin center,
- Sign in to the Microsoft Entra admin center.
- Go to Identity > Applications > Enterprise applications > All applications.
- Find and select the application you want to delete permanently.
- Click Properties and then select the Delete button.
To delete an enterprise application in Entra ID using Graph PowerShell, run the below command.
|
1 2 3 |
Connect-MgGraph -Scopes 'Application.ReadWrite.All' Get-MgServicePrincipal Remove-MgServicePrincipal -ServicePrincipalId '<ObjectID>' |
Replace ‘<ObjectID> ‘with the Object ID of the application you want to delete.
This process performs a soft delete, meaning the application will be moved to the recycle bin and remain in a suspended state for 30 days. During this period, you can restore the application if needed. After 30 days, the deleted application will be permanently removed (Hard deleted).
To prevent accidental hard deletions, you can configure protected actions in Entra ID, which adds an extra safeguard for critical objects.
To let an application access your organization’s data, users need to grant permission. Different permissions allow different levels of access. By default, all users can grant consent to applications for permissions that don’t require admin consent. However, you can manage user consent to applications to control and restrict which apps can access organizational data. Disabling user consent prevents users from granting permissions to applications, thereby blocking access to apps that require user-level permissions.
Using Entra Admin Center:
To configure user consent settings in the Microsoft Entra admin center:
- Sign in to the Microsoft Entra admin center.
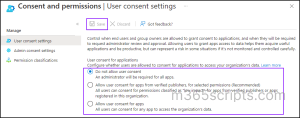
- Go to Identity > Applications > Enterprise applications > Consent and permissions > User consent settings.
- Choose ‘Do not allow user consent’ under User consent for applications and click Save. However, Microsoft recommends allowing user consent to applications from verified publishers.
We hope this blog has provided useful insights into managing user access to applications in Entra ID, thereby enhancing application security. Also, be sure to check out the application activity report in Entra ID. Thanks for reading. If you have any questions, feel free to leave a comment below.