Manage User Deletions in Microsoft 365 Using PowerShell
Managing user deletions in Microsoft 365 involves more than just removing accounts – it requires careful handling of soft deletes, permanent deletes, and restorations. While native tools can be limiting, the provided all-in-one PowerShell script simplifies the process by enabling bulk actions and efficient user management from a single place.
Managing user accounts in Microsoft 365 doesn’t stop at creating and assigning licenses. Deleting users is equally critical. Whether you’re offboarding a departing employee or cleaning up accounts after a merger, user deletion plays a key role in avoiding unnecessary license costs.
But when you delete an object, the impact can go far beyond just removing a login. In Microsoft 365, deleting a user account can trigger the removal of associated objects such as emails, permissions, and other linked resources. Therefore, it’s crucial to manage deletions carefully to avoid accidental data loss and maintain tenant security.
In this blog, we’ll walk through managing user deletions in Microsoft 365 — from soft delete vs. hard delete, to recovering deleted accounts.
Admins can delete or restore users in Microsoft 365 using the following methods:
To delete or restore users via the Microsoft Entra admin center, follow these steps:
- Go to Microsoft Entra admin center → Users → All users.
- Select the user you want to delete.
- Click Delete user to remove the account. This performs a soft delete, meaning the user can still be restored later.
- To permanently delete or restore a user, navigate to the Deleted users section.
- Select the user and choose either Delete permanently or Restore user based on your requirement. You can also restore multiple users at once from this page by using the bulk restore CSV option.
This approach may work well for single user operations, but for bulk deletions or restorations, each operation in the Microsoft Entra admin center can run for a maximum of 1 hour. In large tenants with many users, operations may time out or fail due to these limitations. Additionally, constantly switching between tabs for multiple tasks can slow you down and increase the chance of errors.
You can also manage user deletions and restorations from the Microsoft 365 admin center:
- Navigate to Microsoft 365 admin center → Users → Active users (for deletions) or Deleted users (for restorations).
- Select the user account.
- Click Delete user to remove the account or Restore user to recover it.
However, to delete multiple users, you must manually select them, since bulk restore via CSV is not supported. Also, you cannot permanently delete users from the M365 admin center.
Another method to delete or restore users in Microsoft 365 is by using Microsoft Graph PowerShell. You can use the following cmdlets:
- Soft delete users: To soft delete a user account in Microsoft 365, use the Remove-MgUser cmdlet. When executed, the user is removed from the active users list and moved to the ‘Deleted users’ container. For example,
|
1 |
Remove-MgUser -UserId '[email protected]' |
- Hard delete users: To permanently delete a user from Microsoft 365, use the Remove-MgDirectoryDeletedItem cmdlet. It removes the user from the ‘Deleted users’ container, making the account unrecoverable.
|
1 |
Remove-MgDirectoryDeletedItem -DirectoryObjectId '5c442efb-5e66-484a-936a-91b6810bed14' |
- Restore deleted users: To restore a previously deleted user, use the Restore-MgDirectoryDeletedItem cmdlet. This moves the user from the ‘Deleted users’ container back to the active users list.
|
1 |
Restore-MgDirectoryDeletedItem -DirectoryObjectId '5c442efb-5e66-484a-936a-91b6810bed14' |
However, these actions typically need to be executed for each user using loops when handling multiple accounts, which can become time-consuming in large environments. In addition, some operations require the Directory Object ID of the user, meaning admins must first retrieve the user’s ID before performing the action.
To overcome these limitations, we’ve developed a PowerShell script. It allows you to execute multiple user deletion management actions such as soft deletion, permanent deletion, bulk deletion, and restoration in one go.
This saves time while providing flexible and granular control over deletions and restorations in Microsoft 365.
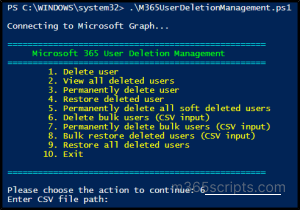
Download script: M365UserDeletionManagement.ps1
- Performs 8 user management actions and 1 reporting action related to user deletion.
- Automatically install the Microsoft Graph PowerShell module (if not already installed) after your confirmation.
- Supports execution with MFA-enabled accounts.
- Exports deleted users report results to a CSV file.
- Tracks the execution status of all deletion actions and exports them to a CSV file.
- Supports certificate-based authentication.
- The script is scheduler friendly.
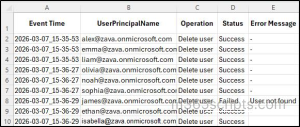
The log file shows key attributes like Event Time, UserPrincipalName, Operation, Status, and Error Message.
- Download the script.
- Start the Windows PowerShell.
- Select any of the methods provided to execute the script.
Method 1: Execute the script with MFA and non-MFA account.
|
1 |
.\M365UserDeletionManagement.ps1 |
Method 2: Execute the script by explicitly mentioning the required ‘Action’. It allows you to specify the operation the script should perform. Instead of selecting actions interactively, you can explicitly define the required operation using this parameter as:
|
1 |
.\M365UserDeletionManagement.ps1 -Action 1 |
Method 3: Execute the script using certificate-based authentication.
To use certificates, you must register the app in Microsoft Entra.
|
1 |
.\M365UserDeletionManagement.ps1 - TenantId <TenantId> -ClientId <ClientId> -CertificateThumbprint <CertThumprint> -Action 1 |
The above method is scheduler friendly. You can schedule the script using the Task scheduler or Azure Automation.
Method 4: By default, the script session ends after completing an action. This parameter allows admins to perform multiple operations within the same session without restarting the script.
To enable multiple execution mode, use the -MultiExecutionMode parameter when running the script:
|
1 |
.\M365UserDeletionManagement.ps1 -MultiExecutionMode |
This allows the script to run consecutive actions without restarting, saving time and making bulk user management more efficient.
📝 Note: The main menu will keep appearing until the script is terminated by entering 0.
Below are key scenarios where the script proves especially effective:
- Delete a specific user in Microsoft 365
- View all deleted users
- Permanently delete a specific Microsoft 365 user
- Restore a deleted user
- Permanently delete all soft-deleted users
- Delete users in bulk using CSV
- Permanently delete multiple users
- Restore deleted users in bulk using CSV
- Restore all deleted users in Microsoft 365
When you need to delete a specific user in Microsoft 365, such as during employee offboarding or when removing temporary accounts, you can run the script as follows:
|
1 |
.\M365UserDeletionManagement.ps1 -Action 1 |
The script will prompt you to enter the User Principal Name (UPN) of the user you want to delete. After providing the UPN, the user account will be deleted.
If you prefer to explicitly specify the UPN in the cmdlet, you can use the -UPN parameter as shown below (The UPN parameter can also be used for applicable actions to target specific users).
|
1 |
.\M365UserDeletionManagement.ps1 -Action 1 -UPN “[email protected]” |
This command will delete the user Alex and generate a log file that records the deleted user and the deletion status.
📝 Note: By default, this performs a soft delete. The deleted user can be restored within 30 days before it is permanently removed.
Sometimes admins may want to review recently deleted accounts to check whether a user was accidentally deleted during offboarding or bulk cleanup and needs to be restored. In such cases, you can retrieve the list of all soft-deleted users by running the below command:
|
1 |
.\M365UserDeletionManagement.ps1 -Action 2 |
This command generates a report containing the list of all deleted users in Microsoft 365.
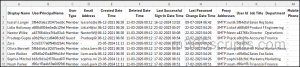
The generated report includes the following attributes: Display Name, UserPrincipalName, User Type, Email Address, Created Date Time, Deleted Date Time, Last Successful Sign-In Date Time, Last Password Change Date Time, Proxy Addresses, User ID, Job Title, Department, and Mobile Phone.
When you want to permanently delete old test accounts that are no longer needed in the tenant, you can run the script as shown below:
Note: Once permanently deleted, the user account cannot be recovered. Make sure the account is no longer needed before performing this action.
|
1 |
.\M365UserDeletionManagement.ps1 -Action 3 |
The command will prompt you to enter the User Principal Name (UPN) of the user. After you provide the UPN, the script will permanently delete the user from Microsoft 365.
Restoring a soft-deleted user may be required in scenarios where a previously deleted account needs to be brought back, such as when a user returns to the organization, or access needs to be re-enabled.
To restore a soft-deleted user in Microsoft 365, run the script as shown below:
|
1 |
.\M365UserDeletionManagement.ps1 -Action 4 |
This will prompt you for the UPN. To restore a user from the soft-deleted state, you need to provide the name in User ID + UPN format, which can be obtained from the output of Action 2.
Once the UPN is provided, the command will restore the user account.
By default, when users are deleted in Microsoft 365, their accounts are soft-deleted and moved to the ‘Deleted users’ page, where it remains available for restoration for 30 days. You may want to permanently remove all users to free up licenses or comply with data retention. In such scenarios, you can run the script as shown below:
|
1 |
.\M365UserDeletionManagement.ps1 -Action 5 |
This command will permanently delete all soft-deleted users from Microsoft 365.
When cleaning up inactive users in Microsoft 365, you can perform the action in bulk using a CSV file.
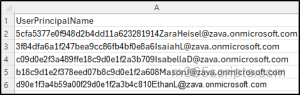
The CSV file should contain the list of users to be deleted in the format shown below, with UserPrincipalName as the column header as shown below. Providing a different header name may result in an error.

Once the CSV is ready, run the script as shown below:
|
1 |
.\M365UserDeletionManagement.ps1 -Action 6 |
This command will prompt you to provide a CSV file as input. If you want to explicitly specify the CSV file path in the command, you can use the -InputCsvFilePath parameter as shown below:
|
1 |
.\M365UserDeletionManagement.ps1 -Action 6 -InputCsvFilePath “C:\UsersToDelete.csv” |
This command will delete all the users listed in the CSV file.
The previous action soft deletes users in bulk, which means they remain in the soft-deleted state and can still be restored within 30 days. However, if you want to permanently delete multiple users directly in bulk, you can use the command below.
⚠️Important Note: When permanently deleting users who are already in the soft-deleted state, you may need to append the user’s unique ID before the UPN in the CSV input as shown below (You can also obtain it from the output of Action 2).
|
1 |
.\M365UserDeletionManagement.ps1 -Action 7 |
This command will prompt you to provide a CSV file containing the users to be permanently deleted.
For situations where you need to restore multiple deleted users at once, such as recovering accounts removed during cleanup, you can restore them in bulk using a CSV file like the above sample. Ensure the User ID + UPN format is used.
Run the script as shown below:
|
1 |
.\M365UserDeletionManagement.ps1 -Action 8 |
Once executed, the script prompts you to provide a CSV file and restores all users listed in it.
If you want to restore all users that are currently in the soft-deleted state, you can run the script as shown below:
|
1 |
.\M365UserDeletionManagement.ps1 -Action 9 |
This command will restore all the soft-deleted users in Microsoft 365.
We hope this blog helped you understand how to manage user deletions effectively and improve Microsoft 365 user management. Thank you for reading! If you have any questions or suggestions, feel free to share them in the comments section.