Manage SharePoint Recycle Bin Effectively Using PowerShell
Manage SharePoint Online Recycle Bin using PowerShell for efficient recovery and cleanup operations. Restore accidentally deleted items from first-stage and second-stage recycle bins within the 93-day retention period. Perform bulk operations on deleted files, lists, and libraries across multiple sites.
SharePoint Online, a collaboration platform, enables users to securely share data with their colleagues. However sometimes, users may accidentally delete sensitive items in the SharePoint lists or document libraries. Fortunately, the Recycle Bin in SharePoint acts as a safety net for deleted items without being deleted permanently. It’s easy for you to manually delete and restore a small number of items in the SharePoint Recycle Bin, but managing a large volume of deleted items can be challenging. No need to worry! You can manage SharePoint Recycle Bin effectively using PowerShell, that saves you time and improves the SharePoint site storage and performance.
Let’s delve into this blog to explore the ways of managing the SharePoint Online Recycle Bin using Microsoft PowerShell.
Recycle bins are data recovery bins, which store all the deleted SharePoint items temporarily in a single place.
Permissions: You should have proper SharePoint Online permissions
to access SharePoint Recycle Bin. You have to be assigned with a Site Member (with Edit permissions level) or Site/Group Owner (with Full Control permission level).
There are two stages of Recycle Bin available in SharePoint Online. Deleted files and folders in SharePoint are automatically kept for 93 days in the first stage recycle bin. If the first stage Recycle Bin is emptied or items are deleted from it, they will then be moved to the second stage Recycle Bin, where they will be stored for the remaining days (out of 93 days).
To manage Recycle Bin efficiently from SharePoint Online, follow the steps below.
SharePoint Online>Respective Site>Settings>Site contents>Recycle Bin
You can check the deleted items and choose whether to delete SharePoint pages, sites, and other contents, or to restore them based on your needs.
However, for larger organizations, managing Recycle Bin is crucial to avoid accidental deleting or permanently deleting important items. To help you with this, PowerShell provides simple cmdlets to manage SharePoint Recycle Bin effectively.
The PnP PowerShell module provides you with a set of cmdlets to effectively manage your SharePoint Recycle Bin. With the PnP cmdlets, you can be able to search, delete, and restore Recycle Bin items with just a few clicks.
You should Connect to SharePoint online PnP PowerShell Module
to manage SharePoint Recycle Bin using PnP module .
Note: If you have already installed the module, you can update it using ‘Update-Module -Name PnP.PowerShell’ to get the latest version thereby avoiding failed executions.
Using the PnP PowerShell module, you can gain the ability to effectively manage the SharePoint Recycle Bin through various actions.
You can generate a list of all the items in the Recycle Bin via PowerShell to ensure only necessary items are retained inside the bin.
To get a list of deleted items in the SharePoint Recycle Bin, execute the following cmdlet.
|
1 |
Get-PNPRecycleBinItem |
After successfully executed the cmdlet, you will get a list of items like the screenshot below.

You can keep track of the number of items you’ve deleted and are currently being stored in the Recycle Bin.
To get the count of items in Recycle Bin, execute the below PowerShell Script.
|
1 2 3 |
$totalItemCount = (Get-PnPRecycleBinItem).Count Write-Host "Total items in Recycle Bin: $totalItemCount" |
This script will give you the count of the items inside the Recycle Bin of SharePoint Online site like below screenshot.

You can use PnP PowerShell cmdlet to retrieve specific types of items from the Recycle Bin.
To get items of file/folder/List items, execute the following PowerShell cmdlet.
|
1 |
Get-PnPRecycleBinItem | Where-Object { $_.ItemType -eq <Folder/File/ListItems> } |
After running the cmdlet successfully, you will get the list of items based on the specified type like below screenshot.

If you need information about a specific deleted item, you can easily retrieve it using its Recycle Bin ID.
You can run the below cmdlet to find specific items in SharePoint Recycle Bin.
|
1 |
Get-PnPRecycleBinItem -Identity <Item Id> |
After the cmdlet get executed, you will get the specified item, as shown in the screenshot provided.

To avoid the Recycle Bin getting overfilled, which results in a drop in site performance, it is crucial to manage its storage effectively.
To get the storage occupied by files in Recycle Bin, execute the following PowerShell cmdlet.
|
1 2 3 4 5 |
$storageSizeBytes = Get-PnPRecycleBinItem | Measure-Object -Property Size -Sum | Select-Object -ExpandProperty Sum $storageSizeMBFormatted = "{0:N3} MB" -f ($storageSizeBytes / 1MB) $storageSizeGBFormatted = "{0:N3} GB" -f ($storageSizeBytes / 1GB) Write-Output "Recycle Bin Storage Size:`nBytes: $storageSizeBytes`nMB: $storageSizeMBFormatted`nGB: $storageSizeGBFormatted" |
The Measure-Object cmdlet in the code is used to calculate the sum of a specific property called “Size” for all the items in the recycle bin. The ExpandProperty will return the total size of the Bin. To make it understandable for users, the bytes values can be divided by 1KB/1GB.
This PowerShell script will give you the storage size of the Recycle Bin as below.

You can restore deleted items using Restore-PnPRecycleBinItem PnP PowerShell cmdlet.
To recover bulk deleted items from SharePoint Recycle Bin, execute the following cmdlet.
|
1 |
Restore-PnPRecycleBinItem |
The cmdlet will restore the items in the Recycle Bin to their original location upon successful execution.
Sometimes, users may delete confidential or important files from the SharePoint sites. If you need that particular file to be restored, you can run the below cmdlet.
|
1 |
Get-PnPRecycleBinItem -Identity <Item Id>| Restore-PnPRecycleBinItem –Force |
You can also restore the last deleted item from the Recycle Bin using PowerShell.
To do so, execute the following PowerShell cmdlets.
|
1 2 3 4 |
# Retrieve the last deleted item from Recycle Bin $lastDeletedItem = Get-PnPRecycleBinItem | Sort-Object -Property DeletedDate | Select-Object -Last 1 # Restore the last deleted item Restore-PnPRecycleBinItem -Identity $lastDeletedItem |
Note: If you delete things in bulk, this cmdlet will restore the last selected item.
You can also be able to restore the first deleted item using PowerShell by executing the script below.
|
1 2 3 4 |
# Retrieve the first deleted item from Recycle Bin $FirstDeletedItem = Get-PnPRecycleBinItem | Sort-Object -Property DeletedDate | Select-Object -First 1 # Restore the first deleted item Restore-PnPRecycleBinItem -Identity $FirstDeletedItem |
Note: If you delete things in bulk, this cmdlet will restore the first selected item.
Deleted items in the Recycle Bin may contain malicious files or folders. Keeping them in the Recycle Bin for a long period increases the risk of unauthorized access or data breaches in SharePoint Online sites. So, it is better to delete the items in the Recycle Bin periodically to mange your SharePoint environment effectively.
Execute the below cmdlet to delete items inside the Recycle Bin.
|
1 |
Clear-PnPRecycleBinItem |
Once done with the cmdlet execution, the deleted items are no longer available in the Recycle Bin.
To delete a particular item in Recycle Bin which occupies more storage can be deleted using the below cmdlet.
|
1 |
Get-PnPRecycleBinItem -Identity <Item Id> | Clear-PnPRecycleBinItem –Force |
The specified item will get delete permanently from the Recycle Bin.
It’s crucial to remember that deleting items from the recycle bin also permanently deletes their associated version history. Always check the file version history for any items in the recycle bin before permanently deleting them. This ensures you don’t lose previous versions you might need.
You can permanently delete a list of items that have been deleted by a particular user by simple PowerShell cmdlet.
To clear a list of items deleted by a specific user, you can use the following cmdlet.
|
1 2 3 |
foreach ($item in (Get-PnPRecycleBinItem -FirstStage | Where-Object { $_.DeletedByEmail -eq "<user's email" } )) { Clear-PnPRecycleBinItem -Identity $item -Force } |
You can use PowerShell cmdlets to clear a list of items based on a date using the “DeletedDate” parameter.
To do so, run the following PowerShell cmdlet.
|
1 |
Get-PnPRecycleBinItem | Where-Object { $_.DeletedDate -lt (Get-Date).AddDays(-<specify the days>) } | Clear-PnPRecycleBinItem |
Managing SharePoint Recycle Bin using PowerShell is a convenient and efficient way to monitor storage size, enforce data governance, and optimize site performance. Use the above PnP PowerShell cmdlets and manage the SharePoint Recycle Bin effectively. Along with the above, you can use the SharePoint Online PowerShell cmdlets such as Get-SPOUser, Get-SPOSite, to manage your SharePoint environment effectively.
Do you need a cmdlet free management of SharePoint Recycle Bin and jumping from page to page to get such a better alternative? Cease your quest! AdminDroid SharePoint Online reporter is in your hands.
AdminDroid provides a user-friendly interface that simplifies the SharePoint Online Recycle Bin management and reporting without difficult PS scripts.
You can gain a doorstep monitoring of your SharePoint Recycle Bin with AdminDroid’s Sharepoint Online reports.
“All Sites” report in the AdminDroid SharePoint Online reporting tool lets you manage the SPO Recycle Bin efficiently. You can quickly retrieve the “Recycle Bin Enabled” sites and their properties in detail by following the steps below.
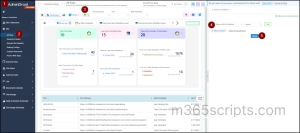
In addition to the above, you can get the SharePoint sites with disabled Recycle Bin from the “Recycle Bin Disabled” report of AdminDroid to confirm the unnecessity of SPO Recycle Bin.
Besides the above, you can audit other SharePoint Online activities such as site configuration changes, file accesses, file sharing, access request events, link creations and more with AdminDroid’s SharePoint Online auditing tool.
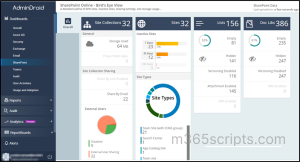
Also, you are provided with eye catching SharePoint Online dashboard with AI-powered graphical analysis on SharePoint site collections, sites, lists, and document libraries, along with storage details, external user sharing, and more.
We guess your next question. Is this exclusively for the SharePoint Online management, right? Absolutely
not. AdminDroid provides comprehensive reports on various resources of your Microsoft 365 environment, including Microsoft Teams, Exchange Online, OneDrive, SharePoint Online and so on.
Why are you still thinking? Start to download AdminDroid now for efficient monitoring of your SharePoint Online.
We hope you will get more information on managing SharePoint Recycle Bin using PowerShell. Furthermore, feel free to reach us in the comments section for any assistance.