Manage Microsoft 365 User Photos using MS Graph PowerShell
In the fast-paced realm of Microsoft 365 administration, adaptability is key, particularly managing user photos using PowerShell within organizations. If you’re used to the familiar trio of “Set-UserPhoto,” “Get-UserPhoto,” and “Remove-UserPhoto” cmdlets in Exchange Online for handling bulk updates of user profile photos, be prepared for a significant shift.
Microsoft has announced the retirement of Get, Set, and Remove UserPhotos, with the initial schedule set for completion by November 30, 2023. However, a recent update indicates a new timeline, with the retirement now scheduled for late March 2024 as per the MC678855.
This adjustment doesn’t imply a time to relax; instead, it serves as a crucial reminder to be proactive and prepare for the inevitable transition. The upcoming changes prompt us to explore alternative methods.
In this blog post, we’ll explore the process of updating user photos within the Microsoft 365 admin center. Then, we will discuss the drawbacks associated with this method and delve into how to manage Microsoft 365 user photos using MS Graph PowerShell.
When organizations permit users to upload their photos, some opt for admins to handle the task to efficiently automate Microsoft 365 user onboarding, ensuring the removal of any inconsistent or unprofessional images. This practice helps maintain adherence to the company’s brand and promotes a professional reputation.
Microsoft 365 user profile pictures play a crucial role in facilitating easy identification of employees and fostering teamwork and collaboration. As an administrator, you possess the capability to modify user photos directly within the Microsoft 365 admin center. So, let’s explore how to update user photos in the Microsoft 365 admin center under this section.
- Sign in to the Microsoft 365 admin center.
- Navigate to “Users” and choose the “Active users” option.
- Select the specific user whose profile photo you want to update.
- Within the user’s profile, locate the “Change photo” option under the existing photo placeholder.
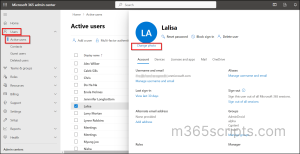
5. After selecting the “Change Photo” option, a flyout pane will appear with the prompt “Choose photo.” Click on this option to open the File upload dialog, allowing you to select your desired profile image. After choosing the photo, click “Open.”
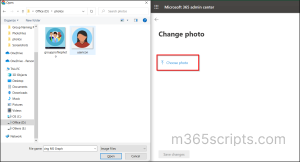
6. Return to the “Change Photo” flyout pane and click on “Save changes” to finalize the update.
NOTE: It’s important to highlight that you can download the current image by right-clicking on the image within the “Change Photo” flyout pane and selecting the “Save image as” option.
Although the Microsoft 365 admin center provides a platform for configuring and updating user profile photos, it has limitations in certain scenarios:
- Removal of existing user profile photos is not supported.
- Managing group profile photos is not possible.
- Bulk updating of user and group profile photos is not supported.
This is where the Microsoft Graph PowerShell comes into play! With Microsoft Graph PowerShell, streamlining user profile photo management in Microsoft 365 becomes a breeze. This powerful tool simplifies the process, making it more efficient and hassle-free. Now, let’s explore the steps to manage Microsoft 365 user photos using MS Graph PowerShell.
Managing Microsoft 365 user photos is made simple with the power of Microsoft Graph PowerShell. Administrators can effortlessly customize the photos for users and groups in Microsoft 365, making it easy for users to identify their colleagues and teammates. This, in turn, fosters a friendly atmosphere and facilitates smoother collaboration across the organization.
- Managing user profile photos using MS Graph PowerShell
- Managing Microsoft 365 group profile photos using PowerShell
Besides connecting to Microsoft Graph PowerShell, specific permissions are necessary to manage Microsoft 365 user photos using MS Graph PowerShell. Thus, before proceeding, ensure you have global admin privileges and add the following permissions.
- For managing users’ profile photos – User.ReadWrite.All
- For managing Microsoft 365 group profile photos – Group.ReadWrite.All
Effortlessly manage user photos using MS Graph PowerShell with the following operations.
For a single user, utilize the “Set-MgUserPhotoContent” cmdlet to set photo in Microsoft Entra user profile. Provide the UPN and the correct input file name in the respective places within the cmdlet:
|
1 |
Set-MgUserPhotoContent -UserId <UPN> -InFile <inFile> |
![]()
Upon execution, the profile picture for the specified Microsoft 365 user will be updated accordingly.
NOTE: The maximum supported size of a photo is 4 MB.
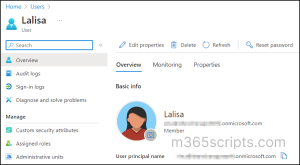
To set profile photos for bulk users at once, start by creating a CSV file with headers such as DisplayName, UPN, and PhotoFile, as illustrated in the image below.

Then, input your CSV location and execute the provided cmdlet to efficiently bulk upload user photos in Office 365.
|
1 |
Import-Csv <Filelocation> | Foreach { Set-MgUserPhotoContent -UserId $_.UPN -InFile $_.PhotoFile} |

This cmdlet facilitates bulk updates to user profile photos in Microsoft 365. However, it’s important to address the scenario where users may change their profile photos frequently. Therefore, it’s crucial to prevent Microsoft 365 users from changing their profile photos using Microsoft Graph PowerShell.
Admins can enhance the visual confirmation aspect in organizational communication and collaboration by uploading photos in Azure AD user profiles. This is especially valuable in virtual or remote work scenarios where face-to-face interactions are limited. The PowerShell script provided below allows admins to streamline the process, utilizing a folder with user principal names as file names for the profile photos. Ensure to specify the correct folder path in the <FilePath>.
|
1 2 3 4 5 6 7 8 9 10 11 12 |
# Get all user profiles $users = Get-MgUser -All $photoFolderPath = "<FilePath>" foreach ($user in $users) { $userId = $user.UserPrincipalName $photoPath = Join-Path $photoFolderPath "$userId.png" # Check if the photo file exists if (Test-Path $photoPath -PathType Leaf) { # Update the user's profile photo Set-MgUserPhotoContent -UserId $userId –InFile $photoPath } } |
To efficiently manage storage and bandwidth usage, administrators can use the “Get-MgUserPhoto” cmdlet to retrieve details about user profile photos, including dimensions. Upon execution, this cmdlet provides the following information, enabling admins to store and transmit appropriately sized images, thereby reducing the load on servers and improving overall system performance.
- ID: The default identifier.
- Height: The photo height is specified in pixels.
- Width: The photo width is specified in pixels.
|
1 |
Get-MgUserPhoto -UserId <UPN > |

NOTE: In the case of users without profile photo, executing the PowerShell command will result in the following error:
Exception of type ‘Microsoft.Fast.Profile.Core.Exception.ImageNotFoundException’ was thrown. 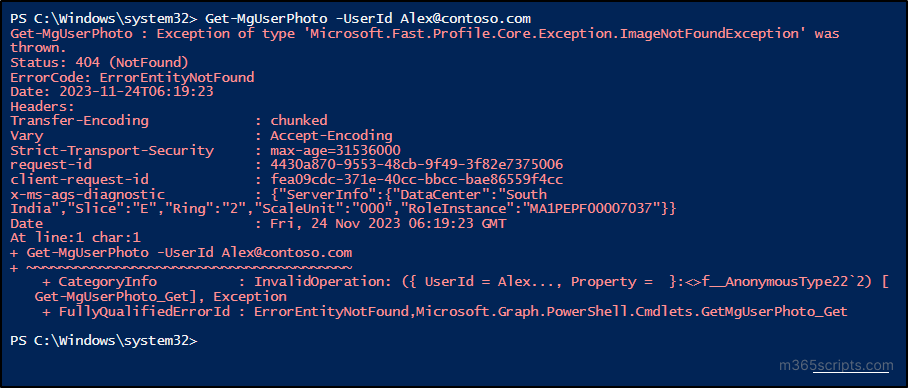
To obtain a user profile photo, you can utilize the “Get-MgUserPhotoContent” cmdlet, which downloads the photo and saves it to the specified location defined by the “OutFile” parameter.
|
1 |
Get-MgUserPhotoContent -UserId <UPN> -OutFile <PhotoPathAndFileName> |

Effortlessly download profile photos for bulk users by creating a CSV file with necessary parameters like photo path and user ID, as we’ve set up before. Then, execute the provided cmdlet by inputting your file location.
|
1 |
Import-Csv <Filelocation> | Foreach { Get-MgUserPhotoContent -UserId $_.UPN -OutFile $_.PhotoPath } |

As part of security compliance auditing in Microsoft 365, administrators may find it necessary to bulk download user profile pictures. This ensures alignment with security protocols and organizational policies, allowing for the identification of discrepancies or unauthorized changes. Use the PowerShell script below to download profile photos for all Office 365 users, specifying the desired photo file path before execution.
|
1 2 3 4 5 6 7 8 9 |
$users = Get-MgUser -All $photoFolderPath = "<FilePath>" foreach ($user in $users) { $userId = $user.UserPrincipalName $photoPath = Join-Path $photoFolderPath "$userId.png" Get-MgUserPhotoContent -UserId $userId -OutFile $photoPath -ErrorAction SilentlyContinue -ErrorVariable Err if ($ERR -ne $null) {Write-Host Photo Not Found for the user $($user.UserPrincipalName)} else {Write-Host Photo Download Successful for the user $($user.UserPrincipalName)} } |
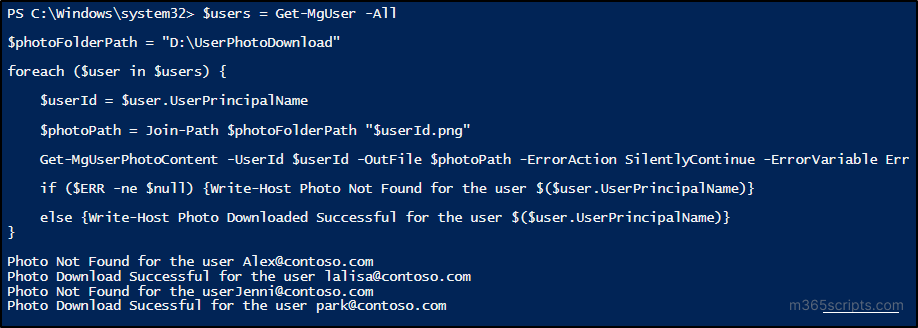
Despite Microsoft providing an option to update the user profile photo in the Microsoft 365 admin center, it doesn’t offer a straightforward way to remove it during user offboarding. In such cases, the “Remove-MgUserPhoto” cmdlet comes in handy. Ensure to enter the user ID in the cmdlet for proper execution.
|
1 |
Remove-MgUserPhoto -UserId <UPN> |

Clear profile photos for multiple Microsoft 365 users using a CSV file. Input your CSV file and execute the below cmdlet to efficiently remove the user profile photos for multiple users.
|
1 |
Import-Csv <Filelocation> | Foreach { Remove-MgUserPhoto -UserId $_.UPN } |


Effortlessly maintain visual uniformity and privacy compliance across Office 365 users by using the below PowerShell script to remove photos in all Azure AD user profiles. The script ensures a standardized look, displaying a “Photo Not Found” message for users without an image, streamlining management while promoting privacy and consistency.
|
1 2 3 4 5 6 7 |
# Get all user profiles $users = Get-MgUser -All foreach ($user in $users) { $userId = $user.UserPrincipalName Remove-MgUserPhoto -UserId $userId -ErrorAction SilentlyContinue -ErrorVariable Err if($ERR -ne $null) { Write-Host Photo Not Found for the user $($user.DisplayName) } } |
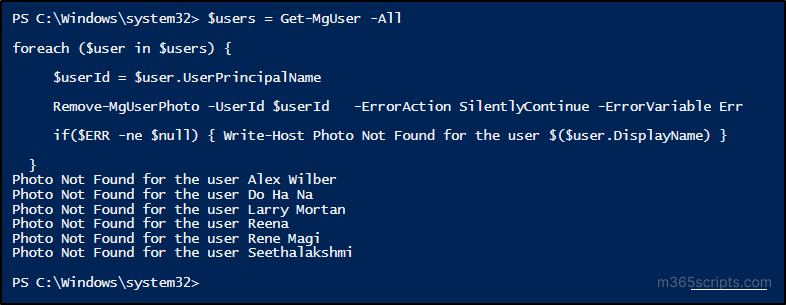
Now easily manage Microsoft 365 group profile photos using MS Graph PowerShell through the following operations.
While managing group profile photos in the Microsoft 365 admin center is unavailable, MS Graph PowerShell provides the capability to handle group profile photos. You can set and manage group profile photos using the “Set-MgGroupPhotoContent” cmdlet. Before executing the cmdlet, ensure to input the GroupID and the correct file name for the photo. Retrieve the GroupID by using the “Get-MgGroup” cmdlet.
|
1 |
Set-MgGroupPhotoContent -GroupId <GroupId> -InFile <inFile> |


Microsoft Graph PowerShell not only facilitates the management of Microsoft 365 group profile photos but also enables bulk operations. Start by creating a CSV file that includes the following columns: GroupName, GroupId, and PhotoPath. The PhotoPath column should contain the file path where the group photos are stored. Ensure your CSV file structure aligns with the provided image.

Once your CSV file is ready, utilize the following PowerShell cmdlet. Make sure to replace the <Filelocation> with the actual location of your CSV file.
|
1 |
Import-Csv <Filelocation> | Foreach { Set-MgGroupPhotoContent -GroupId $_.GroupId –InFile $_.PhotoPath } |

The PowerShell script below assists admins in effectively managing the process of updating Microsoft 365 group profile pictures in their organization. Microsoft Entra group profile photos play a crucial role in aiding users to swiftly discern the purpose of a group within a conversation. This is particularly beneficial in organizations with a large number of groups, enhancing collaboration efficiency. The script utilizes a folder where group names serve as file names for the profile photos. Ensure to specify the correct <FilePath> for seamless execution.
|
1 2 3 4 5 6 7 8 9 10 11 12 13 14 15 |
# Get all user profiles $groups = Get-MgGroup -All $photoFolderPath = "<FilePath>" foreach ($group in $groups) { $groupId = $group.Id $photoPath = Join-Path $photoFolderPath "$($group.DisplayName).png" # Check if the photo file exists if (Test-Path $photoPath -PathType Leaf) { # Update the user's profile photo Set-MgGroupPhotoContent -GroupId $groupId –InFile $photoPath -ErrorAction SilentlyContinue -ErrorVariable Err if($ERR -ne $null) {Write-Host Photo is not found for the group $($group.DisplayName)} } } |
Understanding the dimensions of group profile pictures is vital for a positive user experience, preventing distortion and enhancing overall visual appeal during interactions with groups. To effortlessly retrieve details about a specific group’s profile photo in Microsoft 365, execute the “Get-MgGroupPhoto” cmdlet. This command mirrors the outcomes obtained through the “Get-MgUserPhoto” cmdlet, providing crucial information such as the ID, height, and width of the group profile photo.
|
1 |
Get-MgGroupPhoto -GroupId <GroupId> |

Now, with the “Get-MgGroupPhotoContent” cmdlet, you have the ability to download the group profile photo in Microsoft 365. Make sure to specify the correct location in the “OutFile” parameter where you want to save the downloaded group profile photo.
|
1 |
Get-MgGroupPhotoContent -GroupId <GroupId> -OutFile <PhotoPathAndFileName> |

Streamline the process of downloading Microsoft 365 group profile pictures for multiple groups using the following cmdlet. After entering the Group ID and the desired file name in the PhotoPath column of your CSV file, utilize this cmdlet for efficient photo retrieval.
|
1 |
Import-Csv <Filelocation> | Foreach { Get-MgGroupPhotoContent -GroupId $_.GroupId -OutFile $_.PhotoPath} |

For auditing purposes and to verify that individuals align with organizational policies within specific teams or departments, downloading group profiles becomes crucial. In this context, administrators can utilize the script below to download group profile photos. Be sure to replace “$photoFolderPath” with your preferred file path.
|
1 2 3 4 5 6 7 8 9 |
$groups = Get-MgGroup|?{$_.GroupTypes -eq 'Unified'} $photoFolderPath = "<FilePath>" foreach ($group in $groups) { $groupId = $group.Id $photoPath = Join-Path $photoFolderPath "$($group.DisplayName).png" Get-MgGroupPhotoContent -GroupId $groupId -OutFile $photoPath -ErrorAction SilentlyContinue -ErrorVariable Err if($ERR -ne $null) { Write-Host Photo Not Found for the group $($group.DisplayName) } } |

To remove profile photos from inactive Microsoft 365 groups, use the ‘Remove-MgGroupPhoto’ cmdlet. This enhances user profile management in Microsoft 365. Also, make sure to input the group ID before executing the cmdlet.
|
1 |
Remove-MgGroupPhoto -GroupId <GroupId> |

Take advantage of a CSV file containing the essential GroupID data to efficiently remove profile photos for multiple groups. Execute the following cmdlet after replacing <Filelocation> with your CSV file location to initiate the process.
|
1 |
Import-Csv <Filelocation> | Foreach { Remove-MgGroupPhoto -GroupId $_.GroupId} |

Simplify Microsoft 365 group identity management with our PowerShell script, effortlessly removing all group profile photos for a clean and professional appearance. This operation addresses potential privacy concerns linked to group images. If a group lacks a photo, the script displays a “Photo Not Found” message, streamlining identification of absent or unintended photo deletions.
|
1 2 3 4 5 6 |
$groups = Get-MgGroup -All foreach ($group in $groups) { $groupId = $group.Id Remove-MgGroupPhoto -GroupId $groupId -ErrorAction SilentlyContinue -ErrorVariable Err if($ERR -ne $null) { Write-Host Photo not found for the group $($group.DisplayName) } } |

To sum it up, managing Microsoft 365 user photos just got easier with MS Graph PowerShell. We’ve covered the ins and outs of how to update user photos using MS Graph PowerShell, especially since Exchange Online cmdlets are no longer in the picture. In addition, you can also learn how to manage Microsoft 365 users using MS Graph PowerShell effortlessly. If you have any questions or need help, drop a comment below. We’re here to help you to manage Microsoft 365 user photos using MS Graph PowerShell and ensure smooth user profile management in Microsoft 365.


