Automate PowerShell Script Execution with Task Scheduler
Automate PowerShell script execution using Windows Task Scheduler for unattended administrative tasks. Create scheduled tasks with custom triggers, actions, and conditions to run scripts at specified intervals. Configure task settings for reliable automation of system maintenance and Microsoft 365 management operations.
In a corporate environment, it’s crucial to maintain system hygiene and ensure that unnecessary files, temporary data, and logs are regularly cleaned up. In such situations, manual cleanup can be time-consuming and error-prone. To address concerns like those, IT teams often automate admin tasks using PowerShell scripts. Though the scripts reduce errors, manually executing the scripts every time is tedious and may lead to oversight. To streamline this process, you can schedule PowerShell scripts with Task Scheduler to automate executions.
Now, let’s dive into the process of scheduling PowerShell scripts with the Windows Task Scheduler to save your valuable time!
To automate PowerShell script execution using Task Scheduler, simply follow the steps below based on your specific requirements.
- Create a task in the Task Scheduler
- Set triggers and actions in the Task Scheduler
- Set up the conditions in the Task Scheduler
- Configure Task Scheduler settings
- Manually trigger a task in the Task Scheduler
- Delete scheduled tasks in Windows Task Scheduler
The initial process to schedule PowerShell scripts with Task Scheduler is to create the appropriate task. Before proceeding to run PowerShell script from task scheduler, make sure to save the script in the desired location and note down the location. To create a task in Task Scheduler, follow the steps:
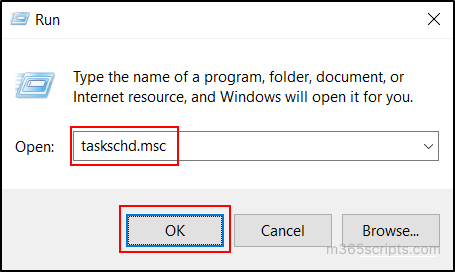
- First, invoke the Task Scheduler by typing ‘Task Scheduler’ in the Windows search bar and hitting Enter. Alternatively, you can also invoke it by pressing the Windows + R keys simultaneously, typing ‘taskschd.msc’, and hitting Enter.
- Within the Task Scheduler, you have the option to select either ‘Create Basic Task’ or ‘Create Task’, depending on your specific needs.
- ‘Create Basic Task’ acts as a step-by-step guide with predefined steps to basic tasks in Task Scheduler.
- The ‘Create Task’ offers flexibility, allowing you to manipulate additional options and customize settings.
Here, I am opting for the ‘Create Task’ option. Select it under the ‘Task Scheduler Library’ category in the ‘Actions’ tab.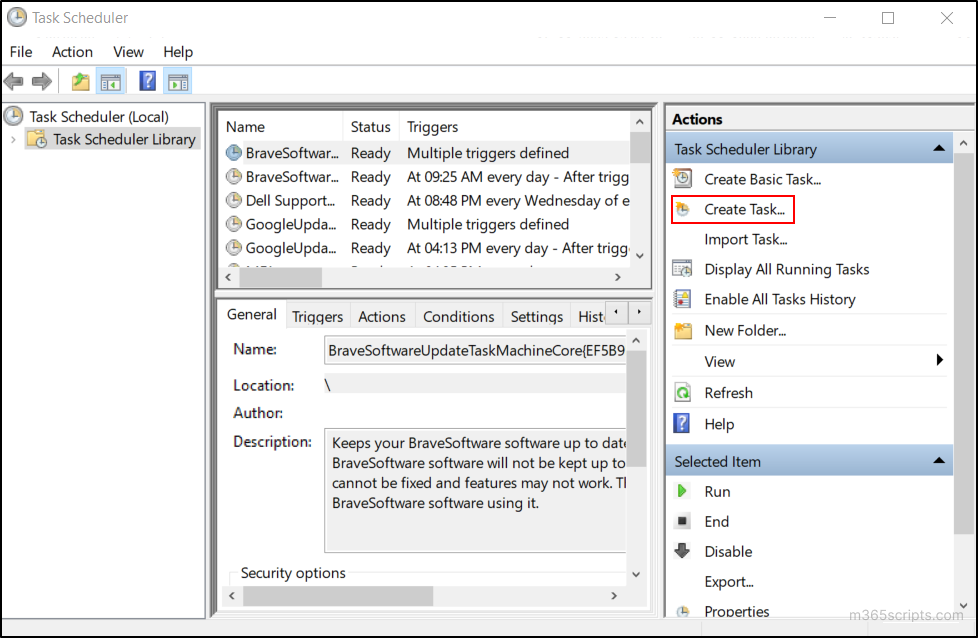
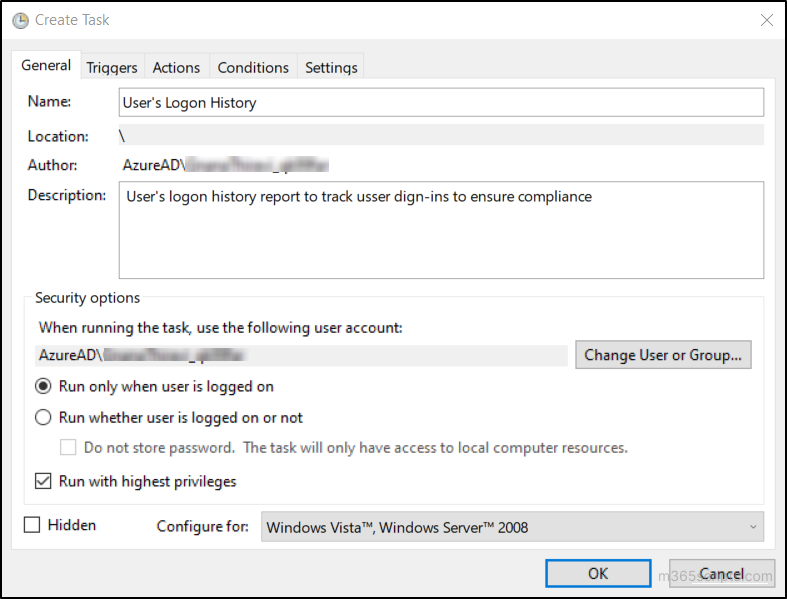
- After selection, the ‘Create Task’ wizard opens. Enter the task name in the ‘Name’ text box and add a description in the ‘Description’ text box.
- Use the ‘Change User or Group’ button to specify the user executing PowerShell scripts with Task Scheduler.
- Specify the condition ‘logged on state’ when the task should be executed.
- Select ‘Run only when the user is logged on’ for interactive tasks.
- Otherwise, choose ‘Run whether the user is logged on or not’ for non-interactive tasks.
- If ‘Run whether the user is logged on or not’ is selected, you may be prompted to supply account credentials, regardless of selecting ‘Do not store password’. If the account is not logged on during task execution, saved credentials will be used.
- If the PowerShell script task requires elevated privileges, select ‘Run with highest privileges’.
- Check the ‘Hidden’ checkbox if you want to hide the task from the list of configured tasks.
After creating the task in the scheduler, you need to specify the conditions that will trigger the tasks and the actions that will occur when your task starts.
- Switch to the ‘Triggers’ tab in the ‘Create Task’ window and select the ‘New’ button. The ‘New Trigger’ window will open.
- In the ‘New Trigger’ window, select the ‘Begin the task’ drop-down menu and specify when to start the task. Here, we typically choose the default option ‘On a schedule’ as we execute the PowerShell script at specific intervals.
- Next, choose the radio button ‘One time’, ‘Daily’, ‘Weekly’, or ‘Monthly’ according to your script’s scenario.
- In the ‘Start’ text box, enter the initial time and date for the script’s first execution.
- Check the ‘Synchronize across time zones’ check box to ensure that scheduled tasks are consistently triggered across different time zones. When this option is selected, the task’s execution time is synchronized with the local time of the computer where the task is set to run. This feature helps maintain consistency, particularly in scenarios where tasks need to run across systems in different time zones.
- Enter the desired time interval for recurrences in the ‘Recur every’ text box, specifying how frequently the task should repeat.
- In the ‘Advanced settings’ section, you can customize additional properties for the task, providing more control over its execution:
- Delay task for up to: This adds a random delay, so the task won’t start at the exact scheduled time.
- Repeat task every: It shows the time interval between each task repetition.
- For a duration of: Specifies how long a task should continue to repeat.
- Stop task if it runs longer than: If the task exceeds the specified time limit, it will automatically stop.
- Expire: After the time specified, the schedule won’t be triggered.
- Synchronize across time zones: As said earlier, here, this option aligns the expiration time with the local time of the computer.
- Enabled: This option ensures that the configured trigger is enabled.

- After that, click on the ‘OK’ button and switch to the ‘Action’ tab, then select ‘New’.
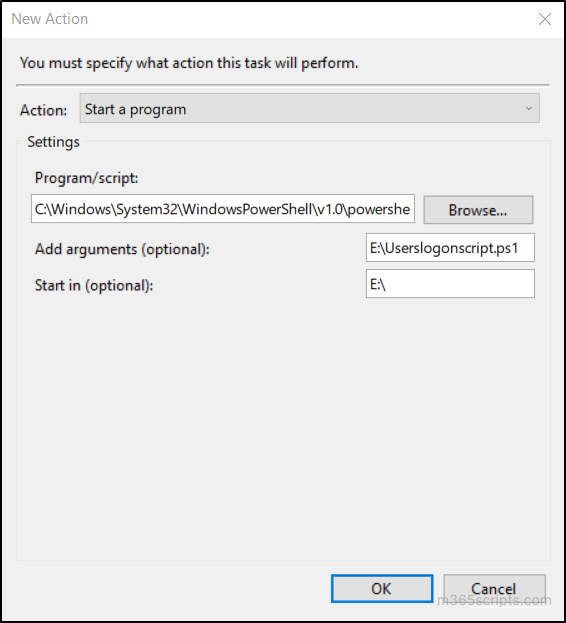
- In the ‘Action’ drop-down, select ‘Start a program’, as this option only allows you to execute a program or script.
- The ‘Program/script’ field requires the location of the application or program that needs to be executed. In our case, we need to select ‘PowerShell.exe’ since PS1 files are executed by this program. So, click the ‘Browse’ button and select ‘PowerShell.exe’ from the following location:
|
1 |
C:\Windows\System32\WindowsPowerShell\v1.0\PowerShell.exe |
- In the ‘Add arguments’ text box, just input the appropriate file location of the script. If you want to run PowerShell script from Task Scheduler with parameters, you can input the parameters with the file path as described here.
|
1 |
ScriptPath -Parameter1 “Value1” -Parameter2 “Value2” |
- In the ‘Start in’ text box, enter the folder path in which the PowerShell scheduled task should begin its execution. It specifies the working directory for the task, providing a context for the task’s execution environment.
- For example, if your PowerShell script relies on certain files or resources in a specific folder, you would set the ‘Start in’ property to the path where those files are located. This ensures that the task can access and utilize the necessary resources seamlessly during execution.
- For example, if your PowerShell script relies on certain files or resources in a specific folder, you would set the ‘Start in’ property to the path where those files are located. This ensures that the task can access and utilize the necessary resources seamlessly during execution.
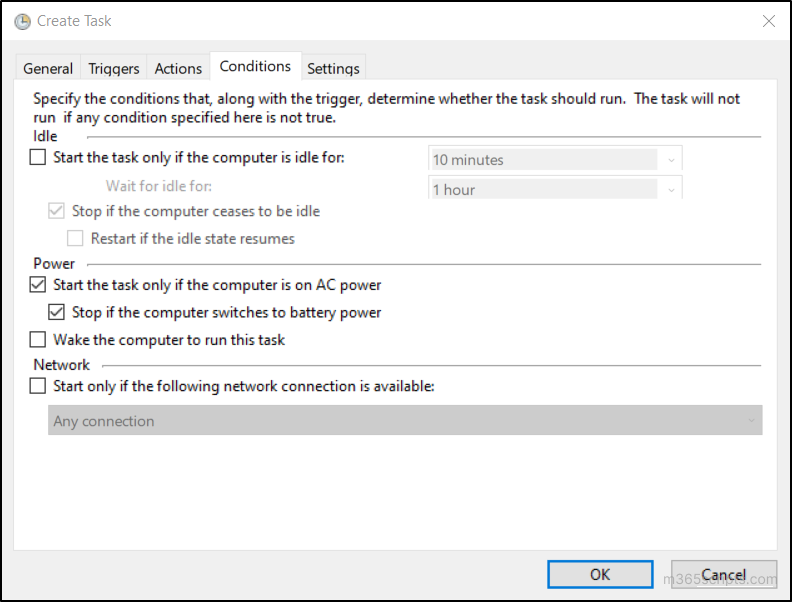
In the next step, you can specify the conditions to schedule PowerShell scripts execution in the Task Scheduler. These conditions are based on idle time, computer power status, or network availability. You can skip these steps if no conditions are needed to trigger the task. To specify conditions in Task Scheduler, just follow the steps:
- Head to the ‘Conditions’ tab in the ‘Create Task’ window.
- Check the ‘Start the task only if the computer is idle for’ checkbox and configure the settings if you want the task to start after the computer has been idle for a specific duration.
- Configure the checkboxes ‘Start the task only if the computer is on AC power’ and ‘Stop if the computer switches to battery power’ based on the time consumption of the task execution and the battery capacity of your machine.
- For tasks to run on a specific network, configure the ‘Start only if the following network connection is available’ option.
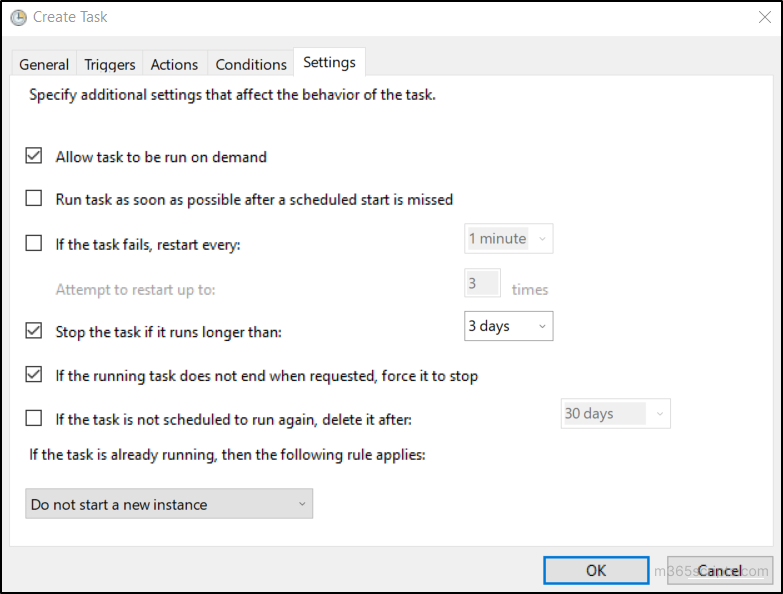
Settings in the PowerShell Task Scheduler offer control and customization options to manage the behavior and execution of tasks.
- Allow the task to run on demand: By default, this setting is enabled in the settings tab. If this setting is turned off, the task cannot be manually executed on demand.
- Run task as soon as possible after a scheduled start is missed: This option enables the task to be executed promptly if the scheduled start is missed, ensuring timely performance even after a delay.
- If the task fails, restart every: Using this setting, you can schedule task restarts every few minutes if it fails. You will also have the option to set the number of restart attempts.
- Stop the task if it runs longer than: This setting allows you to stop the scheduled task if it runs longer than specified days.
- If the running task does not end when requested, force it to stop: This setting enables you to force stop the running task if it doesn’t end when requested.
- If the task is not scheduled to run again, delete it after: This option deletes the task after the specified days if not scheduled for the next execution.
- If the task is already running, then the following rule applies: If the task is already running and the time comes for it to run again, you can choose one of the following options:
- Do not start a new instance – The first instance of the task continues to run.
- Run a new instance in parallel – The first task instance continues to run, and the new task instance also starts.
- Queue a new instance – The new task instance runs after the first task instance is finished.
- Stop the existing instance – The first task instance is stopped, and the new task instance is started.
- Click on the ‘OK’ button to finish the creation of the scheduled task.
Finally, the task will be scheduled, and it will be executed if the trigger occurs, and the conditions are satisfied.
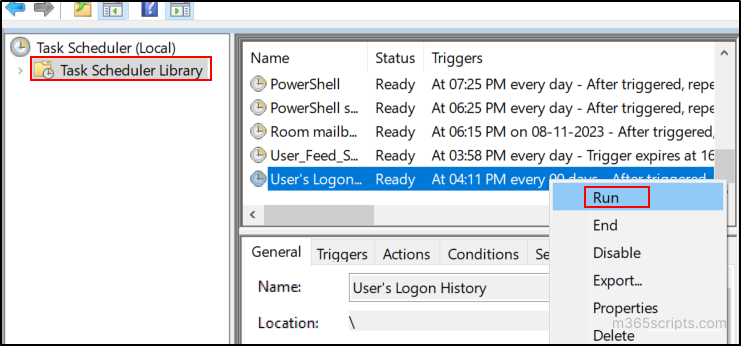
After scheduling the task, you can manually check the execution to ensure the script works fine with the configured settings. The manual trigger may be helpful for task execution before or after any maintenance or updates on your machine. This is also very useful in emergency scenarios when immediate execution of the task is required. To manually execute PowerShell scripts with Task Scheduler on demand, follow the steps below.
- First, open the Task Scheduler.
- Navigate to the ‘Task Scheduler Library’ and locate the PowerShell scheduled task you want to execute.
- Right-click on the respective task and click on ‘Run’.
Note: To manually trigger a hidden task from the Task Scheduler, go to the ‘View’ menu and select ‘Show Hidden Tasks’.
If the automatic execution of the task is no longer needed, you can delete the PowerShell scheduled task from the task scheduler. To delete the task scheduled using the Task Scheduler, follow the steps below.
- First, navigate to the Windows Task Scheduler.
- Find the scheduled task in the list of tasks displayed in the ‘Task Scheduler Library’.
- Right-click on the respective task and click on ‘Delete’.
- In the pop-up window, select the ‘Yes’ button to confirm the task deletion.
Notes:
- To delete the hidden task, go to the ‘View’ menu and select ‘Show Hidden Tasks’.
- If you want to stop the trigger temporarily, you can disable the task. This can be achieved by selecting ‘Disable’ from the right-click options. This setting helps you to enable the task later, instead of task recreation.
While scheduling PowerShell scripts through Task Scheduler is a powerful tool, it’s essential to be aware of its limitations:
Not ideal for an interactive task: If your script requires interaction with the desktop or a user interface, Task Scheduler might not be the ideal choice.
Lacks in error handling: Task Scheduler lacks robust error investigation and handling mechanisms during script execution. For enhanced visibility into errors, outputs, logs, warnings, and job status, you can schedule scripts with Azure Automation to automate cloud-based tasks.
Data security concerns: Any sensitive information related to the task schedule can be viewed by anyone with access to the machine. For example, scheduling a PowerShell Script with parameters that require credential passing may expose those credentials. To avoid exposing credentials passed during task execution, admins should securely store passwords for automated scripts instead of embedding them directly in script parameters.
Closing Lines:
In conclusion, utilizing the Windows Task Scheduler to schedule PowerShell scripts streamlines workflows, enhancing efficiency and reducing manual effort. If you’re a passionate PowerShell enthusiast, you can also create scheduled tasks using PowerShell cmdlets like “New-ScheduledTaskTrigger” and “New-ScheduledTaskAction”.
Whether you’re new to scripting or an experienced user, we’re here to empower your journey. Reach out for any assistance or queries, and let’s seamlessly schedule PowerShell scripts with Task Scheduler!