How To Set Recurring Automatic Replies in Outlook
Set up recurring Out of Office automatic replies in Outlook using Power Automate, Task Scheduler, or Azure Automation. Configure scheduled workflows to enable and disable OOF messages for regular absences like weekly days off when native Microsoft 365 scheduling options are insufficient.
Balancing regular absences with smooth communication is essential for maintaining productivity and professionalism in the workplace. Thankfully, Outlook provides options to set up Out of Office replies and configure work hours and location, helping users collaborate efficiently.
But what if you need to configure Out of Office replies for certain days every week? Unfortunately, Microsoft 365 doesn’t offer a built-in feature for recurring Out of Office replies 😔. This can lead to miscommunication if you forget to configure your replies. That’s why we’ve come up with some effective solutions to help you set up recurring Out of Office replies in Outlook. Let’s dive in!
For those needing recurring Out of Office (OOF) replies for certain dates and times in a week or month (e.g., every Friday), the following ways offer a helpful workaround.
- Schedule Out of Office in Outlook using Power Automate
- Schedule recurring Out of Office message using Task Scheduler
- Set up recurring auto replies using Azure Automation
To ensure consistent Out of Office (OOF) replies, Power Automate offers an efficient and easy solution for users. Power Automate is a tool that automates workflows across apps and services in Microsoft 365. It includes a built-in template that provides the simplest way to configure recurring OOF replies.
Follow these steps to schedule recurring Out of Office replies in Outlook using Power Automate:
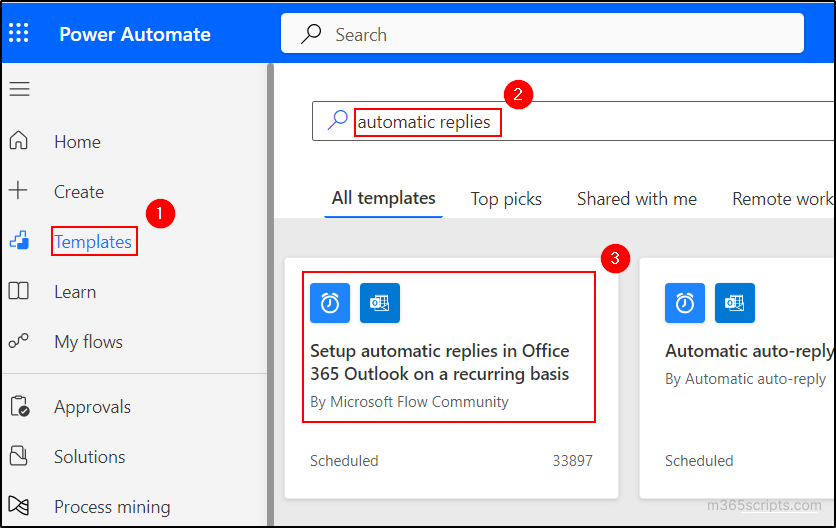
- Sign in to Power Automate and navigate to the Templates tab.
- Search for the keyword “automatic replies” and select the flow named Set up automatic replies in Office 365 Outlook on a recurring basis, provided by the Microsoft Flow community.
- Click on the Sign in option and connect to your Outlook for the necessary permissions. This option won‘t appear if you‘ve already granted Outlook permissions in Power Automate.
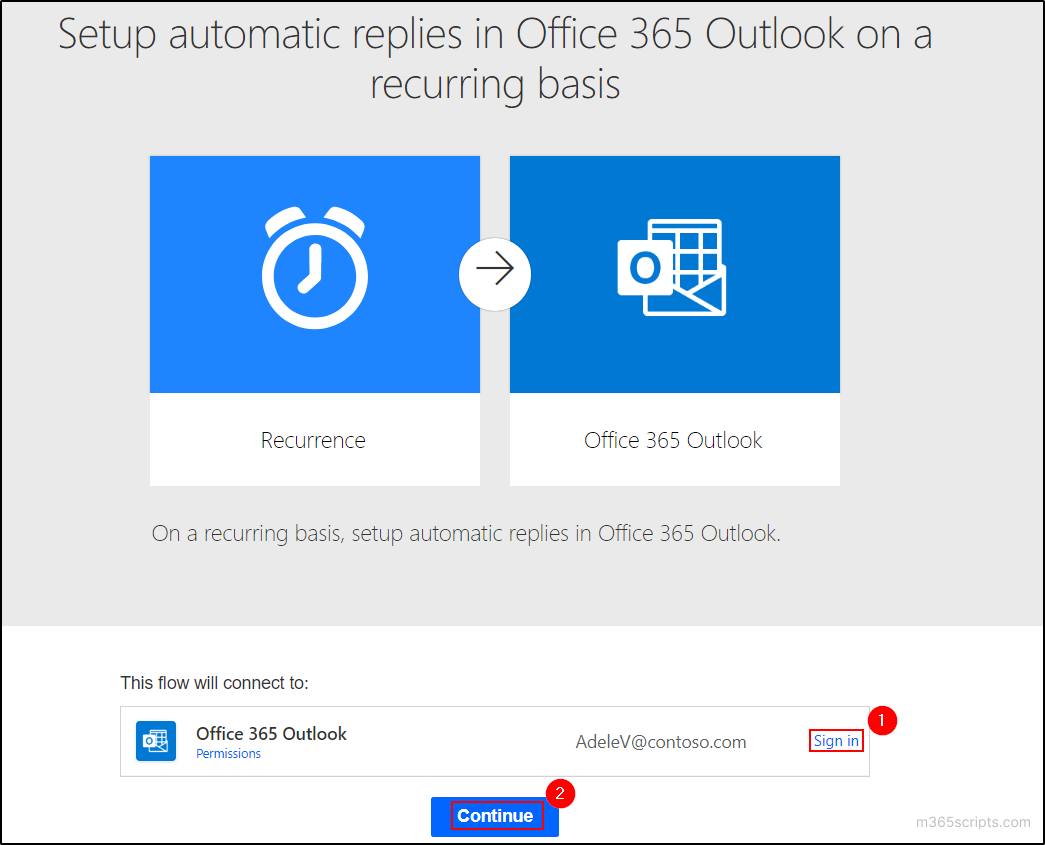
- If you want to configure Out of Office replies for another account, click on the ellipses associated with email address and select the option named Add new connection to get signed in. Then, click the Continue button.
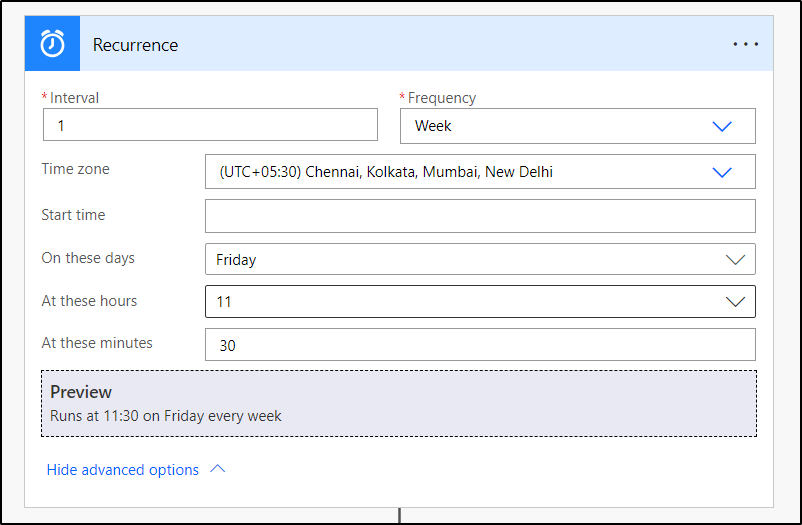
- In the Power Automate recurrence trigger conditions, click Show advanced options.
- Specify the interval, frequency, and time zone for the schedule.
- Based on the frequency you’ve selected; the UI will provide options to input the start time. Fill in the details to specify the trigger start time.
- After configuring the recurrence, you can refer to the Preview section to confirm you’ve correctly configured the trigger time and the interval.
- In the Set up automatic replies action, choose the status as Scheduled.
- Enter the value for the external audience parameter as needed:
- All – Sends OOF to all external users.
- ContactsOnly – Sends OOF to external users saved in contacts.
- None – Does not send OOF to any external users but sends the internal message to internal users.
- Set the Start date expression to the desired date and time when you won‘t be available using the utcNow() function. You can also use additional functions like addMinutes(), addHours(), or addDays() to adjust the start time.
For example, the expression addDays(addHours(addMinutes(utcNow(), 30), 1), 1) will set the start date and time to 1 day, 1 hour, and 30 minutes from the current time.
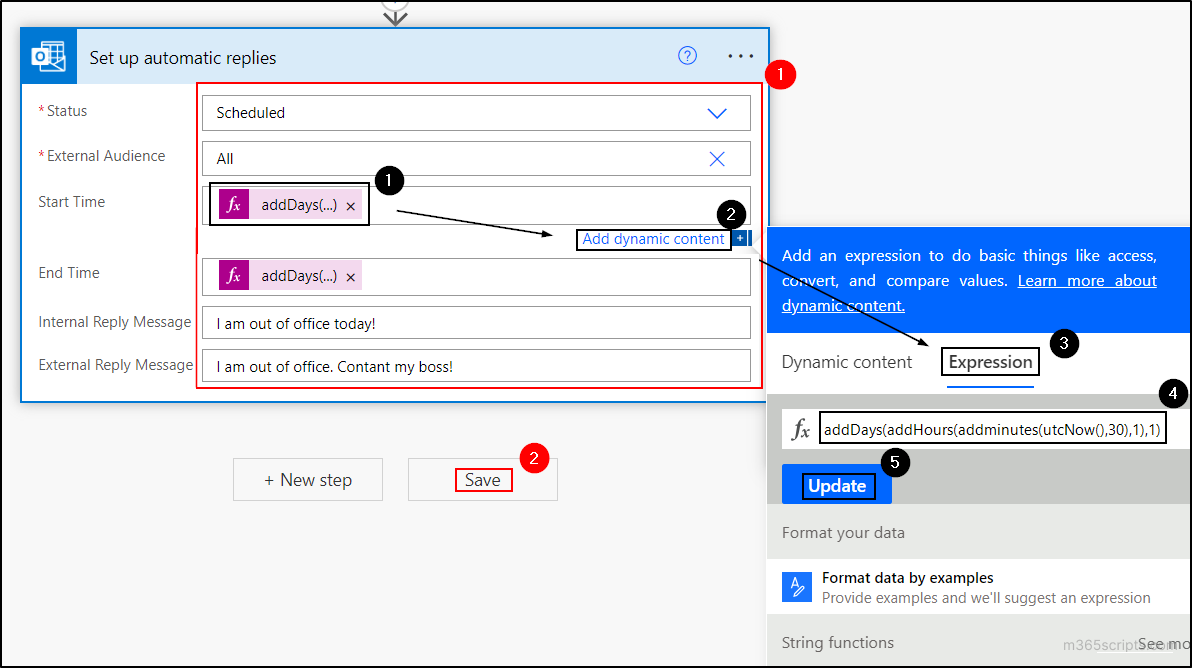
- Similarly, set the expression for the End date.
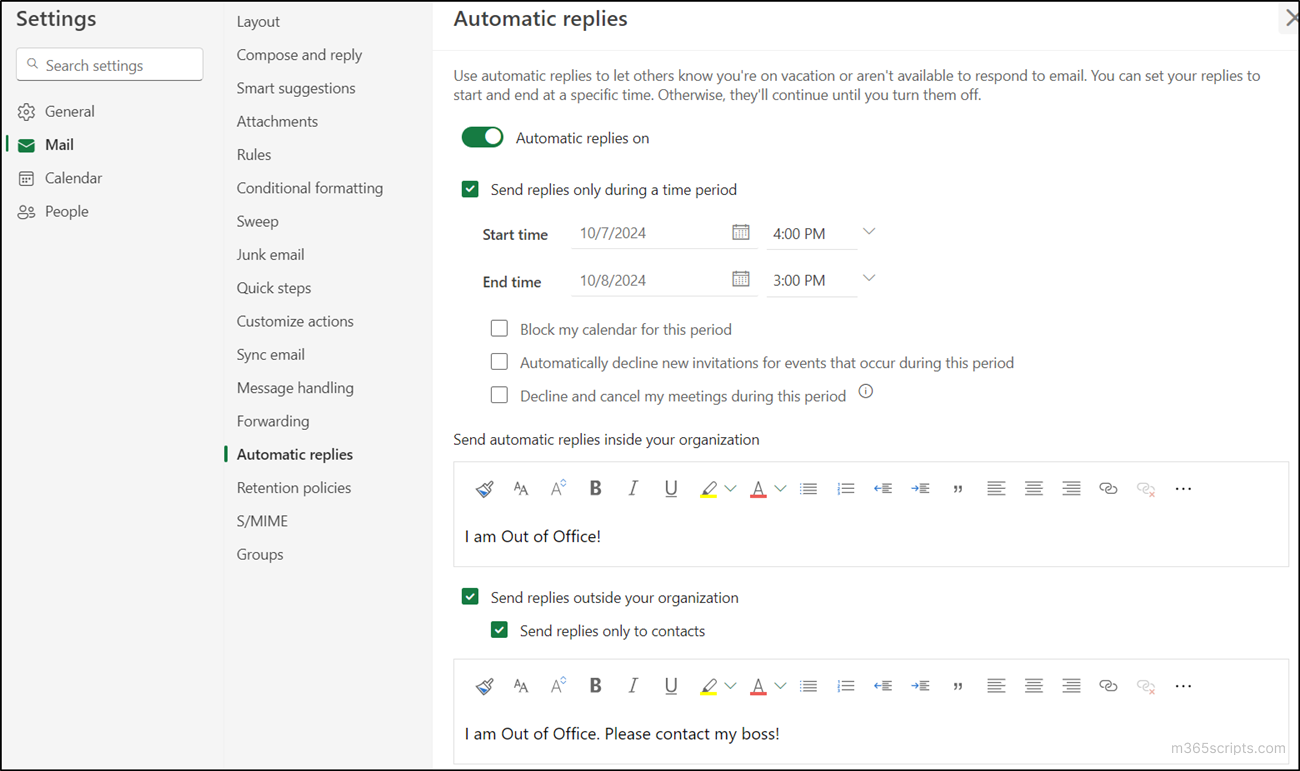
- Enter the Internal reply message and the External reply message.
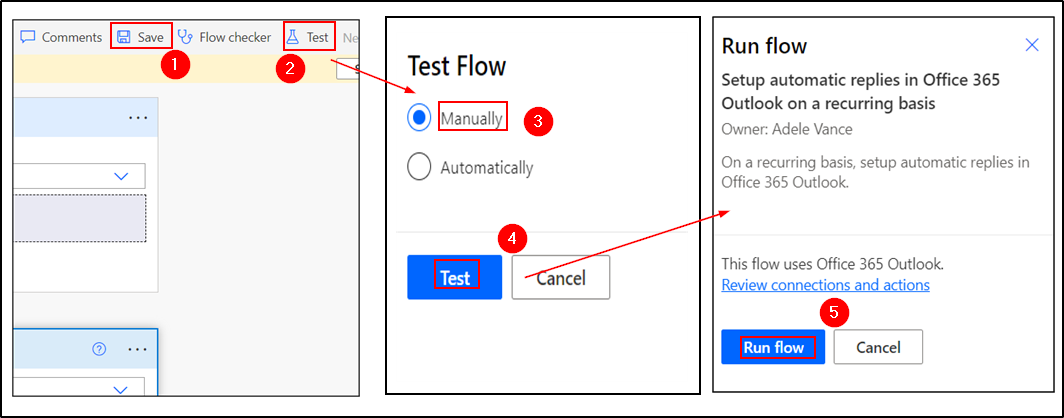
- Save and manually test the Power Automate flow to ensure it is working properly.
Task Scheduler is a built-in Windows tool that automates the execution of tasks or scripts at specific predefined intervals. This tool allows individual users to send OOF replies or for admins to set up recurring Out of Office messages for users in Exchange Online. Here’s a short procedure to set up recurring Out of Office auto reply using Task Scheduler, based on your specified time and day.
Below is the script we’ve prepared to automate the scheduling of recurring Out of Office replies in Outlook using Task Scheduler.
Download Script: SetUpRecurringOOFReplies.ps1
Script Highlights
- The script can be executed using either username/password or certificate-based authentication (CBA).
- It automatically calculates and sets the Out of Office start and end times for the upcoming occurrences based on the provided day and time parameters.
- This script is primarily designed for setting up recurring Out of Office replies with the help of scheduling tools like Windows Task Scheduler or Azure Automation.
- This script allows admins to set up recurring Out of Office replies for themselves or their users, and it also enables users to configure their own recurring OOF replies.
- The external Out of Office message defaults to the internal message if not provided.
- The external audience defaults to “All” if not specified.
Script Execution – Set Up Recurring OOF Replies in Outlook
Before setting up the script in the Task Scheduler, it is highly recommended to execute it manually in your PowerShell environment for a flawless process.
Execute the PowerShell script as outlined below to schedule the Out of Office reply for users as an admin or for yourself as a user.
|
1 |
.\SetUpRecurringOOFReplies.ps1 -Identity '<UserUPN>' -StartDay '<DayName>' -StartTime '<Time>' -EndDay '<DayName>' -EndTime '<Time>' -InternalMessage '<InternalMessage>' -ExternalMessage '<ExternalMessage>' -ExternalAudience '<ExternalAudience>' -UserName '<Admin/UserUPN>' -Password '<Admin/UserPassword> |
Here, replace:
- <UserUPN> with the user’s UPN for whom you need to schedule an OOF reply.
- <DayName> with the name of the start or end date, e.g., Monday.
- <Time> with the start or end time in 24-hour format, e.g., 14:30.
- <InternalMessage> with the content that must be replied to the internal users.
- <ExternalMessage> with the content that must be replied to the external user.
- <ExternalAudience> with ‘All’, ‘Known’, or ‘None’ to reply to all external users, only to external users specified in the Contact list, or not to send replies to any external senders.
- <Admin/UserUPN> with your UPN. If you are an admin configuring OOF replies for another user, replace this with the admin’s UPN.
- <Admin/UserPassword> with your account password. If you are an admin configuring OOF replies for another user, replace this with the admin’s password.
For example:
|
1 |
.\SetUpRecurringOOFReplies.ps1 -Identity '[email protected]' -StartDay 'Monday' -StartTime '16:00' -EndDay 'Tuesday' -EndTime '15:00' -InternalMessage 'I am Out of Office!' -ExternalMessage 'I am Out of Office. Please contact my boss!' -ExternalAudience 'Known' -UserName 'admin.contoso.com' -Password 'ZZxxYY@0011' |
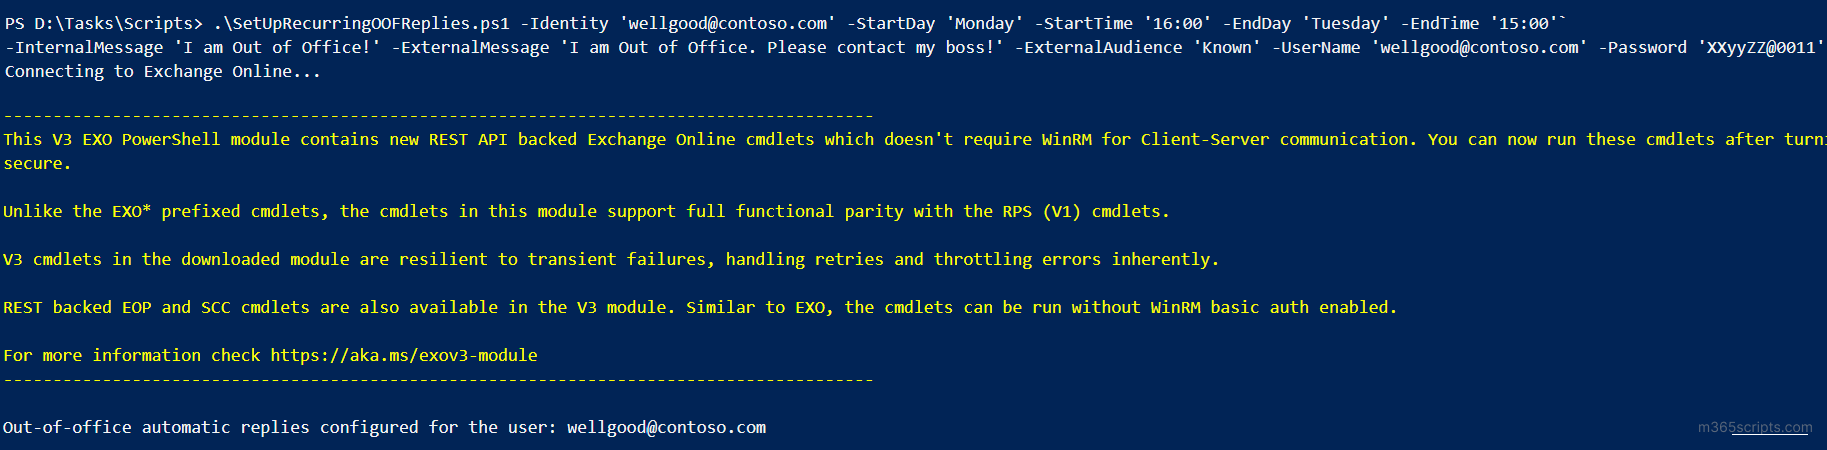
The above execution will schedule an OOF reply for the user ‘wellgood’ starting next Monday at 4:00 PM until the following Tuesday at 3:00 PM.
Note: We have not designed the script to run based on interactive sign-in, as our main aim is to schedule recurring OOF replies using Windows Task Scheduler, where fulfilling sign-in each time is not feasible. Therefore, this script is not suitable for MFA accounts.
However, to address this concern, the script allows admins the ability to run based on certificate-based authentication. To run this script with certificate-based authentication, execute the script as outlined below.
|
1 |
.\SetUpRecurringOOFReplies.ps1 -Identity '<UserUPN>' -StartDay '<DayName>' -StartTime '<Time>' -EndDay '<DayName>' -EndTime '<Time>' -InternalMessage '<InternalMessage>' -ExternalMessage '<ExternalMessage>' -ExternalAudience '<ExternalAudience>' -Organization '<DomainName>'-ClientId '<AppId>' -CertificateThumbprint '<CertThumbPrint>' |
Here, replace:
- <DomainName> with the domain name.
- <AppId> with the Azure AD application that has access to Exchange Online services.
- <CertThumbPrint> with the thumbprint of the respective application’s certificate.
For example:
|
1 |
.\SetUpRecurringOOFReplies.ps1 -Identity '[email protected]' -StartDay 'Monday' -StartTime '16:00' -EndDay 'Tuesday' -EndTime '15:00' -InternalMessage 'I am Out of Office!' -ExternalMessage 'I am Out of Office. Please contact my boss!' -ExternalAudience 'Known' -ClientId '8a6dd7de-2f8d-44c9-bbe3-2ba1d5c221fa' -CertificateThumbprint 'D7D3D8534462F6AACB2A8CD36657AECC1297C036' -Organization 'contoso.onmicrosoft.com' |
If you don’t have the client ID and certificate thumbprint for the above execution, register an application in Microsoft Entra ID with the Exchange Online permissions and add a certificate to it.
Note: If you want to set the external reply the same as the internal reply, you can skip the parameter ‘ExternalReply’. Also, if you skip the parameter ‘ExternalAudience’, replies will be configured for all external users.
Script Scheduling – Set Up Recurring OOF Replies in Outlook
After you try executing the script, run the following snippet to create a scheduled task that runs the OOF script on a recurring basis. You can also automate PS script execution Windows Task Scheduler UI.
|
1 2 3 |
$Time=New-ScheduledTaskTrigger -At '<Time>' -Weekly -DaysOfWeek '<DayOfExecution>' $Action=New-ScheduledTaskAction -Execute PowerShell.exe -WorkingDirectory '<ScriptDirectory>' -Argument “<ScriptExecution>” Register-ScheduledTask -TaskName '<TaskName>' -Trigger $Time -Action $Action |
Replace the placeholders <Time>, <DayOfExecution>, <ScriptDirectory>, <ScriptExecution>, and <TaskName> with the script’s trigger time, trigger day, script path, script execution command with parameters, and task name, respectively.
For example:
|
1 2 3 |
$Time=New-ScheduledTaskTrigger -At '3:01 PM' -Weekly -DaysOfWeek 'Monday' $Action=New-ScheduledTaskAction -Execute 'PowerShell.exe' -WorkingDirectory 'D:\Tasks\scripts' -Argument “D:\Tasks\Scripts\SetUpRecurringOOFReplies.ps1 -Identity '[email protected]' -StartDay 'Monday' -StartTime '16:00' -EndDay 'Tuesday' -EndTime '15:00' -InternalMessage 'I am Out of Office!' -ExternalMessage 'I am Out of Office. Please contact my boss!' -ExternalAudience 'Known' -ClientId '8a6fg6de-2f8d-44c9-bbe3-2ba1d5c330fa' -CertificateThumbprint 'D7D3D8534462F6BBCB2A8CD36657BBGG1297C036' -Organization 'contoso.onmicrosoft.com'” Register-ScheduledTask -TaskName 'Recuring OOF' -Trigger $Time -Action $Action |
This configuration schedules a recurring Out of Office reply for the specified user every week. The Out of Office (OOF) settings will be automatically updated for the upcoming week based on the schedule. You can modify the schedule settings to make the OOF replies recur every month or at any other specified interval.
While the above approach helps admins schedule recurring Out of Office replies for users or allows users to set automatic replies for themselves, what if your organization doesn’t use Windows OS? In such cases, Azure Automation emerges as a lifesaver.
Azure Automation is a cloud-based service by Microsoft that allows admins to manage tasks using runbooks and schedules, enhancing operational efficiency.
Prerequisites: An Azure subscription and a Microsoft Entra ID P1 or P2 license.
Use the PS script provided above and follow the procedure outlined in the blog: schedule PowerShell scripts using Azure Automation.
To recursively schedule the runbook, follow the steps described here.
- Go to the respective Runbook where you imported the PowerShell script and choose the Link to schedule option.
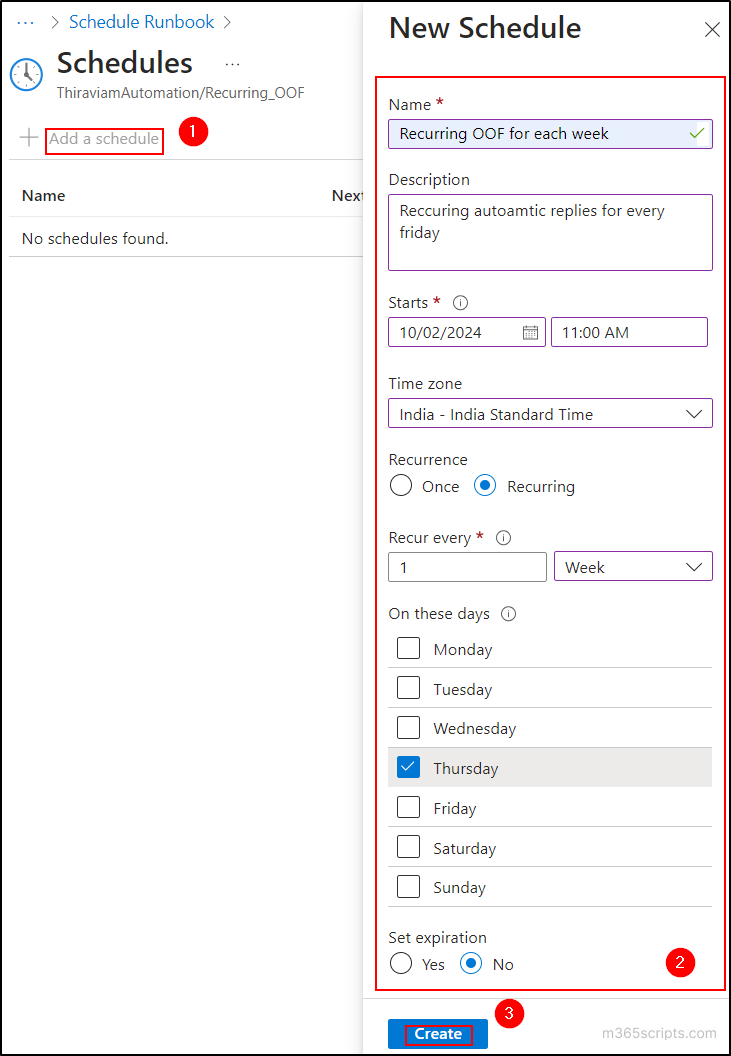
- Select Link a schedule to your Runbook and click Add a schedule.
- Provide a name for the schedule, the start time, and the time zone at which the schedule should be triggered.
- Choose the Recurring radio button under the Recurrence option.
- Configure the recurrence settings, including the specific interval between triggers and the expiration time. Then, click Create.
- Select the Configure parameters and run settings option. Then, input the values for the script parameters, ensuring the timing is based on UTC.
- If you want to set up recurring Out of Office reply only for a certain period, make sure to set the expiration date.
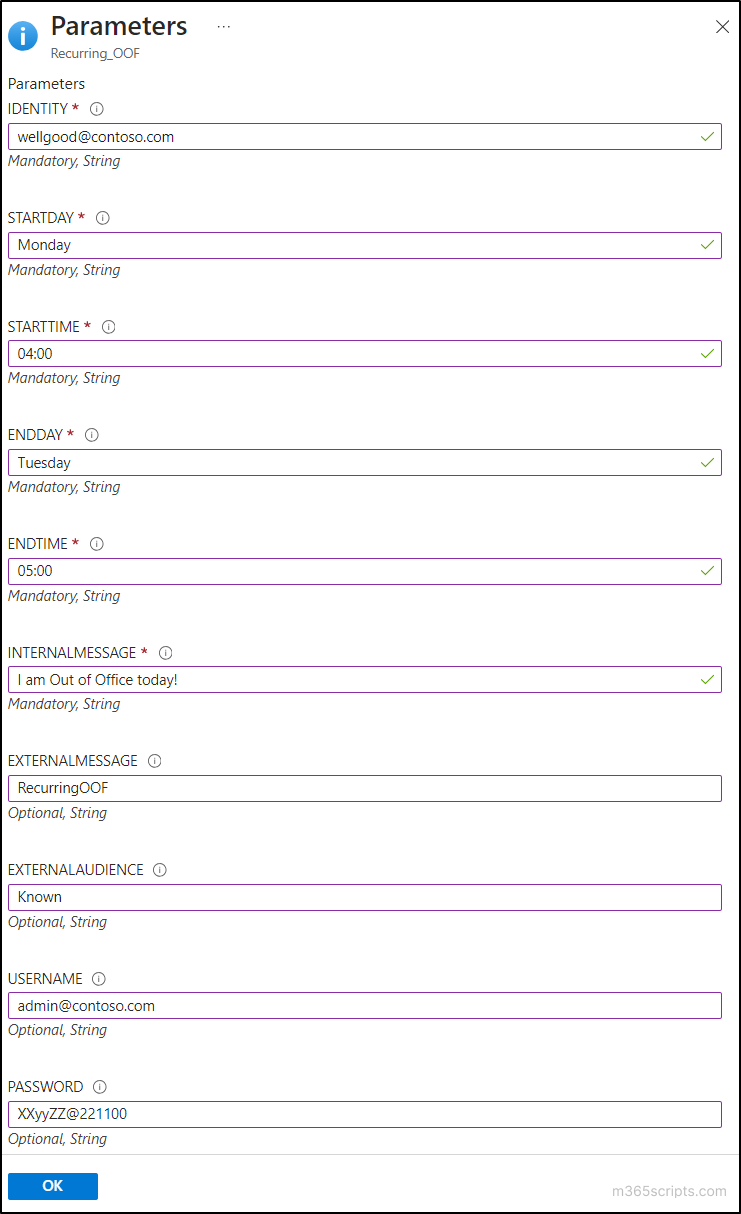
- Finally, click OK to complete the setup of recurring Out of Office replies for Outlook emails.
Points to Remember
- Similar to Power Automate, admins can schedule and run recurring workflows using the recurrence trigger in Azure Logic Apps. This option is ideal for admins who want to configure recurring Out of Office replies for Microsoft 365 users.
- In all the above approaches, we have shown you how to set up recurring Out of Office auto- reply for certain days of the week in Outlook. You can configure recurring Out of Office messages twice a week, twice a month, monthly, or any other frequency based on your needs.
- While scheduling the script using Azure Automation, instead of passing the admin password as a parameter, you can use the credential asset available in the Azure portal. If you choose this method, adjust the PowerShell script to retrieve the Azure Automation’s credential asset and remove the existing password parameter.
- As the above methods only schedule OOF events consecutively, admins can’t view the subsequent when they explore the mailbox auto-reply configuration report.
Further Consideration – Set Recurring Out of Office Events in the Outlook Calendar
Configuring Out of Office automatic replies and setting Out of Office events in the Outlook calendar serve different purposes. The automatic reply feature in Outlook sets your status as ‘Out of Office’ and notifies email senders of your absence, while Out of Office events in the Outlook calendar mark your unavailability for meeting requests and appointments.
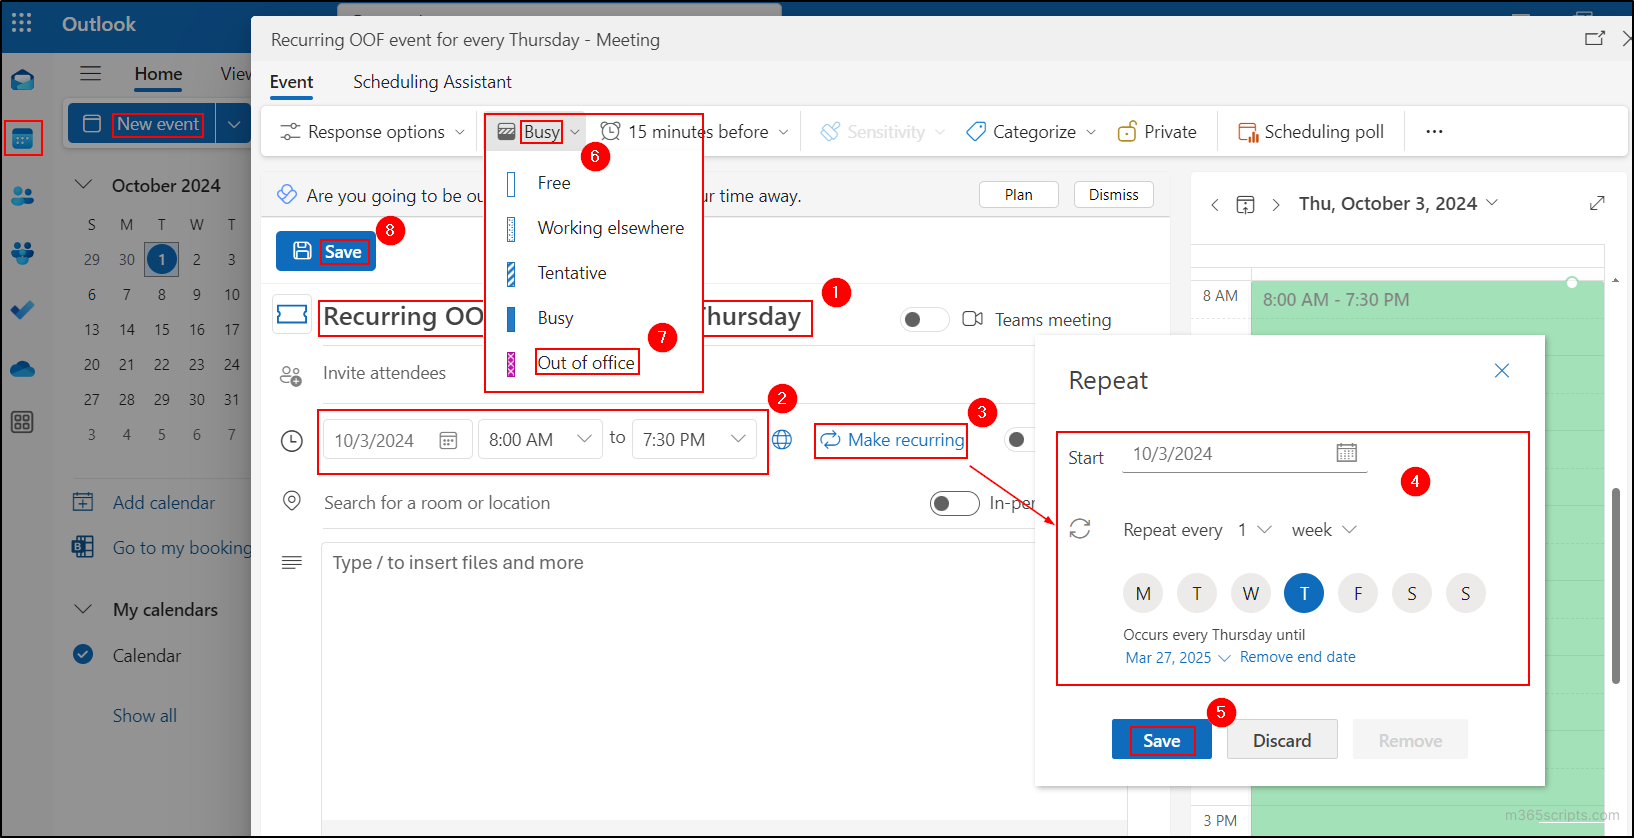
Here’s a step-by-step guide to marking recursively schedule Out of Office without automatic reply via Outlook calendar:
- Log in to your Microsoft 365 Outlook account via any browser.
- In the Calendar (📅) tab, select New event.
- Add a title for the Out of Office (OOF) event, then configure the start and end date & time ranges.
- Click on the Make recurring option, configure the recurrence as per your requirement, and click Save.
- Click the Busy status drop-down and choose Out of Office.
- Hit the Save button to finish setting up recurring meetings in Outlook for Out of Office events.
Overall, I hope this blog provides M365 admins and users with insight into resolving queries like “how to set up automatic Out of Office replies in Outlook every Friday,” “can I set a recurring Out of Office in Outlook,” and other related questions. Stay tuned for more Microsoft 365 technical content! 🚀