How to Encrypt Email Messages with Mail Flow Rules in Exchange Online
Encrypt Exchange Online emails automatically using mail flow rules with Microsoft Purview Message Encryption. Configure transport rules to apply encryption based on recipients, keywords, or sensitivity labels. Protect confidential communications with BYOK support and control over forwarding and printing permissions.
When employees send sensitive data like financial reports or customer records to partners through email, encryption is key to protecting the confidentiality and integrity of data. However, relying on users to manually apply encryption is unreliable and leaves too much room for mistakes. That’s why every organization needs a consistent, automated way to safeguard email communication.
One of the most effective ways to achieve this is to encrypt emails with transport rule in Exchange Online. This approach lets you apply encryption automatically based on specific conditions like recipient type, keywords—helping you minimize the risk without adding administrative overhead.
In this blog, we’ll guide you through setting up mail flow rules for email encryption to ensure secure email communication across your Microsoft 365 environment.
When it comes to securing sensitive emails, admins have multiple encryption options. However, not all approaches offer the same level of usability or consistency.
Traditional methods like S/MIME encryption involve complex certificate management, as each user needs a properly installed and configured digital certificate. These certificates must be distributed and managed continuously. This increases the administrative overhead and reduces efficiency.
Another method to encrypt email messages is Office 365 Message Encryption (OME), which works through mail flow rules. However, it had key limitations like no BYOK support, no control over forwarding or printing, and required recipients to open an HTML file in a browser. Due to these issues, Microsoft deprecated OME on July 1, 2023, and recommends users switch to Microsoft Purview Message Encryption.
Microsoft Purview Message Encryption is a modern solution that also integrates with mail flow rules. It addresses previous limitations by offering enhanced protection features such as support for BYOK, control over forwarding and printing, and a seamless reading experience.
Handy Tip: Beyond encryption, mail flow rules can block emails auto-forwarding to external domains, redirect emails to unlicensed admin, or restricting emails to external addresses—enhancing compliance and consistency across your organization.
Microsoft Purview Message Encryption is built on Azure Rights Management Services (Azure RMS). This is the core technology behind Azure Information Protection, which helps secure emails and documents through encryption and access controls.
To set up Microsoft Purview Message Encryption, Azure RMS must be enabled in your Microsoft 365 tenant.
Microsoft Purview Message Encryption is included by default in the following plans:
- Microsoft 365 E3 and E5
- Office 365 E3 and E5
- Microsoft 365 Business Premium
- Office 365 A1, A3, and A5
- Office 365 Government G3 and G5
You can also receive Microsoft Purview Message Encryption by adding the AIP Plan 1 to the following plans:
- Exchange Online Plan 1 or Plan 2
- Office 365 F3
- Microsoft 365 Business Basic or Standard
- Office 365 Enterprise E1
For most eligible subscriptions, AIP is already activated by default. If it’s not enabled in your subscription, you can check its status and activate AIP using PowerShell.
You can create mail flow rules in two ways to encrypt email messages in Microsoft 365.
- Create a mail flow rule for email encryption in EAC
- Create a mail flow rule to encrypt emails using PowerShell
You can follow the steps below to set up Microsoft Purview Message Encryption through mail flow rules to encrypt email messages.
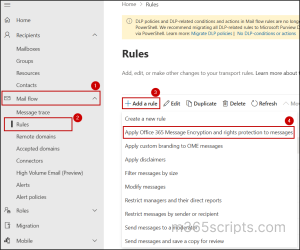
- Sign in to the Exchange admin center.
- Navigate to Mail flow –> Rules.
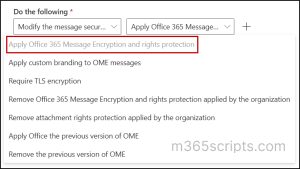
- Click on Add a rule and select Apply Office 365 Message Encryption and rights protection to message.
- Set Mail Flow Rule Conditions
- Name your rule. For example: Encrypt Email Messages.
- Use the dropdowns under ‘Apply this rule if’ to select the appropriate attribute and condition that meet your organization’s requirements.
- Then, click on the edit ✏️option under ‘Do the following’. In the select RMS template flyout pane, select the template you want to use from the pull-down menu.
- Then, click Save and select Next.

Tip: You can use the ‘Except if’ field to exclude certain emails from this rule based on specific conditions.
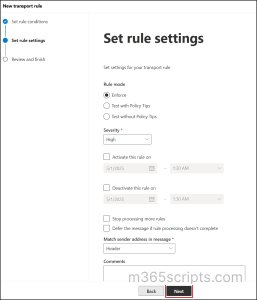
- Set Mail Flow Rule Settings
- By default, the rule mode is set as Enforce. If required, you can change it to test with or without policy tips to test rules without affecting the delivery of the message.
- Click on the ‘Severity’ dropdown and choose the desired option.
- If you want to set the time range to apply rule, use the Activate this rule on and Deactivate this rule on checkboxes to define the start and end date.
- Leave the ‘Match sender address’ in message as Header and click Next.
- Review the policy conditions & settings and click Finish to create an Exchange Online mail flow rule.
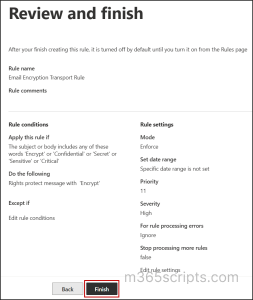
- Once the mail flow rule has been created, click Done.
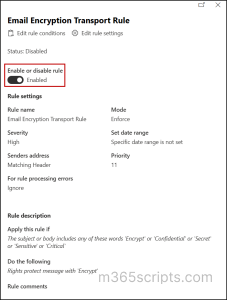
Note: After the rule is created, it remains disabled by default. To activate it, simply click on the rule and turn on the toggle switch as shown below.
To create a mail flow rule to encrypt email messages using Exchange Online PowerShell, follow the steps below.
- Connect to Exchange Online PowerShell and run the below cmdlet to create a transport rule that encrypts emails in your organization.
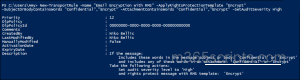
1New-TransportRule -Name "<RuleName>" -ApplyRightsProtectionTemplate "Encrypt" -SubjectOrBodyContainsWords "Confidential","Encrypt" -AttachmentContainsWords "Confidential","Encrypt" -SetAuditSeverity High
This cmdlet creates a mail flow rule for encrypting emails that contain “Encrypt” or “Confidential” word in the subject, body, or attachment.
You can also create mail flow rules with different or even more conditions that suits your organization’s requirement using New-TransportRule cmdlet. This could include encrypting emails sent from specific users, blocking messages for specific users, etc.
Note: Transport rules created using PowerShell will be enabled automatically.
Instead of creating a new rule from scratch, you can make a few changes in the existing mail flow rules and use them for encrypting email messages.
- In the EAC mail flow rules page, select the rule you want to modify and click Edit.
- Next, modify the attributes and conditions under ‘Apply this rule if’ based on your requirement.
- Under Do the following, select Modify the message security > Apply Office 365 Message Encryption and rights protection.
- Select an RMS template from the list and click Save.
- Configure all other settings as per your requirements, then click Save. Once the mail flow rule is updated, click Done.
You can also modify the existing mail flow rule to set up Message Encryption using PowerShell.
To update an existing mail flow rule, use the Set-TransportRule as follows.
|
1 |
Set-TransportRule -Identity "<ExistingRuleName>" -ApplyRightsProtectionTemplate "Encrypt" -SubjectOrBodyContainsWords "Confidential","Encrypt" -AttachmentContainsWords "Confidential","Encrypt" -SetAuditSeverity High |
This cmdlet updates the existing mail flow rule to encrypt emails that contain “Encrypt” or “Confidential” in the subject, body, or attachment.
Not only can you encrypt emails with transport rule, but you can also use the same approach to remove encryption from internal or reply messages.
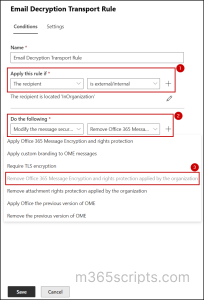
- In the Set rule conditions section, name your rule. For ex. Remove Encryption from Emails.
- Under ‘Apply this rule if’, choose when to remove encryption.
- In Do the following, select Modify the message security > Remove Office 365 Message Encryption and rights protection applied by the organization.
- Finally, verify the configurations, save the rule, and enable it to view rule in action.
Note:
You cannot decrypt messages that were encrypted by senders outside your organization.
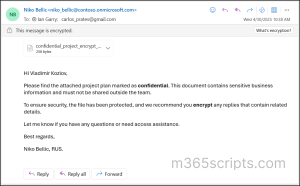
The experience of viewing encrypted emails varies depending on the email client used. Users accessing encrypted messages through Outlook desktop, Outlook Mac, Outlook mobile on iOS and Android, and Outlook on the web will receive a native, first-class reading experience, even if they are outside the same organization, as shown in the image below.
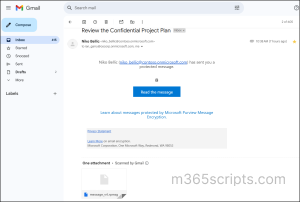
However, recipients using Outlook for Mac or third-party services like Gmail, Yahoo, ProtonMail will receive a wrapper email with a Read the message button. To decrypt the mail, they can either sign in with the account the email was shared with or use a one-time passcode sent to that same email.
We hope this blog helped you understand how to configure transport rules to automatically encrypt emails in Outlook. By encrypting mails based on conditions like keywords or recipient domains, you can ensure sensitive information is always protected. Try creating a rule that fits your needs and see how it strengthens your email security. Let us know how it worked for you in the comments!


