
How to Create and Manage Inbox Rules for Shared Mailboxes in Outlook
Shared mailboxes support collaboration, but high email volume can be overwhelming. Organizing emails with inbox rules helps teams manage this more efficiently and reduce manual effort. This blog explains how to create, configure, and manage inbox rules for shared mailboxes, including common scenarios like auto-sorting emails, anti-spam cleanup, etc.
Shared mailboxes in Microsoft 365 play a key role for teams like support, finance, and HR by enabling multiple users to manage a single inbox efficiently. However, as messages pile up from different senders with attachments, requests, and follow-ups, it doesn’t take long for a shared mailbox to become cluttered and hard to manage. This is where inbox rules in Outlook help bring structure.
Inbox rules apply predefined actions to incoming emails based on set conditions, allowing the mailbox to process messages automatically instead of relying on manual sorting.
In this blog, we’ll walk through how to create and manage inbox rules for shared mailboxes. Let’s dive in.
An inbox rule is a set of instructions in Outlook that tells the mailbox how to handle incoming email messages automatically. When an email matches the conditions you define, Outlook performs the specified action without any manual intervention.
Inbox rules can be used to route emails based on sender, subject, keywords, attachments, etc. They can be used to move messages into the correct folders, mark important emails, forward specific messages to the right team members, and more.
📝 Note: Inbox rules operate at the mailbox level, applying only to that user or shared mailbox. This is different from transport (mail flow) rules, which are organization-wide rules managed by administrators in Exchange Online and apply to all emails passing through the system.
Since shared mailboxes are accessed by multiple people, inbox rules help handle common real-world situations, such as:
- High-Volume Senders: Automatically move system alerts, newsletters, or vendor notifications into separate folders.
- Department-Specific Requests: Route emails with keywords like invoice, leave, or support to the correct team folder.
- Prioritize Important Messages: Automatically forward emails from managers, clients, or executives while moving non-urgent or low-priority messages to separate folders.
- Avoid Missing Critical Emails: Keep important messages on track by automatically routing them to the right folder or person.
To create or manage inbox rules for a shared mailbox, you must meet the following requirements:
- You must have Full Access permissions to the shared mailbox. You cannot create rules for a mailbox if you only have Send As or Send on Behalf permissions.
- The shared mailbox must be added to your Outlook desktop app or Outlook on the web (OWA).
Before creating inbox rules, you must first add the shared mailbox to Outlook. You can open the shared mailbox using:
To access a shared mailbox from Outlook on the web, follow the steps below:
- Sign in to your Outlook account.
- Click your profile picture (top-right corner).
- Select Open another mailbox.
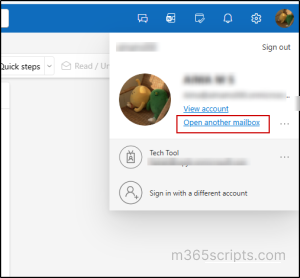
4. Enter the shared mailbox email address and click Open.
The shared mailbox opens in a new tab.
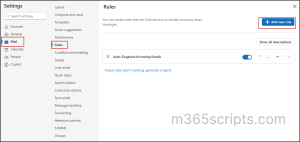
To set up rules for a shared mailbox using Outlook on the web:
- Click Settings (⚙️) in the top-right corner.
- Navigate to Mail → Rules.
- Click ‘Add new rule’ and configure it as needed.
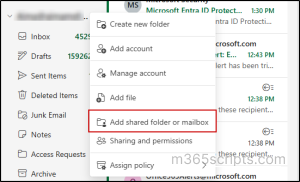
Follow these steps to access a shared mailbox in the Outlook desktop app:
- Open the Outlook desktop app.
- In the left navigation, click the three dots next to your primary account.
- Select Add shared folder or mailbox.
- Enter the shared mailbox email address and click Continue.
Now, to create inbox rules for a shared mailbox in Outlook desktop:
- Go to Settings (⚙️) → Mail → Rules → Your rules for.
- From the dropdown, select the shared mailbox.
- Start creating and configuring rules for the mailbox as needed.
Client-side vs Server-side Rules
Rules created in Outlook desktop are called client-side rules.
- They run only when your Outlook app is open.
- If your PC is off or Outlook is closed, the rule will not run.
Rules created in Outlook on the web are server-side rules.
- They run on Microsoft servers.
- They work 24/7—even when you’re offline.
Recommendation: Always create rules from Outlook on the web (server-side rules) for shared mailboxes.
Here are some of the most common inbox rule scenarios that help keep your shared mailbox organized and ensure important emails are handled efficiently.
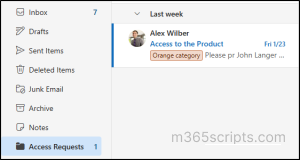
A shared mailbox receives different types of emails, such as invoices, access requests, support queries, and project-related updates. When all of these land in the same inbox, team members spend time manually identifying and moving emails before taking action.
Auto-sorting rules automatically move emails into the correct folders based on keywords in the subject or body, allowing teams to quickly find, prioritize, and respond to emails without manual sorting.
To configure this rule,
- Click ‘Add new rule’.
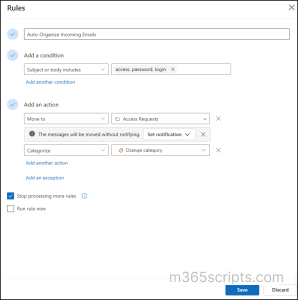
- Enter a Rule name.
- Under Add a condition, select ‘Subject or body includes.’
- Enter your keywords (one by one).
- Under Add an action, choose Move to → select a folder. You can also create a new folder if needed.
➡️ By default, messages are moved silently without any notification. You can choose to get notified by enabling a desktop alert or playing a sound.
6. If there are exceptions (for example, certain senders or subjects to ignore), you can add them under ‘Add an exception’.
7. Add a category as a second action if required.
Below the configuration, you’ll see two important options for every rule you create:
- Stop processing more rules: This ensures that once this rule is applied, other rules are not processed on the same email. For example, you may have one rule that moves emails containing the keyword “access” to a folder, and another rule that deletes emails with attachments. Without this option, an email that contains “access” keyword and has an attachment might be deleted. Enabling Stop processing more rules prevents such conflicts.
💡Tip: Rules are applied top to bottom, so even if Stop processing more rules is unchecked, you can control which rules run first by adjusting the priority order of rules.
- Run rule now: By default, rules only apply to emails received after the rule is created. If you want the rule to apply to existing emails in the mailbox, enable Run rule now.
8. Click Save.
Emails containing those keywords will now be automatically moved to the chosen folder and categorized accordingly.
A shared mailbox like support@ receives emails from VIP clients, internal management, or urgent requests that need immediate attention by specific team members. Without automation, team members must manually identify these emails and forward them, which can cause delays or missed messages.
To avoid such things, you can configure an inbox rule that automatically forwards or redirects these important emails to the right person or team, ensuring timely action.
To configure this rule,
- Click Add a new rule.
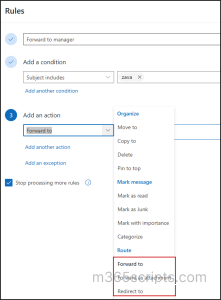
- Add a condition (sender, keywords, etc.).
- Under Add an action, go to Route and choose one of the following based on your requirements:
- Forward to sends a copy of the email to another email, while the original email stays in the shared mailbox. The recipient does not see the original sender. Instead, the shared mailbox appears in the From field.
- Forward as attachment sends the email as an attached file (.eml). When the recipient opens the attachment, the original sender, recipients, subject, and full email details are visible. The email also remains in the shared mailbox.
- Redirect to sends the email directly to the specified person and removes it from the shared mailbox. The recipient sees the original sender, not the shared mailbox, making it appear as if the email was originally sent to them.
Once the rule is configured, all matching emails will be automatically forwarded or redirected according to your settings.
3. Anti-Spam / Bulk Cleaning: A shared mailbox like support@ or info@ keeps getting newsletters, promo emails, and sales pitches that distract agents from real customer queries.
Action to use: Mark as Junk or Move to folder (Avoid delete unless you’re 100% sure — moving keeps a safety net.)
4. VIP / Domain Routing: Emails from important clients (for example, @top-client.com) must be noticed immediately, even during peak hours.
Action to use: Pin to top (Optionally combine with Move to folder → VIP if the mailbox is very busy.)
5. Incident / Outage Management: When an incident occurs, you can use the Received before/after a specific date condition to group all related emails in one folder, making tracking and resolution faster.
Similarly, you can combine the available conditions and actions to create various rules based on your needs and keep shared mailboxes organized, focused, and easier to manage at scale.
Once inbox rules are created, you can edit, delete, reorder, or disable them at any time.
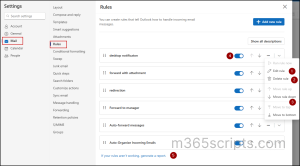
To manage inbox rules, go to Settings → Mail → Rules, where you’ll see the list of rules configured for the shared mailbox.
From there, you can perform the following actions:
- Edit rule: Update the rule name, conditions, or actions as requirements change.
- Delete rule: Permanently remove a rule if it’s no longer needed.
- Move rule up / down (Rule reordering): Changes the order in which inbox rules run. Rules are processed from top to bottom, so the rule placed higher runs first. This helps avoid conflicts—for example, ensuring important rules (like VIP or incident-related rules) run before general cleanup rules.
- Disable rule: Temporarily stop a rule from running without deleting it. This is useful when you want to pause automation without losing your settings.
- Generate inbox rule report: Use this option to generate a diagnostic report, which is sent to your inbox. The report helps identify rules that are not working and explains why they may fail.
Note: You can also create and manage inbox rules in Outlook using PowerShell.
- Inbox rules apply only to incoming emails, not outgoing messages.
- There’s no limit on the number of rules a user can create.
- Rules are processed from top to bottom, so the order matters.
- Inbox rules in Outlook have a total size limit of 256 KB. Each rule consumes space in your mailbox depending on its complexity, such as the length of its name and the number of conditions applied.
- By default, rules only apply to new emails; use “Run rule now” to apply them to existing messages.
- Inbox rules are mailbox-specific; they don’t affect other users’ mailboxes unless configured there.
That’s a wrap on shared mailbox rules. We hope this blog has given you a clear understanding of how to use inbox rules effectively for shared mailboxes. Thanks for reading. For more queries, feel free to reach out to us through the comments section.


