
How to Connect a Team Site to a Microsoft 365 Group
Standalone SharePoint team sites are often used for simple content management. But when organizations need more room for collaboration, these standalone sites reach their limits. By connecting them to Microsoft 365 Groups, organizations can introduce modern collaboration capabilities without migrating data. This guide walks through how to connect and the impact of this transformation.
Imagine you have created a classic team site in SharePoint Online, as well-structure space where your team, stores and collaborates on documents. As the project scales, new demands for collaboration and requirements begin to arise. Team members need to schedule meetings, manage tasks, maintain ongoing conversations, and collaborate in real time. This naturally involves using tools such as shared calendars and mailboxes in Exchange Online, task management through Planner, and chat-based collaboration via Microsoft Teams.
This is where Microsoft 365 group becomes essential. By connecting your existing SharePoint team site to a Microsoft 365 Group, you unify these capabilities into a single, connected workspace while preserving your site’s structure, content, and permissions. In this blog, we’ll walk through how to modernize your site and elevate your collaboration experience.
Modernizing a team site without a Microsoft 365 group allows organizations to extend the capabilities of their current sites while aligning them with modern Microsoft 365 standards.
Here’s why this approach makes sense:
- Integrated collaboration services: No content migration required, as all existing files, lists, and libraries remain in place, with Microsoft 365 Group capabilities layered on top of the site instead of rebuilding or moving data.
- Simplified access management – Membership is managed at the group level. Adding users to the Microsoft 365 group automatically grants them access to the connected SharePoint site, reducing the need for separate permission management.
- Modern capabilities and performance improvements: Once connected, the classic site adopts the behavior and capabilities of a modern group-connected team site, benefitting:
- Responsive design that works seamlessly across devices without customizations.
- Native features such as news, quick links, and activity feeds.
- Faster site creation compared to classic team sites.
- Modern lists and libraries with support for Power Automate and Power Apps.
- Improved page editing experience.
- Enhanced site contents page with usage insights.
Before connecting team sites to Microsoft 365 groups, it is essential to first identify which sites are still operating as standalone SharePoint sites. To identify a team site without a group, you can use either the SharePoint Admin Center or PowerShell, depending on the scale of your environment.
Get Team Site Without a Group Using SharePoint Admin Center (UI Method)
The easiest way to visually identify these sites is through the Active Sites page in the SharePoint admin center. This approach is suitable for quick checks or smaller environments.
- Open the SharePoint admin center.
- Navigate to Sites ➜ Active Sites.
- Click on the Standard view and then select Sites without a group.
- Go to Template column and click the dropdown ➜ Filter by Template ➜ Team site (no Microsoft 365 Group).
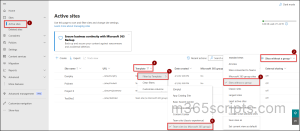
Note: This filter is based on how the site was originally created. It shows sites that were created as Team sites without a Microsoft 365 Group. However, sites that were recently connected to a Microsoft 365 Group may still appear in this list, as it can take some time for the changes to be reflected in the filter results.
Export team site without a Microsoft 365 group using PowerShell
In the UI, admins often have to dig through filters and click through multiple steps just to find standalone team sites. PowerShell takes away that hassle by exporting the data directly. In large environments, that same list can be reused to bulk‑connect sites to Microsoft 365 Groups, streamlining modernization across hundreds or even thousands of sites in one go.
Before continuing, establish a connection to the PnP PowerShell module.
|
1 2 3 4 5 6 7 8 9 10 11 12 13 14 15 |
# Connect to your tenant Connect-PnPOnline -Url "https://yourtenant-admin.sharepoint.com" -Interactive # Filter for modern team sites (STS#3) or classic team sites (STS#0) that have no group Get-PnPTenantSite -Detailed | Where-Object { $_.Template -like "STS*" -and $_.GroupId -eq [Guid]::Empty } | Select @{Name="SiteUrl"; Expression={$_.Url}}, @{Name="SiteName"; Expression={$_.Title}} | Export-Csv -Path "C:\Temp\SitesWithoutGroup.csv" -NoTypeInformation |
Output:

This method ensures accuracy by directly checking the GroupId property of every team site. If the value is empty, it confirms the site isn’t connected to a Microsoft 365 Group, and the results are exported in a csv file.
Microsoft provides two supported ways to connect a standalone team site to a Microsoft 365 group: the SharePoint interface or using the PowerShell.
- Modernize SharePoint team sites without Microsoft 365 groups
- Connect team sites to Microsoft 365 groups using PowerShell
Permissions Required to Connect a SharePoint Site to a New Microsoft 365 Group
The following are the prerequisites to connect a SharePoint team site to a Microsoft 365 Group:
- You must be a site collection administrator or a SharePoint/Global administrator.
- The “Connect to new Microsoft 365 group” option is available by default for site collection admins. If the option is not visible, verify that it is enabled in the classic SharePoint admin center:
SharePoint admin center → Settings → Classic Settings Page → Connections from sites to Microsoft 365 groups → Allow site collection administrators to connect sites to new Microsoft 365 groups.

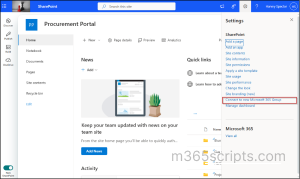
Microsoft provides a built-in option in SharePoint to modernize classic team sites by connecting them to a new Microsoft 365 group, enabling them to fully leverage the modern user interface.
- Navigate to standalone team site.
- Click the Settings icon in the top-right corner of the page.
- Click on Connect to new Microsoft 365 Group.
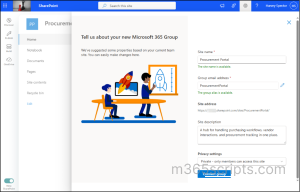
- Select Let’s get started.
- The wizard will prompt you to provide a Site name, Group email address, Site description, and a Privacy settings (Public or Private). Fill in the details that match your team’s requirements.
- Click Connect group to complete the process. The connection is made immediately.
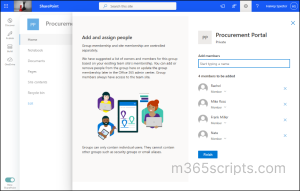
- Then, in the next page you can add members to the Microsoft 365 group connected team site.
- Once done, click Finish.
Important Considerations:
- The ‘Connect to New Microsoft 365 group’ option is available only on standalone team sites. It does not appear on Communication sites or group-connected subsites, as they cannot be connected to a Microsoft 365 group. Additionally, if the team sSite is already connected to a Microsoft 365 group, this option will no longer be visible.
- There is no supported way to connect a team site to an existing group. Each connection results in a brand-new group.
- Also, the main root site in SharePoint Online of your tenant cannot be connected to a Microsoft 365 group.
- ⚠️Once a site is connected to a Microsoft 365 group, the change is irreversible and it cannot be disconnected.
The above-mentioned UI approach is particularly suitable for single site transformations or scenarios where administrative oversight is required during each step. However, its manual nature makes it less suitable for environments where multiple sites need to be transformed at scale. Here, PowerShell becomes a far more scalable and controlled approach.
To connect an existing team Site to a new Microsoft 365 group, use the Add-PnPMicrosoft365GroupToSite PowerShell cmdlet as shown below:
|
1 |
Add-PnPMicrosoft365GroupToSite -Url $SiteURL -Alias $GroupAlias -DisplayName $GroupName -IsPublic -KeepOldHomePage |
The parameters –Url, -Alias, and -DisplayName should be replaced, specifying the SharePoint site URL, a unique group email alias, and the display name for the Microsoft 365 Group.
In large enterprises, administrators often need to enforce consistent policies for retention, compliance, and access control. Connecting standalone team sites to Microsoft 365 Groups helps align them with built-in governance and lifecycle management.
At scale, it is common to manage dozens or even hundreds of standalone team sites that require this transformation. Performing this manually is inefficient. PowerShell helps administrators connect multiple non-group-connected Team Sites in a scalable and controlled manner.
Before performing bulk conversion, it is recommended to follow a structured approach: Learn, Analyze, and Modernize.
Learn: Understand the impact of group connection by testing a few sites using the UI.
Analyze: Identify which sites are suitable for conversion, especially in large environments. Microsoft recommends the SharePoint Modernization Scanner, or alternatively, PowerShell can be used to retrieve and analyze all non-group-connected Team Sites.
Modernize: Use a validated input file and PowerShell to connect sites at scale. This helps avoid misconfigurations, ensures consistency, and supports reliable large-scale transformations.
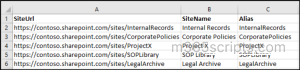
Sample Input:
Below is an example of how the CSV file should be structured. When using a CSV as input for the script, you must have the Alias and SiteName values defined for each site.
You can also use the input from the file retrieved in the above section, but ensure you add the required Alias field. The Alias represents the Group email address and must be provided without spaces.
Here is the PowerShell script that performs bulk conversion of standalone teams sites using a CSV input. The script reads site details from a CSV file, connects each team site to a new M365 group using the provided alias and display name. It will also export an output csv file with a status of each connection.
|
1 2 3 4 5 6 7 8 9 10 11 12 13 14 15 16 17 18 19 20 21 22 23 24 25 26 27 28 29 30 31 32 33 34 35 36 37 38 39 40 41 42 43 44 45 46 47 48 49 50 51 52 53 54 55 56 57 58 59 60 61 62 63 64 65 66 67 68 69 70 71 72 73 74 75 76 77 78 79 80 81 82 83 84 85 |
# Connect to SharePoint Admin Center Connect-PnPOnline -Url "https://-admin.sharepoint.com" -ClientId "clientId" -Interactive# Import CSV containing sites $Sites = Import-Csv "<FilePath>.csv" # Initialize results array $Results = @() foreach ($Site in $Sites) { # Skip empty SiteUrl if ([string]::IsNullOrWhiteSpace($Site.SiteUrl)) { Write-Host "Skipping empty row..." -ForegroundColor Yellow $Results += [PSCustomObject]@{ SiteUrl = "N/A" SiteName = "N/A" Alias = "N/A" Status = "Skipped" Message = "Empty SiteUrl" } continue } try { Write-Host "Processing site: $($Site.SiteUrl)" -ForegroundColor Cyan # Use Alias from CSV; fallback to last segment of URL if empty $Alias = if (-not [string]::IsNullOrWhiteSpace($Site.Alias)) { $Site.Alias.Trim().ToLower() } else { ($Site.SiteUrl.Split("/")[-1]).ToLower() } if ([string]::IsNullOrWhiteSpace($Alias)) { Write-Host "Skipping due to empty alias: $($Site.SiteUrl)" -ForegroundColor Yellow $Results += [PSCustomObject]@{ SiteUrl = $Site.SiteUrl SiteName = $Site.SiteName Alias = "N/A" Status = "Skipped" Message = "Empty Alias" } continue } # Use SiteName from CSV; fallback to Alias if empty $DisplayName = if (-not [string]::IsNullOrWhiteSpace($Site.SiteName)) { $Site.SiteName.Trim() } else { $Alias } Add-PnPMicrosoft365GroupToSite ` -Url $Site.SiteUrl ` -Alias $Alias ` -DisplayName $DisplayName ` -KeepOldHomePage Write-Host "Successfully connected: $($Site.SiteUrl)" -ForegroundColor Green $Results += [PSCustomObject]@{ SiteUrl = $Site.SiteUrl SiteName = $DisplayName Alias = $Alias Status = "Success" Message = "Group Connected" } } catch { Write-Host "Failed for: $($Site.SiteUrl)" -ForegroundColor Red Write-Host $_.Exception.Message $Results += [PSCustomObject]@{ SiteUrl = $Site.SiteUrl SiteName = $Site.SiteName Alias = $Site.Alias Status = "Failed" Message = $_.Exception.Message } } } # Export results $Results | Export-Csv -Path "C:\Temp\GroupConnectionResults.csv" -NoTypeInformation Write-Host "Done! Results exported." -ForegroundColor Green |
Replace the tenant name in the admin URL, include the Client ID from your Entra app registration, update the CSV file path, and ensure your CSV contains valid Url, Alias, and DisplayName values.
The script processes each site from the CSV, displaying a success message for each completed connection. If a site fails (or is invalid), it skips or logs an error message, ensuring the rest of the sites continue processing.
Connecting a team Site to a Microsoft 365 group introduces several behavioral and structural changes that administrators should be aware of:
✅ Homepage and navigation are updated: SharePoint generates a new homepage aligned with group-connected experiences, while the original homepage is retained in the Site Pages library. Navigation is also updated accordingly.
✅ User roles are mapped automatically: SharePoint Owners become Group Owners, and SharePoint Members become Group Members, ensuring continuity in access and responsibility.
✅ Existing permissions remain unchanged: SharePoint Online does not automatically clean up access. Default SharePoint groups and direct user permissions continue to exist, which may lead to permission sprawl if not reviewed.
✅ Entra ID security groups do not extend to M365 services: Any access granted via Entra ID security groups will still work in SharePoint but will not apply to services. This highlights the difference between M365 Group and security group, where only Microsoft 365 Group membership enables access across connected services.
✅ Microsoft Teams and Planner are not enabled automatically: The process provisions an Outlook inbox and calendar for the group. However, Microsoft Teams and Planner are not enabled automatically to Microsoft 365 group and require manual setup if needed.
✅ User suggestions are based on direct memberships only: SharePoint suggests users for Group Owners and Group Members based on existing site users. However, if permissions are assigned via Microsoft Entra ID security groups or Azure AD groups, SharePoint cannot expand those groups to suggest individual users. You must add those users to the Microsoft 365 Group manually.
✅ Everyone except external users access is removed: If ‘Everyone except external users’ option existed before, it is removed during the connection. The Microsoft 365 group is instead created as Public, maintaining open access in a more structured way.
That’s it!
I hope this blog helped you understand how to convert standalone team sites to Microsoft 365 group-connected sites, enabling a more modern and efficient way of working. Feel free to reach us through the comments section if you have any queries.


