Create and Assign Multiple Teams Policies with Policy Packages
Microsoft Teams policy packages simplify governance by bundling multiple predefined Teams policies into a single package. These packages control which Teams features specific users or groups can access. Teams supports both built-in and custom packages for different roles and scenarios. This blog covers how to assign policy packages to users and groups via the Teams admin center or automate bulk assignments using PowerShell.
Microsoft Teams policies help organizations control which features and capabilities users can access across chat, meetings, calling, apps, and collaboration experiences. Since different roles require different levels of access, admins typically configure policies based on user responsibilities, such as frontline workers, educators, etc.
However, assigning separate messaging, meeting, calling, and app policies for users across departments and locations can quickly become repetitive, time-consuming, and difficult to manage at scale.
To address this, Microsoft Teams provides policy packages. This blog covers what Teams policy packages are, how to create custom packages, and the different ways to assign them.
Policy packages in Microsoft Teams are predefined policy settings that group multiple Teams policies into a single assignable package. These packages are designed for specific organizational roles and user scenarios. Admins can assign all required policies in a single action, and any future updates made to the package are automatically applied to assigned users.
Microsoft Teams supports both built-in policy packages and custom policy packages to meet operational and departmental requirements.
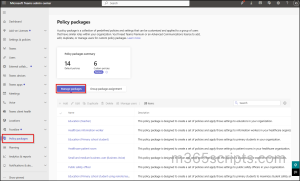
You can view and manage built-in policy packages from the Teams admin center. Follow the steps below to access built-in policy packages:
- Sign in to the Microsoft Teams admin center.
- In the left navigation pane, select Policy packages.
- Under Manage packages, you can view all the available built-in policy packages. Selecting a package displays the included Teams policies and their configured settings.
Policy packages can include multiple Teams policy types that help manage different Teams features and user experiences. Supported policy types include:
- Messaging policy
- Meeting policy
- App setup policy
- Calling policy
- Live events policy
- Call park policy
- Teams policy
- Voice routing policy
- Caller ID policy
- Update policy
- Events policy
Built-in Policy Packages in Microsoft Teams
Microsoft Teams groups these supported policy types into predefined role-based policy packages for common organizational scenarios, such as:
- Frontline manager
- Frontline worker
- Healthcare
- Education
- Public safety officer
- Small and Medium Business (SMB) and more.
Built-in policy packages cover many common organizational roles, but some organizations may require additional role-specific configurations tailored to their operational or departmental needs. In that case, custom policy packages help to group the exact Teams policies required for internal roles and manage them through a single assignment.
License requirement: A Microsoft Teams Premium license is required to create custom policy packages.
Follow the steps below to create a custom policy package in Microsoft Teams:
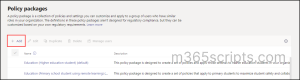
- Sign in to the Microsoft Teams admin center.
- Go to Policy packages from the left navigation pane and click + Add.
3. Enter a package name and optional description.
4. Select the required policy types and the policies to include in the package.
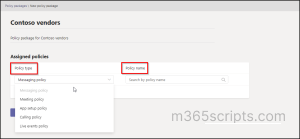
5. Click Save to apply changes.
The custom package will now appear alongside the built-in policy packages under ‘Manage packages’ in the Teams admin center.
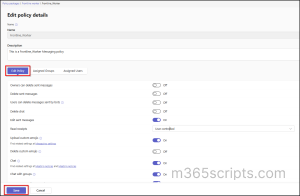
Review and Customize the Policy Package Settings
Once the required policy packages are in place, the next step is to assign them to users or groups. But before assigning a policy package, review the included policies and customize them based on your organization’s requirements. This helps avoid misconfigured settings during large-scale deployments.
You can open the package from the Teams admin center under policy packages, review the included policies, make any required changes, and save them.
Once packages are customized, they can be assigned to individual users, groups, or batches. Microsoft Teams supports multiple ways to assign policy packages depending on the deployment scenario. Admins can use the Teams admin center for single assignments or PowerShell for bulk operations and large-scale deployments.
The Teams admin center supports three primary policy package assignment methods:
- Assign a policy package to a single user
- Assign a policy package to multiple users
- Assign a policy package to a group
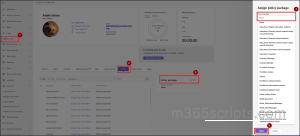
Assign Teams Policy Package to a Single User
Follow the steps below to assign a policy package to a single user in Microsoft Teams.
- Open the Microsoft Teams admin center.
- Go to Manage Users under Users from the left navigation pane.
- Search for and select the target user.
- On the Policies tab, click Edit next to Policy package option.
- Select the required policy package.
- Click Apply to assign the selected package to that user.
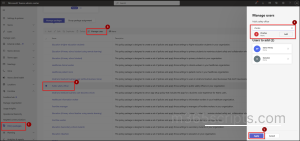
Assign Teams Policy Package to Multiple Users
This approach works well when assigning the same role-based Teams policy settings to a specific set of users, such as new frontline workers, seasonal staff, or onboarding batches.
- In the Teams admin center, go to Policy packages.
- Select the required policy package.
- Click Manage users.
- Search for and add the required users.
- Click Apply to assign package to all selected users.
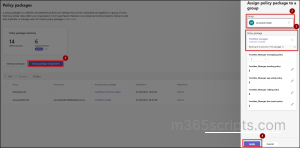
Assign Teams Policy Package to a Group
Group policy assignment is the recommended method for most organizations because they automatically update as users join or leave the group. This reduces manual administrative effort and helps maintain consistent policy enforcement at scale.
Note: If a user has both direct and group-based assignments, the direct assignment takes precedence for that policy type.
- Go to Policy packages in the Teams admin center.
- Select the Group package assignment tab.
- Click + Add and select the target group.
- Choose the policy package to assign.
- Configure the ranking order if multiple group assignments exist. Lower ranking values take higher precedence, meaning the policy assignment with the lowest number is applied first when conflicts occur.
- Click Apply to assign the package to the selected group.
When a policy package is assigned, Teams automatically creates corresponding policies for each included policy type using the package name. For example, assigning the Frontline Manager package creates policies such as Frontline_Manager across supported policy categories, making policy auditing and tracking easier.
Any changes made to a policy package later are automatically applied to all assigned users, helping organizations maintain consistency at scale without manual reassignment.
While the Teams admin center works well for smaller assignments, PowerShell becomes the preferred approach when managing policy packages at scale. It helps admins automate onboarding workflows and standardize assignments across large user sets. It also reduces repetitive manual effort and simplifies bulk or dynamic policy deployments.
PowerShell supports the following policy package assignment scenarios:
- Assign a policy package to a single user
- Assign a policy package to multiple users
- Assign different policy packages to multiple users
- Assign a policy package to a group
- Assign different policy packages to multiple groups
Install and connect to the Microsoft Teams PowerShell module, before running the assignment cmdlets.
|
1 2 |
Install-Module -Name MicrosoftTeams Connect-MicrosoftTeams |
To check the available package names in your tenant, run the following cmdlet:
|
1 |
Get-CsPolicyPackage |
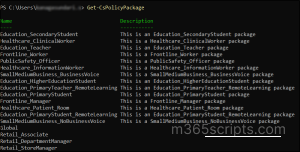
This step is crucial to review available policy packages so the appropriate settings can be assigned to users without mismatches.
Assign Teams Policy Package to a Single User Using PowerShell
To assign a Microsoft Teams policy package to a single user using PowerShell, run the cmdlet below:
|
1 |
Grant-CsUserPolicyPackage -Identity <UPN> -PackageName <PackageName> |
Replace <UPN> with the target user’s User Principal Name and <PackageName> with the required Teams policy package name, then run the cmdlet above.
Note: Use the returned package name exactly as displayed in the output when assigning a policy package.
After running the above cmdlets, you may see the following response: Grant-CsUserPolicyPackage_GrantExpanded: The server responded with an unrecognized response, Status: OK
The above message will appear, but the assignment still succeeds. You can verify the assignment status using the cmdlets shown below.
|
1 |
Get-CsUserPolicyPackage -Identity <UPN> |
Replace <UPN> with the target user’s User Principal Name.
Assign Teams Policy Package to Multiple Users Using PowerShell
To assign a policy package to multiple users, run the following cmdlet:
|
1 |
New-CsBatchPolicyPackageAssignmentOperation -Identity "[email protected]","[email protected]","[email protected]" -PackageName <PackageName> |
Replace the sample UPNs with the target users and update the <PackageName>.
The cmdlet generates an operation ID that can be used to track the assignment status.

Successful Assignments:
To review successful policy package assignments, run the following cmdlet:
|
1 |
Get-CsBatchPolicyAssignmentOperation -OperationId <OperationID> |
Replace <OperationID> with the generated batch operation ID.

Failed Assignments:
To review failed assignments in the batch operation, run:
|
1 2 |
Get-CsBatchPolicyAssignmentOperation -OperationId <OperationID> | Select-Object -ExpandProperty UserState |
Replace <OperationID> with the generated batch operation ID.

Assign Different Teams Policy Packages to Multiple Users in Bulk
Different users in an organization often require different Teams policy packages based on their roles or departments. PowerShell approach helps admins assign these packages to multiple users in bulk, reducing repetitive manual effort.
Before running the script, create a CSV file with the required fields as shown below.
Sample input file:
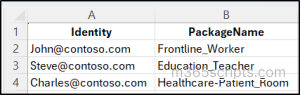
To assign multiple Microsoft Teams policy package to multiple users in bulk using PowerShell, run the script below:
|
1 2 3 4 5 6 |
$assignments = Import-Csv "<CSVPath>" foreach ($row in $assignments) { Write-Host "Assigning $($row.PackageName) to $($row.Identity)..." -ForegroundColor Cyan New-CsBatchPolicyPackageAssignmentOperation -Identity $row.Identity -PackageName $row.PackageName Write-Host "Completed assignment for $($row.Identity)" -ForegroundColor Green } |
Replace <CSVPath> with the location of your CSV file and run the above script. It reads the CSV file and assigns different policy packages in bulk to the specified Microsoft Teams users.
Assign Teams Policy Package to a Group Using PowerShell
Group-based assignment is recommended for most organizations because policy assignments automatically apply to users added to the group later, reducing ongoing administrative effort.
Before assigning the package to a group, retrieve the Microsoft Entra group Object ID and use it with the assignment cmdlet.
|
1 |
Get-MgGroup -Filter "DisplayName eq '<GroupName>'" | Select DisplayName, Id |
Replace the <GroupName> with your target group name and copy the returned Id value.
This cmdlet retrieves the Microsoft Entra group and displays its Display Name and Object ID, which is required for group-based policy package assignment.
Now, to assign the policy package to the group and configure policy ranking order, run the following cmdlet:
|
1 |
Grant-CsGroupPolicyPackageAssignment -GroupId <GroupID> -PackageName <PackageName> -PolicyRankings "TeamsAppSetupPolicy,1","TeamsMeetingPolicy,1","TeamsMessagingPolicy,2" |
Replace <GroupID> with the Microsoft Entra group Object ID and update the <PackageName> & policy rankings as required.
Note: Lower ranking values take higher precedence when users receive assignments from multiple groups.
Assign Multiple Teams Policy Packages to Multiple Groups in Bulk
In large Microsoft Teams environments, different user groups like frontline workers, educators, and corporate users require different policy packages based on their roles. The Teams admin center UI does not support bulk assignment of different policy packages to multiple groups in a single action, making manual configuration time-consuming and error prone.
PowerShell solves this by allowing administrators to assign different policy packages to multiple Entra ID groups in one execution.
Before running, retrieve the respective group IDs and create a CSV file with required fields as shown below.
Sample input file:
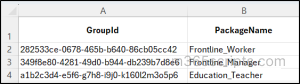
To assign multiple Microsoft Teams policy package to multiple groups in bulk using PowerShell, run the script below:
|
1 2 3 4 5 6 |
$assignments = Import-Csv "<CSVPath>" foreach ($row in $assignments) { Write-Host "Assigning $($row.PackageName) to Group $($row.GroupId)..." -ForegroundColor Cyan Grant-CsGroupPolicyPackageAssignment -GroupId $row.GroupId -PackageName $row.PackageName Write-Host "Completed assignment for $($row.GroupId)" -ForegroundColor Green } |
Replace <CSVPath> with the location of your CSV file and then run the script above. It reads the CSV file and assigns different policy packages in bulk to the specified Microsoft Entra groups.
Wrapping Up
That’s it! Policy packages simplify Teams policy management by moving from individual configurations to a structured, role-based approach. Built-in and custom packages ensure consistent settings across user groups, while group-based assignment keeps policies automatically aligned as users change roles. Thanks for reading. If you have any questions, feel free to reach out in the comments!


