
How to Exclude SharePoint Sites from a Retention Policy
In certain scenarios, excluding SharePoint sites from retention policies is necessary to align data protection with site lifecycle, storage considerations, and business requirements. This blog explores common scenarios where exclusions are beneficial and explains how to configure them effectively.
Retention policies in Microsoft 365 help organizations preserve data to meet compliance, legal, and business requirements. Depending on the retention configuration, these policies can prevent SharePoint site deletion, preserve content even after users delete it, or automatically retain and remove data based on the defined retention period.
By default, when you create a SharePoint Online retention policy, it applies to all SharePoint sites. However, applying a single retention strategy across every site may not always be practical. Certain sites may have unique operational requirements that make them unsuitable for organization-wide retention.
Let’s explore the common scenarios where excluding a SharePoint site from a retention policy is beneficial and learn how to configure these exclusions effectively.
It is important to understand when a SharePoint site needs to be excluded from a retention policy. Here are some common scenarios:
- Sites with extensive version history – Highly active sites with frequent document modifications may require exclusion from broad retention policies to manage extensive version accumulation and apply more appropriate retention configurations.
- Inactive sites planned for decommissioning – Exclude obsolete sites that need to be permanently removed as part of lifecycle management.
- Temporary, development, and test sites – Exclude short-lived sites to enable regular cleanup and deletion without retention restrictions.
- Sites requiring custom retention settings – Exclude sensitive, research, or department-specific sites that require different retention rules than the organization-wide policy.
Hope you now understand the key reasons why certain SharePoint sites need to be excluded from retention policies. Let’s move on to how to identify the applicable retention policy and exclude a site from it.
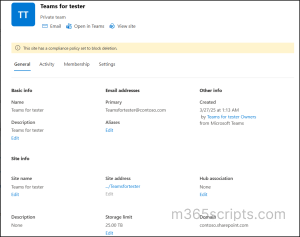
Admins can identify site under retention policy by seeing a message “This site has a compliance policy set to block deletion in SharePoint”. However, this message only indicates that the site is subject to a compliance policy and does not reveal the name of the specific retention policy applied to the site.
Once you’ve confirmed that the site is under retention, you can identify the specific retention policy applied to it using one of the following methods.
- Find retention policy applied to a SharePoint site using Policy Lookup tool
You can use the Microsoft Purview Policy Lookup tool to quickly identify retention policies applied to a SharePoint site. It provides a consolidated view of associated retention policies, retention labels, or auto-labelling policies linked to the site URL. From this list, you can review and identify the specific retention policy responsible for restricting site deletion and proceed by excluding the site from that policy. - Find retention policies applied to sites using PowerShell script
While the Microsoft Purview Policy Lookup tool is useful for identifying policies applied to a SharePoint site, it returns all associated compliance policies, including retention policies, retention labels, and auto-apply label policies. As a result, admins must manually review the results to determine which specific retention policy is responsible for restricting site deletion.
To simplify this large limitation, we have developed a PowerShell script to check retention policies across multiple SharePoint sites from a single report.
Download Script: GetSPOSitesRetentionPolicies.ps1
Once downloaded, run the script like below to retrieve retention policy information for all SharePoint Online sites in Microsoft 365:
|
1 |
.\GetSPOSitesRetentionPolicies.ps1 |
If you need a detailed step-by-step guide on PowerShell script execution and capabilities, refer here.
With this understanding, we can now easily identify the retention policy applied to a SharePoint site and proceed to exclude the site from that policy in Microsoft 365.
Once you have identified the retention policy affecting the site, you can exclude the SharePoint site from the policy in Microsoft 365. Use the following methods to exempt the SharePoint site from the retention policy:
- Exclude a SharePoint site from retention policy in Microsoft Purview
- Exempt a SharePoint site from retention policy using PowerShell
Before proceeding, it is important to understand the difference between excluding a site and removing a site from a retention policy. These two actions are often used interchangeably, but they behave differently in Microsoft Purview.
- Excluding a site from a retention policy: This is explicitly excluding a site from a retention policy when the policy is applied to all SharePoint sites. As a result, the site is never brought under retention control, and no retention or grace period is applied.
- Removing a site from a retention configuration: This means removing a SharePoint site from a retention policy that is applied to specific sites. In this case, retention does not stop immediately. As a result, deleted files may still be kept in the Preservation Hold Library, which can cause site deletion to fail even after removal.
Hope you are clear now. Let’s move on to how to exclude a SharePoint site from a retention policy.
To exclude a SharePoint Online site from a retention policy in Microsoft Purview, you need to modify the policy scope and adjust the SharePoint site exclusion. Follow the below steps to exclude a site by modifying retention policy.
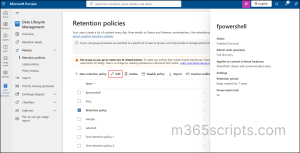
- Sign in to the Microsoft Purview portal and navigate to Solutions → Data Lifecycle Management.
- Expand Policies, choose Retention Policies, and select the required policy.
- Click Edit and then select Next until you reach the Choose where to apply this policy page.
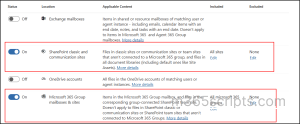
- Under the SharePoint sites location, specify the sites that need to be excluded. This step can be confusing because the policy scope shows two SharePoint options.
- SharePoint Classic and Communication Sites: This applies to any SharePoint site and does not affect Microsoft 365 Groups, mailboxes, or other workloads.
- Microsoft 365 Group-connected SharePoint sites: It applies to Microsoft 365 Group mailbox (emails, calendar, conversations) and the associated Group-connected SharePoint team site.
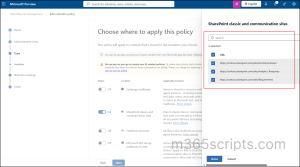
- Ensure you select the correct SharePoint site type when adding it to the Excluded list. For this scenario, choose the first option, then select Edit under Excluded.
- In the search box, enter the site URL, and select the desired site.
- Repeat the process to add additional sites to the exclusion list, and then click Done.
- Click Next, navigate to Review and finish page, review the policy and click on Submit to update the retention policy.
Managing exclusions through the Microsoft Purview portal becomes time-consuming when multiple sites are involved, as each SharePoint site URL must be searched and added to the exclusion list one by one. As the number of sites increases, this manual process becomes repetitive and difficult to manage.
To simplify and speed up this process, PowerShell provides a more efficient and scalable alternative for managing retention policy exclusions. The sections below describe how to exempt SharePoint Online sites from a retention policy, covering both single-site and bulk scenarios.
Exempt a SharePoint Site from Retention Policy Using PowerShell
You can use a single cmdlet to exclude a SharePoint site from a retention policy without going through multiple steps in the Microsoft Purview portal. Follow the steps below to exclude a site from a retention policy using PowerShell.
First, connect to Security and Compliance PowerShell then run the following cmdlet to exempt a SharePoint site from the retention policy.
|
1 |
Set-RetentionCompliancePolicy -Identity "<PolicyName>” -AddSharePointLocationException “<SiteURL>” |
Replace the <PolicyName> with the actual policy name and <SiteURL> with the respective site URL.
After updating the policy, you can verify the changes using the following cmdlet by replacing the <PolicyName> with the required policy name.
|
1 |
Get-RetentionCompliancePolicy -Identity "<PolicyName>" -DistributionDetail | Select-Object -ExpandProperty SharePointLocationException | Select-Object -ExpandProperty Name |

This confirms whether the SharePoint site has been successfully added to the exclusion list of the retention policy.
Note: This exclusion applies only when the policy status is Enabled and shows a status as Success.
Bulk Exclude Multiple SharePoint Sites from Microsoft 365 Retention Policy
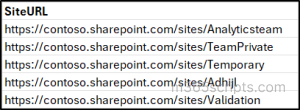
To exclude multiple SharePoint sites from a single retention policy at once, prepare a CSV file containing all required site URLs in a column named SiteURL.
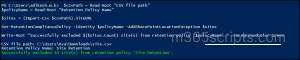
Then run the following script to bulk exclude SharePoint sites at once. Provide the retention policy name and the CSV file path as inputs to exempt all listed SharePoint sites from the retention policy.
|
1 2 3 4 5 |
$csvPath = Read-Host "CSV file path" $policyName = Read-Host "Retention Policy Name" $sites = (Import-Csv $csvPath).SiteURL Set-RetentionCompliancePolicy -Identity $policyName -AddSharePointLocationException $sites Write-Host "Successfully excluded $($sites.Count) site(s) from retention policy '$policyName'." -ForegroundColor Green |
And that’s it!
I hope this guide helped you understand how to exclude SharePoint sites from a retention policy. By correctly configuring exclusions, you can avoid unexpected deletion restrictions, efficiently handle bulk site exclusions, and maintain better control over SharePoint site lifecycle and storage.
If you have any questions or feedback, feel free to leave a comment below. Thanks for reading!


