Create and Manage Retention Policies Using PowerShell
Learn how to create and manage Microsoft 365 retention policies using PowerShell. This guide covers creating retention policies and rules, updating existing policies, managing bulk mailbox exclusions, disabling, and deleting policies. It also covers Teams call log retention policies, which are managed only via PowerShell.
Microsoft 365 data grows faster than most organizations realize. A single mailbox can easily accumulate 50,000+ items within a year, making long-term data management increasingly challenging. Without a proper retention strategy, organizations can face compliance risks, higher storage costs, and delays during eDiscovery.
To handle this, Microsoft 365 provides retention policies. They help organizations retain important data for the required period and automatically delete it when it’s no longer needed.
In this blog, we’ll explore how to create and manage retention policies using PowerShell.
A Microsoft 365 retention policy is a set of rules that determine how long data should be retained and what happens to it after the retention period ends. Depending on its configuration, it can retain content, delete content, or retain and then delete content across M365 workloads.
Example: If your organization must retain all employee emails for seven years, you can create a retention policy that automatically keeps those emails for the defined period before deleting them.
Along with retention policies, Microsoft 365 also offers retention labels for managing data retention. While both help organizations manage data retention, they differ in their scope, application, and use cases:
- Retention policies apply broadly at the container level (a mailbox, a site, a Teams channel).
- Retention labels apply to individual items such as a specific email, document, or folder. It can be applied manually or automatically based on content type or sensitive info detected.
The following table summarizes the key differences between retention policies and retention labels:
| Category | Retention Policy | Retention Label |
| Applies to | Mailboxes, sites, Teams, OneDrive | Emails, documents, folders |
| Scope | Entire location | Individual items |
| Assignment | Automatically applied to selected locations | Applied manually, automatically, or as a default label |
| Best for | Organization-wide retention | Content-specific retention |
| Precedence | Lower — applies when no retention label exists | Higher — takes precedence over retention policies when applied to the same item |
| Example | Retain all Exchange mailboxes for 7 years | Retain HR contracts for 10 years |
Microsoft 365 Locations Supported by Retention Policies
A retention policy can be applied to one or more Microsoft 365 locations, depending on your organization’s requirements. Supported M365 workloads include:
- Exchange Online – Mailboxes and public folders.
- SharePoint & OneDrive – SharePoint sites and OneDrive accounts.
- Microsoft Teams – Chats and channel messages (standard, shared, and private).
- Microsoft 365 Groups – Group mailboxes and sites.
- AI apps – Microsoft Copilot experiences, Enterprise AI apps, and other AI apps.
- Viva Engage – Community and user messages.
- Skype for Business (legacy).
Not all Microsoft 365 locations can be included in a single retention policy. If multiple retention policies apply to the same location, Microsoft 365 follows its principles of retention to determine which retention setting takes effect.
To configure retention policies in Microsoft 365, you need any one of the following licenses:
- Microsoft 365 E5/A5/G5/E3/A3/G3, Business Premium
- Microsoft 365 E5/A5/G5/F5 Compliance and F5 Security & Compliance
- Microsoft 365 E5/A5/F5/G5 Information Protection and Governance
- Office 365 E5/A5/G5/E3/A3/G3
Permissions required: Global administrator/Compliance administrator. For more details on the license requirements and permissions, you can refer to the permissions documentation.
You can create and manage retention policies using the Purview portal or PowerShell. While the Purview portal provides a way to configure retention policies, managing them at scale can be challenging. Administrators may need to repeat configurations, perform bulk updates manually, and manage multiple settings. PowerShell simplifies these tasks. It also supports certain retention management operations that aren’t available through the Purview portal.
Before you can start managing retention policies using PowerShell, first make sure to install EXO Management module & connect to Security and Compliance PowerShell.
Once you’re connected, you can start managing retention policies using PowerShell for the following tasks:
- List all Microsoft 365 retention policies
- View policy settings and retention rules
- Create & apply a Microsoft 365 retention policy
- Modify an existing retention policy using PowerShell
- Bulk exclude Exchange mailboxes from a retention policy
- Disable a Microsoft 365 retention policy
- Delete a Microsoft 365 retention policy
- Manage Microsoft Teams call log retention policies
Before creating, modifying, or deleting retention policies, it’s important to review the existing policies in your Microsoft 365 environment.
To view all retention policies, run the following cmdlet:
|
1 |
Get-RetentionCompliancePolicy |
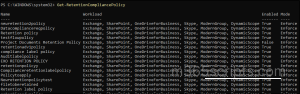
This command retrieves all retention policies configured in your Microsoft Purview environment. This helps to avoid overlapping configurations and ensure retention settings align with your organization’s compliance requirements.
To retrieve the settings of a specific Microsoft Purview retention policy, use the Get-RetentionCompliancePolicy and Get-RetentionComplianceRule cmdlets as shown below:
|
1 |
$PolicyName = "<PolicyName>"; Get-RetentionCompliancePolicy -Identity $PolicyName | Format-List; Get-RetentionComplianceRule -Policy $PolicyName | Format-List |
Replace <PolicyName> with the name of the retention policy whose settings you want to view.
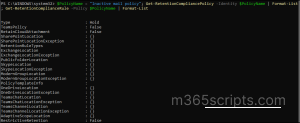
This command displays the detailed settings of the specified retention policy and its associated retention rule, including workload locations, enforcement mode, and distribution status.
Creating a retention policy in PowerShell involves two steps. First, create a retention policy to define where the policy applies. Then, create a retention rule to define how long the content should be retained and what happens after the retention period ends.
First, to create a new retention policy, run the following cmdlet:
|
1 |
New-RetentionCompliancePolicy -Name "<PolicyName>" -SharePointLocation “<SiteURL>” |
For example,
|
1 |
New-RetentionCompliancePolicy -Name "Important Documents Retention Policy" -SharePointLocation "https:/zava.sharepoint.com/sites/ProjectManagement" |

📝 Note: At least one location parameter must be defined to create a retention policy.
This command creates a retention policy named Important Documents Retention Policy and applies it to the specified SharePoint site Project Management.
After creating the policy, create a retention rule to define the retention settings:
|
1 |
New-RetentionComplianceRule -Name "<RuleName>" -Policy "<PolicyName>" -RetentionDuration 2555 -RetentionComplianceAction Keep |
Replace <RuleName> with the retention rule name and <PolicyName> with the target retention policy name. Modify the RetentionDuration value based on your organization’s retention requirements. The RetentionComplianceAction parameter supports the following values:
- Keep – Retains content for the specified retention period.
- Delete – Deletes content after the specified retention period.
- KeepAndDelete – Retains content for the specified retention period and deletes it when the retention period expires.

This command creates a retention rule associated with the policy and configures Microsoft 365 to retain the content for 2555 days (7 years).
💡Tip: After creating, you can also use the policy lookup tool to quickly find which retention policies are applied to specific users, sites, or workloads.
If a retention policy applies to all Exchange mailboxes, you can modify the existing policy to exclude specific mailboxes using the Set-RetentionCompliancePolicy cmdlet. This approach is commonly used for migration, service accounts, test mailboxes, or users with different retention requirements.
First, to list the names of retention policies that apply to all Exchange Online mailboxes, run:
|
1 |
Get-RetentionCompliancePolicy -DistributionDetail | Where-Object {$_.ExchangeLocation -match "All"} | Select-Object -ExpandProperty Name |

Now, to exclude an Exchange mailbox from a retention policy, run the following cmdlet:
|
1 |
Set-RetentionCompliancePolicy -Identity "<PolicyName>" -AddExchangeLocationException “<MailboxUPN>” |
Replace <PolicyName> with the name of the retention policy and <MailboxUPN> with the mailbox that you want to exclude from the policy.
This command adds the specified Exchange mailbox as an exception, preventing the retention policy from being applied to it.
📝 Note: For inactive mailboxes that are still under retention, you can remove applicable holds using the ExcludeFromAllHolds parameter.
If you need to exclude multiple Exchange mailboxes from a retention policy, manually adding each mailbox can be time-consuming. Instead, you can import a list of mailboxes from a CSV file and exclude them in bulk using PowerShell.
First, create a CSV file with the UserPrincipalName column, as shown below:
Sample CSV input:
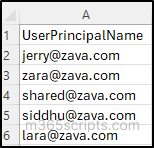
Then, run the following PowerShell script:
|
1 2 3 4 5 6 |
$ExcludedMailboxes = Import-Csv -Path "<CSVFilePath>" foreach ($Mailbox in $ExcludedMailboxes) { Set-RetentionCompliancePolicy ` -Identity "<PolicyName>" ` -AddExchangeLocationException $Mailbox.UserPrincipalName } |
Replace <PolicyName> with the name of your retention policy and <CSVFilePath> with the path to your CSV file.
This script reads each mailbox from the CSV file and adds it as an exception to the specified retention policy, allowing multiple Exchange mailboxes to be processed in a single operation.
Verify Exchange Mailbox Exclusions in Retention Policies
After adding mailbox exclusions, it’s a good practice to verify that they have been applied successfully.
To view the excluded Exchange mailboxes for a retention policy, run the following cmdlet by replacing policy name:
|
1 |
Get-RetentionCompliancePolicy -Identity "<PolicyName>" -DistributionDetail | Format-List ExchangeLocationException |

This command lists all Exchange mailboxes that are currently excluded from the specified retention policy.
There may be situations where you need to temporarily stop a retention policy from being enforced without permanently deleting it. For example, you might want to disable a policy while testing a new retention configuration, troubleshooting policy behavior, or before making significant changes to the policy.
To disable a retention policy, run the following cmdlet:
|
1 |
Set-RetentionCompliancePolicy -Identity "<PolicyName>" -Enabled $false |
Replace <PolicyName> with the name of the retention policy you want to disable.
This command disables the specified retention policy, preventing it from being enforced until it is re-enabled using param -Enabled $true.
If a retention policy is no longer required, you can permanently remove it. To delete the retention policy, run the following cmdlet:
|
1 |
Remove-RetentionCompliancePolicy -Identity "<PolicyName>" |
Replace <PolicyName> with the name of the retention policy you want to delete.
When you run this cmdlet, PowerShell will ask for confirmation before removing the policy. Enter Y to proceed with the deletion.
Deleting a retention policy is irreversible. It’s recommended to export the policy settings before deletion, so you have a record if you need to recreate it later.
Microsoft Teams call log retention policies are managed separately from standard Microsoft Purview retention policies. Unlike regular retention policies, Teams call log retention policies can only be created and modified using PowerShell.
Some important points to note:
- The policy applies to Teams call logs for both Teams chats and Teams channels.
- It applies only to new call logs created after the policy becomes active.
To create a retention policy for Teams call logs, run the following cmdlet:
|
1 |
New-AppRetentionCompliancePolicy -Name "<PolicyName>" -Applications "User:MicrosoftTeamsCallLog" -ExchangeLocation "All" |
This command creates a retention policy that applies to Teams call logs for all mailboxes.
After creating the policy, create a retention rule to define how long the call logs should be retained.
|
1 |
New-AppRetentionComplianceRule -Name "<RuleName>" -Policy "<PolicyName>" -RetentionDuration 365 -RetentionDurationDisplayHint Days -RetentionComplianceAction Delete |
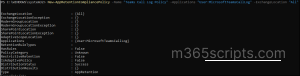
This command creates a delete-only retention rule that permanently deletes Teams call logs after 365 days.
📝 Note: After you create the Teams call log retention policy, it appears in the Microsoft Purview portal under Data Lifecycle Management > Policies as a read-only policy.
Any modifications or deletion must be performed using the corresponding cmdlets like,
- Get-AppRetentionCompliancePolicy
- Set-AppRetentionCompliancePolicy
- Set-AppRetentionComplianceRule
- Remove-AppRetentionCompliancePolicy
- Remove-AppRetentionComplianceRule
Yes. A single retention policy can be configured to apply to multiple supported Microsoft 365 workloads, such as Exchange Online, SharePoint Online, OneDrive, Microsoft Teams, and Microsoft 365 Groups. However, not all workload combinations are supported within the same policy, so some scenarios require separate retention policies.
2. How long do retention policy changes take to apply?
Retention policy changes aren’t applied instantly. Depending on the type of change and the size of your Microsoft 365 environment, it can take several hours or longer for updates to propagate across all targeted locations.
3. What’s the difference between deleting and disabling a retention policy?
Disabling a retention policy temporarily stops it from enforcing retention settings, while deleting a retention policy permanently removes it.
4. Does priority cleanup delete content that’s still under retention?
No. Priority cleanup only removes content that is already eligible for deletion. It doesn’t bypass or shorten retention periods and won’t delete content that must still be retained for compliance.
5. What happens when users delete content that’s under a retention policy?
If users modify or delete retained content, Microsoft 365 automatically preserves a protected copy until the retention period expires. Depending on the workload, the preserved content is stored in:
- SharePoint & OneDrive: Preservation Hold Library
- Exchange Online: Recoverable Items folder
- Microsoft Teams, Viva Engage, Copilot & AI apps: SubstrateHolds (a subfolder of the Recoverable Items folder).
6. Can I edit an existing retention policy instead of creating a new one?
Yes. Existing retention policies can be modified using the Microsoft Purview portal or PowerShell without creating a new policy. However, certain changes may require additional configuration updates.
We hope this guide helps you understand how to manage Microsoft 365 retention policies using PowerShell. Thank you for reading! If you have any questions or suggestions, feel free to share them in the comments section.