How to Remove a User Account in Microsoft 365
Deleting user accounts in Microsoft 365 involves more than simply removing accounts. Learn how to handle common scenarios, including inactive users, former employees, synced accounts, and guest users, while preserving important mailbox and OneDrive data.
As an admin, you may need to delete Microsoft 365 user accounts for various reasons. An employee may have left your organization, a temporary or test account may no longer be needed, or an external user may no longer require access.
However, deleting a user account isn’t always as simple as clicking Delete. Before proceeding, you need to consider whether the user has important emails or files to preserve, manages any groups, or relies on other Microsoft 365 services.
In this blog, we’ll explore how to remove users in Microsoft 365 using different methods, along with common deletion scenarios and the things to check before deleting an account.
Before deleting a Microsoft 365 user account, review the following checklist to avoid losing important data or disrupting other users and services.
1. Check the User’s Mailbox
If the user has important emails, contacts, or calendar details, check whether they need to be retained. If another user needs access, you can convert the mailbox to a shared mailbox and keep the user’s account. Alternatively, if the mailbox is not required, you can proceed with deletion.
2. Review and Transfer OneDrive Files
Check whether the user has important files stored in OneDrive. If access needs to be retained, you can grant OneDrive access to another user or move the files to a suitable location, such as another user’s OneDrive or a SharePoint site, before deleting the account.
3. Check Group and Resource Ownership
Check whether the user owns any Microsoft 365 groups, Teams, or SharePoint sites. If the user is the sole owner, assign another owner to ensure that these resources remain properly managed.
4. Review Application Access and Dependencies
Check whether the account is used by any business applications, automated tasks, or workflows. If other processes depend on the account, update their configuration or transfer responsibilities to another account before deletion.
5. Review Licenses and Subscriptions
Check the licenses assigned to the user and identify whether those can be reassigned to other users who need the same licenses. This helps you make better use of your existing licenses instead of purchasing additional licenses.
6. Check Data Retention Requirements
Determine whether the user’s mailbox or files must be retained for compliance, audit purpose, or other business requirements. Configure the retention policies or holds before deletion if your organization needs to preserve the data.
Once you complete these checks, you can proceed with deleting the account using your preferred method.
Minimum Required Role: User Administrator role.
Microsoft 365 offers several ways to delete a user account, including through the Microsoft Entra admin center, Microsoft 365 admin center, and PowerShell.
Before exploring the user deletion methods, let’s understand what happens when you delete a user account in Microsoft 365.
When you delete a user account in Microsoft 365, it is not immediately removed from the directory. Instead, Microsoft moves it to the Deleted users list, where it remains for 30 days. This is known as soft deletion.
During this period, you can restore the deleted account if it was deleted by mistake or needs to be reactivated. After 30 days, Microsoft permanently deletes the account. You can also permanently delete it manually before the 30-day period ends.
| Soft delete | Permanent delete |
| Moves the account to the Deleted users list. | Completely removes the account from the directory. |
| You can restore the account within 30 days. | You cannot restore the account. |
| When to use: When you want to retain the option to restore the account. | When to use: When you’re certain that the account is no longer needed and don’t require the restoration option. |
By default, deleted user accounts are soft-deleted and remain recoverable for 30 days.
For detailed instructions, see our guide on how to soft delete and permanently delete users using admin centers and PowerShell.
As discussed earlier, deleting a user account involves more than just removing it from Microsoft 365. Depending on the situation, you may need to follow additional steps, such as checking the user’s sign-in activity, retaining their mailbox, or removing access to organizational resources. Let’s look at some common scenarios and how to handle them.
Inactive user accounts that are no longer required can pose security risks and retain unnecessary access to organizational resources. Regularly reviewing and removing these accounts helps reduce your attack surface.
You can identify inactive users based on the last interactive and non-interactive sign-in times. After verifying that the accounts are no longer needed, you can remove them individually or use the pre-built script to automate inactive user removal.
When an employee leaves your organization, it is important to disable their account and revoke active sessions to prevent further access. However, their mailbox, OneDrive files, and other data may still be required by the team.
Make sure you preserve the required data and transfer ownership of important resources before removing the user. To simplify this process, you can use the user offboarding script. It automates common offboarding tasks, such as blocking user access, revoking sessions.
If a former employee’s mailbox contains important emails that the organization needs to retain, you can delete the user account while preserving the mailbox as an inactive mailbox.
To do this, apply the required retention policy or hold to the mailbox before deleting the user account. Once the account is deleted and the retention requirements are met, the mailbox becomes inactive and its data remains preserved for future reference or compliance purposes.
Note: If other employees need continued access to the mailbox, consider converting it into a shared mailbox instead. However, this requires retaining the associated user account with sign-in blocked.
When multiple user accounts are no longer required, deleting them individually can be time-consuming. Instead, you can use our PowerShell script to delete user accounts in bulk.
Follow the steps below:
- Download the M365UserDeletionManagement.ps1 script.
- Create a CSV file containing the users to delete with UserPrincipalName as the column header as shown below.
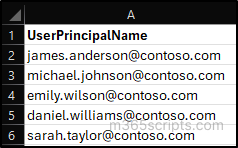
- Open PowerShell and run the script by specifying the required action and CSV file path as shown below:
1.\M365UserDeletionManagement.ps1 -Action 6 -InputCsvFilePath “C:\UsersToDelete.csv”
This command will delete all the users listed in the CSV file.
In a hybrid environment, user accounts are synchronized from on-premises Active Directory to Microsoft 365 using Microsoft Entra Connect.
If on-premises Active Directory remains the Source of Authority (SOA), deleting these accounts directly from Microsoft 365 may not work as expected. The on-premises directory continues to manage the account, and synchronization may restore it.
To delete a synced user, remove the account from on-premises Active Directory. Once deleted, the change will sync to Microsoft Entra ID during the next sync cycle, and the user account will be soft deleted in Microsoft 365.
Steps to Delete a User in Active Directory
- Open the Active Directory Users and Computers (ADUC) console.
- Navigate to the Organizational Unit (OU) that contains the user account.
- Locate and right-click the user account you want to delete.
- Select Delete and confirm the deletion by clicking Yes.
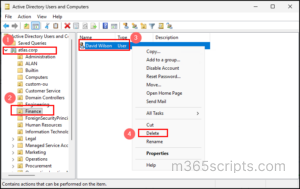
What if you want to remove the user from Microsoft 365 but retain the on-premises AD account?
In this case, move the user account to an OU excluded from synchronization.
During the next sync cycle, Microsoft Entra Connect will remove the account from Microsoft Entra ID and move it to the Deleted users list. In this way, the account will be deleted in Microsoft 365 but will be retained in the on-premises Active Directory.
Guest accounts that are no longer needed can retain unnecessary access to your organization’s resources. Regularly reviewing and removing unused guest accounts helps maintain better control over external access.
However, guest accounts shouldn’t be deleted based on inactivity alone. Admin approval is important to verify that the accounts are no longer required and avoid disrupting ongoing collaboration.
To simplify this entire process, you can use the pre-built Power Automate workflow to remove inactive guest users with approval. It identifies inactive guest users, sends their details for admin approval, and removes them once approved.
Conclusion
Deleting unnecessary user accounts is an important part of Microsoft 365 account management. Before deleting an account, make sure you handle the user’s mailbox, OneDrive data, and other associated resources to avoid losing important information.
By following the right steps for each scenario, you can remove unwanted accounts, reduce unnecessary access, and manage your Microsoft 365 resources more efficiently.
We hope this blog helps you understand how to delete user accounts in Microsoft 365 across different scenarios.