How to Set Up Custom Attributes in Exchange Online?
Configure Exchange Online custom attributes (CustomAttribute1-15) to store additional user information beyond standard fields. Assign values through Exchange admin center or PowerShell for department codes, project identifiers, or organizational data. Use custom attributes in dynamic distribution group filters.
In Microsoft 365, user information is typically stored in the Entra ID fields such as first name, last name, address, and contact details. These attributes cover the basic user data needs for most organizations. However, there are situations where your organization might need to store additional information that extends beyond the fields covered by standard attributes. This is where custom attributes in Exchange Online come into play! This blog will guide you through what custom attributes are, how to add them, and how they can be utilized.
Office 365 custom attributes let you add unique user information, including details that don’t have an existing attribute. Exchange Online provides 15 custom attributes by default, named ‘CustomAttribute1’ through ‘CustomAttribute15’. This could include department, job title, manager, or any other information that isn’t covered by the standard Azure AD fields.
Custom attributes in Exchange Online can be set up using two primary methods: the Exchange admin center (EAC) or PowerShell.
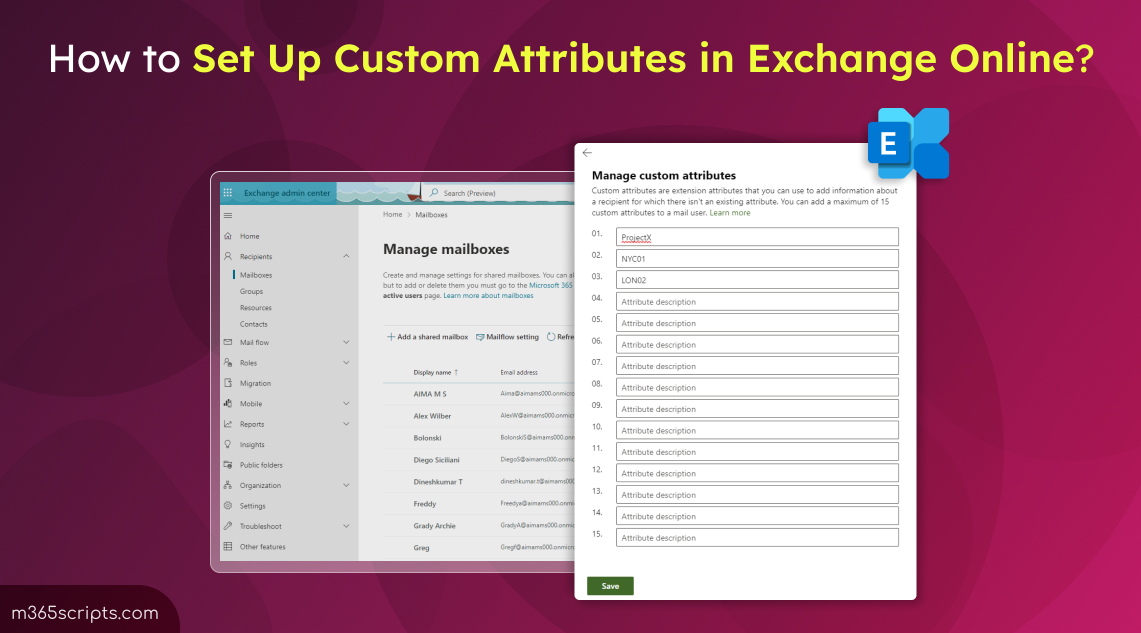
To assign a custom attribute to an Exchange Online mailbox, follow the steps mentioned below.
- Sign in to the Exchange admin center.
- Navigate to Recipients –> Mailboxes.
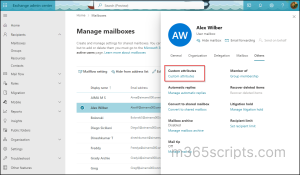
- Choose a user with an active mailbox.
- Go to the ‘Others’ tab and click on Custom attributes.
You will see a list of custom attributes where you can assign up to 15 custom attributes to each mail user.
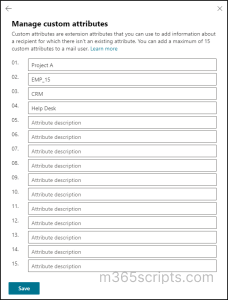
5. After making changes, click Save.
Before proceeding further, connect to Exchange Online PowerShell first.
To modify the first custom attribute for a specific user, run the following cmdlet.
|
1 |
Set-Mailbox “[email protected]” -CustomAttribute1 "new value" |
Replace “[email protected]” with the email address of the mailbox you want to update.
If you want to change a custom attribute for all users, execute the below cmdlet.
|
1 |
Get-Mailbox | Set-Mailbox -CustomAttribute5 "new value" |
You can also verify the custom attributes of a user by running,
|
1 |
Get-Mailbox [email protected] | FL CustomAttribute* |
Note:
Similar to how Exchange Online allows customization through custom attributes, Entra ID offers custom security attributes that let you extend directory objects with organization-specific information. These attributes are designed for fine-grained access control and are ideal for implementing attribute-based access control (ABAC) scenarios.
Custom attributes can be used in various practical ways to improve an organization’s email communication and user data. Let’s explore some key use cases and advantages of custom attributes using ‘ConditionalCustomAttributes’ and ‘ExtensionCustomAttributes’ parameters:
Here’s a quick overview of two key parameters:
- ConditionalCustomAttributes: These parameters allow you to filter users based on specific custom attributes when creating groups, enabling more precise group management in your organization.
- ExtensionCustomAttributes: These are used to store additional data about users and can also be leveraged for filtering when creating groups, providing flexibility in managing user information and group assignments.
Dynamic Distribution Lists (DDLs) are special email groups that automatically update their membership based on certain criteria. Custom attributes add an extra layer of flexibility when defining the criteria for a Dynamic Distribution Group. While you can create DDGs based on default attributes like department, title, or location, custom attributes allow you to use organization-specific criteria that aren’t covered by the default options.
Example: Imagine your company is running multiple projects, and you need to send emails to all employees working on “Project X”. You can use a custom attribute, like CustomAttribute1, to store the project name for each employee. Then, you create a dynamic distribution group (DDG) that includes only those whose CustomAttribute1 is set to “ProjectX.”
To create a dynamic distribution group for users who are in “Project X”, run the following cmdlet.
|
1 |
New-DynamicDistributionGroup -Name "MembersProjectA" -IncludedRecipients "MailboxUsers,MailContacts" -ConditionalCustomAttribute1 "Project A" |
IncludedRecipients “MailboxUsers,MailContacts”: Specifies that the group should include mailbox users and mail contacts.
This cmdlet creates a dynamic distribution group named “MembersProjectA” that automatically includes mailbox users and mail contacts with the CustomAttribute1 set to “Project A”. In addition to this, the group automatically updates when someone joins or leaves ‘Project X’.
Tip- If you want to list all the DDLs, you can use this PS script to export all dynamic distribution groups and its members. You can view the members of a DDL in EAC, but it has limitations, such as the need to click each group to see its members.
Departmental Structure: Beyond the standard “Department” attribute, you can create custom attributes like “Division”, “Team”, or “Project” to reflect your specific organizational hierarchy.
Employee Records: Store additional employee information such as “Hire Date”, “Termination Date”, or “Direct Supervisor” for HR and payroll purposes.
You can use ExtensionCustomAttributes to store custom information about users. For instance, if “Harvey” is enrolled in various projects, you can update his ExtensionCustomAttribute1 to reflect this information.
|
1 |
Set-Mailbox -Identity Harvey -ExtensionCustomAttribute1 ProjectA,ProjectB,ProjectC |
Note: You can add multiple values, up to 1300, as a comma-separated list for each custom attribute using the ExtensionCustomAttribute parameter.
In addition to this, custom attributes can be used for targeted communication, detailed reporting, compliance tracking, and automating workflows. By carefully considering your specific needs, you can create a tailored environment that enhances productivity and efficiency with Exchange Online custom attributes.
I hope this blog helped you gain information on how to add and use Exchange Online custom attributes. If you have queries, feel free to reach us through the comments section.