How to Set Up Room Finder in Outlook
Configure Room Finder in Outlook by creating room mailboxes in Exchange Online and organizing them into room lists. Enable users to discover available meeting rooms based on capacity, location, floor, and features. Streamline meeting scheduling by displaying only suitable rooms matching specific requirements.
If you’ve ever scheduled a meeting in your organization, you’ve likely come across room mailboxes. These resource mailboxes represent physical meeting spaces and allow you to book rooms from anywhere at any time. While they help with the booking process, finding an available room that meets your specific needs can still be challenging.
Imagine this: A small team of five reserves a conference room for 50, leaving a larger team scrambling for space. This misallocation leads to underutilized resources, delayed meetings, and reduced productivity. But what if there was a way to book rooms based on capacity, location, availability, and more?
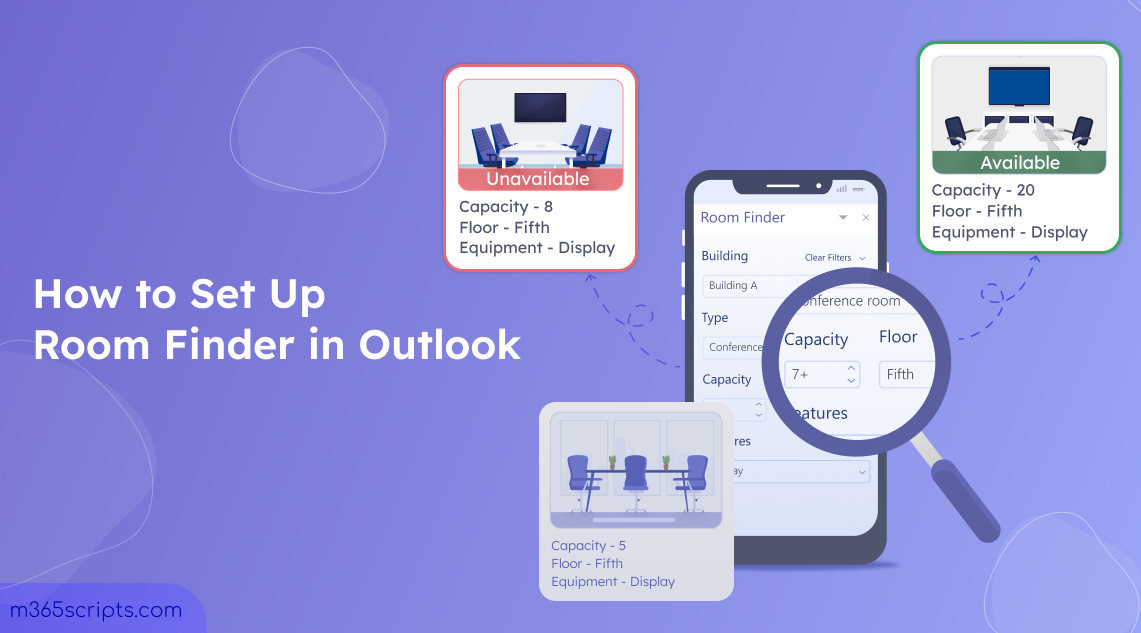
Room Finder in Outlook makes this possible. It helps you quickly locate meeting rooms that suit your needs, eliminating guesswork and scheduling conflicts. Let’s explore how to set up Room Finder in Outlook and transform the way you schedule meeting rooms in Microsoft 365.
Room Finder in Outlook is a built-in feature that helps users quickly find available meeting rooms based on capacity, location, availability, floor, and other features. It streamlines scheduling by displaying only suitable rooms, reducing conflicts, and optimizing space usage. With Room Finder, you can simplify meeting planning in Microsoft 365, ensuring teams always have the right meeting space at the right time.
To set up the Room Finder in Outlook, you must first create room mailboxes for each meeting space in your organization and organize them in a room list. This setup allows Room Finder to seamlessly display available rooms when scheduling meetings in Outlook. Let’s walk through the setup process!
- Create a room mailbox in Exchange Online
- Create room lists using PowerShell
- Add rooms to the room list in Exchange Online
Meeting rooms are the essential resources that many people in your organization need for important and often confidential discussions. To make them easily available for everyone, the best approach is to create resource mailboxes in Exchange Online for each room. Once set up, anyone in the organization can reserve a meeting room seamlessly.
Note: You should have at least the Exchange Recipient Administrator role to create and manage resource mailboxes in Exchange Online.
You can create a room mailbox in Microsoft 365 using EAC or PowerShell.
Create a Room Mailbox Using Exchange Admin Center
- Sign in to the Exchange admin center.
- Navigate to Recipients → Resources and click + Add a room resource.
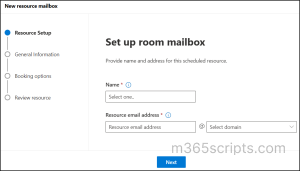
- Enter the Name and Resource email address, then click Next.
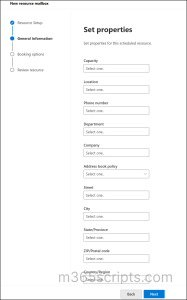
- On the next page, set properties like Capacity, City, Location, etc., and click Next.
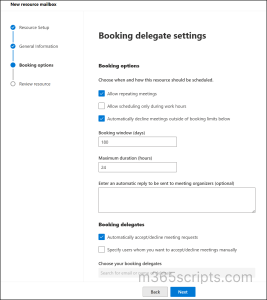
- In the ‘Booking delegate settings’ page, configure the Booking options and Booking delegates as per your requirement, then click Next.
- Review the room mailbox properties and click Create to complete the process.
Create Exchange Online Room Mailbox Using PowerShell
Connect to the Exchange Online PowerShell
and run the below cmdlet to create a room mailbox using PowerShell.
|
1 |
New-Mailbox [email protected] -Room |
The above cmdlet creates a room mailbox for the meeting space “Conference Room”.
However, after creating the room mailbox, it’s important to define key properties such as city, location, floor, and capacity using the Set-Place cmdlet. These details enhance Room Finder’s filtering capabilities, making it easier for users to browse and find the right meeting space based on specific criteria such as city or capacity.
Run the below cmdlet to update the room mailbox in Exchange Online with additional metadata.
|
1 |
Set-Place [email protected] -CountryOrRegion "India" -State "Mumbai" -City "Maharashtra" -Floor 5 -FloorLabel “Fifth” -Capacity 50 -IsWheelChairAccessible $false -AudioDeviceName “Poly Studio X45” -DisplayDeviceName “LG 45” -VideoDeviceName “Logitech BRIO” |
The above example sets the country, state, city, floor, audio device, video device, display device, and capacity for the room mailbox ‘conferenceroom’.
Note: If the meeting room lacks certain features, you can omit those specific parameters from the cmdlet.
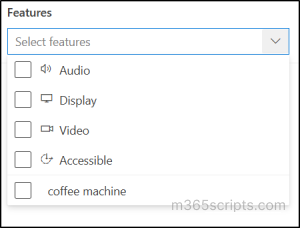
You can also use the -Tags parameter to add details about additional room features, such as coffee makers, projectors, conference tables, etc. The tags you define will appear in the drop-down menu for the Features filter in Room Finder.
|
1 |
Set-Place [email protected] -Tags “Projector","CoffeeMachine” |
Handy Tip:
You can use the PowerShell script to get all room mailboxes and their capacity in your organization. This allows you to easily identify and book meeting rooms that match your capacity requirements, ensuring optimal space utilization.
Now that we have created room mailboxes, the next crucial step is ensuring they appear in Room Finder for seamless booking. However, to make room mailboxes discoverable in Room Finder, they must be part of a room list.
Room lists are special distribution groups designed to organize room mailboxes. They structure the meeting room booking system by grouping rooms logically, making it easier for users to find and reserve the right space.
To maximize the effectiveness of Room Finder, Microsoft strongly recommends defining room lists to reflect your building layouts. This ensures that meeting rooms are categorized based on location, allowing for accurate filtering and a streamlined scheduling experience.
Note: Room lists can only be created using PowerShell; they cannot be created in the Exchange Admin Center.
Follow the steps below to create a room list using Exchange Online PowerShell.
You can either create a new room list distribution group from scratch or convert an existing distribution group into a room list.
Create a New Room List in Exchange Online
Run the below cmdlet to create a new room list in Microsoft 365.
|
1 |
New-DistributionGroup -Name "Building A" -RoomList |
This command creates a room list named “Building A” in your organization.
Convert an Existing Distribution Group to a Room List
If you already have a distribution group that contains room mailboxes, you can convert it into a room list using the following cmdlet.
|
1 |
Set-DistributionGroup -Identity "Conference Rooms" -RoomList |
This command converts the “Conference Rooms” distribution group into a room list.
Important: While converting a distribution list to a room list, track the group membership of the Distribution List and ensure all members are room mailboxes. If the list contains user mailboxes, the conversion will fail with an error.
After creating a room list, you need to add room mailboxes to it, so they appear in Room Finder while scheduling meetings.
When adding room mailboxes to a room list in Exchange Online, ensure that each room list contains rooms from the same city. If a room list includes rooms from multiple cities, it will only appear in Room Finder results when you filter by the city where most of its rooms are located.
Important: There is no strict limit on the number of rooms and workspaces that can be added to a room list. However, Room Finder can display a maximum of 100 results per search. For optimal performance, it is recommended to limit each room list to 50 room mailboxes.
Run the cmdlet below to add a resource mailbox to the room list.
|
1 |
Add-DistributionGroupMember -Identity [email protected] -Member [email protected] |
The above cmdlet adds the room mailbox ‘[email protected]’ to the room list ‘[email protected]’.
If you’re unsure of the room mailbox name, use the Get-Mailbox cmdlet to retrieve all room mailboxes in your organization.
|
1 |
Get-Mailbox -RecipientTypeDetails RoomMailbox -ResultSize Unlimited |
To verify that each room list contains only the intended room mailboxes, you can track all the members of a room list using the following cmdlet.
|
1 |
Get-DistributionGroupMember -Identity “Building A” |
The above cmdlet gets the group membership of the room mailbox ‘Building A’.
Note: After creating or updating a room list, it may take up to 24 to 48 hours for the changes to reflect in Room Finder.
That’s it! Room Finder is now set up in Outlook, making it easier for users to locate meeting rooms.
Now, let’s see how Room Finder helps users in scheduling meetings.
- Log in to Outlook and go to Calendar → New Event.
- Enter all the required details.
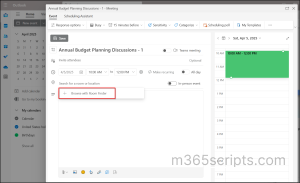
- Click Search for a room or location, then at the bottom of the suggested locations list, click Browse with Room Finder.
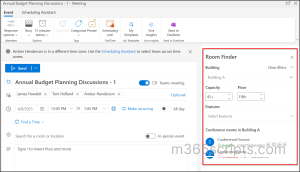
The Room Finder appears in the left pane. Here, set filters based on your requirements, and all suitable rooms will be displayed below.
If a room is available at the time of your meeting, it will display Available in green text. If it is already booked, it will display Unavailable in red text.
Note: While scheduling meetings, users may notice that rooms are not displaying in room finder. In such cases, you may need to troubleshoot the issue and then ask them to try again.
Handy Tip: If the meeting has multiple attendees, it can be difficult to find a time that works for everyone. To check availability for people and rooms, you can use the Scheduling Assistant button on the ribbon.
For even better accuracy, you can use the Scheduling Poll in Outlook. It lets you schedule a meeting based on attendee’s preferences without any back-and-forth emails.
Once you’re done setting up your meeting, click Send to confirm it.
Important: There is a known issue where Room Finder does not display available rooms when scheduling a meeting outside your working hours. To fix this issue, update working hours in Outlook settings to match the room’s availability.
I hope this blog helped you understand how to set up and use Room Finder in Outlook effectively. If you have any questions or need further clarification, feel free to ask in the comments section!