Configure Org-wide Email Signatures using Disclaimers in Microsoft 365
Email is a crucial form of communication in today’s business world. One key aspect of professional email correspondence is the use of an org-wide email signature. Not only does it promote the brand, but also serves as a digital business card. However, there are limitations to using the disclaimer method to configure organization-wide email signatures in Microsoft 365. In this blog post, let’s learn to create email signatures in Microsoft 365 mailboxes using disclaimers and discuss their advantages and limitations.
The Company-wide email signature is a block of texts and images that highlights company information in emails. One of the easiest ways to set up a company-wide email signature is to configure it using disclaimers in the Exchange Admin Center.
To create an organization-wide email signature in Microsoft 365, follow the steps given below.
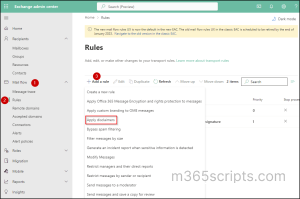
Step 1: Open the Exchange Admin Center.
Step 2: Under ‘Mail Flow’ from the navigation, select, ‘Rules’.
Step 3: Add a rule by choosing ‘Apply disclaimers’.
Important: Choosing ‘Apply disclaimers’ over creating a new rule saves time by having its pre-selected attributes.
Step 4: Name the rule and configure settings based on your requirements.
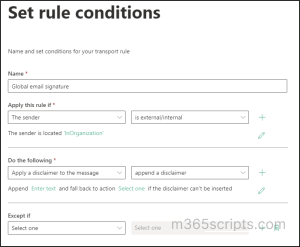
The current configuration of the rule is limited to applying email signatures to all emails sent by members within the organization.
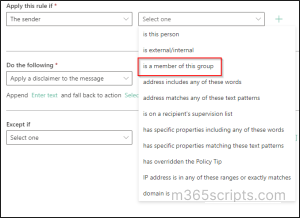
You can apply the rule to specific sender, recipient, email subject, body, or other properties. It is also possible to apply the rule to the sender/recipient based on the group they are a member of. Thus, allowing users to enforce these configurations on a group of members.
From the ‘Except if’ option, you can select the conditions that you would like to exclude from the rule.
Step 5: Ensure that the ‘Apply a disclaimer to the message’ and ‘append a disclaimer’ is already selected in the ‘Do the following’ section.
Step 6: Specify disclaimer text either as plain text or using Html code for formatting.

Fall back actions are used in situations where signatures cannot be added to an email, for example, encrypted messages. These action tells Microsoft what among the following actions should be taken. You can go through the below explanations and choose the appropriate action based on the signature’s importance.
Wrap: The original email is wrapped inside a new message as an attachment and the disclaimer text is added to the new message.
Ignore: The email is sent without the signature and disclaimer.
Reject: The email is not sent.
Step 7: Set rule settings as shown in the below screenshot. Review and finish creating the rule.
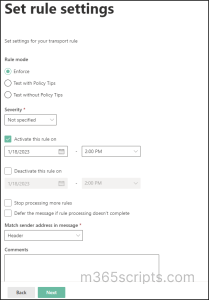
Important: After creating, don’t miss to enable the rule from the ‘Rules’ page. Only then the rule gets applied across your organization.
Your organization-wide email signature is now set up and ready for use!
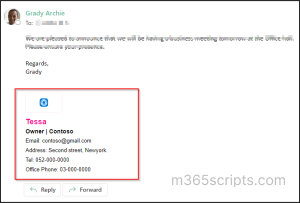
Note: The org-wide email signature can be modified by users. To avoid this, automate email signature in Outlook and maintain a professional & standardized signature effectively.
But what if you want to personalize email signatures for each employee? Follow the provided instructions.
To get a professional email signature, it is recommended to use one signature template and automatically personalize it for all users without the need for users to create one. Personal info used to personalize the template can be taken from the list of Azure AD attributes available for email signatures.
To personalize a global email signature, include the Azure AD attribute (For example, %%DisplayName%%) in signature templates as given in the screenshot below. So that the Display Name is customized for each user when they send email messages.

Some of the disadvantages of configuring email signatures using disclaimers are that,
- While drafting the email, previewing the email signature in the user’s mailbox is not possible.
- Inserting the signature directly below the latest reply/forward is not possible.
- It is not possible to see email signatures from the Sent Items.
- The disclaimer text has a limit of 5000 characters.
- There is no specific editor available for formatting, you will either need to code using HTML or use available third-party email signature templates.
- Empty values in Azure AD lead to blank spaces in email signatures and cannot be removed.
I hope this blog will help you understand the concepts of creating company-wide Office 365 email signatures using disclaimers. Feel free to reach us in the comments for any assistance.


