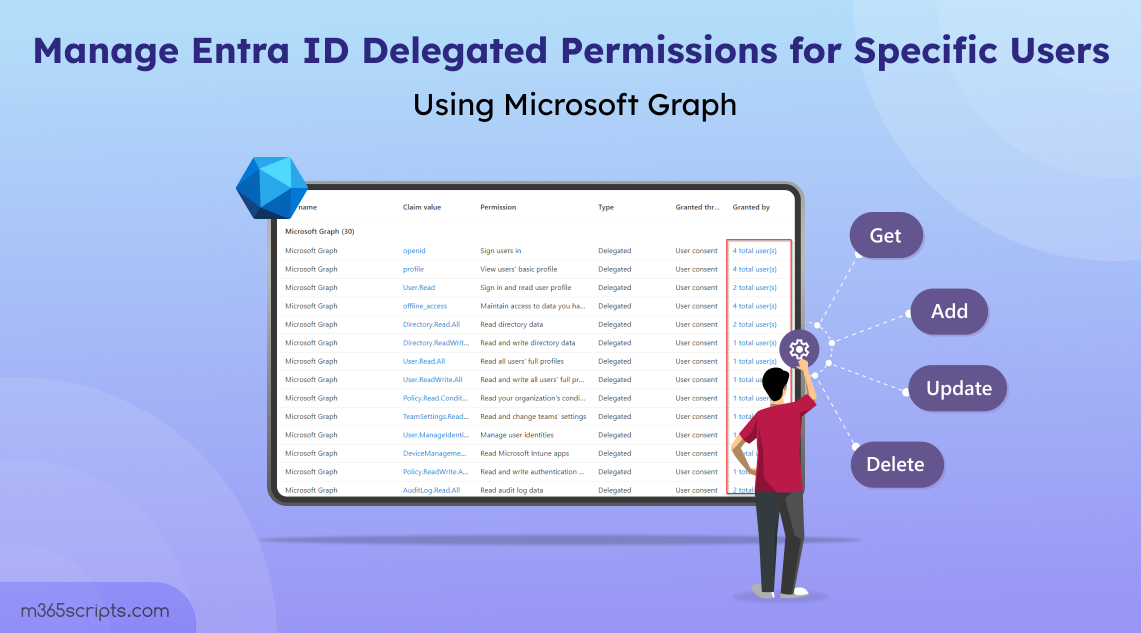
Manage Entra ID Delegated Permissions for Specific Users Using Microsoft Graph
Manage Microsoft Entra ID delegated permissions for specific users using Microsoft Graph PowerShell. Add, review, and revoke user-specific OAuth2 permission grants for applications. Control which delegated permissions individual users have consented to for secure resource access.
In Entra ID apps, understanding the difference between app and delegated permissions is crucial for secure and efficient access management.
- Delegated permissions empower applications to access Microsoft 365 resources on behalf of a specific user, ensuring that the application acts within the confines of the user’s granted permissions.
- However, application permissions allow an application to operate independently, without user authentication, giving it broader access to resources.
When it comes to security, delegated permissions hold the upper hand. Their restrictive nature ensures that applications can only access resources and perform tasks that the user is authorized to. This minimizes risks and enhances control, making delegated permissions the more secure option. At the same time, delegated permissions should also be properly managed. But why? Let’s see!
By default, Microsoft has allowed users to consent for apps in Entra ID. While it streamlines access, it can also lead to users granting applications more access than necessary.
Therefore, it is the responsibility of admins to review, revoke, and even add delegated permissions whenever necessary, as some new users may struggle to consent to delegated permissions themselves. Simply, effective management of Entra ID delegated permissions paves the way for safe and secure access to Microsoft 365 resources.
Coming to the main point – While the Microsoft Entra ID user interface allows adding delegated permissions to applications, it lacks the ability to manage these permissions for individual users. To manage Entra ID delegated permissions for Microsoft 365 users, you need to use Microsoft Graph/Beta SDK PowerShell or Graph Explorer. Let’s explore how this can be done.
1. ClientID – It is the Object ID of the application registered in Entra ID.
📍Navigate to Microsoft Entra admin center > Identity > Applications > Enterprise Applications > select the respective application > Object ID.
2. Consent Type – There are two ways applications can acquire permissions: admin consent and user consent. Admin consent (AllPrincipals) applies the delegated permission to all users in the organization. In our case, we’re focusing on user consent, where the user themself gives consent for the application to act on their behalf. This will be displayed as “Principal” under the ‘ConsentType’.
📍 Navigate to Microsoft Entra admin center > Identity > Applications > Enterprise Applications > select an application > Permissions > User consent.
3. ResourceID – The Resource ID is the identifier of the resource or API to which you are granting access. For example, if you need to grant “Sites.Manage.All” and “Sites.Read.All” delegated permissions, these permissions are associated with the “SharePoint” resource. The Object ID of SharePoint is considered the resource ID.
📍 Navigate to Microsoft Entra admin center > Identity > Applications > Enterprise Applications > Search for the respective resource > ObjectID.
4. Scope – Scope refers to the specific API permissions granted to the user. For instance, in the example above, “Sites.Manage.All” and “Sites.Read.All” are the scopes.
📍 Navigate to Microsoft Entra admin center > Identity > Applications > Enterprise Applications > select an application > Permissions > User consent > Claim value.
5. PrincipalID – This is the GUID of the Entra ID user.
📍 Navigate to Microsoft Entra admin center > Identity > Users > All users > click on the respective user > Object ID.
6. OAuth2PermissionGrant – Unique identifier of the delegated permissions associated with the resource and client application. You can’t find it via the Microsoft Entra admin center. This identifier is crucial for revoking permissions and can be retrieved using the “Get-MgBetaOauth2PermissionGrant” cmdlet.
Here are the possible ways to effectively manage delegated permissions for specific users in Microsoft Entra ID.
- Identify delegated permissions for a specific user across all service principals.
- Detect delegate permissions for a user on a specific app.
- Create delegated permissions for a user in Entra ID.
- Update delegate permission for a specific Entra ID user.
- Review and revoke all delegated permissions for a user in a specific app.
- Revoke specific delegated permission for a user in Entra ID.
- Delete all permissions of a user across all service principals.
Now, let’s explore how to manage Entra ID delegated permissions via PowerShell SDK and Graph Explorer. Before proceeding, make sure you install the Microsoft Graph beta module if you rely on PowerShell. If you intend to use the Microsoft Graph API for these tasks, you need to grant the “DelegatedPermissionGrant.ReadWrite.All” permission.
Before adding or revoking delegated permissions for a user, it’s essential to review the permissions the user currently holds. This helps ensure that only necessary Entra API permissions are granted and aids in deciding whether to revoke any unnecessary permissions.
Using PowerShell:
After installing and connecting to the Graph beta PowerShell module, run the following cmdlet to extract all delegated permissions granted to a specific user across all applications.
|
1 |
Get-MgBetaOauth2PermissionGrant -Filter "principalId eq '<UserGUID>'" |
The output will show details about the delegated permissions, including the Client ID of the applications.

Using Graph Explorer:
You can retrieve all delegated permissions of a specific user across all service principals (tenant-wide) using the Graph API below.
| HTTP Method | API |
| GET | https://graph.microsoft.com/v1.0/users/<UserGUID>/oauth2PermissionGrants |
If it is challenging to search for delegated permissions granted to a user for a specific app, you can specify the app/service principal ID of the application to narrow down the search.
Using PowerShell:
To get the delegated permissions for a specific user on a particular application, run the following PowerShell cmdlet after replacing <ClientID> with the Object ID of the application and <PrincipalID> with the GUID of the user.
|
1 |
Get-MgBetaOauth2PermissionGrant -Filter "principalId eq '<UserGUID>' and clientID eq '<AppObjectID>'" |

Using Graph Explorer:
You can use the API below to list all the delegated permissions a specific user holds for a specific application.
| HTTP Method | API |
| GET | https://graph.microsoft.com/v1.0/oauth2PermissionGrants?$filter=principalId eq ‘<UserGUID>’ and clientId eq ‘<ObjectID>’ |
Instead of giving users the freedom to consent to applications, you can take control of assigning delegated permissions for the ones needed. Let’s dive into how to do it.
Using PowerShell:
To grant delegated permissions in Entra ID for a specific user, run the following PowerShell script in Windows Powershell.
|
1 2 3 4 5 6 7 8 9 10 |
$params = @{ clientId = "<ObjectID of the app>" consentType = "Principal" principalId = "<UserGUID>" resourceId = "<ResourceID>" scope = "<Permissions>" startTime = [System.DateTime]::Parse("2022-03-17T00:00:00Z") expiryTime = [System.DateTime]::Parse("2023-03-17T00:00:00Z") } New-MgBetaOauth2PermissionGrant -BodyParameter $params |
You need to replace with respective clientID, resourceID, scope, PrinicipalID in the above script.
Note: Permissions created programmatically are not subject to review or confirmation. They take effect immediately.

The unique oauth2permisssiongrantid id generated will be shown under “ID”, which will be used for the revoking process.
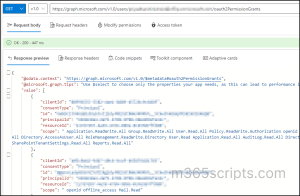
Using Graph Explorer:
To create delegated permissions for a user on a specific application using Graph Explorer, use the API below.
| HTTP Method | API |
| POST | https://graph.microsoft.com/v1.0/oauth2PermissionGrants |
Once pasted, paste the below JSON in the ‘Request body” of the graph Explorer and run the query.
|
1 2 3 4 5 6 7 |
{ "clientId": "<ObjectID of the app>", "consentType": "Principal", "principalId": "<UserGUID>", "resourceId": "<ResourceID>", "scope": "<Permission>" } |

When you create delegated permissions, a unique ID called “oAuth2PermissionGrant” is generated, and interlinked with the respective resource and client app. This ID holds details about the scopes (delegated permissions).
You can update this oAuth2PermissionGrant to change the delegated permissions by adding or removing items from the list of scopes.
For example, consider you already have the SPO resource permission – “AllSites.FullControl”, which is represented by an oAuth2PermissionGrant. If you need to add another permission, such as “AllSites.Manage,” from the same resource, you can use the unique ID and add the required scopes easily. Here are the methods you can make use of to do the above.
Using PowerShell:
Run the following PowerShell script to update the oAuth2PermissionGrant object with additional delegated permissions.
|
1 2 3 4 |
$params = @{ scope = "User.ReadBasic.All Group.ReadWrite.All" } Update-MgBetaOauth2PermissionGrant -OAuth2PermissionGrantId <Id> -BodyParameter $params |
You need to specify the generated oAuth2PermissionsGrant Id in the above cmdlet.
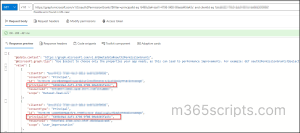
Using Graph Explorer:
You can also use Microsoft Graph Explorer to update delegated permissions for a specific user. Use the following Graph API:
| HTTP Method | API |
| PATCH | https://graph.microsoft.com/v1.0/oauth2PermissionGrants/<ID> |
After pasting the API, place the below JSON in the “Request body” and run the query.
|
1 2 3 |
{ "scope": "<Permissions>" } |
Note: Make sure to specify both the existing and new scopes in the above parameter. If not, the action will overwrite the existing ones.
If a security incident is detected involving a user via an application, you may need to revoke all delegated permissions granted to that user for that application. You can do this using the following methods.
Using PowerShell:
To delete all delegated permission for a user on a specific application, you can simply run the below PowerShell cmdlet by specifying the respective OAuth2PermissionGrant ID.
|
1 |
Remove-MgBetaOauth2PermissionGrant -OAuth2PermissionGrantId <ID> |
Alternatively, if you need to fully revoke a user’s permissions for an application, you can remove access to the application using PowerShell.
Using Graph Explorer:
Same as PowerShell, you can specify the oAuth2PermissionGrant option in the API to delete all delegated permissions for a user.
| HTTP Method | API |
| DELETE | https://graph.microsoft.com/v1.0/oauth2PermissionGrants/<Id> |
Instead of deleting all the scopes represented in the oAuth2PermissionGrant, you can delete specific scopes for a user. There is no direct cmdlet or Graph API to remove specific scopes individually. Instead, you’ll need to first remove the current scopes and then apply the updated permissions.
- Delete Existing Scopes: Use the above provided PowerShell cmdlet or Graph API to delete the existing oAuth2PermissionGrants for the user.
- Update with New Scopes: After deleting the old permissions, use the update PowerShell cmdlet or Graph API to update the user’s permissions with the new set of scopes.
If you identify users who no longer need delegated permissions to access your organization’s resources via application, you can easily remove those permissions using PowerShell.
You can run the script below which will loop through all the delegated permissions of the user and remove them accordingly.
|
1 2 |
$Id = (Get-MgBetaOauth2PermissionGrant -Filter "principalId eq '<UserGUID>'").Id Remove-MgOauth2PermissionGrant -OAuth2PermissionGrantId $Id |
We hope this guide helps you manage delegated permissions in Entra ID effectively. Likewise, you can also manage application permissions to secure your apps from unnecessary or excessive privileges. If you have any questions, feel free to reach out through the comments section. Happy reading!